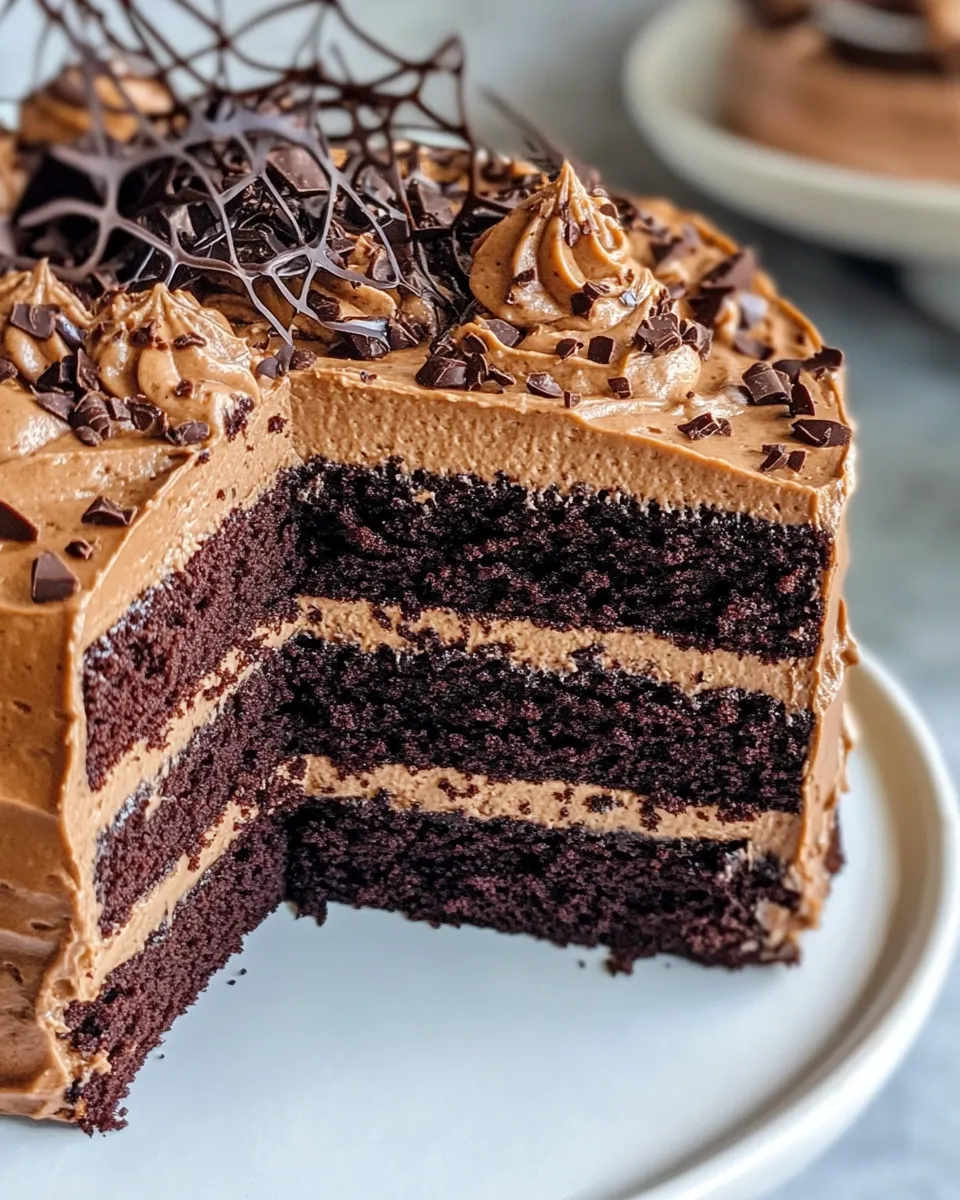
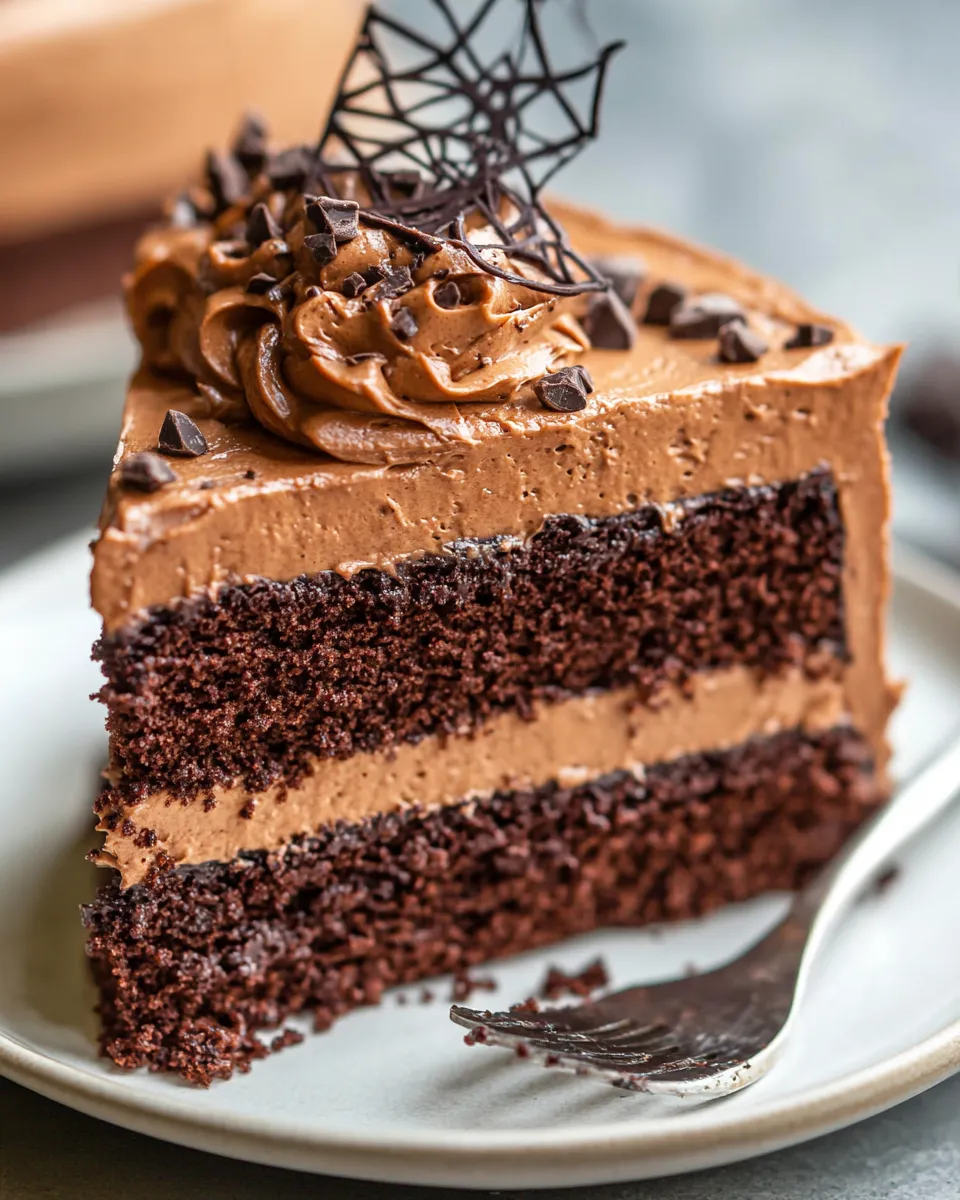
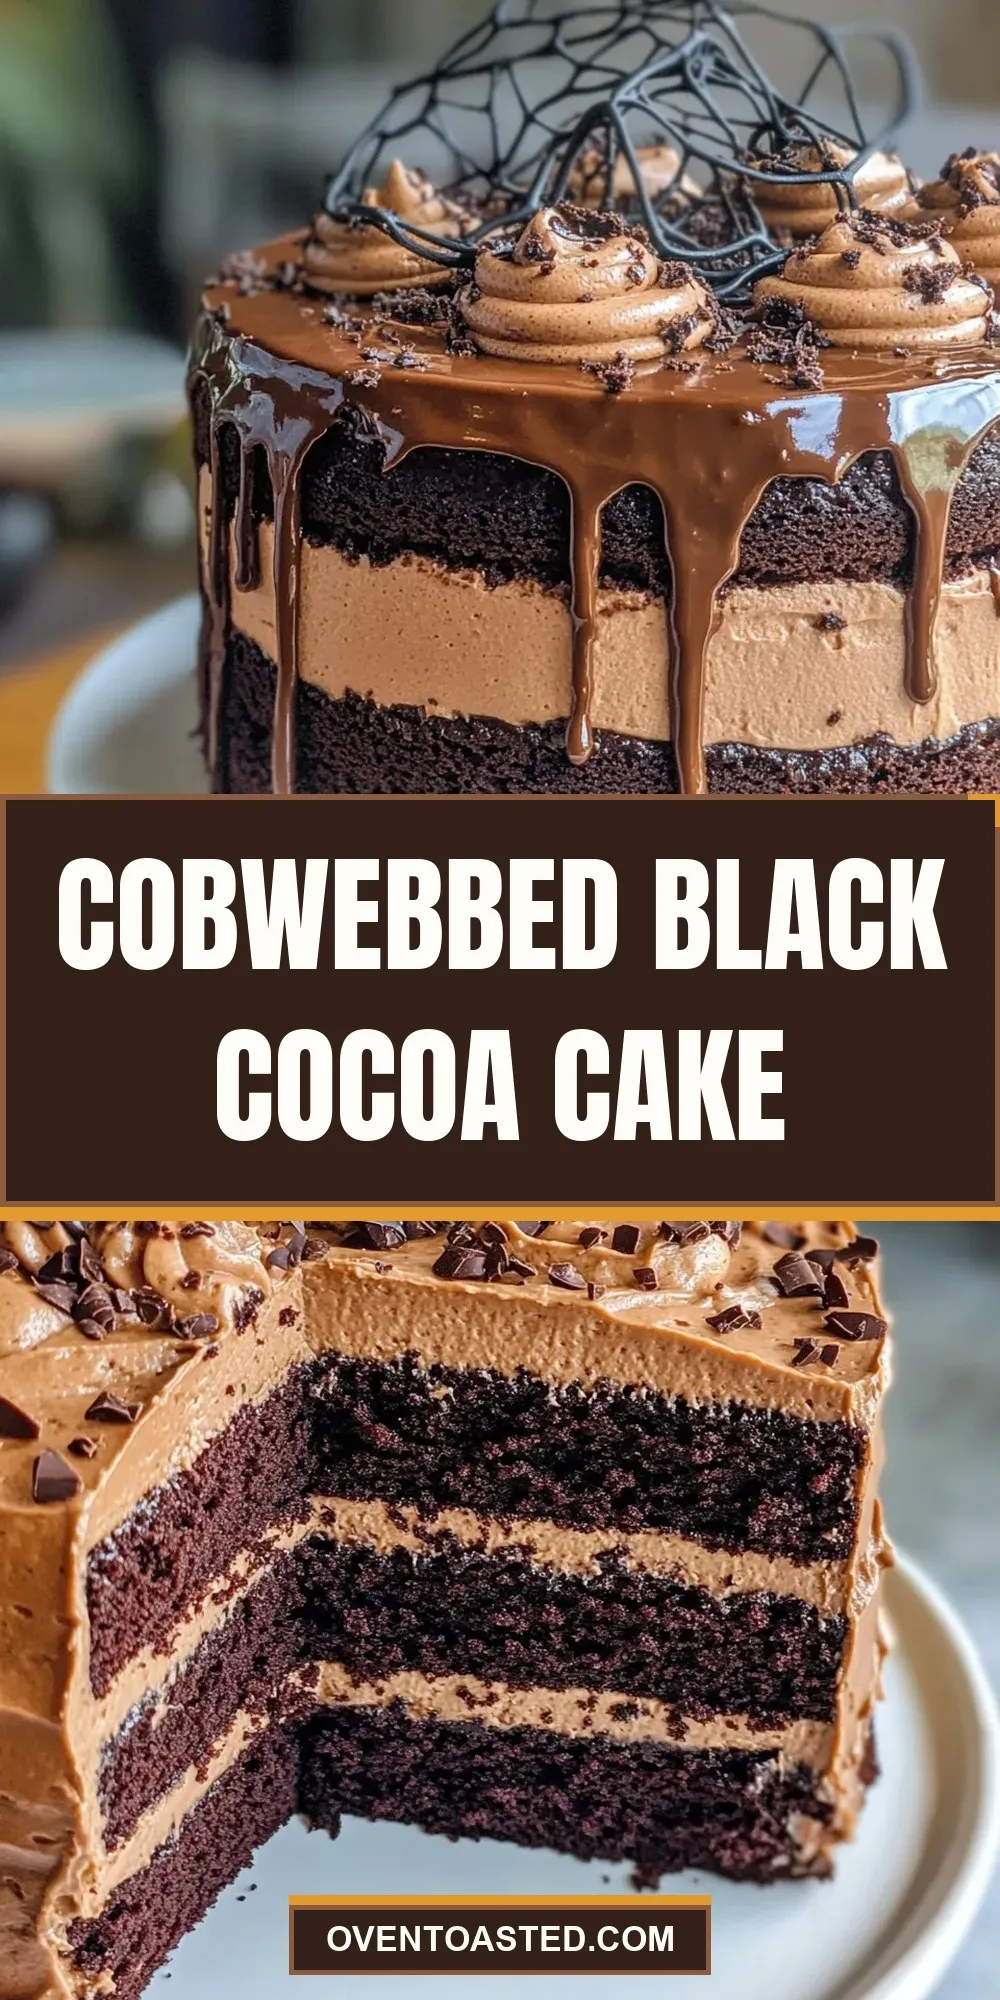
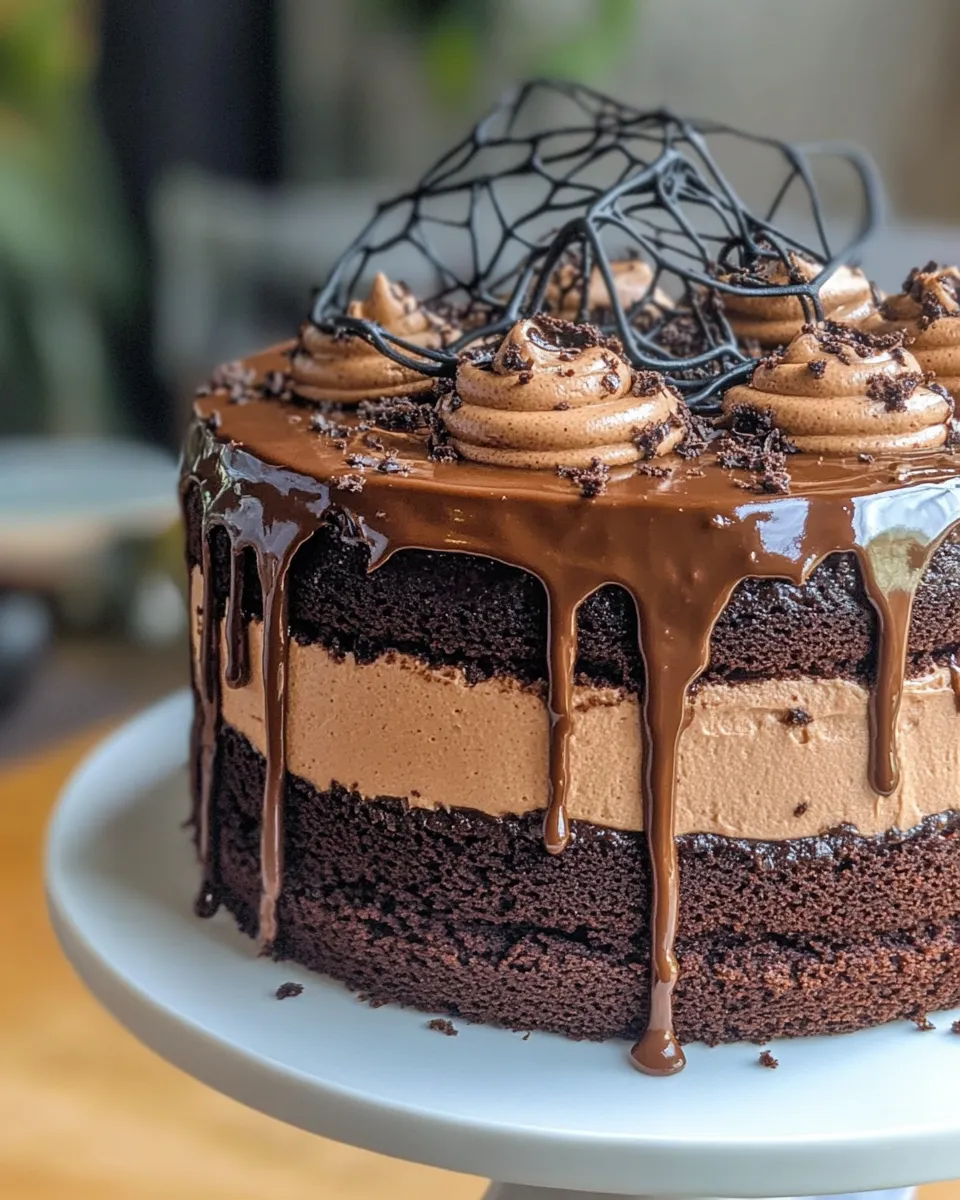
Cobwebbed Black Cocoa Cake
Dive into the eerie elegance of this Cobwebbed Black Cocoa Cake, a dramatic twist on classic chocolate cake that’s perfect for Halloween or any time you want a show-stopping dessert. This cake boasts a rich, deeply chocolatey flavor thanks to the star ingredient: black cocoa powder. The dense, fudgy crumb pairs beautifully with smooth, luscious chocolate frosting that’s elegantly adorned with intricate cobweb designs. Whether you’re a seasoned baker or just starting out, this recipe is approachable and guaranteed to impress your guests with its spooky sophistication.
What You’ll Love About This Recipe
- Intense Chocolate Flavor: Black cocoa powder gives this cake a bold, almost bittersweet chocolate taste that chocolate lovers crave.
- Moist and Tender Crumb: Thanks to buttermilk and vegetable oil, the cake stays incredibly moist and soft, perfect for slicing.
- Simple Yet Stunning Decoration: The cobweb frosting design is fun to create and adds a festive, elegant touch without needing advanced piping skills.
- Versatile for Any Occasion: While perfect for spooky celebrations, this cake’s rich flavor and texture make it a year-round favorite.
- Easy to Customize: Use your favorite chocolate chip cinnamon roll cake frosting recipe or store-bought options to save time without sacrificing flavor.
Ingredient Rundown
- All-purpose flour (1 3/4 cups): Provides structure to the cake, balancing the richness of the cocoa.
- Unsweetened black cocoa powder (1 cup): This ultra-dark cocoa powder gives the cake its signature deep color and intense chocolate flavor.
- Granulated sugar (2 cups): Sweetens the cake and helps create a tender crumb.
- Baking soda (1 1/2 teaspoons) and baking powder (1 teaspoon): Leavening agents that ensure the cake rises perfectly and has a light texture.
- Salt (1/2 teaspoon): Enhances the chocolate flavor and balances sweetness.
- Vegetable oil (1 cup): Keeps the cake moist and tender without overpowering the flavor.
- Buttermilk (1 cup): Adds moisture and a slight tang, reacting with the leaveners for a soft crumb.
- Large eggs (3): Bind ingredients together and add richness.
- Vanilla extract (2 teaspoons): Boosts the chocolate flavor with warm, aromatic notes.
- Boiling water (1 cup): Intensifies the cocoa flavor and creates a luscious batter consistency.
- Chocolate frosting (1 cup): Use your favorite homemade or store-bought frosting as the luscious finishing touch.
- Decorative frosting: For piping the delicate cobweb designs on top.
Toolbox for This Recipe
- Mixing Bowls: Essential for combining dry and wet ingredients separately before mixing together.
- Whisk and Spatula: For thorough mixing and folding without overworking the batter.
- Measuring Cups and Spoons: Accurate measurements make all the difference in baking.
- 9-inch Round Cake Pans (two): Standard size for even baking and layering.
- Cooling Racks: Allow the cakes to cool completely before frosting.
- Piping Bag and Small Round Tip: For creating the cobweb decorations with precision.
- Electric Mixer (optional): Speeds up mixing, especially for frosting.
Make Cobwebbed Black Cocoa Cake: A Simple Method
Step 1: Prep Your Oven and Pans
Preheat your oven to 350°F (175°C). Grease two 9-inch round cake pans and line the bottoms with parchment paper to ensure easy release.
Step 2: Combine Dry Ingredients
In a large bowl, sift together the all-purpose flour, black cocoa powder, granulated sugar, baking soda, baking powder, and salt. Whisk until well combined.
Step 3: Mix Wet Ingredients Separately
In another bowl, whisk the vegetable oil, buttermilk, eggs, and vanilla extract until smooth and homogenous.
Step 4: Combine Wet and Dry
Gradually add the wet ingredients to the dry, mixing gently with a spatula or whisk until just combined. Avoid overmixing to keep the cake tender.
Step 5: Add Boiling Water
Carefully pour the boiling water into the batter and stir gently. The batter will be thin – this is expected and ensures a moist, rich cake.
Step 6: Bake
Divide the batter evenly between the two prepared pans. Bake for 30-35 minutes, or until a toothpick inserted in the center comes out clean or with a few moist crumbs.
Step 7: Cool Completely
Allow the cakes to cool in the pans for 10 minutes, then turn out onto cooling racks. Let them cool completely before frosting.
Step 8: Frost and Decorate
Spread a generous layer of chocolate frosting between the two cake layers and over the top and sides. To create the cobweb effect, pipe concentric circles of decorative frosting on top, then drag a toothpick from the center outward to form the web pattern.
No-Store Runs Needed
- All-purpose flour, sugar, and baking essentials are pantry staples.
- Vegetable oil can be swapped with any neutral oil you have on hand.
- Black cocoa powder might be less common, but regular unsweetened cocoa powder can be used in a pinch (though the color and flavor will be lighter).
- Buttermilk can be made at home by adding 1 tablespoon of vinegar or lemon juice to 1 cup of milk and letting it sit for 5 minutes.
- Chocolate frosting can be homemade or store-bought – either works beautifully.
Frequent Missteps to Avoid
- Overmixing the batter: This can develop gluten and result in a tougher cake. Mix just until ingredients are combined.
- Skipping the boiling water step: It intensifies the cocoa flavor and thins the batter for a moist crumb.
- Not letting the cake cool completely before frosting: Warm cake causes frosting to melt and slide off.
- Forgetting to grease and line pans: This can cause the cake to stick and break apart when removed.
- Using expired leavening agents: Ensure your baking soda and powder are fresh for proper rise.
Shelf Life & Storage
This Cobwebbed Black Cocoa Cake stays fresh when stored properly. Keep it covered at room temperature for up to 3 days. For longer storage, wrap tightly in plastic wrap and refrigerate for up to a week. Before serving, bring it to room temperature for the best texture and flavor. You can also freeze the cake layers (unfrosted) in an airtight container for up to 3 months; thaw overnight in the fridge and frost as usual.
Top Questions & Answers
Can I substitute the black cocoa powder with regular cocoa powder?
Yes, you can use regular unsweetened cocoa powder if you don’t have black cocoa powder. Keep in mind the cake’s color and flavor will be lighter and less intense but still delicious.
How do I make the cobweb design perfect?
Pipe concentric circles of frosting starting from the center, then drag a toothpick from the middle to the edges to create the web effect. Practice on parchment paper first if you’re new to piping.
Is it okay to use a different type of oil?
Absolutely! Any neutral-flavored oil like canola or light olive oil works well in this recipe.
Can I make this cake dairy-free?
Yes! Substitute the buttermilk with a dairy-free milk plus a splash of lemon juice or vinegar. Use a dairy-free frosting to keep it consistent.
Healthy-ish Favorites
- Chocolate Almond Toffee Bark – A crunchy, nutty treat with a chocolate twist.
- Chocolate Chip Cheesecake Stuffed Cookies – Indulgent cookies with a creamy surprise inside.
- Chocolate Chip Cinnamon Roll Cake – A fusion of two favorites in one luscious cake.
Bring It to the Table
This Cobwebbed Black Cocoa Cake is a guaranteed crowd-pleaser, perfect for festive gatherings or a decadent treat any day. Serve it with a scoop of vanilla ice cream or a drizzle of raspberry sauce for an extra touch of elegance. Gather your friends and family around, cut generous slices of this dark, fudgy marvel, and watch the smiles appear. Whether you’re celebrating a spooky holiday or just craving something rich and chocolatey, this cake is sure to become a beloved staple in your baking repertoire.
Share on Pinterest
Cobwebbed Black Cocoa Cake
Ingredients
Equipment
Method
- Preheat your oven to 350°F (175°C). Grease two 9-inch round cake pans and line the bottoms with parchment paper to ensure easy release.
- In a large bowl, sift together the all-purpose flour, black cocoa powder, granulated sugar, baking soda, baking powder, and salt. Whisk until well combined.
- In another bowl, whisk the vegetable oil, buttermilk, eggs, and vanilla extract until smooth and homogenous.
- Gradually add the wet ingredients to the dry, mixing gently with a spatula or whisk until just combined. Avoid overmixing to keep the cake tender.
- Carefully pour the boiling water into the batter and stir gently. The batter will be thin – this is expected and ensures a moist, rich cake.
- Divide the batter evenly between the two prepared pans. Bake for 30-35 minutes, or until a toothpick inserted in the center comes out clean or with a few moist crumbs.
- Allow the cakes to cool in the pans for 10 minutes, then turn out onto cooling racks. Let them cool completely before frosting.
- Spread a generous layer of chocolate frosting between the two cake layers and over the top and sides. To create the cobweb effect, pipe concentric circles of decorative frosting on top, then drag a toothpick from the center outward to form the web pattern.
Notes
- Use regular unsweetened cocoa powder if black cocoa powder is unavailable, though color and flavor will be lighter.
- Do not overmix the batter to avoid a tough cake texture.
- Allow cake layers to cool completely before frosting to prevent melting and sliding.
- Store cake covered at room temperature for up to 3 days or refrigerate up to a week.
- Freeze unfrosted cake layers in an airtight container for up to 3 months; thaw before frosting.