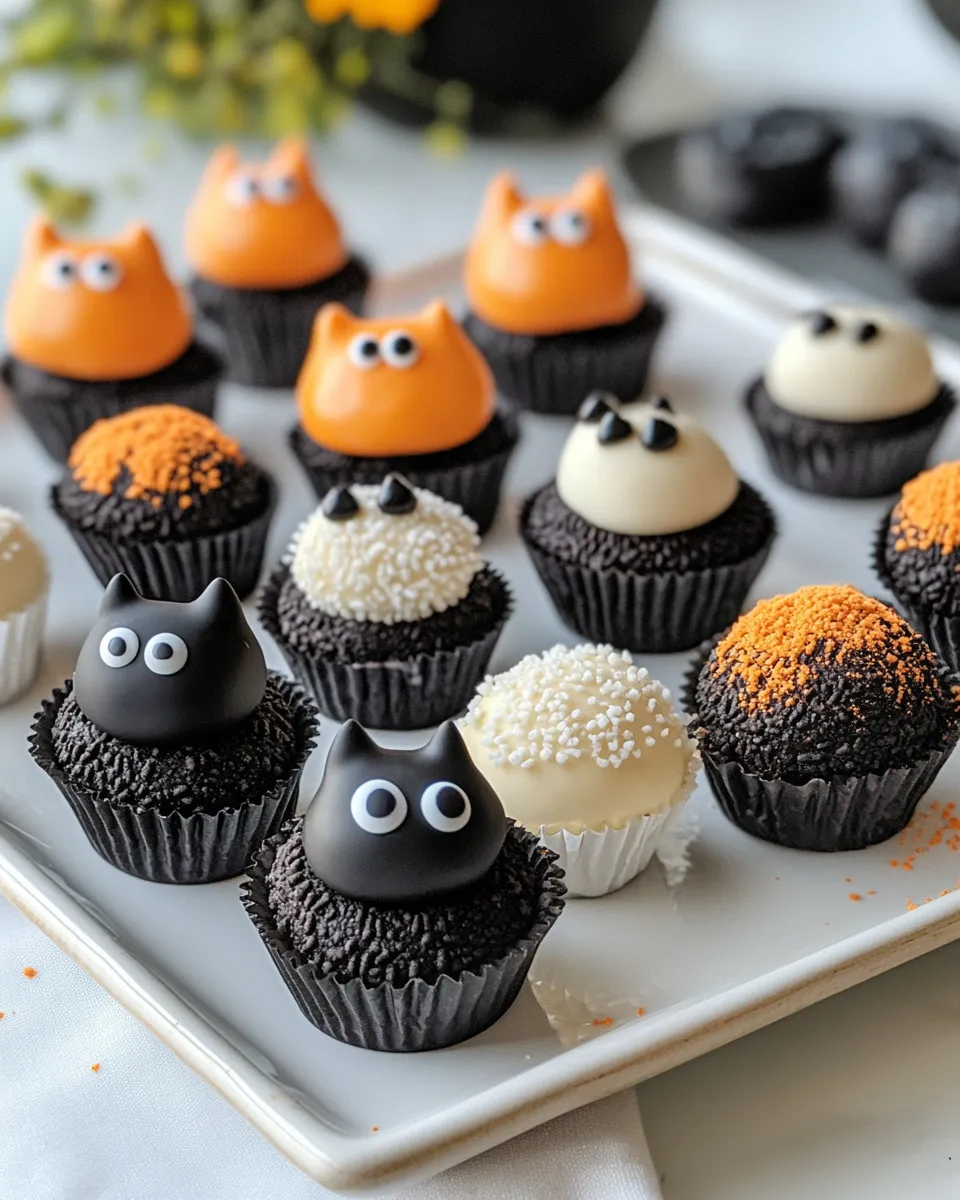
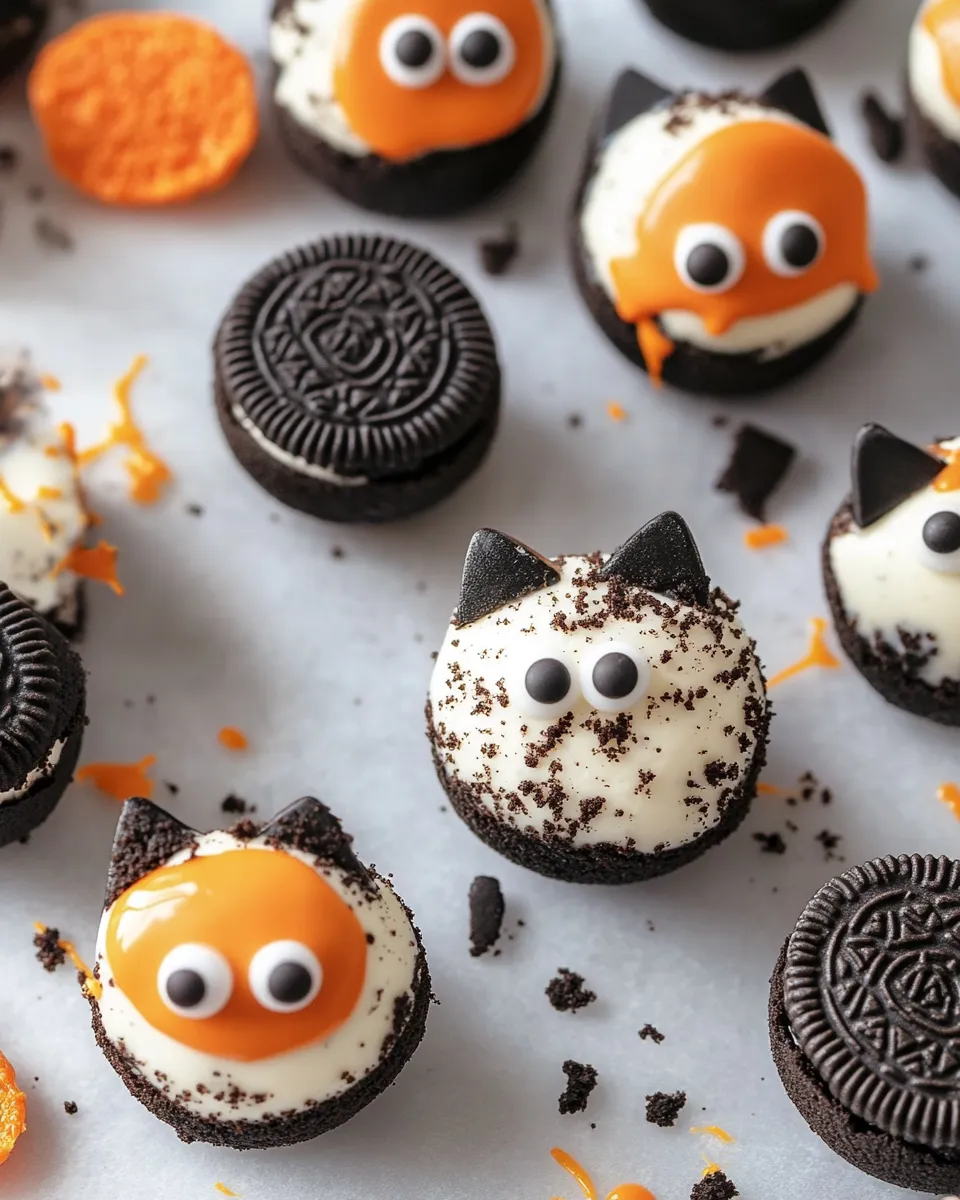
Black Cat Oreo Truffles
If you’re looking for a delightfully spooky treat that’s as fun to make as it is to eat, these Black Cat Oreo Truffles are your new go-to recipe. Perfect for festive gatherings or just a playful indulgence, these truffles combine the classic crunch of Oreo cookies with the creamy richness of cream cheese, all wrapped up in a sleek black candy coating. The cute cat faces, detailed with orange and white candy melts and edible eyes, make these truffles an irresistible showstopper on any dessert table. Let’s dive into what makes these treats so special and how you can whip them up in your kitchen today!
What Makes This Recipe Special
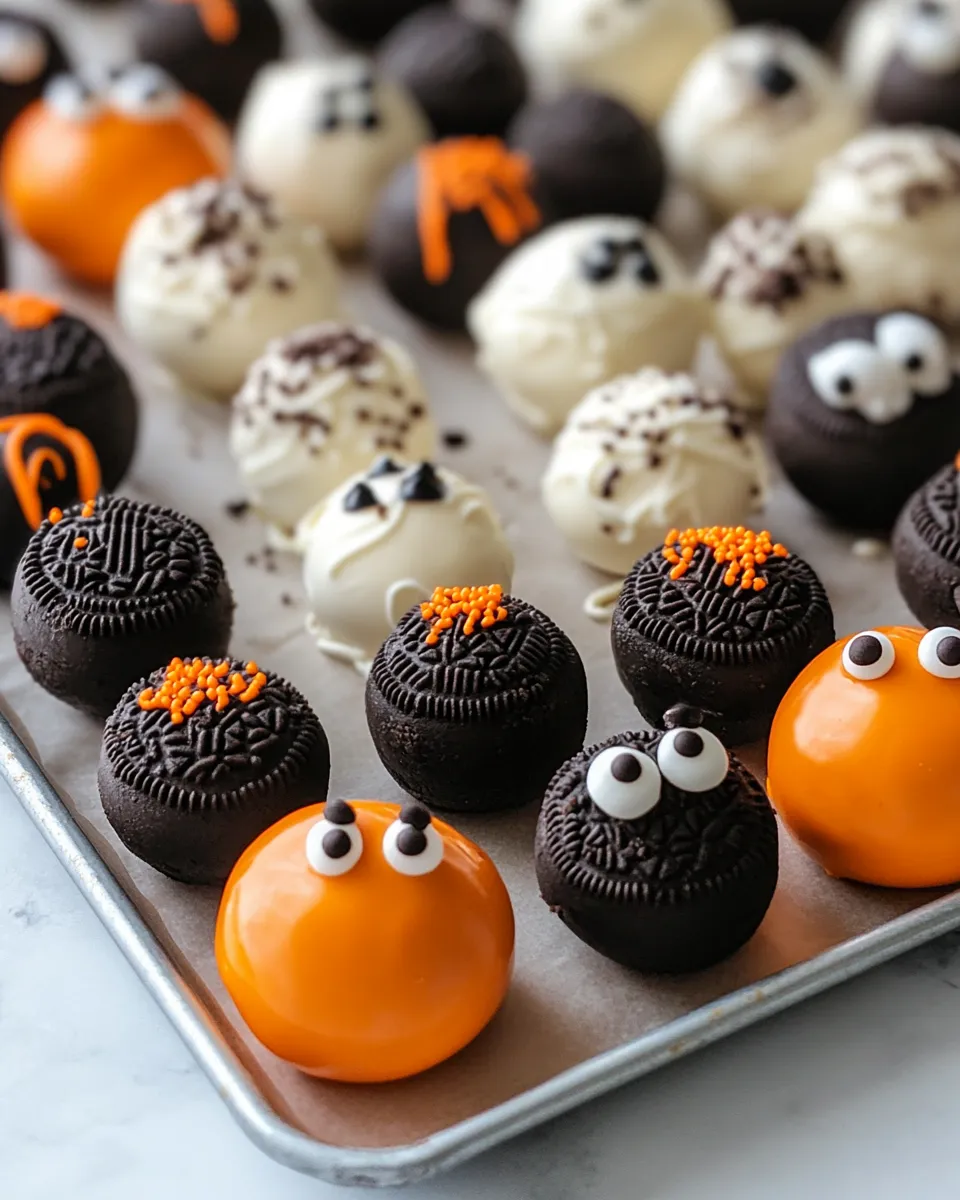
These Black Cat Oreo Truffles stand out because they blend simplicity with creativity. Using one package of Oreo cookies and cream cheese as the base, the recipe transforms everyday ingredients into delightful, bite-sized treats. The black candy coating not only gives them a smooth, glossy finish but also perfectly captures the essence of a black cat. Delicate accents with orange and white candy melts add personality, while edible eyes bring the truffles to life. This recipe is approachable for bakers of all skill levels and offers a playful twist that’s ideal for Halloween or any time you want a cute, crunchy, creamy snack.
Ingredient Rundown
- 1 package Oreo cookies: The classic chocolate sandwich cookies provide the perfect crunch and chocolate flavor base.
- 8 oz cream cheese, softened: Adds a smooth, tangy creaminess that balances the sweetness and helps bind the cookies together.
- Black candy melts (for coating): These melts create the shiny, smooth black coating that forms the “fur” of our black cat truffles. They melt easily and set quickly for a professional finish.
- Orange candy melts (for decoration): Used to draw cute accents like whiskers or nose details, bringing a pop of color and festive flair.
- White candy melts (for decoration): Perfect for highlighting features such as the eyes’ whites or other small decorative touches.
- Edible eyes (for decoration): These add the finishing touch, making the truffles look like adorable little black cats ready to charm everyone.
Cook’s Kit
- Food processor or blender: To crush the Oreo cookies finely for an even texture.
- Mixing bowl: For combining cookie crumbs and cream cheese.
- Spatula or spoon: To mix the ingredients thoroughly.
- Baking sheet lined with parchment paper: For shaping and chilling the truffles.
- Microwave-safe bowls: For melting the candy melts safely.
- Toothpicks or small piping bags: For decorating with the candy melts.
- Cooling rack (optional): Allows excess coating to drip off and helps the truffles set evenly.
Cooking Black Cat Oreo Truffles: The Process
Step 1: Crush the Oreo Cookies
Start by placing the Oreo cookies into your food processor. Pulse until you get fine crumbs — no large chunks. This step is crucial for smooth, creamy truffles that hold their shape well. If you don’t have a processor, place cookies in a sealed plastic bag and crush with a rolling pin.
Step 2: Mix with Cream Cheese
Transfer the cookie crumbs into a mixing bowl. Add the softened cream cheese and stir with a spatula or spoon until thoroughly combined. The mixture should be uniform, sticky, and easy to roll into balls.
Step 3: Shape the Truffles
Using your hands or a small cookie scoop, form the mixture into 1-inch balls. Place each ball on the parchment-lined baking sheet. Once all are shaped, chill them in the refrigerator for at least 1 hour to firm up.
Step 4: Melt the Black Candy Coating
While the truffles chill, melt the black candy melts in a microwave-safe bowl in 30-second intervals, stirring between each until smooth and completely melted.
Step 5: Coat the Truffles
Remove the chilled truffles from the fridge. Using a fork or dipping tool, dip each truffle into the melted black candy coating until fully covered. Gently tap off excess coating and return to the parchment-lined sheet. Let them set completely, either at room temperature or in the fridge.
Step 6: Decorate the Black Cat Faces
Melt the orange and white candy melts separately. Transfer each to a piping bag or use a toothpick for detailed decorating. Use the orange melts to create noses, whiskers, or other fun facial features. Use the white melts to add highlights or eye whites. Finally, place edible eyes on each truffle while the coating is still slightly wet so they stick well.
Step 7: Let the Decorations Set
Allow the decorated truffles to sit until all candy melts have hardened completely. Store in an airtight container in the refrigerator until ready to serve.
Texture-Safe Substitutions
- Instead of Oreo cookies, try gluten-free chocolate sandwich cookies for a different texture.
- For a dairy-free option, use a plant-based cream cheese alternative that softens easily.
- If candy melts are unavailable, high-quality dark chocolate chips can be melted and used for coating and decoration.
- Edible eyes can be substituted with small dots of white and black icing piped on for a homemade look.
Pro Perspective
When making Black Cat Oreo Truffles, a few expert tips can elevate your results. Be sure to soften your cream cheese fully to avoid lumps and ensure smooth mixing. Chilling the truffle mixture before coating is key to preventing melting and maintaining shape. When dipping, work quickly so the candy melts don’t harden mid-dip. For the decorations, practice piping on parchment first to gain confidence. These little touches make a huge difference in how professional your truffles look.
Leftovers & Meal Prep
These truffles keep beautifully in an airtight container in the refrigerator for up to one week. They also freeze well for up to 3 months — just thaw in the fridge before serving. Because they hold their shape and flavor so well, they’re perfect for prepping ahead of parties or making in bulk for gifts. When serving leftovers, allow them to come to room temperature for the best flavor and texture experience.
Reader Q&A
Can I use a different type of cookie instead of Oreos?
Absolutely! While Oreos provide a classic flavor and perfect texture, you can experiment with other chocolate sandwich cookies or even graham crackers for a twist. Just make sure the cookies crush finely and blend well with the cream cheese.
How do I prevent the truffles from melting when dipping?
Chilling the formed truffles thoroughly before dipping is essential. Also, work quickly when dipping and avoid warming the candy melts too much. If the candy coating is too hot, it can cause the truffles to soften or melt.
Can I skip the edible eyes and just use candy melts for decoration?
Yes, you can! Simply pipe small white circles and add black dots with the candy melts to mimic eyes. This method works well and lets you customize the expressions on each truffle.
What’s the best way to store these truffles for gifting?
Place the truffles in a sturdy, airtight container with parchment paper between layers to prevent sticking. Keep them refrigerated until gifting, especially if the weather is warm, to maintain their shape and appearance.
That’s a Wrap
Whipping up these Black Cat Oreo Truffles is a delightful way to impress your guests or treat yourself to an adorable, tasty snack. The combination of crunchy cookies, creamy cheese, and colorful candy melts creates a textural and visual feast that’s hard to resist. Whether you’re celebrating a special occasion or simply craving a fun homemade treat, these truffles deliver on every level. So grab your ingredients, get creative with your decorating, and watch these little black cats disappear bite by bite!
Share on Pinterest


Black Cat Oreo Truffles
Ingredients
Equipment
Method
- Start by placing the Oreo cookies into your food processor. Pulse until you get fine crumbs — no large chunks. If you don’t have a processor, crush the cookies in a sealed plastic bag with a rolling pin.
- Transfer the cookie crumbs into a mixing bowl. Add the softened cream cheese and stir until thoroughly combined into a uniform, sticky mixture.
- Using your hands or a small cookie scoop, form the mixture into 1-inch balls. Place on parchment-lined baking sheet and chill in the refrigerator for at least 1 hour to firm up.
- Melt the black candy melts in a microwave-safe bowl in 30-second intervals, stirring between each until smooth and fully melted.
- Remove the chilled truffles from the fridge. Dip each truffle into the melted black candy coating until fully covered. Tap off excess and return to the parchment-lined sheet. Let set completely at room temperature or in the fridge.
- Melt the orange and white candy melts separately. Use piping bags or toothpicks to decorate the truffles with noses, whiskers, highlights, and eyes. Place edible eyes on while coating is still wet.
- Allow the decorated truffles to sit until all candy melts have hardened completely. Store in an airtight container in the refrigerator until ready to serve.
Notes
- Soften cream cheese fully before mixing to ensure a smooth, lump-free mixture.
- Chill the truffle balls well before dipping to prevent melting and maintain shape.
- Practice decorating on parchment paper to gain confidence before decorating the truffles.
- Store truffles in an airtight container in the fridge for up to one week or freeze for up to 3 months.