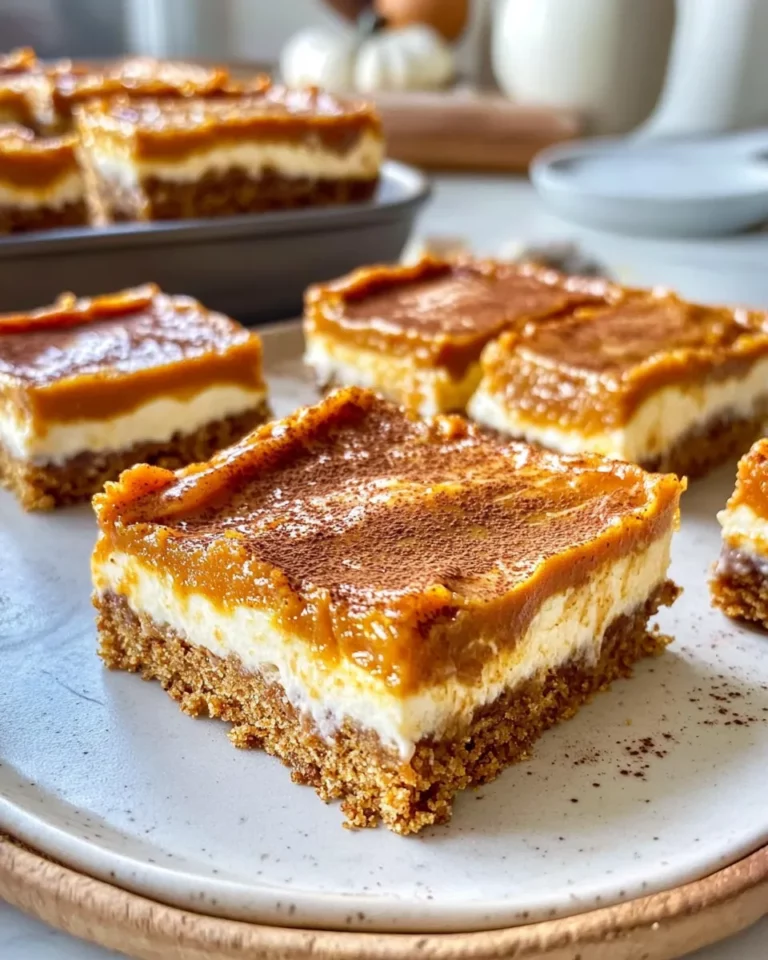
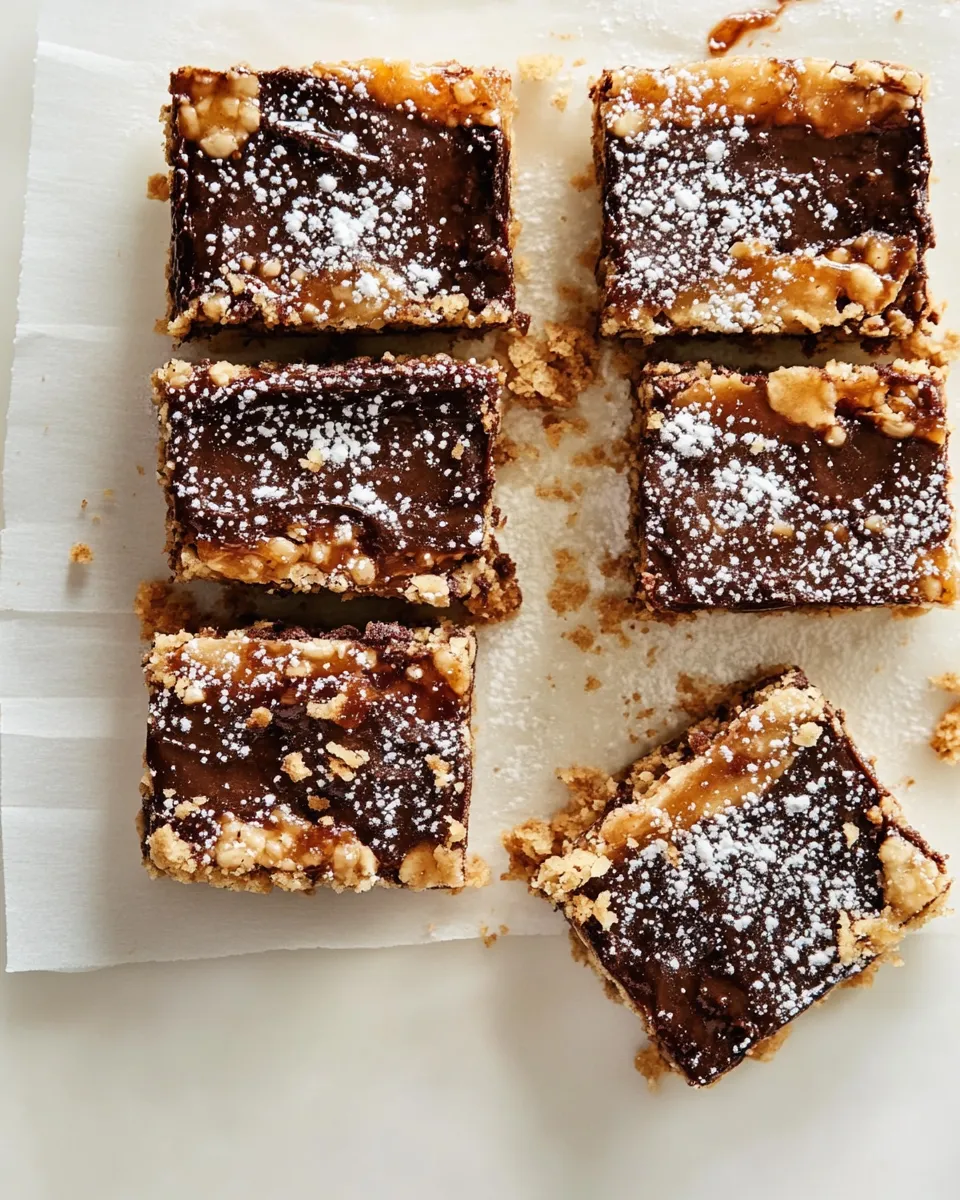
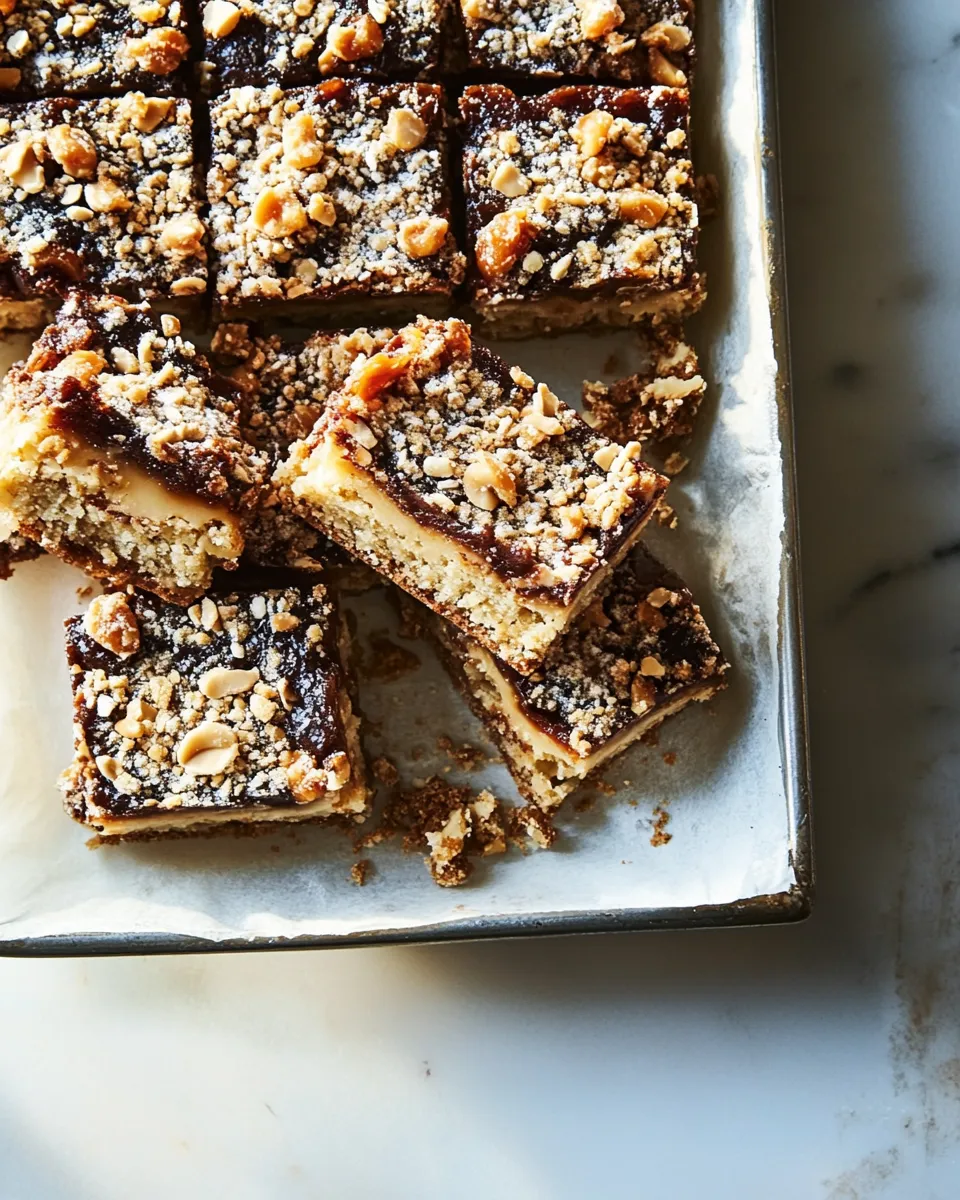
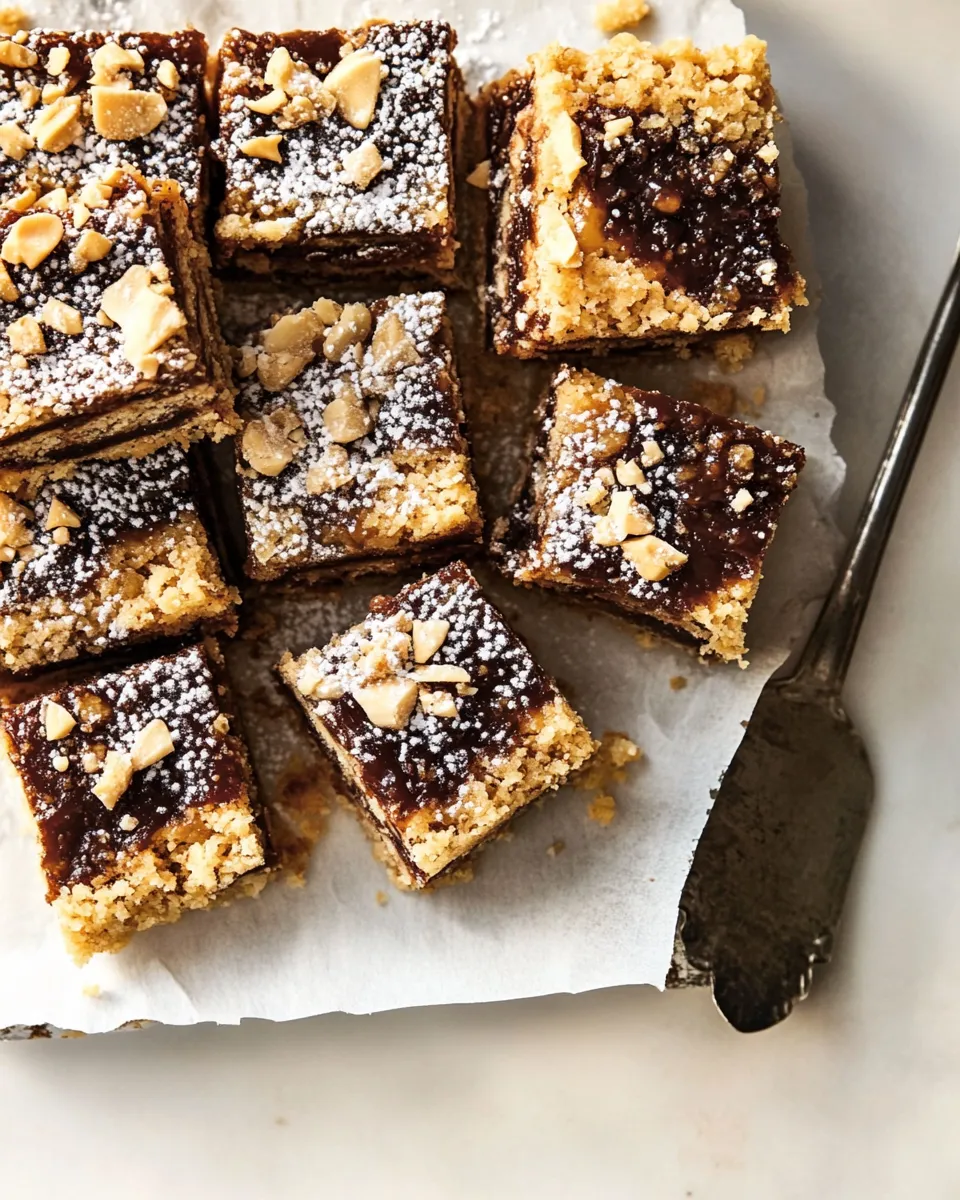
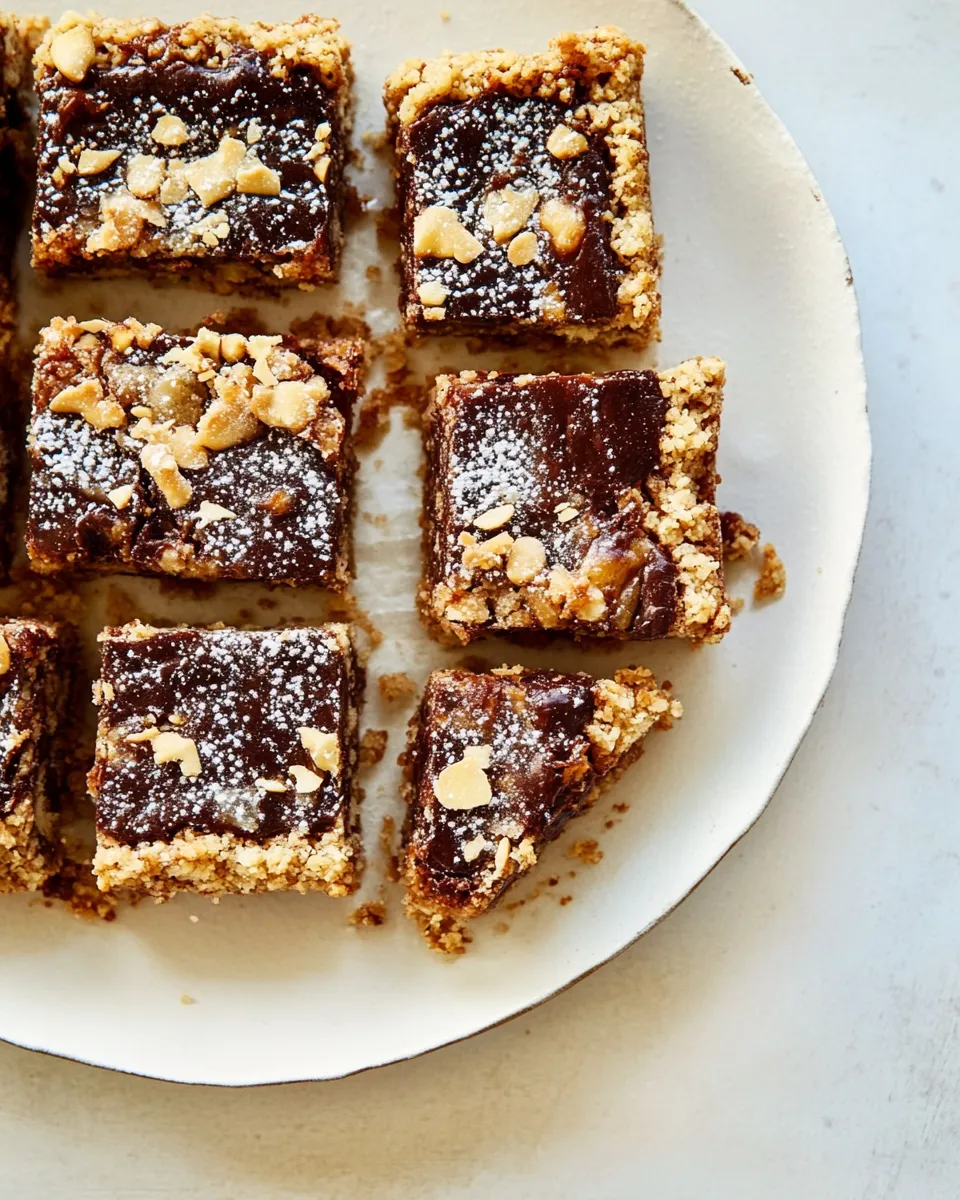
Carmelita Bars
These Carmelita Bars are the kind of dessert I reach for when I want something that feels homemade but comes together without drama. They have a buttery oat crust, pools of salted caramel, and chocolate that melts into the center — everything that makes a bar irresistible. The recipe is forgiving in execution, but there are a few small moves that make a big difference in texture and presentation.
I adapted the steps from a trusted source and kept the technique straightforward: mix, press, bake, layer, and bake again. You don’t need fanciful equipment or obscure ingredients. A stand mixer and a sturdy 9 x 13-inch pan will do the heavy lifting.
Read through the steps once before you start. Line up your ingredients, let the butter soften to room temperature, and you’ll be amazed how quickly these come together. They’re excellent for potlucks, a weekday treat, or a simple slice for coffee.
What’s in the Bowl
Ingredients
- 2 cups flour — provides structure to the crumb base and top; handle gently to keep the bars tender.
- 1 3/4 cups quick-cooking oats — gives chew and oat flavor; quick oats blend into the dough while still keeping texture.
- 1 1/4 cups brown sugar — adds moisture and that caramel-forward flavor to the crumb.
- 1 teaspoon baking soda — a touch of lift so the crumb isn’t dense.
- 1/4 teaspoon salt — balances sweetness and enhances overall flavor; don’t skip.
- 1 1/4 cups (2 1/2 sticks) unsalted butter, softened — the fat that creates the buttery crumb; soften until easily indented by a finger.
- 1 1/2 cup chocolate chips, divided use — chocolate pockets throughout; the divided use ensures chocolate in the middle and on top.
- 1 /4 cup chopped pecans, divided use — offers crunch and a toasty contrast; divided so nuts appear both under the caramel and on top.
- 1 1/2 cups Salted Caramel Sauce (homemade or store bought) — the star layer; salted caramel adds richness and a glossy finish when set.
- 2 1/2 tablespoons flour — blended with the caramel to help it set and stay in place while the bars finish baking.
Carmelita Bars Made Stepwise
- Preheat oven to 350°F. Lightly coat a 9 x 13‑inch pan with non‑stick spray.
- In a stand mixer bowl fitted with the paddle attachment, add 2 cups flour, 1 3/4 cups quick‑cooking oats, 1 1/4 cups brown sugar, 1 teaspoon baking soda, 1/4 teaspoon salt, and 1 1/4 cups (2 1/2 sticks) softened unsalted butter. Mix on low until the ingredients are fully combined and the mixture is crumbly.
- Divide the crumb mixture into two equal portions (transfer half to a separate bowl).
- Press one half of the crumb mixture evenly and firmly into the bottom of the prepared pan to form the crust.
- Bake the crust for 10 minutes. Remove from the oven and let it cool about 5 minutes.
- Evenly sprinkle 1 cup of the chocolate chips and half of the chopped pecans (2 tablespoons) over the warm crust.
- In a small bowl, stir together 1 1/2 cups Salted Caramel Sauce and 2 1/2 tablespoons flour until combined. Drizzle the caramel mixture evenly over the chocolate chips and pecans.
- Sprinkle the remaining crumb mixture evenly over the caramel (press lightly so it adheres but leave some gaps), then top with the remaining 1/2 cup chocolate chips and the remaining chopped pecans (2 tablespoons).
- Return the pan to the oven and bake 15 to 20 minutes, or until the top and edges begin to brown.
- Remove the pan from the oven and place it on a wire rack. Cool at room temperature for 30 minutes, then refrigerate until the caramel is set, about 2 hours.
- After chilling, cut into bars and serve.
Why Carmelita Bars is Worth Your Time
These bars hit a satisfying balance: buttery oat crumb, gooey salted caramel, melty chocolate, and toasted nuts. Each bite gives you a little of everything. They look impressive but they aren’t fussy to assemble. The two-bake method locks in texture: the first bake sets the crust so it holds the caramel, the second bake toasts the top crumb and melds flavors together.
They’re also versatile in where they shine — packed in a picnic tin, sliced for a dessert plate, or left on the counter for casual snacking. Because the caramel is pre-thickened with flour, the bars slice cleanly after chilling and won’t make a sticky mess when served.
Texture-Safe Substitutions
Keep texture in mind when making any swaps. You can omit the pecans entirely for a nut-free bar; the bars will remain structurally sound but lose the toasted crunch. If you prefer more chew, press the crumb base a bit more firmly before the first bake so it compacts and holds together better.
If your caramel is particularly runny, stir in a little more of the 2 1/2 tablespoons flour in small increments until it reaches a drizzable, yet stable, consistency — do this gradually so you don’t over-thicken. If you want fewer chocolate pockets, reduce the amount used on top and in the middle (following the divided-use structure keeps the texture balanced).
Toolbox for This Recipe
- Stand mixer with paddle attachment — for evenly combining the crumb without overworking.
- 9 x 13‑inch baking pan — the specified size keeps thickness and baking time accurate.
- Non‑stick spray or a light coating of butter — for easy release.
- Small mixing bowl — for combining the caramel and flour.
- Wire rack — for proper cooling before refrigeration.
- Measuring cups and spoons — accuracy matters for texture.
- Spatula or flat measuring cup — to press the crust evenly into the pan.
Slip-Ups to Skip
- Don’t skip chilling after the final bake. Cutting warm bars will cause the caramel to ooze and the bars to fall apart.
- Avoid overworking the crumb when mixing. Mix on low just until combined so the texture stays tender, not dense.
- Don’t press the top crumb too hard after adding the caramel. Press lightly so you leave small gaps; those gaps create a pleasing, rustic look and proper texture contrast.
- Don’t use a pan significantly larger or smaller than 9 x 13. Size changes affect thickness and baking time, which can alter doneness and texture.
Make It Fit Your Plan
For make-ahead needs, these bars are ideal. Bake, chill, slice, and refrigerate. They travel well stored in a single layer or stacked with parchment between layers. If you need a dessert for a gathering, bake a day ahead and refrigerate overnight — flavors deepen and they slice perfectly.
Want to serve warm? Remove portions from the refrigerator and allow them to come to room temperature for about 20 minutes, or pop individual slices into a low oven briefly to soften the chocolate and caramel slightly. For room-temperature service at a party, take them out 30–45 minutes before guests arrive so the caramel relaxes but doesn’t become runny.
Cook’s Commentary
I like to give the crust a gentle, even press so it browns consistently during the first bake. If the crust seems a touch soft when it comes out, that’s fine — the 5-minute rest before layering helps it stabilize. The trickier element is the caramel: stir it with the flour thoroughly so it blends smooth and distributes evenly when drizzled.
When I make these, I break up some of the chocolate chips in the middle layer with a spoon so the caramel can mingle into pockets rather than sitting on top of a solid chip layer. That little move yields soft ribbons of chocolate throughout.
Storage Pro Tips
- Refrigerate in an airtight container after the initial chill; they keep best chilled to maintain caramel set and tidy slices.
- Separate layers with parchment or wax paper when stacking to prevent sticking and mess.
- Bring to room temperature briefly before serving if you prefer softer chocolate and a less-firm caramel slice.
Handy Q&A
- Q: How long do these keep in the fridge?
A: Stored airtight, they stay good for several days; refrigeration maintains the set caramel and keeps slices clean-cut. - Q: Can I skip chilling and still cut them?
A: Chilling is important. Without the refrigeration step, the caramel won’t fully set and the bars will be messy to slice. - Q: What if my caramel is too thin?
A: Fold in the 2 1/2 tablespoons flour slowly until the caramel thickens to a stable drizzling consistency before applying. - Q: Can I make these in a different pan?
A: Using a different size changes thickness and bake time; stick to 9 x 13‑inch for the best match with the recipe’s times.
Ready, Set, Cook
Line up your ingredients, preheat the oven to 350°F, and plan for a short bake, a bit of assembly, and a patient chill. The active time is mostly assembly and two short bakes; the hands-off chilling is the only patience required. Follow the stepwise directions, press that crust evenly, and trust that a good caramel and a couple of chocolate pockets will make everything sing. Enjoy — and save a piece for someone who appreciates buttery, caramelly, chocolatey bars.
Carmelita Bars
Ingredients
Equipment
Method
- Preheat oven to 350°F. Lightly coat a 9 x 13‑inch pan with non‑stick spray.
- In a stand mixer bowl fitted with the paddle attachment, add 2 cups flour, 1 3/4 cups quick‑cooking oats, 1 1/4 cups brown sugar, 1 teaspoon baking soda, 1/4 teaspoon salt, and 1 1/4 cups (2 1/2 sticks) softened unsalted butter. Mix on low until the ingredients are fully combined and the mixture is crumbly.
- Divide the crumb mixture into two equal portions (transfer half to a separate bowl).
- Press one half of the crumb mixture evenly and firmly into the bottom of the prepared pan to form the crust.
- Bake the crust for 10 minutes. Remove from the oven and let it cool about 5 minutes.
- Evenly sprinkle 1 cup of the chocolate chips and half of the chopped pecans (2 tablespoons) over the warm crust.
- In a small bowl, stir together 1 1/2 cups Salted Caramel Sauce and 2 1/2 tablespoons flour until combined. Drizzle the caramel mixture evenly over the chocolate chips and pecans.
- Sprinkle the remaining crumb mixture evenly over the caramel (press lightly so it adheres but leave some gaps), then top with the remaining 1/2 cup chocolate chips and the remaining chopped pecans (2 tablespoons).
- Return the pan to the oven and bake 15 to 20 minutes, or until the top and edges begin to brown.
- Remove the pan from the oven and place it on a wire rack. Cool at room temperature for 30 minutes, then refrigerate until the caramel is set, about 2 hours.
- After chilling, cut into bars and serve.