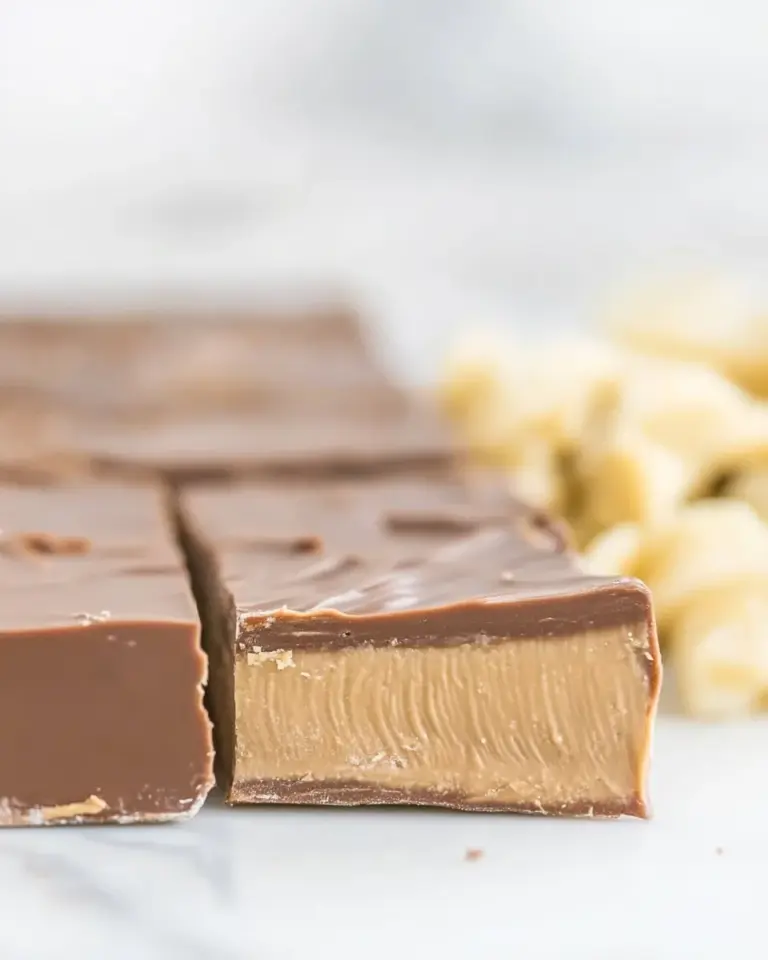
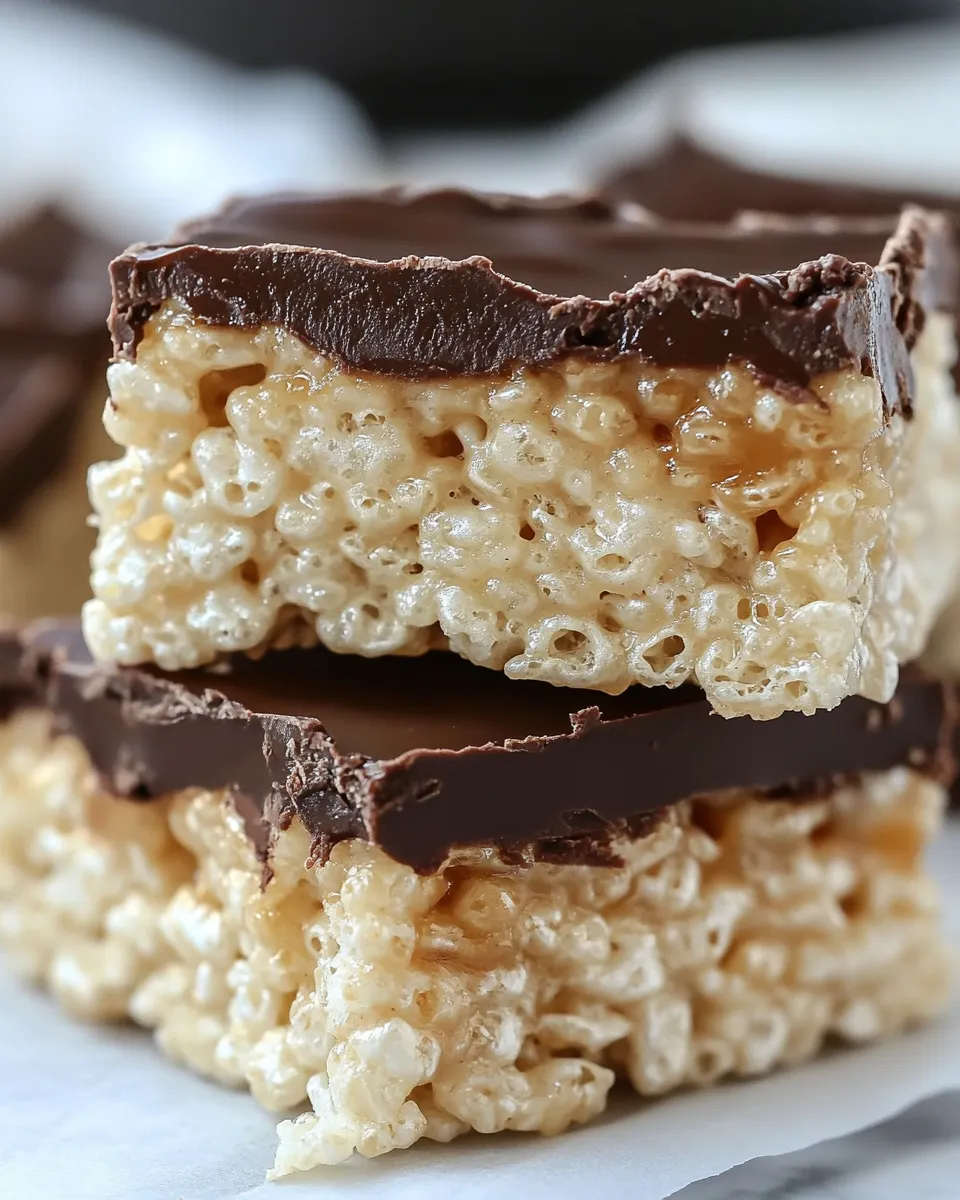
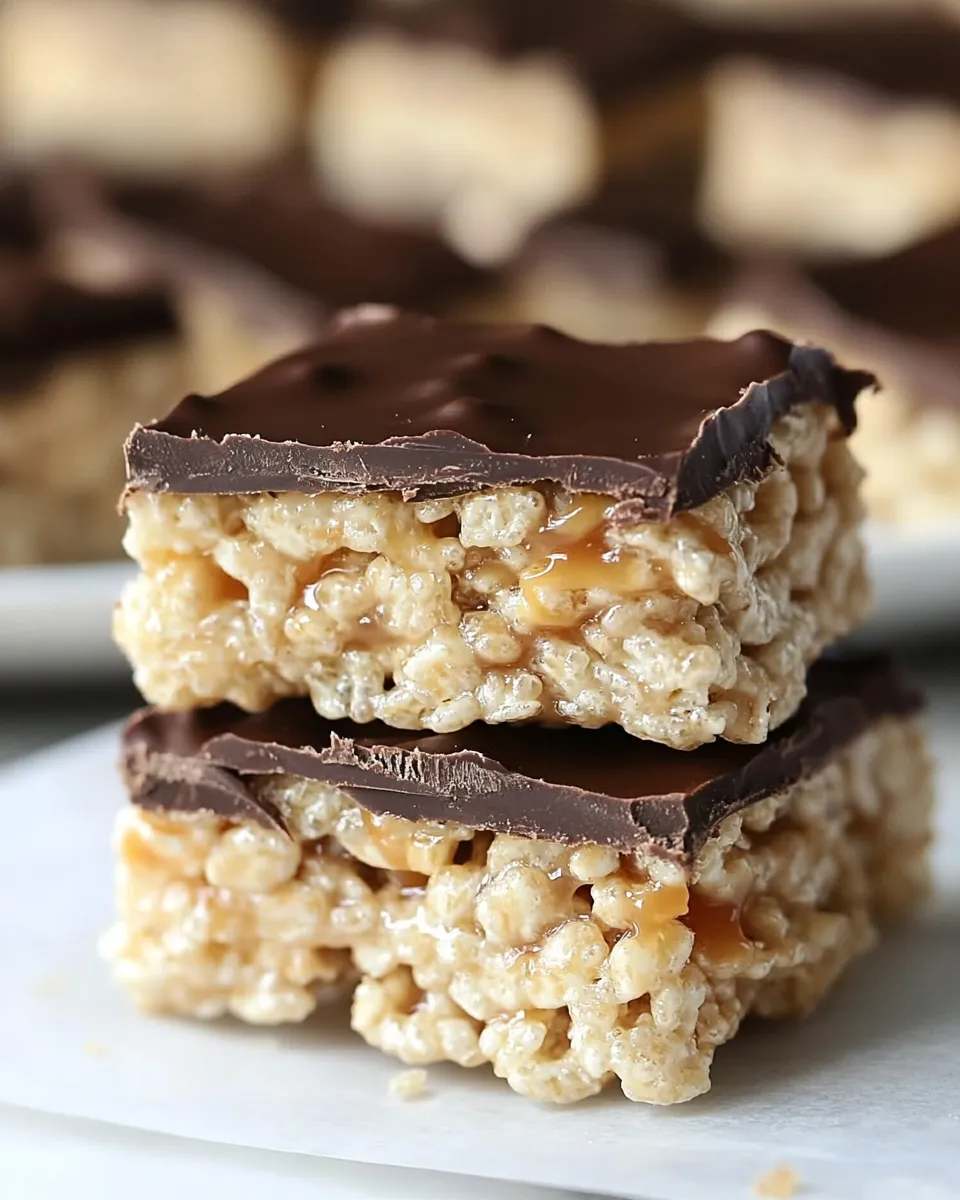
Chocolate Caramel Rice Krispie Treats
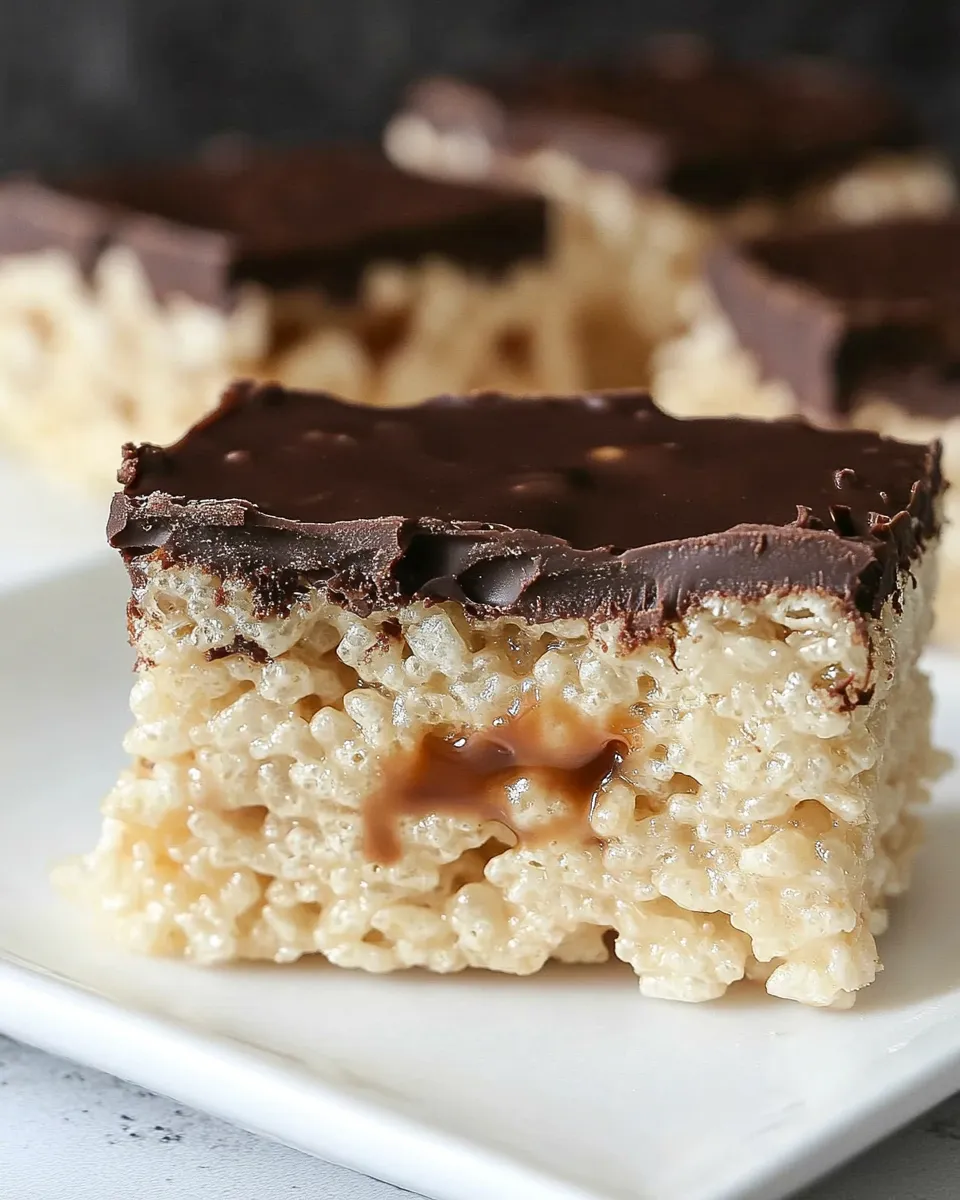
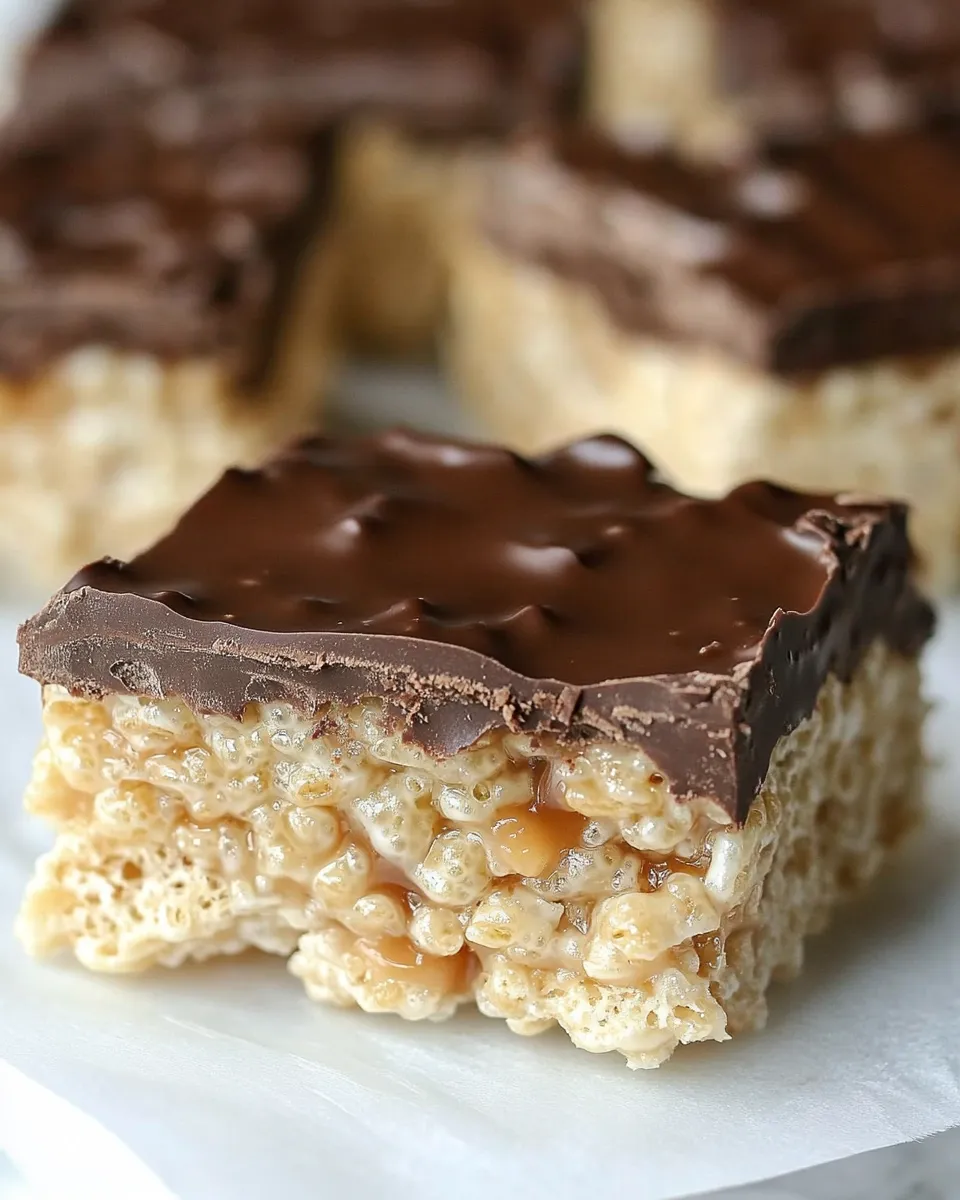
These bars are the kind of thing I make when I want something that feels a little fancy but comes together faster than a fussy dessert. Crispy rice cereal gets the light, airy base; a homemade soft-ball caramel adds chew and depth; and a glossy milk chocolate layer on top finishes everything off. The result is addictive — crisp, chewy, and chocolatey in one bite.
I wrote this recipe to be straightforward: clear steps, predictable timing, and a few small notes so you don’t have to guess. The method separates the layers so each does its job: the marshmallow keeps the rice cereal light, the caramel builds a tender chew, and the chocolate seals the top with a snap.
If you read the steps first, you’ll know when to refrigerate and when to work quickly. These bars keep well in the fridge, which is handy for weekend baking, gift boxes, or a quick treat when you want something that travels well.
What Goes In
- 6 cups crispy rice cereal (like Rice Krispies) — the crunchy, airy base that gives structure and snap.
- 5 Tablespoons butter — total called for; some used to grease the pan and the rest to melt with marshmallows.
- 4 heaping cups mini marshmallows — they bind the cereal and create a light texture; use fresh marshmallows for best melting.
- 1/2 cup butter — this is for the caramel; adds richness and smoothness.
- 1/2 cup light brown sugar — gives the caramel its classic flavor and color.
- 1/2 cup light corn syrup — helps prevent crystallization and keeps the caramel glossy and pliable.
- 7 ounce can sweetened condensed milk (half of the can) — use half the can in the caramel; this adds sweetness and body to the sauce.
- dash of salt — balances sweetness and lifts the caramel’s flavor.
- 2 cups milk chocolate chips (a high quality brand works best) — the melting layer on top; choose a brand you like eating straight from the bag.
- 1 Tablespoon butter — added to the chocolate to make a glossy, spreadable topping.
How to Prepare (Chocolate Caramel Rice Krispie Treats)
- Lightly butter a 9×13-inch pan using 1 tablespoon of the 5 tablespoons of butter from the ingredient list; set the pan aside. Measure 6 cups crispy rice cereal into a large mixing bowl.
- In a large saucepan, melt the remaining 4 tablespoons of butter over medium-low heat.
- As soon as the butter is melted, add 4 heaping cups mini marshmallows to the saucepan. Stir constantly until the marshmallows are fully melted and the mixture is smooth. Remove from heat.
- Pour the melted marshmallow mixture over the measured cereal. Gently stir with a spatula until the cereal is evenly coated.
- Transfer the cereal-and-marshmallow mixture to the prepared 9×13 pan. Press it into an even layer, pressing gently so the treats remain light and retain air pockets. Refrigerate the pan while you make the caramel.
- For the caramel, combine in a medium saucepan: 1/2 cup butter, 1/2 cup light brown sugar, 1/2 cup light corn syrup, half of the 7-ounce can sweetened condensed milk (the 3.5-ounce portion), and a dash of salt. Cook over medium heat, stirring until the sugar dissolves.
- Bring the caramel mixture to a rolling boil, then continue to cook, stirring constantly, until it reaches the soft-ball stage (about 235–240°F on a candy thermometer). If you don’t use a thermometer, use the ice-water test: drop a small spoonful into very cold water; it should form a soft, pliable ball that flattens when removed. Remove the caramel from heat as soon as it reaches the soft-ball stage.
- Immediately pour the warm caramel in an even layer over the chilled rice krispie base. Use an offset spatula or the back of a spoon to smooth the caramel. Allow the caramel to set at room temperature for at least 30 minutes, or place the pan in the refrigerator until firm.
- To make the chocolate topping, place 2 cups milk chocolate chips and 1 tablespoon butter in a heatproof bowl. Melt using a double boiler or in the microwave in 30-second intervals, stirring between intervals, until the chocolate is completely smooth.
- Pour the melted chocolate over the set caramel and spread into an even layer. Refrigerate until the chocolate is fully set.
- Once set, cut into bars. Store the bars in the refrigerator; they will keep for at least a week.
The Upside of (Chocolate Caramel Rice Krispie Treats)
These bars give you a great mix of textures: airy cereal, chewy caramel, and a chocolate finish. That contrast is the whole point — each component is simple on its own, but stacked together they feel memorable.
They’re fast to assemble, require no tempering skills, and are family-friendly. The recipe is forgiving; if you press the rice krispie layer gently, it stays light, and the caramel soft-ball stage creates a reliable chew without being rock-hard.
Because the final product is chilled, these travel well and keep their shape in gift tins or lunchboxes. They also slice nicely, which makes them great for batch baking if you’re bringing treats to a party or potluck.
If You’re Out Of…
If you’re missing a specific item, here are practical workarounds without changing structure:
- Out of mini marshmallows: measure the same volume in large marshmallows and cut them into smaller pieces so they melt evenly.
- No light corn syrup: the corn syrup’s role is to prevent crystallization in the caramel; if you’re out, work carefully and stir constantly, but be aware texture may differ slightly.
- Short on butter: the recipe splits butter across steps; don’t skip it entirely — it contributes flavor and the right mouthfeel.
Appliances & Accessories
Keep this small set of tools on hand to make the process smoother:
- Large saucepan — for melting butter and marshmallows.
- Medium saucepan — dedicated to the caramel to monitor temperature closely.
- Candy thermometer (optional but helpful) — takes the guesswork out of the soft-ball stage.
- Offset spatula or sturdy rubber spatula — for pressing the rice krispie layer and smoothing caramel and chocolate.
- 9×13-inch pan — the specified size gives the right thickness for the layers.
- Heatproof bowl — for melting chocolate chips without burning them.
Slip-Ups to Skip
There are a few mistakes people make that change the result. Avoid them.
- Over-pressing the rice krispie base. Press gently; you want the treats to stay airy. Pressing too hard makes them dense.
- Skipping the chill before pouring caramel. If the base is warm, the caramel will sink in and you’ll lose the distinct layers.
- Overcooking the caramel past soft-ball. That makes a hard, brittle caramel rather than a tender, chewy one.
- Melting chocolate too quickly or overheating. Stir frequently and remove from heat as soon as it’s smooth to prevent seizing.
- Not timing refrigeration. Chocolate sets faster in the fridge, but if chilled too quickly the caramel can contract and crack the top. A brief room-temperature set for the caramel, then chill for chocolate, works best.
Smart Substitutions
If you want to tweak things without changing technique, consider these options.
- Swap milk chocolate chips for darker chocolate if you prefer less sweetness — it will change the flavor but not the process.
- If you prefer a salted contrast, sprinkle a light pinch of flaky sea salt over the chocolate layer before it sets.
- Use a higher-quality chocolate brand for a more polished finish; the melting behavior is similar, but flavor improves.
Behind the Recipe
This is a classic layering technique borrowed from candy-making. The marshmallow and cereal create a stable foam base. The caramel is cooked to the soft-ball stage so it’s pliable and chewy — not runny, not hard. The chocolate topping provides a cooling snap and seals everything together.
Controlling temperature and timing matters more than exact phrasing. That’s why the recipe asks you to chill the cereal layer before pouring caramel and to remove the caramel once it reaches soft-ball. Those two steps protect your layers and ensure a clean cross-section when you cut the bars.
Best Ways to Store
Store the bars in an airtight container in the refrigerator. They keep for at least a week chilled. If you want to freeze them, wrap individual bars in plastic and then place in an airtight container; thaw in the refrigerator before serving to avoid condensation on the chocolate.
When stacking bars in a container, place a sheet of parchment between layers to prevent sticking. Let the chocolate set fully before stacking to keep edges neat.
Popular Questions
Can I skip refrigerating the base before pouring caramel?
You shouldn’t. The chill helps the rice krispie layer firm up so the warm caramel sits on top instead of soaking in.
What if I don’t have a candy thermometer?
Use the ice-water soft-ball test described in the instructions. It takes a little practice, but it works reliably for small batches.
Why do some caramels get grainy?
Graininess is usually due to sugar crystallization. The corn syrup helps prevent that. Stir until the sugar dissolves and avoid splashing sugar crystals onto the sides of the pan.
How do I get clean cuts?
Chill the pan well, then use a sharp knife warmed in hot water and wiped dry between cuts. That gives neat edges without smearing the chocolate.
Make It Tonight
Plan about 60–90 minutes with active steps and some chilling time. Start by making the rice krispie layer — that only takes a few minutes — then chill while you cook the caramel. Once the chocolate is set, you can cut and enjoy. These bars are forgiving and quick to scale if you need more or fewer servings.
Make a batch tonight and keep the extras in the fridge for the week. They’re a dependable crowd-pleaser, and once you get the rhythm of layered assembly, you’ll be making them whenever you want a treat that looks thoughtful without a lot of fuss.
Chocolate Caramel Rice Krispie Treats
Ingredients
Equipment
Method
- Lightly butter a 9x13-inch pan using 1 tablespoon of the 5 tablespoons of butter from the ingredient list; set the pan aside. Measure 6 cups crispy rice cereal into a large mixing bowl.
- In a large saucepan, melt the remaining 4 tablespoons of butter over medium-low heat.
- As soon as the butter is melted, add 4 heaping cups mini marshmallows to the saucepan. Stir constantly until the marshmallows are fully melted and the mixture is smooth. Remove from heat.
- Pour the melted marshmallow mixture over the measured cereal. Gently stir with a spatula until the cereal is evenly coated.
- Transfer the cereal-and-marshmallow mixture to the prepared 9x13 pan. Press it into an even layer, pressing gently so the treats remain light and retain air pockets. Refrigerate the pan while you make the caramel.
- For the caramel, combine in a medium saucepan: 1/2 cup butter, 1/2 cup light brown sugar, 1/2 cup light corn syrup, half of the 7-ounce can sweetened condensed milk (the 3.5-ounce portion), and a dash of salt. Cook over medium heat, stirring until the sugar dissolves.
- Bring the caramel mixture to a rolling boil, then continue to cook, stirring constantly, until it reaches the soft-ball stage (about 235–240°F on a candy thermometer). If you don’t use a thermometer, use the ice-water test: drop a small spoonful into very cold water; it should form a soft, pliable ball that flattens when removed. Remove the caramel from heat as soon as it reaches the soft-ball stage.
- Immediately pour the warm caramel in an even layer over the chilled rice krispie base. Use an offset spatula or the back of a spoon to smooth the caramel. Allow the caramel to set at room temperature for at least 30 minutes, or place the pan in the refrigerator until firm.
- To make the chocolate topping, place 2 cups milk chocolate chips and 1 tablespoon butter in a heatproof bowl. Melt using a double boiler or in the microwave in 30-second intervals, stirring between intervals, until the chocolate is completely smooth.
- Pour the melted chocolate over the set caramel and spread into an even layer. Refrigerate until the chocolate is fully set.
- Once set, cut into bars. Store the bars in the refrigerator; they will keep for at least a week.
Notes
For Ice water method to test Soft Ball Stage: Stick several ice cubes in a small cup and fill with water. Test if the mixture has reached soft ball stage by dropping a spoonful of it into the ice water cup. If you're able to just barely clump the caramel sauce together in your hands to form a really soft ball, then it's ready! This is the most important step! Don't overcook the caramel or it will be hard and sticky on your teeth. When the caramel starts to turn golden, I do the ice water method every few minutes until it's ready, just to make sure I don't overcook it.