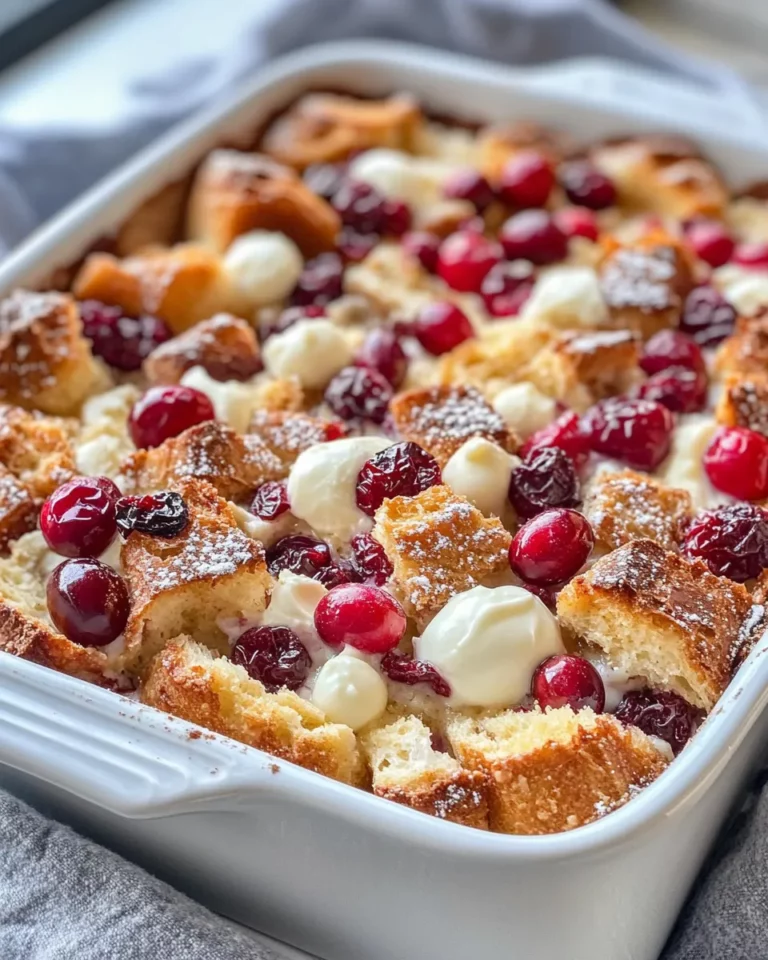
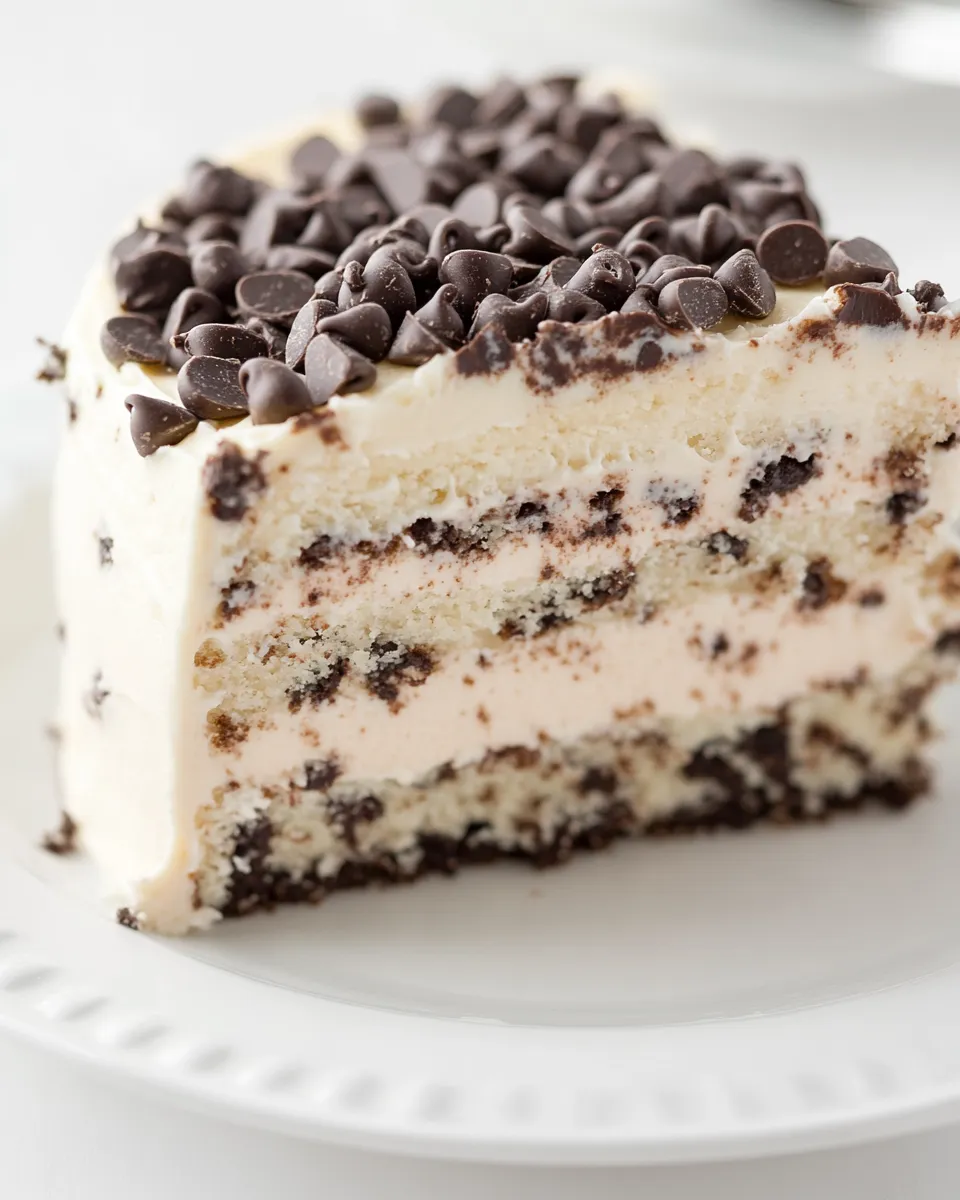
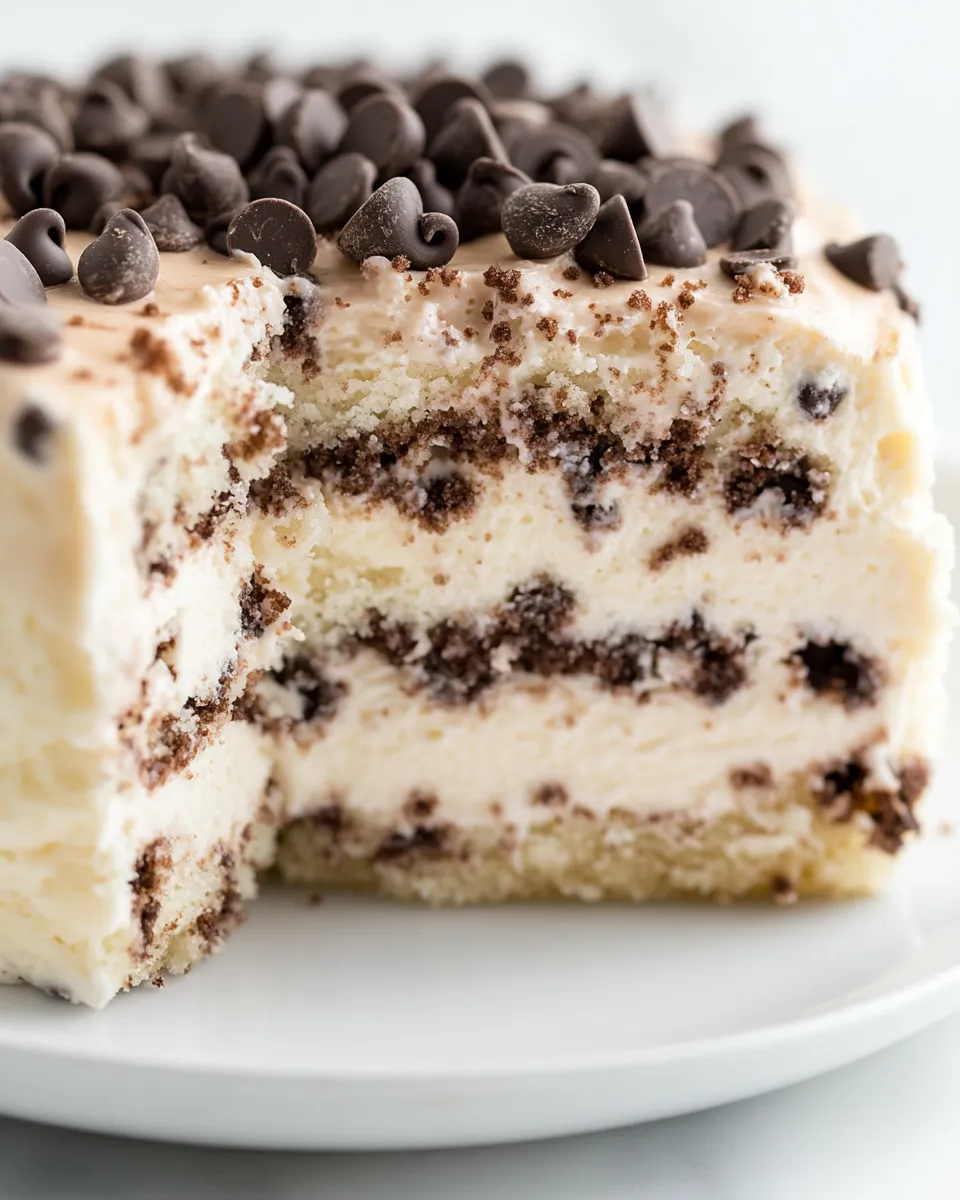
Chocolate Chip Cheesecake Cake
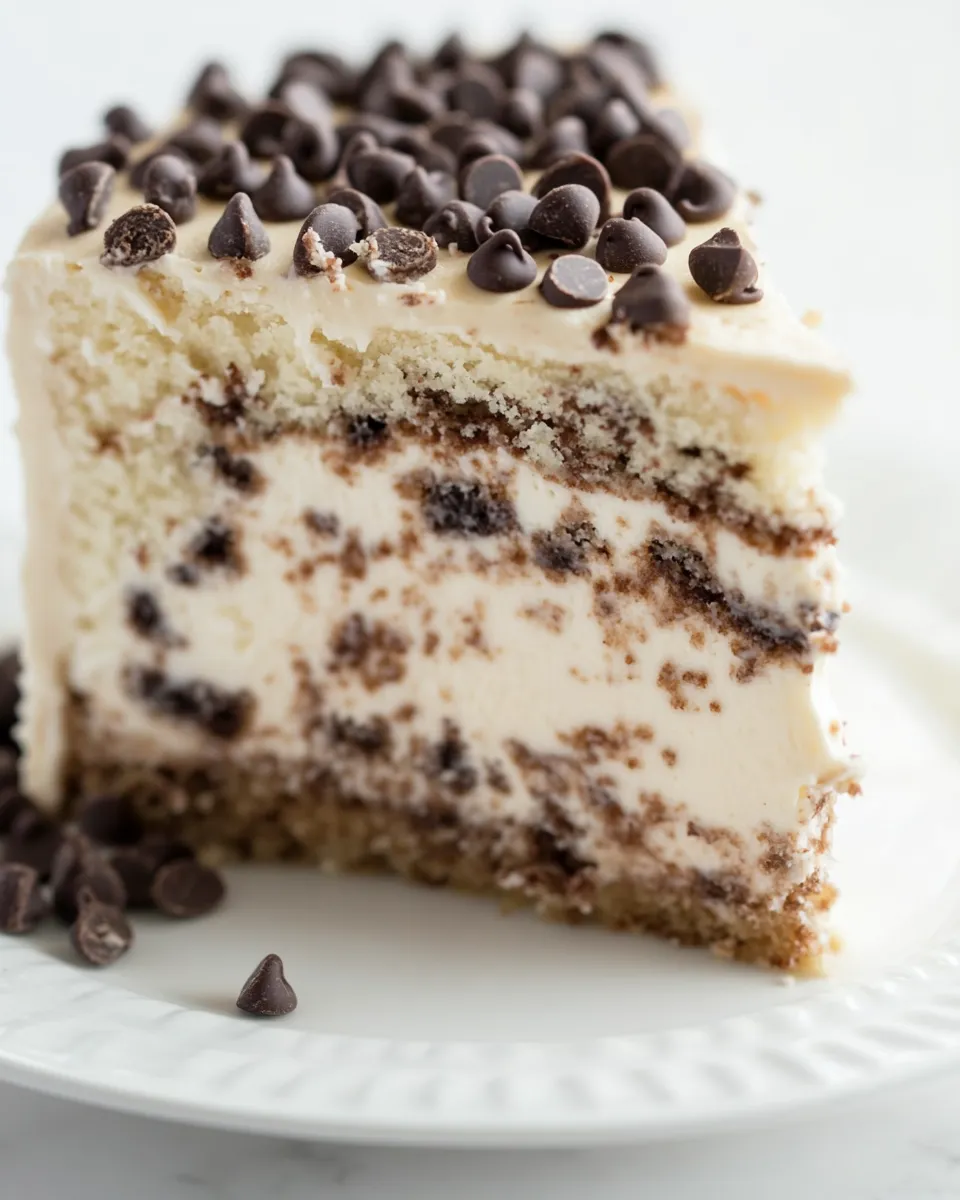
This Chocolate Chip Cheesecake Cake is one of those desserts that looks fancy but behaves like a home baker’s best friend. A dense, creamy frozen cheesecake layer is sandwiched between two tender white cake layers studded with mini chocolate chips, then finished with a smooth cream cheese frosting and more chips. It comes together with straightforward steps and mostly pantry-stable items.
I test recipes the way I serve them: to real people who notice texture first and decoration second. This cake delivers both — a silky cheesecake heart for richness, light cake for contrast, and a frosting that ties everything together without being cloying. It’s surprisingly simple once you follow the sequence of chilling and layering carefully.
Below I walk through what you need, the complete step-by-step using the exact directions, sensible swaps, hardware tips, and troubleshooting so your final cake is consistent and slicable. No tricks — just reliable technique and practical notes earned from repeat bakes.
What You’ll Gather
Ingredients
- Two 8-ounce packages cream cheese, at room temperature — for the cheesecake base; warming prevents lumps when beating.
- ⅔ cup granulated white sugar — sweetens the cheesecake filling; balances tang.
- ½ teaspoon salt — enhances overall flavor and offsets sweetness.
- 2 large eggs — provide structure and richness to the cheesecake.
- ⅓ cup sour cream — adds creaminess and slight tang to the filling.
- ⅓ cup heavy whipping cream — lightens texture and helps the filling set smoothly.
- 1 teaspoon vanilla extract — flavor backbone for the filling.
- ½ cup miniature chocolate chips — mix-ins for the cheesecake layer for pockets of chocolate.
- One 15.25-ounce box white cake mix — the base for both cake layers; keeps the cake tender and consistent.
- 1¼ cups water — required by the cake mix for batter consistency.
- ⅓ cup canola or vegetable oil — adds moisture and keeps layers tender.
- 3 large egg whites — lighten the cake batter while still providing structure.
- 1 cup miniature chocolate chips — stir-ins for the cake batter to echo the cheesecake layer.
- 2½ cups powdered sugar, sifted to remove lumps — sweetens and stabilizes the cream cheese frosting; sifting prevents gritty frosting.
- Two 8-ounce packages cream cheese, at room temperature — used again for the frosting; room temp ensures a smooth emulsion.
- ½ cup (1 stick) salted butter, at room temperature — gives the frosting body and spreadability; salted balances sweetness.
- 1 tablespoon vanilla extract — flavor boost for the frosting.
- extra miniature chocolate chips, for garnish — for texture and a pretty finish on top and sides.
Mastering Chocolate Chip Cheesecake Cake: How-To
- Preheat oven to 325°F. Spray a 9-inch springform pan with nonstick spray and line the bottom with a round of parchment paper.
- In a large bowl, using an electric mixer on medium speed, beat the first Two 8-ounce packages cream cheese until smooth and creamy and free of lumps.
- Add ⅔ cup granulated sugar and ½ teaspoon salt to the cream cheese and beat for about 2 minutes, stopping once or twice to scrape down the sides and bottom of the bowl.
- Add the 2 large eggs one at a time, beating briefly after each addition just until incorporated.
- Add ⅓ cup sour cream, ⅓ cup heavy whipping cream, and 1 teaspoon vanilla extract. Mix until the batter is smooth and homogenous.
- Fold in ½ cup miniature chocolate chips with a spatula or spoon.
- Pour the cheesecake batter into the prepared springform pan and smooth the top. Bake at 325°F for about 45 minutes, or until the center is set and the surface is not jiggly.
- Remove the cheesecake from the oven and place it on a wire rack. Let it cool at room temperature for at least 1 hour.
- After cooling, remove the springform sides, slide a knife under the parchment, and lift the cheesecake out. Peel off the parchment, then place the cheesecake (on a plate or baking sheet) into the freezer and freeze completely (several hours or overnight).
- When ready to bake the cake layers, preheat oven to 350°F. Grease and flour two 9-inch round cake pans and line the bottoms with parchment rounds.
- In a large bowl, combine One 15.25-ounce box white cake mix, 1¼ cups water, ⅓ cup canola or vegetable oil, and 3 large egg whites. Use a hand mixer on medium speed to mix until smooth.
- Stir in 1 cup miniature chocolate chips by hand until evenly distributed.
- Divide the batter evenly between the two prepared pans, filling each pan to about 3/4 full or about 1 inch below the rim.
- Bake the cake layers at 350°F for 30–35 minutes, or until a toothpick inserted in the centers comes out clean. Begin checking at 30 minutes and then every 5 minutes until done.
- Let the cake layers cool in the pans for about 20 minutes, then turn them out onto cooling racks and cool completely.
- While cakes cool, make the frosting: In a large bowl, using an electric mixer on medium-high speed, beat the second Two 8-ounce packages cream cheese, ½ cup (1 stick) salted butter (both at room temperature), 2½ cups sifted powdered sugar, and 1 tablespoon vanilla extract until smooth and creamy. Do not overbeat.
- Place one cooled cake layer on a cake plate or platter. Spread a thin layer of frosting over the top of that layer (this will help the cheesecake adhere).
- Remove the frozen cheesecake from the freezer, remove any remaining parchment, and set it on a cutting board. If the cheesecake is larger than the cake layers, trim the outer edge of the cheesecake to match the cake diameter using a long knife (work quickly while the cheesecake is frozen).
- Place the cheesecake layer on top of the frosted bottom cake layer. Spread a thin layer of frosting over the top of the cheesecake.
- Place the second cake layer on top of the cheesecake, pressing lightly to level.
- Apply a thin, even crumb coat of frosting over the entire stacked cake. Chill the cake in the refrigerator for 15–30 minutes to set the crumb coat.
- Finish frosting the cake with the remaining frosting: start with a large scoop on top, spread evenly across the top, then down the sides with a long, thin spatula. Add more frosting as needed to cover bare spots and smooth the surface. Optionally use a piping bag for a decorative edge.
- Press extra miniature chocolate chips onto the top and sides of the cake as garnish.
- Refrigerate the assembled cake until ready to serve. Store leftovers refrigerated.
Why It Deserves a Spot
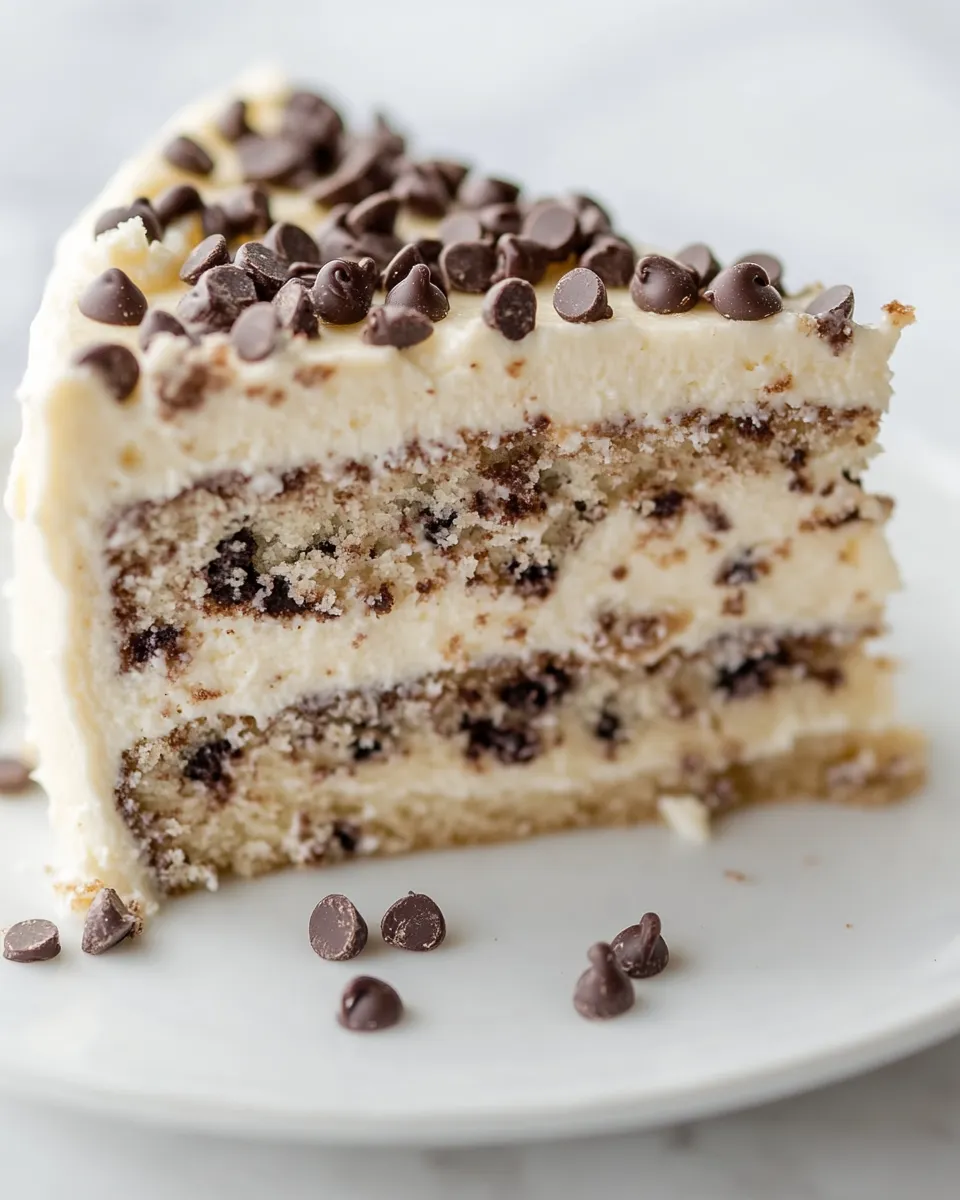
This cake combines two textures people instinctively love: dense, creamy cheesecake and airy cake crumb. The contrast keeps each bite interesting and avoids the sameness that can happen with single-component desserts. It’s also scalable — once you’ve made one, you can adapt sizes or timing for parties.
It’s a showstopper without requiring complicated technique. The key dramatic moment is the frozen cheesecake layer: it lets you trim and handle the filling cleanly and gives perfectly even slices when cut. For guests, it reads luxurious. For the baker, it’s forgiving — sloppy frosting can be chilled and adjusted, and the cake layers are resilient.
Dairy-Free/Gluten-Free Swaps
- Dairy-free cream cheese — use a high-quality plant-based cream cheese for both the cheesecake and frosting; expect a slight change in tang and texture.
- Non-dairy sour cream and heavy cream substitutes — full-fat coconut cream can replace heavy whipping cream and some vegan sour cream products mimic texture; chill well to help setting.
- Gluten-free cake mix — substitute One 15.25-ounce box white cake mix with a gluten-free white cake mix of similar weight and follow the package-equivalent liquid instructions.
- Oil swaps — use neutral avocado oil instead of canola/vegetable if preferred; no volume adjustments needed.
Hardware & Gadgets
- 9-inch springform pan — essential for removing the cheesecake layer cleanly.
- Two 9-inch round cake pans — for the cake layers; heavy-gauge pans give the most even bake.
- Electric mixer and hand mixer — an electric stand or hand mixer for the cheesecake and frosting; a hand mixer suffices for the cake batter as stated.
- Offset spatula and long thin spatula — for spreading crumb coat and finishing frosting smoothly.
- Parchment rounds — line pan bottoms for easy release.
- Wire rack and cutting board — cooling and trimming tools; the cutting board makes trimming the frozen cheesecake easier.
Troubles You Can Avoid
Most problems with this recipe are timing and temperature related. The cheesecake must be cooled then frozen solid so it trims and transfers without collapsing. The cake layers should be completely cool before stacking; warm cake will make frosting melt and slide.
- Grainy cheesecake batter — start with room-temperature cream cheese and beat thoroughly until smooth before adding sugar.
- Soggy base or weeping frosting — don’t stack while components are still warm; chill the crumb coat so the finish holds.
- Cracked cheesecake — bake at the specified lower temperature (325°F) and avoid overbaking; a slight jiggle in the center is normal before cooling.
- Difficulty trimming cheesecake — keep it fully frozen and use a long, hot knife (run under hot water and dry between cuts) to get clean edges.
Holiday-Friendly Variations
This cake adapts well to seasonal accents. For winter, press crushed peppermint candies into the frosting edge or swap the chocolate chips for mint chips. For fall, drizzle caramel over the top and scatter toasted pecans. For a birthday or celebration, tint portions of the frosting or pipe festive borders.
Keep the cheesecake filling the same for the best textural integrity; changes to the cheesecake base should be minimal. Instead, play on the exterior: flavored extracts, toppings, or a thin fruit compote between cake and cheesecake can elevate the flavor profile without risking structure.
Recipe Notes & Chef’s Commentary
Two practical notes from repeated bakes:
- Room temperature matters. Both sets of cream cheese and the butter should be soft to the touch — not warm, not melted. This prevents lumps and overmixing.
- Freeze the cheesecake fully. Don’t skip the freeze step. A frozen cheesecake trims cleaner and won’t compress into the cake layers when you assemble.
- Don’t overbeat the frosting. Overbeating can introduce too much air, making the frosting soft and harder to smooth. Beat until just combined and creamy.
- Trim quickly. Work swiftly when cutting the frozen cheesecake to match cake diameter — the frozen edge will soften if left at room temperature too long.
Refrigerate, Freeze, Reheat
Storage is straightforward. Keep the assembled cake refrigerated and covered; slices will hold well for 3–4 days. The cream cheese components make room-temperature storage risky beyond a couple of hours.
If you need to freeze the whole cake, wrap it tightly in plastic and then in foil; freeze up to 2 months. Thaw overnight in the refrigerator before serving. For individual slices, freeze on a tray until solid, then transfer to an airtight container. Thaw in the refrigerator when ready to eat.
Reheating is not necessary — this is a chilled cake best served cold or at cool room temperature. If you want softer frosting, let slices sit at room temperature for 15–20 minutes before serving; do not microwave the whole slice.
Chocolate Chip Cheesecake Cake Q&A
Q: Can I make the cheesecake and cake layers a day ahead?
A: Yes. Bake the cheesecake and freeze it as directed (overnight is ideal). Bake the cake layers and cool completely; you can wrap them and leave them at room temperature for a day or refrigerate if you prefer. Assemble on the day you plan to serve for best texture.
Q: My cheesecake had a few tiny cracks — is it ruined?
A: No. Small cracks are cosmetic and will be covered by frosting. Cracks often come from slight overbaking or rapid cooling; next time, pull it a touch earlier or cool gradually.
Q: Can I use a different cake flavor?
A: Yes — yellow or vanilla-flavored cake works. If you use chocolate cake, you’ll get a richer, denser profile; just ensure the layers are the same size for stacking.
Q: What’s the best knife for slicing this cake?
A: Use a long, sharp, non-serrated knife. For clean slices, wipe the blade between cuts. If the cheesecake is very cold, dip the knife in hot water and dry it before each slice for the smoothest cut.
The Takeaway
Chocolate Chip Cheesecake Cake is an approachable, crowd-pleasing centerpiece that rewards a little planning. Follow the sequence: bake the cheesecake, freeze it, bake the cake layers, cool, assemble, and chill. The result is a balanced dessert — creamy and elegant with straightforward steps you can repeat reliably.
Make it for a celebration or a weekend when you want to impress without a last-minute scramble. With frozen cheesecake and patient layering, you’ll get clean slices and smiles at the table.
Chocolate Chip Cheesecake Cake
Ingredients
Equipment
Method
- Preheat oven to 325°F. Spray a 9-inch springform pan with nonstick spray and line the bottom with a round of parchment paper.
- In a large bowl, using an electric mixer on medium speed, beat the first Two 8-ounce packages cream cheese until smooth and creamy and free of lumps.
- Add ⅔ cup granulated sugar and ½ teaspoon salt to the cream cheese and beat for about 2 minutes, stopping once or twice to scrape down the sides and bottom of the bowl.
- Add the 2 large eggs one at a time, beating briefly after each addition just until incorporated.
- Add ⅓ cup sour cream, ⅓ cup heavy whipping cream, and 1 teaspoon vanilla extract. Mix until the batter is smooth and homogenous.
- Fold in ½ cup miniature chocolate chips with a spatula or spoon.
- Pour the cheesecake batter into the prepared springform pan and smooth the top. Bake at 325°F for about 45 minutes, or until the center is set and the surface is not jiggly.
- Remove the cheesecake from the oven and place it on a wire rack. Let it cool at room temperature for at least 1 hour.
- After cooling, remove the springform sides, slide a knife under the parchment, and lift the cheesecake out. Peel off the parchment, then place the cheesecake (on a plate or baking sheet) into the freezer and freeze completely (several hours or overnight).
- When ready to bake the cake layers, preheat oven to 350°F. Grease and flour two 9-inch round cake pans and line the bottoms with parchment rounds.
- In a large bowl, combine One 15.25-ounce box white cake mix, 1¼ cups water, ⅓ cup canola or vegetable oil, and 3 large egg whites. Use a hand mixer on medium speed to mix until smooth.
- Stir in 1 cup miniature chocolate chips by hand until evenly distributed.
- Divide the batter evenly between the two prepared pans, filling each pan to about 3/4 full or about 1 inch below the rim.
- Bake the cake layers at 350°F for 30–35 minutes, or until a toothpick inserted in the centers comes out clean. Begin checking at 30 minutes and then every 5 minutes until done.
- Let the cake layers cool in the pans for about 20 minutes, then turn them out onto cooling racks and cool completely.
- While cakes cool, make the frosting: In a large bowl, using an electric mixer on medium-high speed, beat the second Two 8-ounce packages cream cheese, ½ cup (1 stick) salted butter (both at room temperature), 2½ cups sifted powdered sugar, and 1 tablespoon vanilla extract until smooth and creamy. Do not overbeat.
- Place one cooled cake layer on a cake plate or platter. Spread a thin layer of frosting over the top of that layer (this will help the cheesecake adhere).
- Remove the frozen cheesecake from the freezer, remove any remaining parchment, and set it on a cutting board. If the cheesecake is larger than the cake layers, trim the outer edge of the cheesecake to match the cake diameter using a long knife (work quickly while the cheesecake is frozen).
- Place the cheesecake layer on top of the frosted bottom cake layer. Spread a thin layer of frosting over the top of the cheesecake.
- Place the second cake layer on top of the cheesecake, pressing lightly to level.
- Apply a thin, even crumb coat of frosting over the entire stacked cake. Chill the cake in the refrigerator for 15–30 minutes to set the crumb coat.
- Finish frosting the cake with the remaining frosting: start with a large scoop on top, spread evenly across the top, then down the sides with a long, thin spatula. Add more frosting as needed to cover bare spots and smooth the surface. Optionally use a piping bag for a decorative edge.
- Press extra miniature chocolate chips onto the top and sides of the cake as garnish.
- Refrigerate the assembled cake until ready to serve. Store leftovers refrigerated.