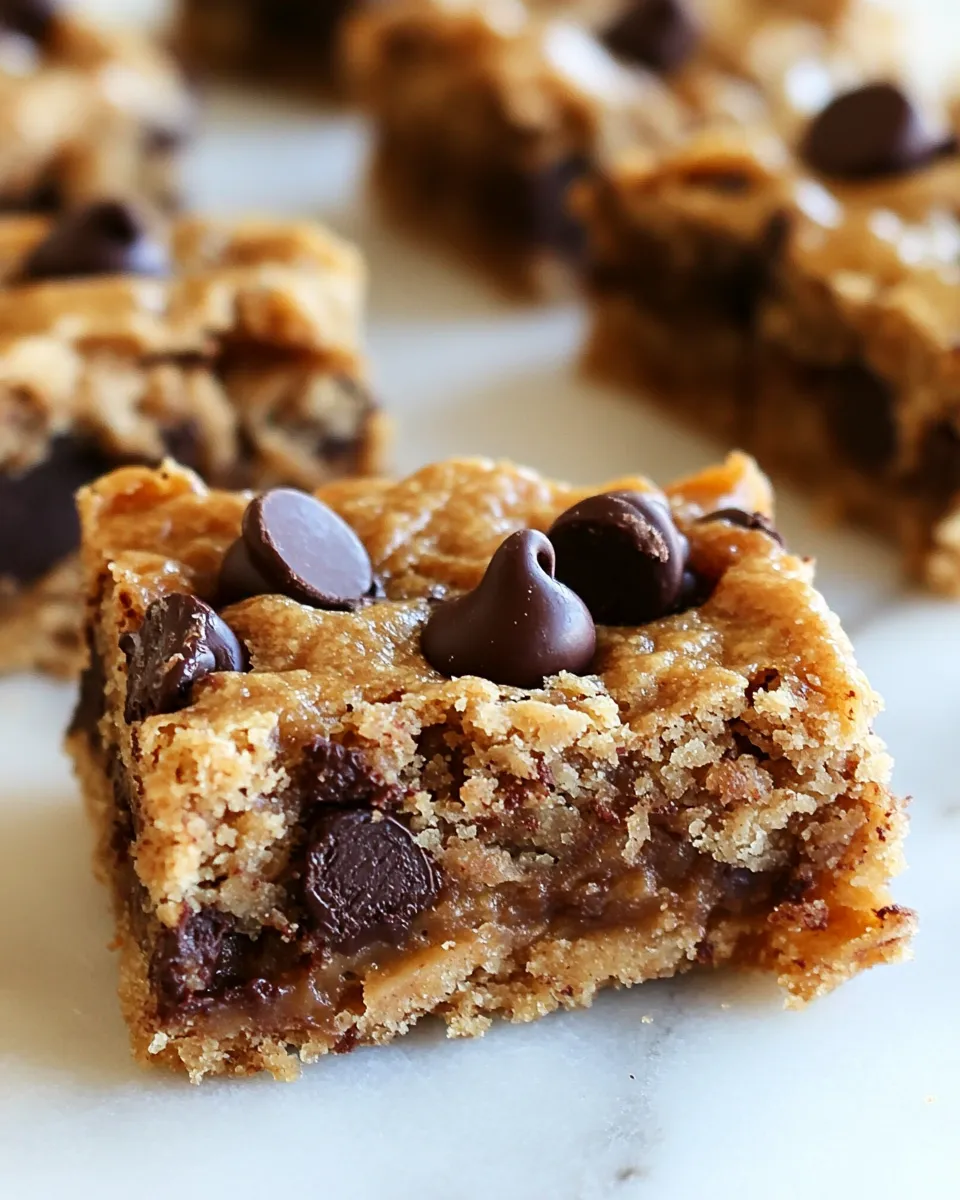
Chocolate Chip Peanut Butter Bars
These bars are the kind of recipe I reach for when I want something unfussy, nutty, and reliably satisfying. They come together with a handful of pantry staples, bake in ten minutes, and hold their shape even when the center looks a little soft right out of the oven. Expect a dense, chewy bar with a clear peanut butter profile and the option to fold in chocolate chips for pops of sweetness.
I like this recipe because it’s practical: little chopping, no mixing bowl drama, and flexible enough for allergy swaps and alternative flours. It’s forgiving in texture—if the dough starts crumbly, a tablespoon of milk tames it. If you prefer a chewier result, press more chocolate chips into the top before baking.
Below you’ll find a compact ingredient list with notes on purpose and substitution options, step-by-step instructions that follow the tested method, and tips for troubleshooting, storing, and making small seasonal tweaks. Read through once, gather your ingredients, and the whole process will feel calm and manageable.
What Goes In
Short, focused ingredients that do heavy lifting. These bars lean on peanut butter for structure and flavor, a little applesauce or yogurt to bind and add moisture, and a small amount of flour and sugar to create stability and sweetness. Chocolate chips are optional but highly recommended if you like a contrast of texture and sweetness.
Ingredients
- 1/4 cup applesauce, or yogurt such as coconut-milk yogurt — adds moisture and helps bind without extra oil; coconut-milk yogurt is a good dairy-free option.
- 1 cup peanut butter OR allergy-friendly alternative – nut-free recipe here — the main structure and flavor; if yours is stiff, warm gently until stirrable.
- 1 tsp pure vanilla extract — lifts and rounds the peanut butter flavor.
- 1 1/2 tsp baking soda — a small amount to give a bit of lift and prevent a dense brick.
- 1/8 tsp salt — balances the sweetness and enhances peanut flavor.
- 1/4 cup plus 2 tbsp flour – you can use spelt, white, sorghum, oat, almond, even or buckwheat (50 g) — binds the batter; choose one that suits your diet.
- 2/3 cup granulated sugar of choice or xylitol — sweetens and changes texture slightly depending on the sweetener chosen.
- 1/4 cup chocolate chips, optional — folded in or pressed on top for melty pockets of chocolate.
- up to 2 tbsp milk of choice, only if needed — used sparingly to bring a crumbly mix together into a cohesive dough; do not exceed 2 tbsp.
Chocolate Chip Peanut Butter Bars, Made Easy
- Preheat the oven to 350°F. Grease an 8-inch pan or line it with parchment paper, leaving an overhang to lift the bars out later if desired.
- If the 1 cup peanut butter (or allergy-friendly alternative) is stiff, warm it gently until stirrable. Place the peanut butter in a medium bowl.
- Add 1/4 cup applesauce (or yogurt such as coconut-milk yogurt) and 1 tsp pure vanilla extract to the peanut butter and stir until smooth and combined.
- In a separate bowl, combine 1 1/2 tsp baking soda, 1/8 tsp salt, 1/4 cup plus 2 tbsp flour (50 g), and 2/3 cup granulated sugar (or xylitol). Stir in 1/4 cup chocolate chips, if using.
- Pour the dry ingredients into the wet ingredients and stir to combine. The mixture will be dry at first—work to break up pockets of peanut butter and scrape the bowl as needed so everything incorporates.
- If the mixture remains crumbly, slowly add up to 2 tbsp milk of choice, a little at a time, just until the batter comes together into a stiff, cohesive dough. Do not add more than 2 tbsp.
- Transfer the batter to the prepared pan and press it down evenly to form a flat layer. If you like, place a second sheet of parchment on top and press to smooth, then remove the top parchment. Press extra chocolate chips into the top if desired.
- Bake for 10 minutes. The top should look set even if the interior seems undercooked—that is expected.
- Remove the pan from the oven and let the bars cool in the pan on a wire rack for at least 20 minutes, until firm enough to cut. They will firm up further as they cool (and even more overnight).
- Lift the bars from the pan using the parchment overhang (if used) and cut into pieces.
Why It Deserves a Spot
These bars are a reliable go-to because they combine speed, minimal cleanup, and dependable flavor. Ten minutes in the oven is short enough for weeknight baking and long enough for the top to set so you can slice clean bars. The peanut butter gives a satisfying chew and richness without needing eggs or extra butter, and the recipe tolerates several flour options so you can adapt to what you have on hand.
They’re also forgiving in texture. The directions explicitly allow for a bit of underdone-looking center right out of the oven; that center firms up as the bars cool and overnight if you leave them wrapped. That forgiving nature makes the recipe good for busy cooks and for baking with kids.
Quick Replacement Ideas
- Applesauce swap: use 1/4 cup coconut-milk yogurt instead of applesauce for extra tang and creaminess.
- Peanut butter alternatives: use an allergy-friendly nut-free butter if needed; the recipe accommodates that swap without other changes.
- Flour options: use spelt, white, sorghum, oat, almond, or buckwheat flour—50 g total (1/4 cup plus 2 tbsp).
- Sweetener: replace the 2/3 cup granulated sugar with xylitol if you prefer a sugar substitute.
- Chocolate chips: the 1/4 cup is optional—fold them in or press them on top as you like.
Essential Tools for Success
- 8-inch baking pan — the recipe is scaled for this size; lining it with parchment that overhangs makes removal easy.
- Measuring cups and spoons — accuracy with the flour and sugar gives consistent texture.
- Two mixing bowls — one for the wet peanut butter mixture and one for the dry ingredients.
- Spatula or sturdy spoon — for scraping and pressing the batter evenly into the pan.
- Oven thermometer (optional but helpful) — to ensure the oven sits at 350°F for accurate bake time.
- Wire rack — for cooling the pan so the bars set properly.
Troubleshooting Tips
Mixture is crumbly after combining
Add milk of choice, up to 2 tbsp, a teaspoon at a time. The recipe is explicit about this limit—use just what’s needed to bring the dough together into a stiff, cohesive mass. Overwatering will make the batter loose and change the texture.
Top looks set but interior seems undercooked
This is expected. The bars bake quickly and the interior continues to firm as they cool. Let them rest in the pan on a wire rack for at least 20 minutes; they’ll firm up more overnight. Cutting too soon can cause crumbling.
Bars too dense or gummy
Measure the flour carefully and avoid packing it. If you used a heavier flour like almond or oat, expect a slightly different texture—those flours can make the crumb more tender. You can try a lighter white or spelt flour next time for a more classic chew.
Too sweet or not sweet enough
The recipe allows 2/3 cup granulated sugar or xylitol. If you prefer less sweetness, reduce slightly next bake; if you want contrast, fold in the optional 1/4 cup chocolate chips or press extra on top to create melty pockets.
Holiday & Seasonal Touches
Keep things simple and within the recipe’s swaps: press extra chocolate chips into the top before baking for a slightly glossier finish that looks inviting for a cookie tray. Use coconut-milk yogurt in place of applesauce for a creamier, slightly tropical flavor that pairs well with warmer months. If you’re baking for someone with nut allergies, use the allergy-friendly alternative for the peanut butter and stick with the flour options listed—sorghum or oat can give a wholesome seasonal feel.
Because the bars are small and sturdy, they also work well on dessert platters or packed into boxes for gifting. The texture will hold up, and the list of allowed swaps above gives you ways to tailor them to dietary needs or seasonal produce you already enjoy.
Behind-the-Scenes Notes
I baked a batch trying different flours to test texture. White and spelt flours produced the most familiar peanut-butter-bar chew; oat and almond flour made a slightly softer, more tender bite. Buckwheat brought earthiness that paired nicely with dark chocolate chips. The overall structure depends on the combination of peanut butter, just enough flour, and a minimal lift from baking soda.
Another detail: if your peanut butter separates or is very oily, stir it well before measuring. If it’s stiff from refrigeration, warming it gently (a few seconds in the microwave or sitting in a warm spot) makes it easier to blend with the applesauce and vanilla. Scrape the bowl often when combining; the recipe asks you to break up pockets of peanut butter so everything incorporates evenly.
Save It for Later
Store bars in an airtight container at room temperature for a day or two, or refrigerate if your kitchen is warm. They will firm up further in the fridge. For longer storage, wrap bars individually and freeze—thaw at room temperature before serving. If you do refrigerate or freeze, note that the texture will become firmer, so allow time to come back to room temperature if you prefer a softer bite.
Top Questions & Answers
- Can I make Chocolate Chip Peanut Butter Bars without chocolate? Yes. The 1/4 cup chocolate chips is optional—leave them out for a straightforward peanut butter bar.
- My dough was crumbly. Did I do something wrong? Not necessarily. The recipe anticipates that and allows up to 2 tbsp milk of choice, added slowly, to bring the dough together. Add only what’s needed for a stiff, cohesive dough.
- What’s the best flour to use? All the listed options work: spelt or white give a familiar texture, while sorghum, oat, almond, and buckwheat change the crumb slightly. Use what fits your diet and taste preference; you may see small texture differences.
- Do the bars need to be refrigerated? No, not immediately. If your kitchen is cool, room temperature storage is fine for a day or two. Refrigerate if you prefer a firmer bar or if your kitchen is warm.
- Can I make these nut-free? Yes. Use an allergy-friendly alternative in place of the peanut butter as indicated in the ingredients list.
Wrap-Up
Chocolate Chip Peanut Butter Bars are a compact, flexible treat that works for snack time, lunchbox additions, or a last-minute sweet for company. They excel because they’re simple, tolerant of a few substitutions, and forgiving about the look of the center right out of the oven. Follow the directions, respect the small limits (like the 2 tbsp milk max), and you’ll end up with a tidy tray of bars that hold up, slice well, and taste comforting in that unmistakable peanut-butter way.
Chocolate Chip Peanut Butter Bars
Ingredients
Equipment
Method
- Preheat the oven to 350°F. Grease an 8-inch pan or line it with parchment paper, leaving an overhang to lift the bars out later if desired.
- If the 1 cup peanut butter (or allergy-friendly alternative) is stiff, warm it gently until stirrable. Place the peanut butter in a medium bowl.
- Add 1/4 cup applesauce (or yogurt such as coconut-milk yogurt) and 1 tsp pure vanilla extract to the peanut butter and stir until smooth and combined.
- In a separate bowl, combine 1 1/2 tsp baking soda, 1/8 tsp salt, 1/4 cup plus 2 tbsp flour (50 g), and 2/3 cup granulated sugar (or xylitol). Stir in 1/4 cup chocolate chips, if using.
- Pour the dry ingredients into the wet ingredients and stir to combine. The mixture will be dry at first—work to break up pockets of peanut butter and scrape the bowl as needed so everything incorporates.
- If the mixture remains crumbly, slowly add up to 2 tbsp milk of choice, a little at a time, just until the batter comes together into a stiff, cohesive dough. Do not add more than 2 tbsp.
- Transfer the batter to the prepared pan and press it down evenly to form a flat layer. If you like, place a second sheet of parchment on top and press to smooth, then remove the top parchment. Press extra chocolate chips into the top if desired.
- Bake for 10 minutes. The top should look set even if the interior seems undercooked—that is expected.
- Remove the pan from the oven and let the bars cool in the pan on a wire rack for at least 20 minutes, until firm enough to cut. They will firm up further as they cool (and even more overnight).
- Lift the bars from the pan using the parchment overhang (if used) and cut into pieces.
Notes
Leftover chocolate chips? Make these
Healthy Chocolate Chip Cookies
!
If you’re a visual person, be sure to watch the recipe video above, to see the bars being made.