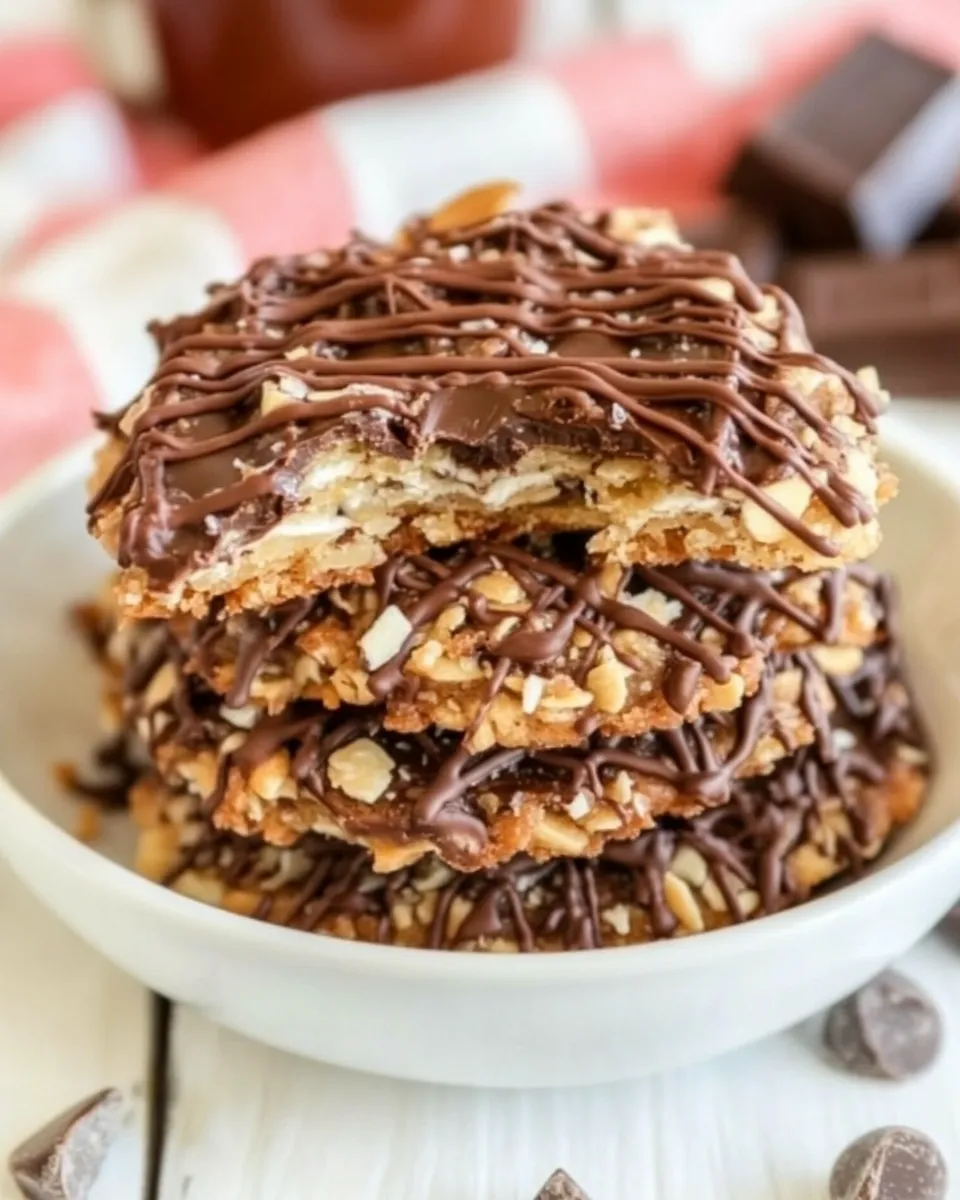
Chocolate Florentine Cookies
These Chocolate Florentine Cookies are a small showstopper: thin, lacy oat cookies sandwiched with a glossy milk chocolate filling. They come together fast and travel well, which makes them a favorite for holiday trays, coffee breaks, and last-minute dessert needs. Texturally they balance crisp, caramelized oats with that quick chocolate ooze that firms into a tidy sandwich.
I test-run these often and I can tell you the technique matters more than fancy ingredients. Small details — the butter temperature, the spacing on the pan, and working quickly when the chocolate is melted — make the difference between bakery-worthy cookies and a sticky, sad tray. The recipe below is straightforward and forgiving, and I include my practical swaps and troubleshooting so you can get the best result every time.
Read through once, gather your mise en place, and plan to move a little faster when the chocolate is fluid. These cookies reward attention: crisp edges, golden brown color, and clean chocolate sandwiches that look as good as they taste.
What You’ll Gather

Ingredients
- 11 tablespoons salted butter, melted — melts the oats and binds the mixture; salted adds a little depth.
- 2 cups quick-cooking oats — the body of the cookie; quick oats give the thin, lacy texture.
- 1 cup granulated sugar — caramelizes during baking to crisp the cookies.
- 2/3 cup all-purpose flour — helps hold the thin rounds together.
- 1/4 cup light corn syrup — keeps the cookies glossy and flexible while baking.
- 1/4 cup whole milk — hydrates the dry ingredients for even spreading.
- 1 teaspoon vanilla extract — simple flavor lift; don’t skip it.
- 1/4 teaspoon salt — balances the sweetness and heightens flavor.
- 1 3/4 cups (1 bag) milk chocolate chips — melts to make the filling; milk chocolate gives a creamy, familiar taste.
Make Chocolate Florentine Cookies: A Simple Method
- Preheat oven to 375°F (190°C). Line two or more baking sheets with foil.
- Melt 11 tablespoons salted butter in a medium saucepan over low heat. Remove the saucepan from the heat as soon as the butter is fully melted.
- Stir the following into the melted butter until evenly combined: 2 cups quick-cooking oats, 1 cup granulated sugar, 2/3 cup all-purpose flour, 1/4 cup light corn syrup, 1/4 cup whole milk, 1 teaspoon vanilla extract, and 1/4 teaspoon salt.
- Use a teaspoon to portion the batter onto the prepared baking sheets, spacing each mound about 3 inches apart.
- Use a rubber spatula (or the back of a spoon) to flatten each mound slightly into a thin round.
- Bake in the preheated oven 6 to 8 minutes, or until the cookies are golden brown.
- Remove the baking sheets from the oven and place them on wire racks. Let the cookies sit on the foil-lined sheets until they are mostly set but still slightly warm (this makes them easier to peel). Carefully peel the foil away from the bottoms of the cookies.
- Place 1 3/4 cups (1 bag) milk chocolate chips in a medium microwave-safe bowl. Microwave in 20-second intervals, stirring well between each interval, until the chocolate is completely melted and smooth.
- Work quickly while the chocolate is fluid: spread a layer of melted chocolate on the flat side of half the cookies, then top each with one of the remaining cookies (flat side down) to form sandwiches. Press gently so the chocolate spreads to the edges.
- Let the assembled cookies sit at room temperature until the chocolate firms.
Why This Chocolate Florentine Cookies Stands Out

These cookies look delicate but are surprisingly robust. The quick-cooking oats crisp without getting chewy, producing the thin, lace-like structure that Florentines are known for. The light corn syrup and melted butter combine to create that characteristic spread and gloss, while the milk chocolate gives a soft, familiar finish that people of all ages enjoy.
They’re also efficient: no chilling, no complicated tempering, and assembly is quick. Because the cookies are thin, they bake fast, so you can produce a batch in under half an hour once your sheets are prepped. The final sandwich format hides minor imperfections and makes them easy to stack for gifts or transport.
Ingredient Swaps & Substitutions

- Butter — If you only have unsalted butter, use it but add an extra 1/4 teaspoon salt to the batter.
- Quick-cooking oats — If you must, pulse regular rolled oats briefly in a food processor to approximate quick oats; do it in short bursts so they don’t turn into flour.
- Light corn syrup — Honey or golden syrup can substitute in a pinch, but expect a slightly different flavor and a less shiny finish.
- Whole milk — Any dairy milk will work; use the fattiest milk you can for richness. Plant milks are possible but may change texture slightly.
- Milk chocolate chips — Semi-sweet or dark chocolate will give a less sweet, deeper-flavored sandwich if you prefer.
Equipment at a Glance
- Medium saucepan — to melt butter and combine the wet base.
- Baking sheets — lined with foil for easy peeling and cleanup.
- Wire racks — to cool the sheets and speed setting.
- Teaspoon — for portioning uniform cookies.
- Rubber spatula or spoon — to flatten the mounds evenly.
- Microwave-safe bowl — for melting chocolate quickly and safely.
- Measuring cups and spoons — accurate quantities matter here.
Mistakes That Ruin Chocolate Florentine Cookies
- Overbaking — Even a minute too long will turn a lacy Florentine brittle and dark. Remove when the edges and tops are golden, not brown.
- Underspacing on the sheet — These spread a lot. Placing mounds too close results in one big, uneven cookie.
- Peeling too soon — If you try to remove them while hot and floppy, they tear. Let them set until mostly firm but still warm.
- Melting chocolate too hot — Overheated chocolate can seize or scorch. Warm in short intervals and stir often.
- Working slowly during assembly — The chocolate sets. If you drag your feet, it won’t spread smoothly and sandwiches will be awkward.
Smart Substitutions
- Salt control — If you prefer less salt, use unsalted butter and reduce the 1/4 teaspoon salt to a pinch, or omit if using salted butter.
- Sweeter or darker chocolate — Swap milk chocolate for semi-sweet to reduce sweetness. Use high-quality chips for a smoother melt.
- Gluten-free option — Use a 1:1 gluten-free baking flour in place of the all-purpose flour. Results may vary slightly in spread and texture.
- Non-dairy version — Use a reliable non-dairy butter and a non-dairy chocolate that melts well. Keep the rest of the method the same.
Author’s Commentary
I make these when I want something that feels a little indulgent but doesn’t take over my kitchen for hours. The recipe is forgiving, but it rewards the small attentions: using a clean, warm sheet to set the cookies, peeling gently, and resisting the urge to overbake. I love them because they travel beautifully and look elegant on a simple plate.
My tip? Toast one test cookie from a first batch if you’re unsure about timing. Ovens vary, and this gives you a benchmark. Also, keep the chocolate warm and fluid while you assemble; a slightly runny chocolate gives the smoothest edges once it firms.
Prep Ahead & Store
You can prepare the baked cookies ahead and store them unfilled in an airtight container for up to two days. Assemble with melted chocolate the same day you plan to serve for the cleanest finish. Fully assembled cookies keep at room temperature for 2 to 3 days away from direct heat. If your environment is warm, store them in a cool spot, not the refrigerator — chilling can make the chocolate bloom and dull the sheen.
For longer storage, freeze the unfilled cookies in a single layer until firm, then stack with parchment between layers in a freezer-safe container for up to a month. Thaw completely before filling and assembling. You can also freeze the assembled sandwiches, wrapped well, but the texture is best fresh.
Handy Q&A
Q: Can I bake these on parchment instead of foil?
A: You can, but foil is easier to peel away cleanly from the thin cookie bottoms. If you use parchment, monitor peel time — parchment can adhere if the cookies are very warm.
Q: My chocolate seized. Can I fix it?
A: If the chocolate becomes grainy from overheating, try stirring in a small amount (1/2 teaspoon at a time) of neutral oil or a tiny bit of vegetable shortening while it’s warm to smooth it. If it’s fully seized and dry, it’s safer to start with a new batch.
Q: Why are my cookies too soft?
A: They likely needed a minute or two more in the oven, or they weren’t set enough before peeling. Bake until golden and allow them to cool on the foil until mostly set.
Q: Can I temper chocolate for a shiny finish?
A: Tempering isn’t necessary for these — the chocolate firms to a pleasant finish at room temperature and looks glossy if melted carefully. Tempering will extend the sheen and snap if you want professional polish.
Ready, Set, Cook
These Chocolate Florentine Cookies are a dependable, elegant cookie to keep in your repertoire. They teach you to control heat and timing, and reward careful handling with crisp, pretty sandwiches. Gather your ingredients, preheat your oven, and set up a quick assembly line for the chocolate. Work swiftly when the chocolate is warm, and you’ll have a stack of cookies that look like they belong in a bakery but were made in your kitchen.
Enjoy the process—and the cookies. If you try any of the swaps or tweaks, note what you liked; small refinements make this recipe truly your own.
Chocolate Florentine Cookies
Ingredients
Equipment
Method
- Preheat oven to 375°F (190°C). Line two or more baking sheets with foil.
- Melt 11 tablespoons salted butter in a medium saucepan over low heat. Remove the saucepan from the heat as soon as the butter is fully melted.
- Stir the following into the melted butter until evenly combined: 2 cups quick-cooking oats, 1 cup granulated sugar, 2/3 cup all-purpose flour, 1/4 cup light corn syrup, 1/4 cup whole milk, 1 teaspoon vanilla extract, and 1/4 teaspoon salt.
- Use a teaspoon to portion the batter onto the prepared baking sheets, spacing each mound about 3 inches apart.
- Use a rubber spatula (or the back of a spoon) to flatten each mound slightly into a thin round.
- Bake in the preheated oven 6 to 8 minutes, or until the cookies are golden brown.
- Remove the baking sheets from the oven and place them on wire racks. Let the cookies sit on the foil-lined sheets until they are mostly set but still slightly warm (this makes them easier to peel). Carefully peel the foil away from the bottoms of the cookies.
- Place 1 3/4 cups (1 bag) milk chocolate chips in a medium microwave-safe bowl. Microwave in 20-second intervals, stirring well between each interval, until the chocolate is completely melted and smooth.
- Work quickly while the chocolate is fluid: spread a layer of melted chocolate on the flat side of half the cookies, then top each with one of the remaining cookies (flat side down) to form sandwiches. Press gently so the chocolate spreads to the edges.
- Let the assembled cookies sit at room temperature until the chocolate firms.
Notes
Makes about 3 dozen cookies.
Cookies will keep for 3 to 4 days at room temperature. Store them in an airtight container or ziptop bags.