Chocolate Layered Zebra Mousse Cake.
This cake is one of those recipes I make when I want to impress without spending all day in the kitchen. It combines a striped zebra crumb with a cloudlike chocolate mousse, then finishes with a simple whipped cream coat. The result looks intricate but the technique is straightforward: two batters, a careful spooning method, and patience while things cool.
I like to think of it as a showstopper that’s forgiving. The zebra pattern happens one spoonful at a time; you don’t need piping skills. The mousse is stabilized naturally by chilled tools and careful whipping, not chemical stabilizers. If you follow the steps in order, the cake comes together cleanly and reliably.
Below you’ll find a shopping list, the ingredient breakdown with quick tips, the exact step-by-step directions, and practical notes on equipment, common mistakes, and storage. Read the directions once through before you begin so that you know when to chill, when to bake, and when to assemble.
Shopping List
- Dry goods: all-purpose flour, baking powder, kosher salt, granulated sugar, unsweetened cocoa powder.
- Dairy: buttermilk, plain Greek yogurt, heavy whipping cream.
- Pantry liquids: canola oil, vanilla extract, black coffee (brewed or strong instant).
- Eggs and a sweetener option: eggs plus honey or powdered sugar for the mousse.
- Basic tools: two 8-inch round cake pans, mixing bowls, stand or hand mixer, whisk, spatula, serrated knife.
Ingredients
- 4 cups all-purpose flour — the structure for the cake layers; measure and level for accuracy.
- 1 tablespoon baking powder — the leavening that lifts the batter.
- 2 teaspoons kosher salt — balances sweetness and strengthens flavor.
- 2 cups buttermilk — adds acidity and tang; keeps the crumb tender.
- 1/4 cup plain Greek yogurt — adds moisture and a little richness.
- 1 cup canola oil — keeps the cake moist and gives a soft crumb.
- 4 eggs — bind and give structure; use room-temperature if possible.
- 2 cups granulated sugar — primary sweetener for the cake batter.
- 1 tablespoon vanilla extract — flavor foundation for the batter.
- 1/2 cup unsweetened cocoa powder — for the chocolate portion of the cake batter.
- 1/4 cup black coffee — deepens chocolate flavor in the batter; cool or warm as directed.
- 4 cups heavy whipping cream — total cream used; split between mousse and outer whipped cream.
- 1/2 cup unsweetened cocoa powder — for the chocolate mousse (separate from batter cocoa).
- 1/3–1/2 cup honey or powdered sugar — sweetener choice for the mousse; choose one.
- 2 teaspoons vanilla extract — added to the mousse for depth.
- pinch of sea salt — enhances chocolate in the mousse.
Directions: Chocolate Layered Zebra Mousse Cake
- Preheat oven to 350°F (175°C). Grease two 8-inch round cake pans (and optionally line the bottoms with parchment rounds).
- In a large bowl whisk together 4 cups all-purpose flour, 1 tablespoon baking powder, and 2 teaspoons kosher salt until evenly combined.
- In the bowl of a stand mixer fitted with the paddle (or in a large bowl with a hand mixer) combine 2 cups buttermilk, 1/4 cup plain Greek yogurt, 1 cup canola oil, 4 eggs, 2 cups granulated sugar, and 1 tablespoon vanilla extract. Beat on medium speed until smooth and combined.
- With the mixer on low, add the dry ingredients to the wet ingredients in two or three additions, mixing only until no dry streaks remain and the batter is pourable but not very thin.
- Divide the batter into two equal portions in separate bowls. To one portion, add 1/2 cup unsweetened cocoa powder and 1/4 cup black coffee; beat gently until fully combined and smooth. Leave the other portion plain (vanilla).
- Assemble the zebra pattern: Working over both prepared pans, spoon about 1/4 cup of the plain batter into the center of one pan, then spoon about 1/4 cup of the chocolate batter directly on top of the vanilla in the same spot. Repeat (vanilla then chocolate) alternating spoonfuls into the center until both pans are filled. You can alternate between pans as you go so they fill evenly. Tap the pans gently on the counter occasionally to help the batter spread; don’t overwork it.
- Bake the pans on the middle rack for 35–40 minutes, or until a toothpick inserted in the center comes out clean. Remove from oven, let cool in the pans for 5 minutes, then invert onto a wire rack and cool completely.
- Make the chocolate mousse (prepare while cakes cool). Chill the mixing bowl and whisk attachment if possible. Pour 3 cups heavy whipping cream into the bowl and whip to soft-to-medium peaks. Add the remaining 1/2 cup unsweetened cocoa powder (for the mousse), 1/3–1/2 cup honey or powdered sugar (choose one), 2 teaspoons vanilla extract, and a pinch of sea salt. Continue whipping until the mixture is smooth, holds shape, and is spreadable but not grainy. Cover and refrigerate until ready to assemble.
- When cakes are completely cool, use a serrated knife to slice each cake layer in half horizontally so you have four even layers total.
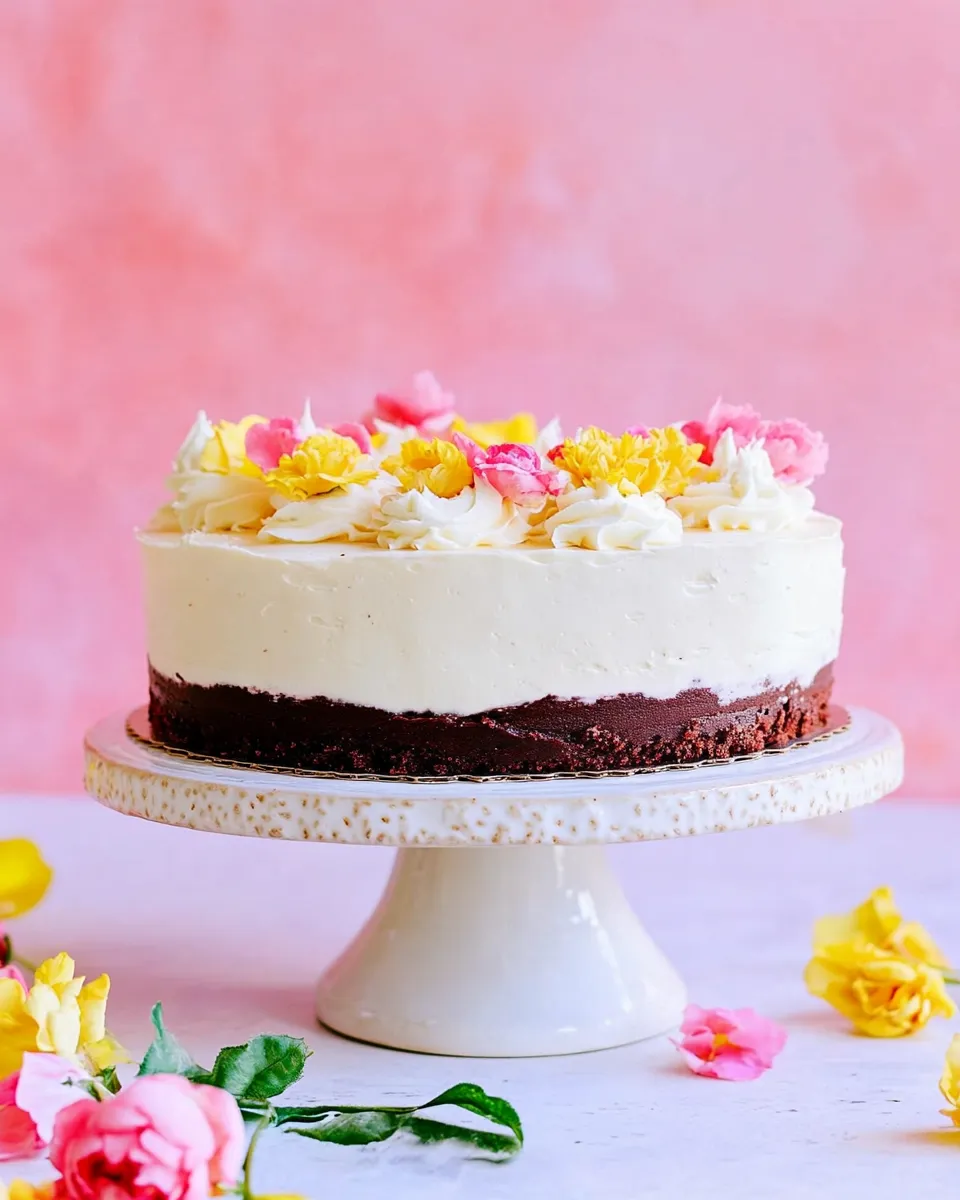
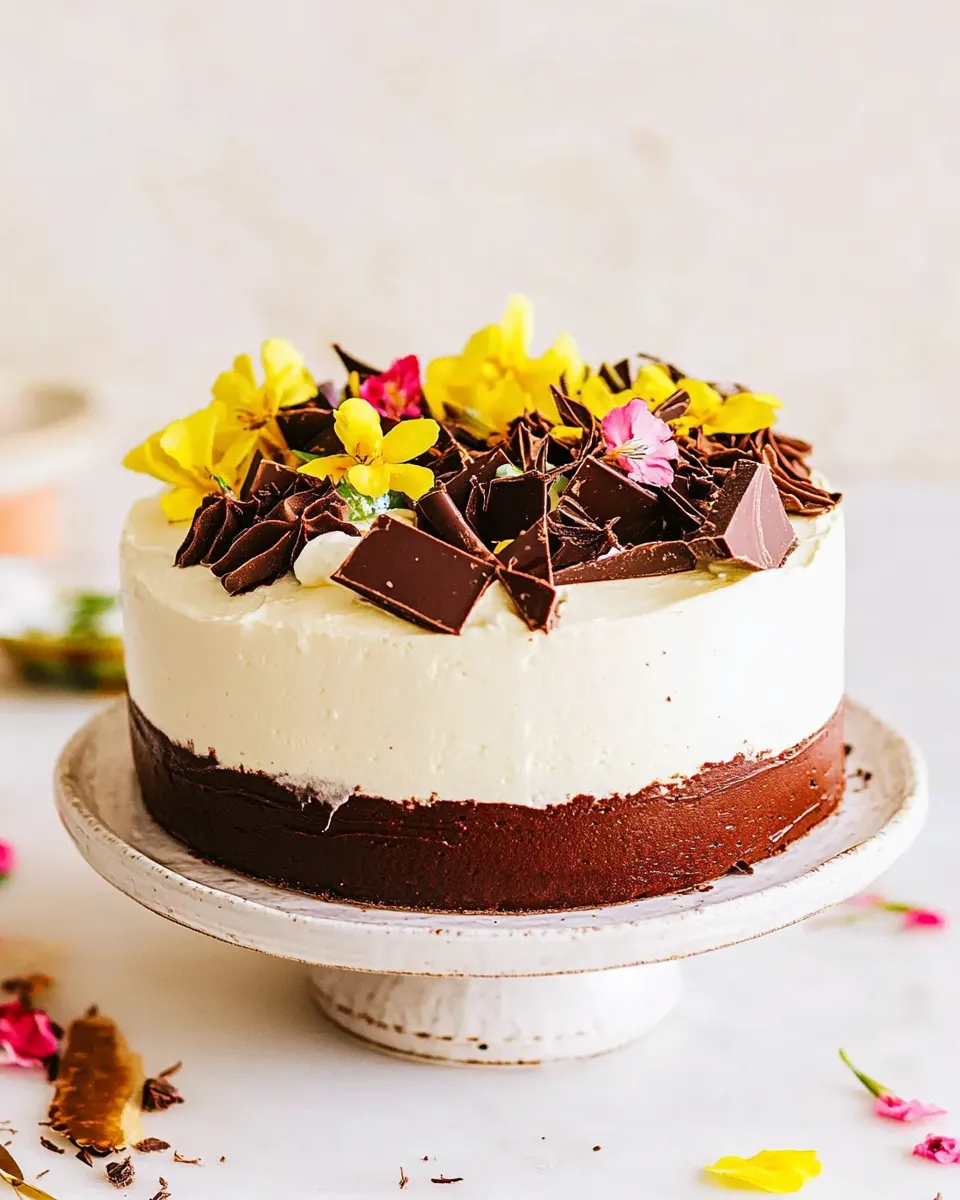
- Assemble the cake: Place one cake layer on your cake stand or serving plate. Spread an even layer of chocolate mousse over the layer. Repeat with the next two cake layers and mousse, finishing with the top cake layer.
- Whip the remaining 1 cup heavy whipping cream in a clean, chilled bowl to stiff peaks. Spread this whipped cream around the outside and over the top of the assembled cake to cover and smooth as desired.
- Refrigerate the finished cake at least 30 minutes to allow the mousse and whipped cream to set. Keep the cake stored in the refrigerator and serve within 1 day.
Why You’ll Keep Making It
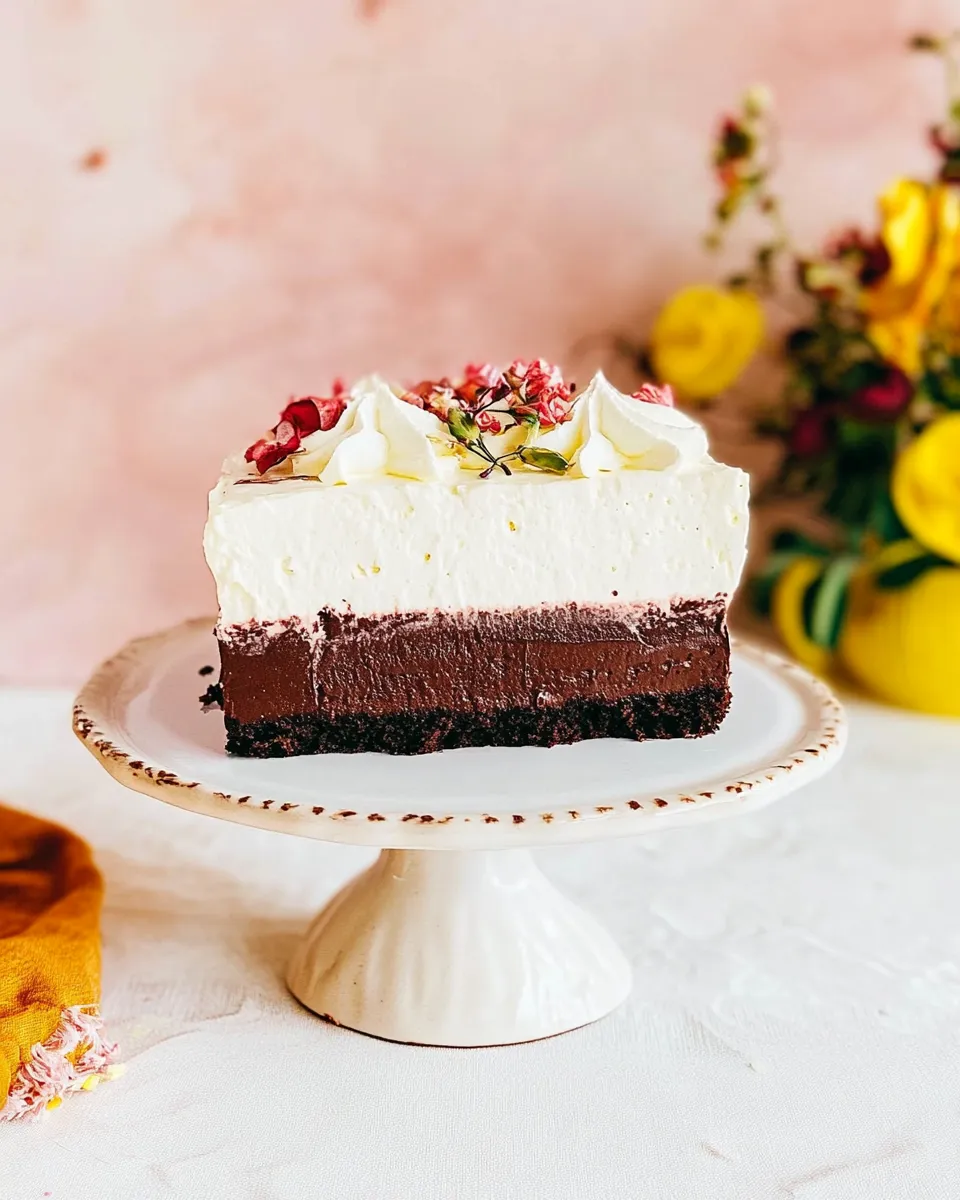
The zebra pattern is an easy visual trick with big payoff. Guests ask how you did it, and the answer — spoon and repeat — is refreshingly simple. The mousse layer keeps the cake light; it doesn’t feel dense or overly sweet, so slices are generous but not cloying.
It’s also flexible enough for different occasions. The components are straightforward enough to prepare in stages: bake the layers first, make the mousse while they cool, and assemble later. That makes the whole process less frantic and more enjoyable.
If You’re Out Of…
This recipe intentionally gives you one explicit option for the mousse sweetener: 1/3–1/2 cup honey or powdered sugar. If you run out of one, use the other listed option. For any other ingredient the recipe lists, there is no alternate ingredient supplied in the recipe—so plan to follow the ingredient list or pause and source what’s missing before you start.
Tools & Equipment Needed
- Two 8-inch round cake pans (greased and optionally parchment-lined).
- Stand mixer with paddle and whisk attachments, or a hand mixer and bowls.
- Mixing bowls for batter separation and for whipping cream.
- Measuring cups and spoons, rubber spatula, whisk, and a serrated knife for slicing layers.
- Wire rack for cooling, cake stand or serving plate for assembly.
Mistakes That Ruin Chocolate Layered Zebra Mousse Cake
- Overmixing the batter once the dry ingredients are added — this tightens gluten and makes the cake dense. Mix only until no dry streaks remain.
- Making the batter too thin by overworking it or adding extra liquid — the zebra pattern needs a batter that’s pourable but holds some body.
- Not chilling the mixing bowl and whisk before whipping the mousse — warm tools make it hard to reach stable peaks.
- Whipping the mousse until grainy or overwhipping the whipped cream — stop when the mousse holds shape and is smooth; stop the whipped cream at stiff peaks.
- Slicing the layers before the cake is completely cool — warm cake will compress and tear when you try to split it.
- Skipping the 30-minute chill after assembly — the mousse needs that time to set for clean slices.
Make It Fit Your Plan
Break the work into three blocks: bake, mousse, assemble. Bake the layers first and cool completely. While they cool, whip the mousse and refrigerate it. Assemble when everything is room-cool and chilled. This sequencing keeps the kitchen organized and lets you step away between stages.
If you want to shorten active time, enlist help for the zebra spooning step or prepare the cake layers the day before and keep them wrapped, then make mousse and assemble on the serving day. The recipe’s refrigeration requirement means it’s well suited to partial prep.
Little Things that Matter
Measure flour by spooning it into the cup and leveling rather than scooping directly. That prevents packing and keeps the crumb light. Tap the pans gently after spooning batter, but don’t shake or swirl aggressively; violent motion disturbs the zebra rings.
Chill the bowl and whisk for the mousse if you can — even 10–15 minutes in the fridge helps. Use a serrated knife and a light sawing motion to split layers horizontally for minimal crumbs. When spreading mousse, a thin initial layer helps trap crumbs, then you can add a thicker layer.
Storing, Freezing & Reheating
Store the finished cake covered in the refrigerator and serve within 1 day, as the recipe directs. The mousse and whipped cream are fresh-cream based; they keep best chilled and fresh rather than stored long-term.
Freezing a fully assembled cake with fresh whipped cream and mousse is not recommended if you want the same texture. If you must freeze, consider freezing baked layers separately (unfrosted, well-wrapped) and then thawing and assembling with freshly made mousse and whipped cream.
Your Questions, Answered
How do I get a clean zebra pattern?
Spoon equal spoonfuls, alternating vanilla then chocolate into the center so each ring sits on the last. Work steadily and don’t overmix or swirl the batter once it’s in the pan. Fill both pans evenly so they bake at the same rate.
How do I know the mousse is done?
It should be smooth, hold shape, and not appear grainy. When you lift the whisk, the mousse should form peaks that soften slightly. Stop whipping as soon as it’s spreadable and stable.
Can I reduce the sugar?
The mousse sweetener is given as a choice between honey or powdered sugar. The cake’s sugar amount is part of the structure and texture; if you reduce it, expect changes in crumb and browning. The recipe as written balances sweetness with the chocolate components.
Make It Tonight
If you want this on the table tonight: preheat the oven, mix batter, and start the zebra layers first. While they bake and cool, chill your whisk and bowl and make the mousse. Slice, assemble, and give it the minimum 30-minute chill. The steps are sequential and efficient, and the finished cake feels like a small miracle for the effort.
Try it once exactly as written so you learn how the batters behave and how the mousse sets. After that, you’ll know where you can speed up or adjust to match your schedule. Enjoy the process—and the cake.

Chocolate Layered Zebra Mousse Cake.
Ingredients
Equipment
Method
- Preheat oven to 350°F (175°C). Grease two 8-inch round cake pans (and optionally line the bottoms with parchment rounds).
- In a large bowl whisk together 4 cups all-purpose flour, 1 tablespoon baking powder, and 2 teaspoons kosher salt until evenly combined.
- In the bowl of a stand mixer fitted with the paddle (or in a large bowl with a hand mixer) combine 2 cups buttermilk, 1/4 cup plain Greek yogurt, 1 cup canola oil, 4 eggs, 2 cups granulated sugar, and 1 tablespoon vanilla extract. Beat on medium speed until smooth and combined.
- With the mixer on low, add the dry ingredients to the wet ingredients in two or three additions, mixing only until no dry streaks remain and the batter is pourable but not very thin.
- Divide the batter into two equal portions in separate bowls. To one portion, add 1/2 cup unsweetened cocoa powder and 1/4 cup black coffee; beat gently until fully combined and smooth. Leave the other portion plain (vanilla).
- Assemble the zebra pattern: Working over both prepared pans, spoon about 1/4 cup of the plain batter into the center of one pan, then spoon about 1/4 cup of the chocolate batter directly on top of the vanilla in the same spot. Repeat (vanilla then chocolate) alternating spoonfuls into the center until both pans are filled. You can alternate between pans as you go so they fill evenly. Tap the pans gently on the counter occasionally to help the batter spread; don’t overwork it.
- Bake the pans on the middle rack for 35–40 minutes, or until a toothpick inserted in the center comes out clean. Remove from oven, let cool in the pans for 5 minutes, then invert onto a wire rack and cool completely.
- Make the chocolate mousse (prepare while cakes cool). Chill the mixing bowl and whisk attachment if possible. Pour 3 cups heavy whipping cream into the bowl and whip to soft-to-medium peaks. Add the remaining 1/2 cup unsweetened cocoa powder (for the mousse), 1/3–1/2 cup honey or powdered sugar (choose one), 2 teaspoons vanilla extract, and a pinch of sea salt. Continue whipping until the mixture is smooth, holds shape, and is spreadable but not grainy. Cover and refrigerate until ready to assemble.
- When cakes are completely cool, use a serrated knife to slice each cake layer in half horizontally so you have four even layers total.
- Assemble the cake: Place one cake layer on your cake stand or serving plate. Spread an even layer of chocolate mousse over the layer. Repeat with the next two cake layers and mousse, finishing with the top cake layer.
- Whip the remaining 1 cup heavy whipping cream in a clean, chilled bowl to stiff peaks. Spread this whipped cream around the outside and over the top of the assembled cake to cover and smooth as desired.
- Refrigerate the finished cake at least 30 minutes to allow the mousse and whipped cream to set. Keep the cake stored in the refrigerator and serve within 1 day.
Notes
Choose either honey or powdered sugar to sweeten the mousse as indicated.