Chocolate Raspberry Cake
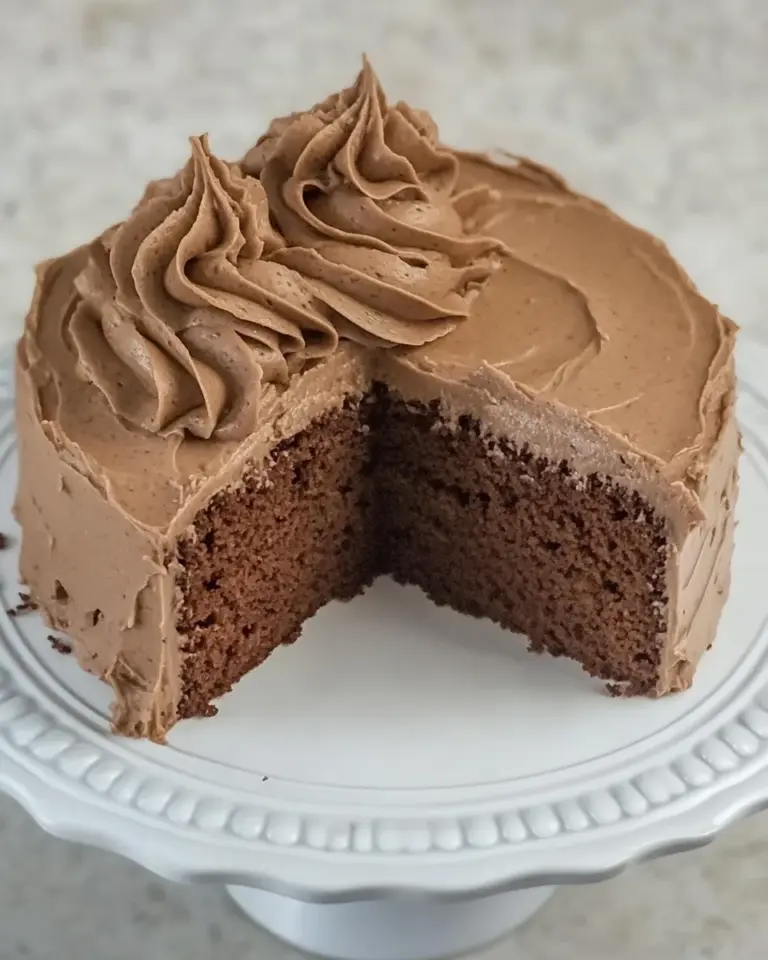
I make this chocolate raspberry cake whenever I need a dessert that feels both celebratory and comforting. The combination of dense chocolate layers, a tangy raspberry filling, and a silky cocoa frosting is straightforward but impressive. It’s the kind of cake that travels well to gatherings and looks beautiful with just a few fresh raspberries on top.
The recipe is forgiving where it matters: the batter can be thin, the filling can be seeded or strained, and the frosting can be adjusted to your desired consistency. There are clear steps to follow and a couple of small techniques that make the final result reliable. If you have basic baking tools and a half hour of oven time, you’ll have a showstopping cake.
I’ll walk you through the exact ingredients, the step-by-step directions, helpful tools, common mistakes and fixes, and a few sensible swaps for budget or dietary needs. No fluff—just what to do, when to do it, and why it matters so your cake comes out consistently great.
What We’re Using
Ingredients
- 2 cups granulated sugar — provides sweetness and helps tenderize the crumb.
- 1 3/4 cups + 2 Tablespoons all-purpose flour — structure for the cake; measure carefully for best texture.
- 3/4 cup unsweetened cocoa powder — main chocolate flavor in the cake layers.
- 1 1/2 teaspoons baking soda — helps the cake rise and keeps it light.
- 1 1/2 teaspoons baking powder — adds lift and balances density from other ingredients.
- 1 teaspoon salt — enhances chocolate flavor and balances sweetness.
- 2 large eggs — add richness and help bind the cake.
- 1 cup buttermilk — acidity keeps the cake tender and reacts with baking soda for lift.
- 1/2 cup oil (vegetable or canola oil) — keeps the cake moist; neutral-flavored oils are best.
- 2 teaspoons vanilla extract — rounds out flavors and deepens chocolate notes.
- 1 cup boiling water — blooms the cocoa for richer chocolate flavor; batter will be thin.
- 1/2 cup butter, melted — base for the chocolate frosting; melted butter gives shine.
- 2/3 cup unsweetened cocoa powder — cocoa for the frosting to match the cake’s flavor.
- 3 cups powdered sugar — sweetens and thickens the frosting; sift if lumpy.
- 1/3 cup milk — thins the frosting to spreadable consistency; adjust as needed.
- 1 teaspoon vanilla extract — flavor lift for the frosting.
- 2 cups raspberries (fresh or frozen) — makes the filling; frozen work fine if fresh aren’t available.
- 1/4 cup sugar — sweetens the raspberry filling.
- 1 tablespoon + 1 teaspoon cornstarch — thickens the raspberry filling so it spreads without running.
- 1 tablespoon water — for the cornstarch slurry to prevent lumps.
- 1 tablespoon lemon juice — brightens the raspberry flavor and balances sweetness.
- Fresh raspberries for topping on the cake, optional — simple garnish that signals what’s inside.
Step-by-Step: Chocolate Raspberry Cake
- Preheat oven to 350°F. Grease two 8- or 9-inch round cake pans and line the bottoms with parchment if desired.
- In a large bowl, whisk together the dry ingredients: 2 cups granulated sugar, 1 3/4 cups + 2 Tablespoons all-purpose flour, 3/4 cup unsweetened cocoa powder, 1 1/2 teaspoons baking soda, 1 1/2 teaspoons baking powder, and 1 teaspoon salt.
- Add the wet ingredients to the dry mixture: 2 large eggs, 1 cup buttermilk, 1/2 cup oil, and 2 teaspoons vanilla extract. Beat on medium speed for 2 minutes, until combined.
- Carefully stir in 1 cup boiling water. The batter will be very thin. Divide the batter evenly between the prepared pans.
- Bake 30–35 minutes, or until a toothpick inserted in the center comes out clean. Cool the cakes in the pans for 10 minutes, run a knife around the edges, then invert the cakes onto cooling racks. Remove parchment and cool completely before filling and frosting.
- (Optional storage) Once completely cooled, you may wrap the layers in plastic wrap and store at room temperature for up to one day, or place in freezer bags to store longer before decorating.
- Make the raspberry filling: In a small bowl, whisk 1 tablespoon water with 1 tablespoon + 1 teaspoon cornstarch until smooth. In a medium saucepan combine 2 cups raspberries and 1/4 cup sugar and 1 tablespoon lemon juice. Cook over medium heat, stirring occasionally, until the raspberries begin to break down. Add the cornstarch slurry, stir constantly, and cook until the mixture thickens. Remove from heat and let cool completely before using. (Optional: strain through a fine-mesh sieve to remove seeds for a smoother filling.)
- Make the chocolate frosting: In a bowl combine 1/2 cup butter (melted) and 2/3 cup unsweetened cocoa powder and mix until smooth. Add 3 cups powdered sugar, 1/3 cup milk, and 1 teaspoon vanilla extract. Beat until smooth and creamy. If needed, adjust the consistency by adding more powdered sugar to thicken or a little more milk to thin.
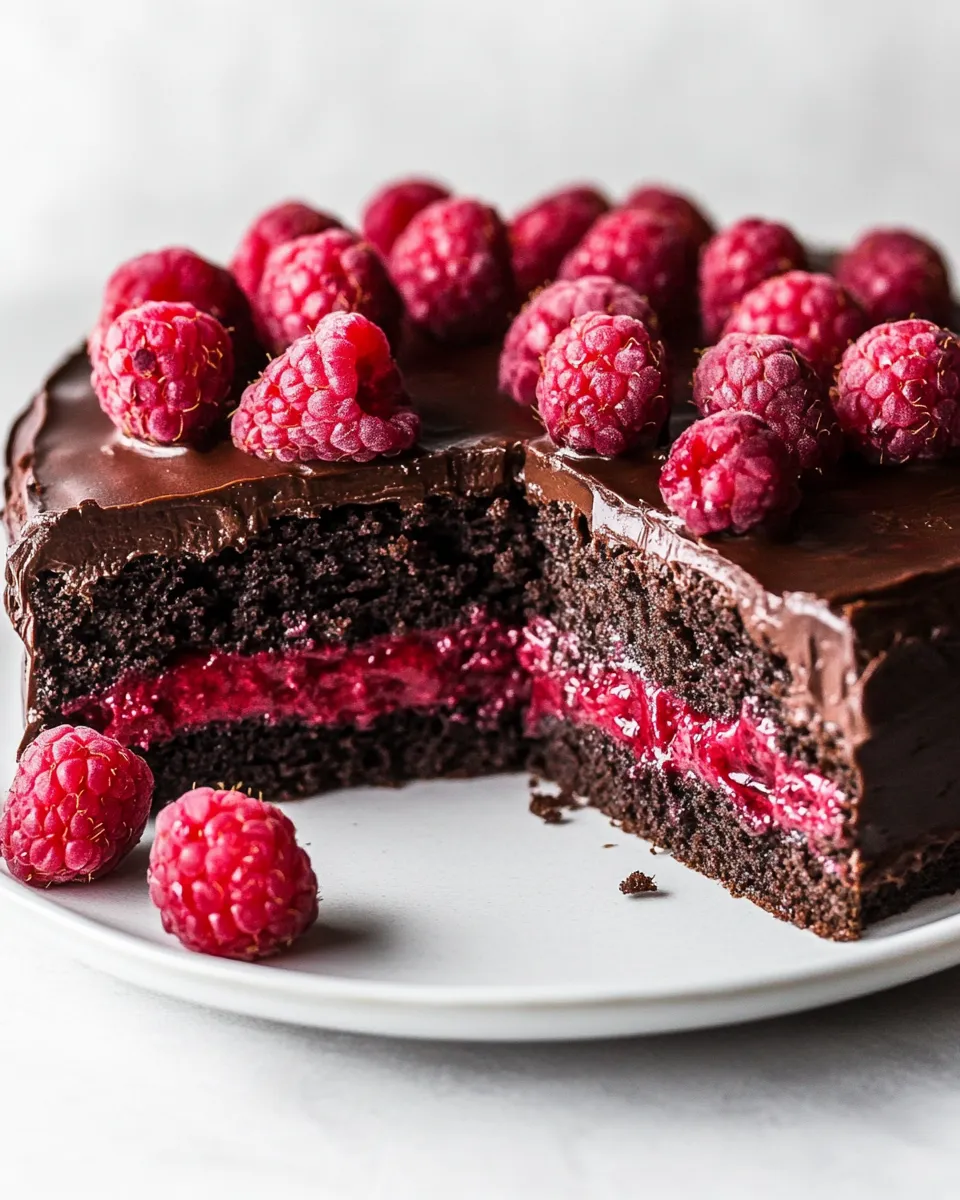
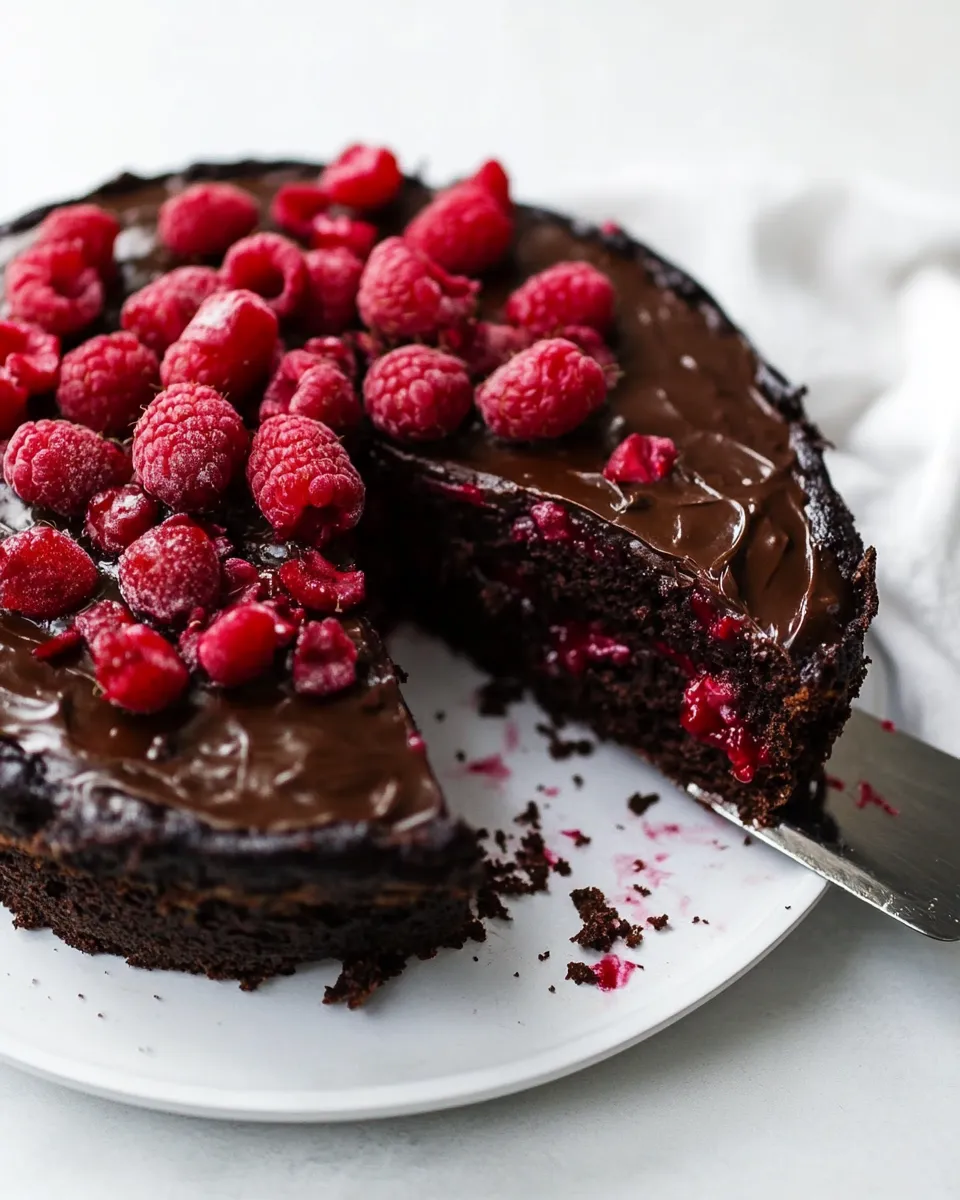
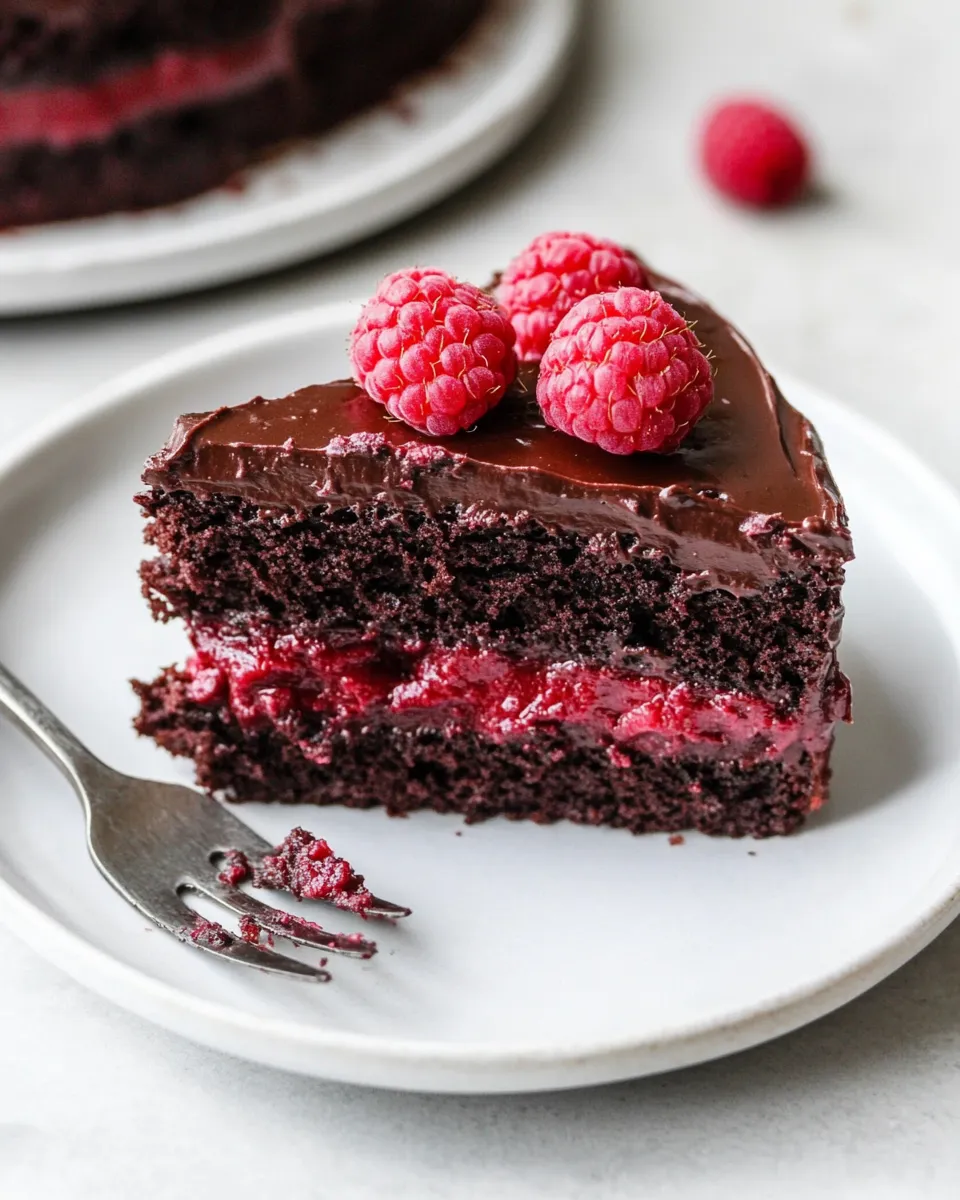
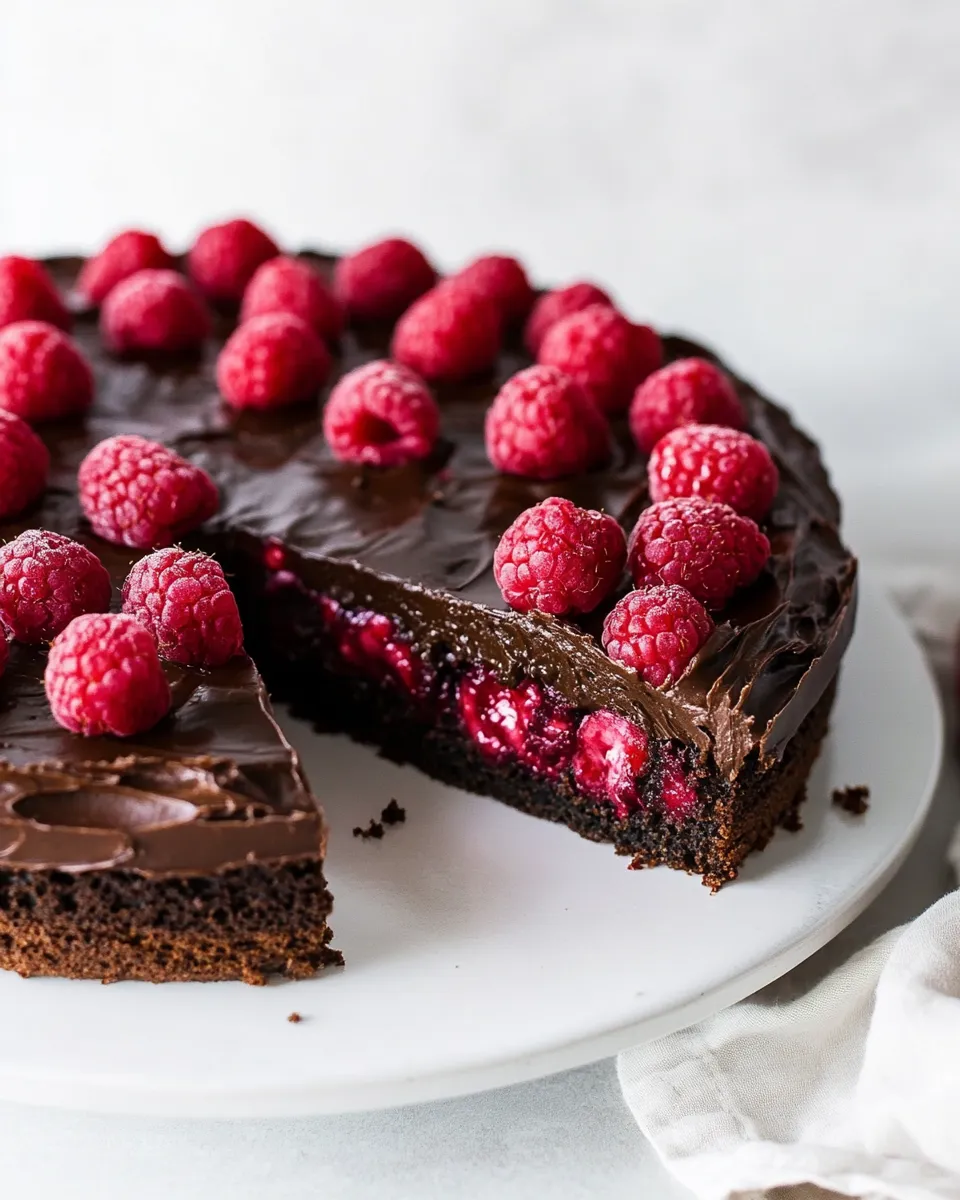
- Assemble the cake: Place one cake layer on a plate or cake stand. Spread the cooled raspberry filling in an even layer over that layer. Top with the second cake layer. Frost the top and sides of the cake with the chocolate frosting. Garnish with fresh raspberries, if desired.
The Upside of Chocolate Raspberry Cake
This cake balances two classic flavors—rich chocolate and bright raspberry—so it feels indulgent without being cloying. The boiling water in the batter intensifies the cocoa, giving a deep chocolate character even though the crumb stays tender. The raspberry filling adds acidity and a fresh fruit note that cuts through the richness.
Worked-out benefits: it’s quick to mix, the layers bake in the same time window, and the assembly is simple. You can make the layers a day ahead and decorate on the event day. The frosting is forgiving and can be smoothed or textured to suit the occasion.
Visually, a few raspberries on top are all you need. The contrast between dark frosting and bright berries is attractive and requires minimal effort.
Budget & Availability Swaps
- Raspberries: frozen raspberries are an excellent, lower-cost substitute for fresh—use them straight from frozen when making the filling, and extend cooking time as needed.
- Cocoa powder: if you only have natural or Dutch-processed cocoa, the cake will still work; keep the rest of the recipe the same. Flavor intensity varies between brands, so taste the frosting batter and adjust if needed.
- Buttermilk: if you don’t have buttermilk, make a quick substitute by stirring 1 tablespoon vinegar or lemon juice into just under 1 cup milk and let it sit for 5–10 minutes (this is a technique, not a change to the recipe quantities you follow precisely).
- Oil: vegetable or canola are listed; if you only have another neutral oil (like sunflower), it’s fine to use.
- Sugar and flour: standard pantry staples—buy store brands in bulk to save if you bake often.
Prep & Cook Tools
- Two 8- or 9-inch round cake pans — for even, stackable layers.
- Parchment paper — optional but makes removing layers easy.
- Large mixing bowl and whisk — for dry ingredients.
- Stand mixer or handheld mixer — for beating the batter and whipping the frosting.
- Rubber spatula — for folding and scraping bowls.
- Medium saucepan — for cooking the raspberry filling.
- Fine-mesh sieve — optional, for seeding the raspberry filling if you want it smooth.
- Cake turntable and offset spatula — helpful for frosting but not required.
- Cooling racks — cool layers completely before decorating.
Things That Go Wrong
Here are the most common issues and how to fix them quickly.
Dense or gummy cake
Possible cause: overmixing or incorrect measuring of flour. Fix: measure flour by spooning it into the cup and leveling with a knife. Mix just until combined before adding boiling water and then don’t overwork the batter.
Cake underbaked in center
Possible cause: oven temp or pan size. Fix: test with a toothpick—if it needs more time, tent with foil and add 3–5 minutes. Ensure pans aren’t too small; use two 8- or 9-inch pans as stated.
Filling runs out when assembling
Possible cause: filling not thick enough or not cooled. Fix: make sure the raspberry mixture is cooked until thickened and completely cooled before spreading. If it’s still thin, simmer a bit longer to reduce and thicken.
Frosting too thin or too thick
Thin: add more powdered sugar a little at a time. Thick: add small splashes of milk. Adjust gradually and beat until smooth.
Adaptations for Special Diets
While this recipe is written for a standard pantry, here are thoughtful adaptations to accommodate dietary needs. Make substitutions with awareness that they can change texture and flavor.
- Vegetarian: this recipe is already vegetarian-friendly as written.
- Vegan: to make vegan, substitute the eggs with commercial egg replacer or a combination of flax eggs (note: this is an adaptation and will change texture), use plant-based milk in place of milk and plant-based butter for the frosting, and use a vegan buttermilk substitute. Expect a slightly different crumb and adjust baking time as needed.
- Gluten-free: use a 1:1 gluten-free flour blend designed for baking. Some blends need xanthan gum; follow the blend’s instructions. The structure and bake time may vary slightly.
- Dairy-free: replace the butter in the frosting with a dairy-free butter substitute and use dairy-free milk. For the cake, use a dairy-free buttermilk substitute made from plant milk and acid (as described in swaps).
- Lower-sugar options: modify the filling sweetness by reducing the 1/4 cup sugar in the raspberry filling if your raspberries are very sweet. Keep in mind that reducing sugar in the cake or frosting affects texture and shelf life.
Cook’s Notes
Little adjustments make big differences.
- Line pans with parchment circles for neat edges and easy release. Greasing alone can work, but parchment is forgiving.
- When you add boiling water to the batter, stir carefully and divide quickly between pans. Thin batter is normal; it produces a moist crumb.
- Cool layers completely before stacking. Warm cake will make the filling and frosting slide.
- If you prefer a seedless filling, press the cooked raspberry mixture through a fine-mesh sieve while it’s still warm. That yields a smooth, glossy jam-like layer.
- Chill the frosted cake briefly if you need to tidy edges—about 10–15 minutes—then smooth again for a polished finish.
Best Ways to Store
Room temperature: If you plan to serve within a day, store the frosted cake at room temperature in an airtight cake box or under a dome—avoid direct sunlight and heat. Note that the filling and frosting contain dairy, so very warm rooms may require refrigeration.
Refrigeration: Store covered in the refrigerator for up to 3–4 days. Bring slices to near room temperature before serving; cold butter-based frosting firms up and mutes flavor.
Freezing: To freeze for longer storage, wrap each unfrosted layer tightly in plastic wrap and place in freezer bags for up to 2 months. Thaw overnight at room temperature before decorating. Fully frosted cake can be frozen if tightly wrapped; thaw in the fridge then bring to room temperature before serving.
Helpful Q&A
Can I make this ahead?
Yes. Bake the layers a day ahead and keep them wrapped at room temperature, or freeze them for longer. Make the filling and frosting ahead as well—filling can be refrigerated and frosting kept covered; bring both to room temperature before assembly if refrigerated.
Why is the batter so thin?
The recipe calls for boiling water; this is intentional. Hot water blooms the cocoa powder and yields a moist, tender crumb. Thin batter is expected and produces a good result.
Can I use a different fruit?
Raspberries are written into this recipe for flavor balance. If you choose another berry, account for differences in sweetness and water content. Adjust sugar in the filling if needed.
Should I strain the raspberry filling?
Straining is optional. If you want a smooth filling without seeds, strain through a fine-mesh sieve while the mixture is warm. If you like texture, skip straining.
Next Steps
Gather your pans and preheat the oven. Measure ingredients accurately, and make the batter as directed. The process is straightforward and rewarding—prepare the layers, make the filling and frosting, assemble, and garnish with fresh raspberries. Serve with coffee or a glass of milk for a classic pairing.
If you try this cake, take a photo and note any small tweaks you made—baking is a personal craft and small adjustments often become signature touches. Happy baking.
Chocolate Raspberry Cake
Ingredients
Equipment
Method
- Preheat oven to 350°F. Grease two 8- or 9-inch round cake pans and line the bottoms with parchment if desired.
- In a large bowl, whisk together the dry ingredients: 2 cups granulated sugar, 1 3/4 cups + 2 Tablespoons all-purpose flour, 3/4 cup unsweetened cocoa powder, 1 1/2 teaspoons baking soda, 1 1/2 teaspoons baking powder, and 1 teaspoon salt.
- Add the wet ingredients to the dry mixture: 2 large eggs, 1 cup buttermilk, 1/2 cup oil, and 2 teaspoons vanilla extract. Beat on medium speed for 2 minutes, until combined.
- Carefully stir in 1 cup boiling water. The batter will be very thin. Divide the batter evenly between the prepared pans.
- Bake 30–35 minutes, or until a toothpick inserted in the center comes out clean. Cool the cakes in the pans for 10 minutes, run a knife around the edges, then invert the cakes onto cooling racks. Remove parchment and cool completely before filling and frosting.
- (Optional storage) Once completely cooled, you may wrap the layers in plastic wrap and store at room temperature for up to one day, or place in freezer bags to store longer before decorating.
- Make the raspberry filling: In a small bowl, whisk 1 tablespoon water with 1 tablespoon + 1 teaspoon cornstarch until smooth. In a medium saucepan combine 2 cups raspberries and 1/4 cup sugar and 1 tablespoon lemon juice. Cook over medium heat, stirring occasionally, until the raspberries begin to break down. Add the cornstarch slurry, stir constantly, and cook until the mixture thickens. Remove from heat and let cool completely before using. (Optional: strain through a fine-mesh sieve to remove seeds for a smoother filling.)
- Make the chocolate frosting: In a bowl combine 1/2 cup butter (melted) and 2/3 cup unsweetened cocoa powder and mix until smooth. Add 3 cups powdered sugar, 1/3 cup milk, and 1 teaspoon vanilla extract. Beat until smooth and creamy. If needed, adjust the consistency by adding more powdered sugar to thicken or a little more milk to thin.
- Assemble the cake: Place one cake layer on a plate or cake stand. Spread the cooled raspberry filling in an even layer over that layer. Top with the second cake layer. Frost the top and sides of the cake with the chocolate frosting. Garnish with fresh raspberries, if desired.
Notes
Raspberry cake filling
: If you don’t wish to make the filling from scratch you could use a can of raspberry cake filling. (I prefer the Solo brand).
For seedless raspberry filling
, cook the raspberries with only water and lemon juice. Press the mixture through a sieve, and return the seedless strawberry juice/pulp to the pan. Add sugar and cornstarch and cook until thickened.
Make ahead and Freezing instructions:
Chocolate frosting will last for 2-3 weeks in the refrigerator and can be frozen for 2-3 months in a freezer-safe container. Thaw overnight in the fridge and bring to room temperature before frosting.
To freeze the chocolate cake, cover each cooled cake layer with plastic wrap and place in a freezer-safe container or gallon bag. Freeze for up to 1 month. I think frozen cakes are easier to frost!