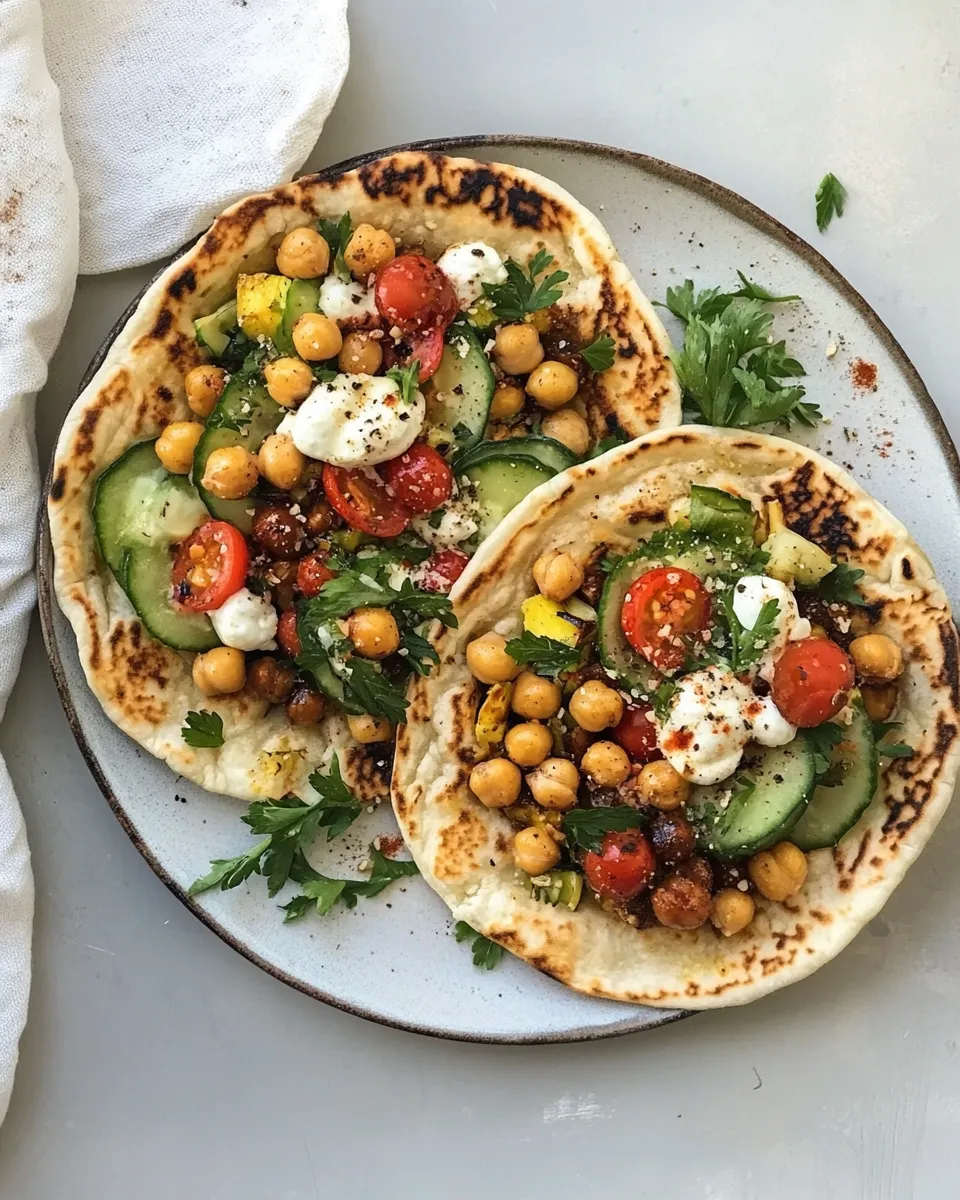
Crunchy Roasted Chickpea Pitas.
These pitas are the kind of meal I come back to when I want something that feels both homemade and effortless. The dough is hearty thanks to whole wheat, the chickpeas roast into blistered, crunchy little bites, and the toppings—bright tomatoes, salty feta, fresh herbs—pull everything together. It’s a compact, satisfying sandwich that travels well and lives equally well on a weeknight plate or at a picnic.
There’s a small rhythm to making them: mix the dough, roast the chickpeas, cook the pitas, assemble. You’ll find pockets of time—while the dough rises or the chickpeas are in the oven—to prep toppings and tidy the kitchen. The steps are straightforward and forgiving. If you follow the sequence below, you’ll end up with pitas that are tender, pillowy, and ready to cradle crisp, spiced chickpeas.
I like these because they’re flexible. Swap herbs, dial the paprika heat, or make extra chickpeas to sprinkle on salads later. Below you’ll find a clear ingredient list (from the recipe’s source of truth), the exact step-by-step directions, and practical notes that make success more likely on your first run.
What Goes Into Crunchy Roasted Chickpea Pitas
- 2 cans chickpeas, drained and rinsed — the main crunchy filling; dry them well to help them crisp in the oven.
- 1 tablespoon olive oil — for seasoning the chickpeas before roasting.
- 1/4 teaspoon salt — for the chickpea seasoning; measured precisely to balance flavor.
- 1/4 teaspoon pepper — simple heat and depth for the chickpeas.
- 1/2 teaspoon smoked paprika — smoky backbone to the roasted chickpeas.
- 1/2 teaspoon garlic powder — savory note that sings with the paprika.
- 1/2 teaspoon brown sugar — a touch of sweetness that helps caramelize the chickpeas.
- pinch of allspice — tiny aromatic lift; use sparingly.
- 1 cup cherry or grape tomatoes, halved — fresh, juicy topping to contrast the crunch.
- 1/2 cup your favorite hummus — creamy spread that keeps the filling from falling through the pita.
- 4 ounces feta cheese, crumbled — salty, tangy finish for each assembled pita.
- fresh dill and oregano for topping — herb finish; use both or pick one.
- olive oil for drizzling — a final gloss over the assembled pitas.
- 1 cup warm water — to activate the yeast for the dough starter.
- 1 package 2 1/4 teaspoons active dry yeast — yeast measurement; the package size called for in the directions.
- 1 tablespoon honey — feeds the yeast and rounds the dough flavor.
- 1 1/2 cups whole wheat flour — gives body and a nutty flavor to the pitas.
- 1 cup all-purpose flour, plus extra for your workspace/kneading — structure and gluten; reserve a bit for dusting if the dough is sticky.
- 1/2 teaspoon salt — for the dough; balances and strengthens the gluten.
- canola oil for brushing — to coat the skillet when cooking the pitas.
Crunchy Roasted Chickpea Pitas: Step-by-Step Guide
- Make the dough starter: pour 1 cup warm water into a medium bowl, add 1 package (2 1/4 teaspoons) active dry yeast and 1 tablespoon honey, stir once to combine, and let sit until foamy, about 10 minutes.
- Mix the dough: to the foamy yeast, stir in 1 1/2 cups whole wheat flour, 1 cup all-purpose flour and 1/2 teaspoon salt until the dough begins to come together. Use your hands to bring it fully together; if it is very sticky, sprinkle on a little extra all-purpose flour from the 1 cup called for.
- Knead and rise: turn the dough onto a lightly floured surface and knead by hand about 5 minutes (until smooth and elastic). Lightly coat the inside of a bowl with canola oil, place the dough inside, cover, and set in a warm spot to rise until doubled in size, about 1 1/2 hours.
- Preheat the oven to 425°F (220°C) and line a baking sheet with foil or parchment.
- Prepare the chickpeas: drain and rinse the 2 cans chickpeas, pat them as dry as you can with paper towels, and remove any loose skins. Place the chickpeas on the lined baking sheet in a single layer.
- Season the chickpeas: drizzle the chickpeas with 1 tablespoon olive oil, then sprinkle on 1/4 teaspoon salt, 1/4 teaspoon pepper, 1/2 teaspoon smoked paprika, 1/2 teaspoon garlic powder, 1/2 teaspoon brown sugar and a pinch of allspice. Toss to coat evenly and spread back into a single layer.
- Roast the chickpeas: bake for 15–20 minutes, remove the sheet, toss and flip the chickpeas, then return to the oven and bake another 15–20 minutes, until crisp and golden. Let cool on the baking sheet.
- Prepare toppings while the chickpeas roast: halve 1 cup cherry or grape tomatoes and crumble 4 ounces feta cheese. Measure out 1/2 cup hummus and have fresh dill and oregano ready. Keep olive oil for drizzling nearby.
- Shape the pitas: after the dough has doubled, turn it onto a floured surface, knead a few times, and divide into 8 equal pieces. Roll each piece out as thinly as you can on a lightly floured surface.
- Cook the pitas: heat a cast iron skillet (or heavy skillet) over medium-high heat and brush it with a little canola oil. Cook each thin dough round in the skillet: place it down and cook about 30 seconds until bubbles form, flip and cook 1–2 minutes until puffy with golden spots, flip once more and cook about 1 minute. Keep cooked pitas warm under a clean towel while you finish the rest.
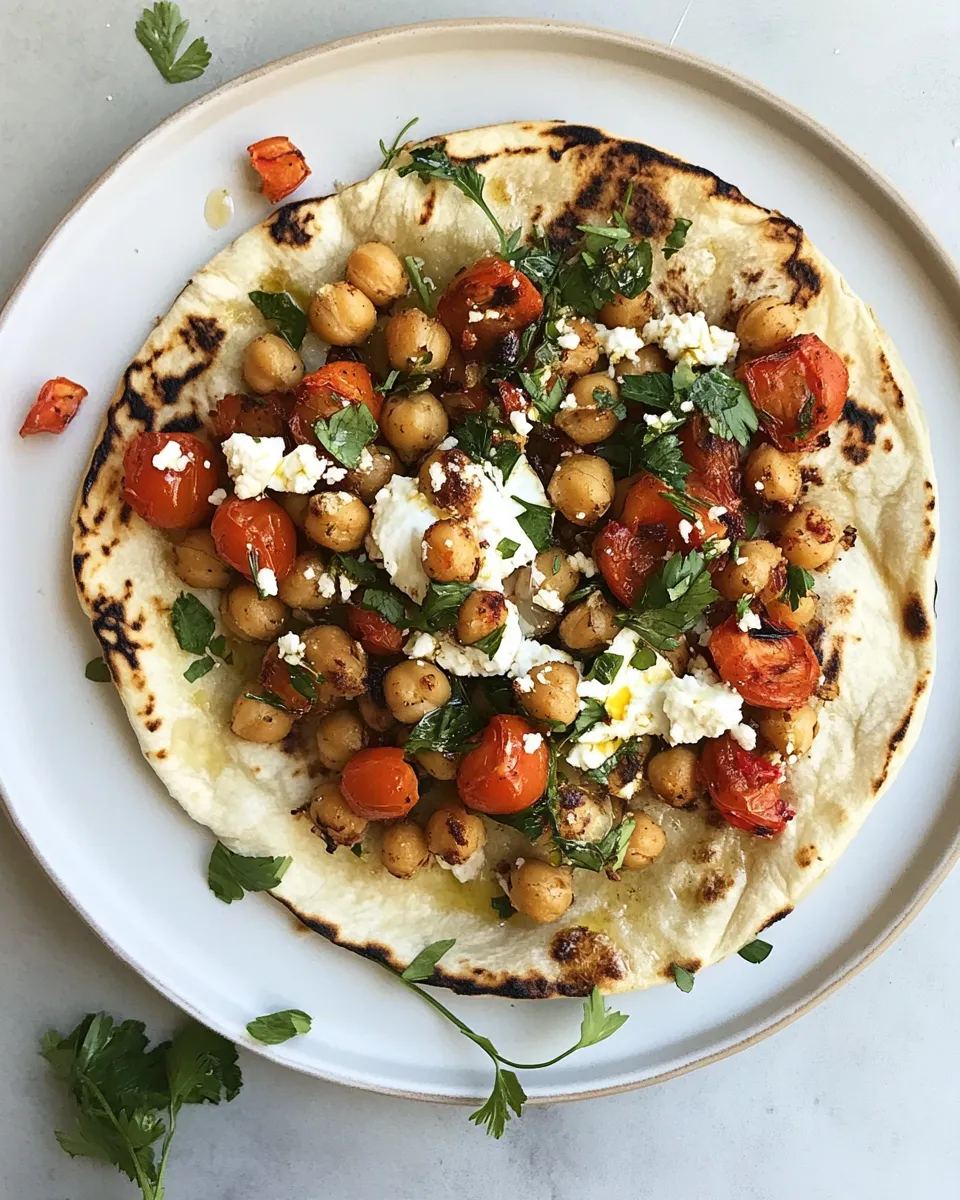
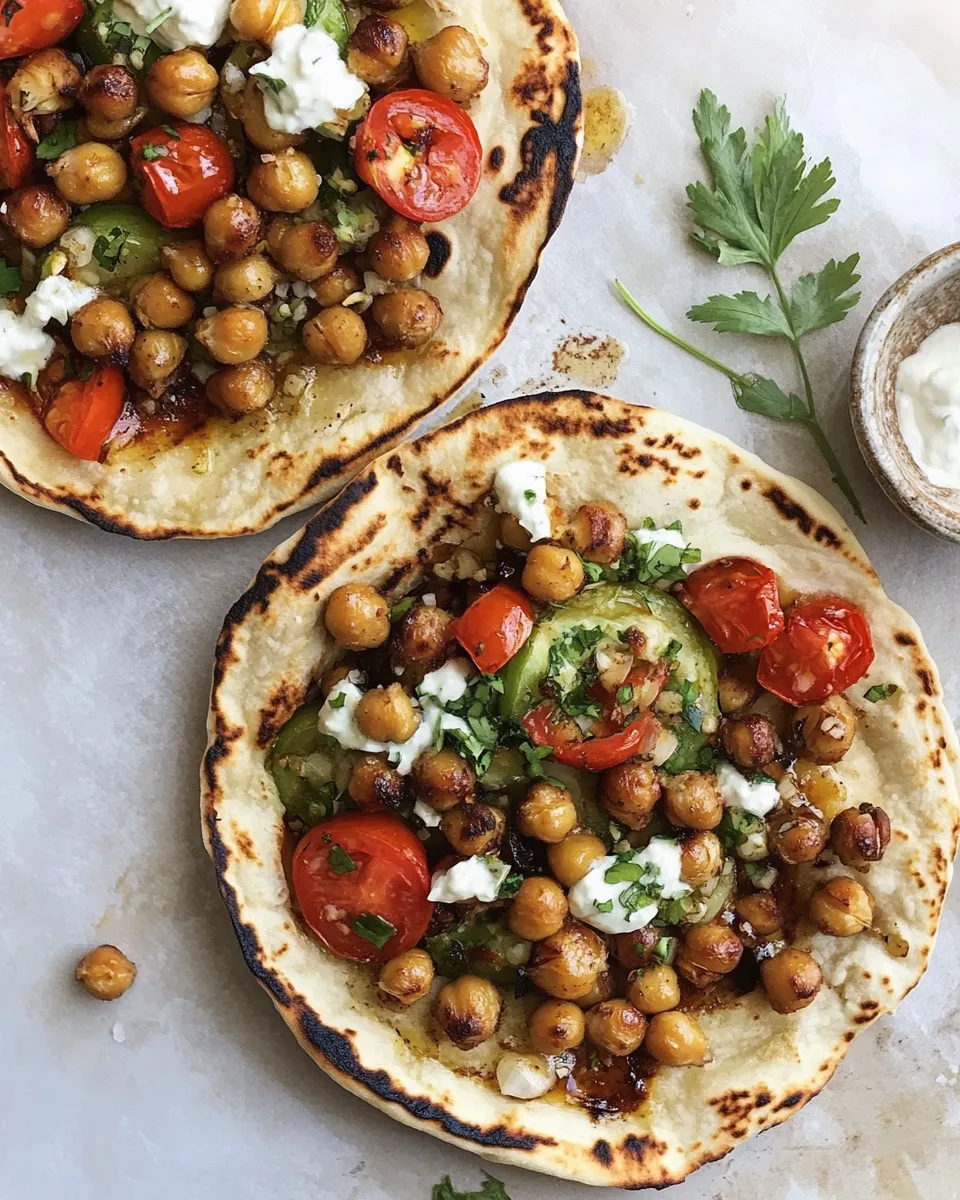
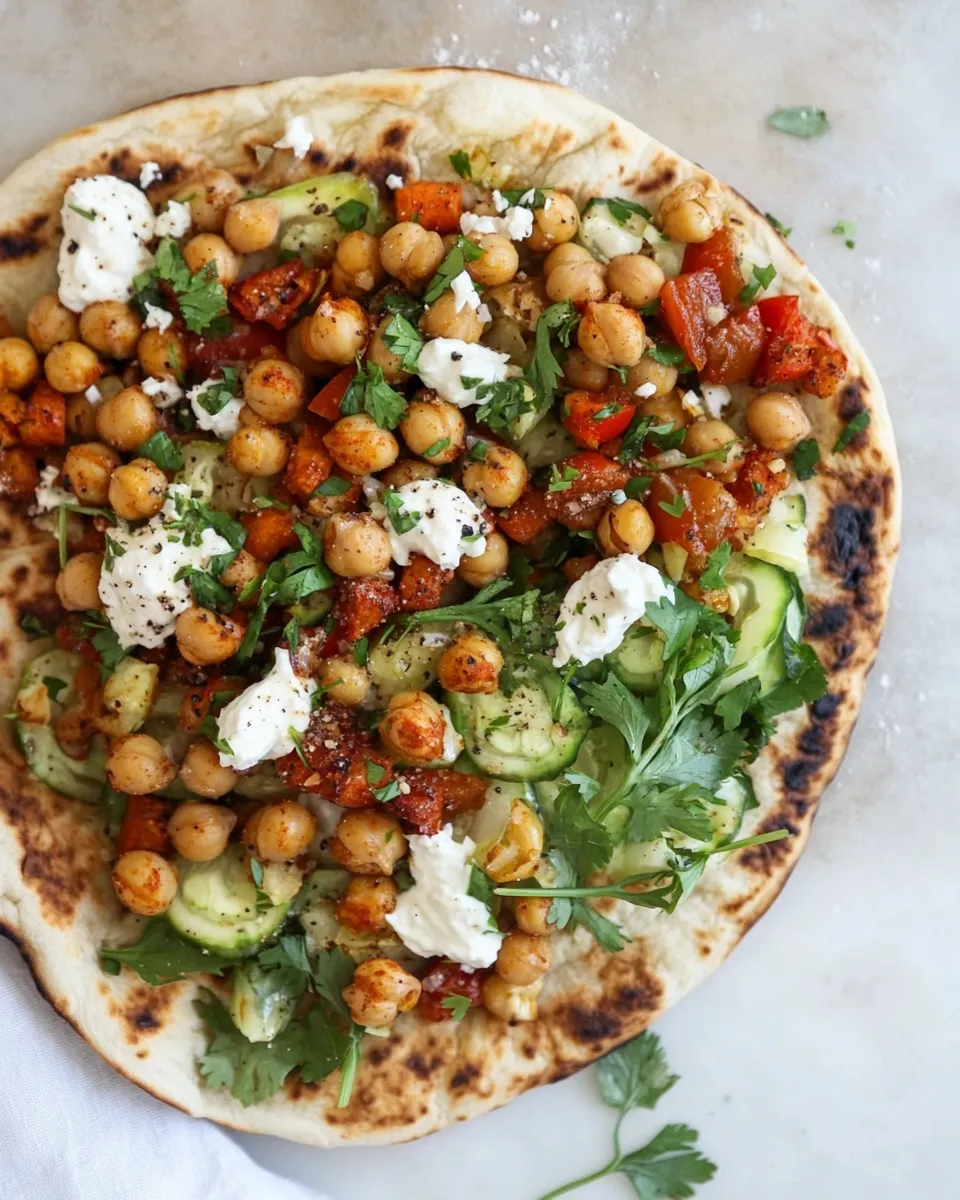
- Assemble the pitas: spread each pita with some of the hummus, top with roasted chickpeas, halved tomatoes, crumbled feta, and finish with fresh dill and oregano and a light drizzle of olive oil.
- Serve immediately. Store any leftover roasted chickpeas in a container for snacking or future use.
Why Crunchy Roasted Chickpea Pitas is Worth Your Time
There’s practical value here: most of the work happens in batches or during passive time. While the dough is rising, the oven does the heavy lifting with the chickpeas. That makes this a low-stress homemade sandwich with a big payoff in texture and flavor.
Texturally, you get contrast in every bite—the crisp, caramelized chickpeas against soft, warm pita and creamy hummus. Flavor-wise, the smoked paprika and garlic powder build warmth, while feta and herbs brighten and keep things lively. Nutritionally, chickpeas add plant protein and fiber, and whole wheat in the dough gives you extra substance compared with white-flour-only pitas.
Finally, it’s just versatile. Make a few for a weeknight; double the chickpeas for snacks; swap herbs and toppings to match what’s in season. Small changes change the character, but the core method still delivers.
Ingredient Swaps & Substitutions
- Chickpeas: use a single can or three cans if you want a heavier filling; if using dried chickpeas, cook them first until tender before roasting.
- Olive oil: you can use canola oil for the chickpeas if you want a neutral flavor (canola is already used for brushing the pan).
- Smoked paprika: regular paprika will still provide color; increase garlic powder slightly if you skip paprika.
- Hummus: any creamy spread works—plain yogurt or labneh make the pita tangier.
- Feta: goat cheese or ricotta salata are great substitutes if you prefer a different tang or texture.
- Fresh herbs: if you don’t have both dill and oregano, one is fine; parsley or mint would also brighten the final sandwich.
- Flour: if you don’t have whole wheat, substitute an equal amount of all-purpose flour for a lighter pita (the texture will change slightly).
What’s in the Gear List
- Medium mixing bowl — for the dough starter and dough mixing.
- Baking sheet lined with foil or parchment — prevents sticking and makes cleanup easy.
- Cast iron skillet or heavy skillet — essential for quick, hot cooking of the pitas.
- Measuring cups and spoons — measure ingredients exactly, especially salt and yeast.
- Kitchen towel — to keep cooked pitas warm and soft while you finish the batch.
- Paper towels — for drying chickpeas sharply before roasting.
- Rolling pin — to roll the dough pieces as thinly as you can.
What Not to Do
- Don’t skip drying the chickpeas thoroughly — moisture prevents crisping and leads to steam rather than crunch.
- Don’t over-flour the dough while rolling; too much flour makes the pitas dry and heavy. Use just enough to prevent sticking.
- Don’t rush the dough rise—underproofed dough won’t puff properly in the skillet.
- Don’t crowd the baking sheet when roasting chickpeas; leave space so they roast rather than steam.
- Don’t cook pitas at too low a temperature—if the pan isn’t hot enough they won’t blister and puff the way they should.
Seasonal Flavor Boosts
- Late summer: use heirloom cherry tomatoes for extra sweetness and color; add a minute of charred corn for texture contrast.
- Autumn: toss in a spoonful of roasted squash cubes with the chickpeas for a sweet, earthy note.
- Winter: swap halved tomatoes for quick-pickled red onion or roasted red peppers to add brightness when fresh tomatoes aren’t at their best.
- Spring: throw in fresh peas or a handful of arugula for peppery freshness right before serving.
Recipe Notes & Chef’s Commentary
Timing: the dough needs about 1 1/2 hours to double. Use that window efficiently—preheat your oven, dry and season chickpeas, and prep toppings. The roast takes 30–40 minutes total, split into two intervals so they crisp evenly.
Texture tips: when rolling the pitas, aim for thin rounds. Thin dough puffs more easily in the skillet. If a round comes out too thick, cook it longer at a lower heat to avoid burning the outside before the inside cooks through.
Batching: roast a double batch of chickpeas and store half for snacks. They make an excellent crunchy salad topper. Cooked pitas can be wrapped and frozen; reheat briefly in a hot skillet or oven to refresh them.
How to Store & Reheat
- Roasted chickpeas: let them cool fully, then store in an airtight container at room temperature for up to 2–3 days if you want them crisp; refrigeration will soften them but keeps them safe longer.
- Pitas: store cooled pitas in a sealed bag in the refrigerator for 3–4 days, or freeze for up to 2 months. Reheat briefly in a hot skillet or wrapped in foil in a 350°F (175°C) oven until warmed through.
- Assembled pitas: assemble right before eating. If you must assemble ahead, keep wet ingredients (hummus, tomatoes) separate and add them just before serving to avoid sogginess.
Your Top Questions
- Can I make the dough ahead? Yes. Refrigerate the dough in an oiled bowl, covered, for up to 24 hours. Bring to room temperature before shaping.
- Can I use dried chickpeas? Yes, but cook them until tender first, then dry thoroughly before seasoning and roasting.
- How do I get the pitas to puff? Roll them thin, heat the skillet well, and work quickly. A hot surface creates steam pockets that puff the bread.
- What if my chickpeas aren’t crispy after roasting? They may have held too much moisture. Next time, pat them drier, give them more space on the pan, and roast until deeply golden.
Wrap-Up
If you want a sandwich that feels composed and homemade but doesn’t demand constant attention, Crunchy Roasted Chickpea Pitas are an excellent choice. The method is straightforward, the components are flexible, and the result is a satisfying mix of crunch, cream, and fresh brightness. Make a double batch of chickpeas, stretch the dough into thin rounds, and enjoy these for lunches, weeknight dinners, or a casual dinner with friends. Simple, flavorful, and built to be adaptable—this is one you’ll come back to again and again.
Crunchy Roasted Chickpea Pitas.
Ingredients
Equipment
Method
- Make the dough starter: pour 1 cup warm water into a medium bowl, add 1 package (2 1/4 teaspoons) active dry yeast and 1 tablespoon honey, stir once to combine, and let sit until foamy, about 10 minutes.
- Mix the dough: to the foamy yeast, stir in 1 1/2 cups whole wheat flour, 1 cup all-purpose flour and 1/2 teaspoon salt until the dough begins to come together. Use your hands to bring it fully together; if it is very sticky, sprinkle on a little extra all-purpose flour from the 1 cup called for.
- Knead and rise: turn the dough onto a lightly floured surface and knead by hand about 5 minutes (until smooth and elastic). Lightly coat the inside of a bowl with canola oil, place the dough inside, cover, and set in a warm spot to rise until doubled in size, about 1 1/2 hours.
- Preheat the oven to 425°F (220°C) and line a baking sheet with foil or parchment.
- Prepare the chickpeas: drain and rinse the 2 cans chickpeas, pat them as dry as you can with paper towels, and remove any loose skins. Place the chickpeas on the lined baking sheet in a single layer.
- Season the chickpeas: drizzle the chickpeas with 1 tablespoon olive oil, then sprinkle on 1/4 teaspoon salt, 1/4 teaspoon pepper, 1/2 teaspoon smoked paprika, 1/2 teaspoon garlic powder, 1/2 teaspoon brown sugar and a pinch of allspice. Toss to coat evenly and spread back into a single layer.
- Roast the chickpeas: bake for 15–20 minutes, remove the sheet, toss and flip the chickpeas, then return to the oven and bake another 15–20 minutes, until crisp and golden. Let cool on the baking sheet.
- Prepare toppings while the chickpeas roast: halve 1 cup cherry or grape tomatoes and crumble 4 ounces feta cheese. Measure out 1/2 cup hummus and have fresh dill and oregano ready. Keep olive oil for drizzling nearby.
- Shape the pitas: after the dough has doubled, turn it onto a floured surface, knead a few times, and divide into 8 equal pieces. Roll each piece out as thinly as you can on a lightly floured surface.
- Cook the pitas: heat a cast iron skillet (or heavy skillet) over medium-high heat and brush it with a little canola oil. Cook each thin dough round in the skillet: place it down and cook about 30 seconds until bubbles form, flip and cook 1–2 minutes until puffy with golden spots, flip once more and cook about 1 minute. Keep cooked pitas warm under a clean towel while you finish the rest.
- Assemble the pitas: spread each pita with some of the hummus, top with roasted chickpeas, halved tomatoes, crumbled feta, and finish with fresh dill and oregano and a light drizzle of olive oil.
- Serve immediately. Store any leftover roasted chickpeas in a container for snacking or future use.