Disney Rice Krispie Treats
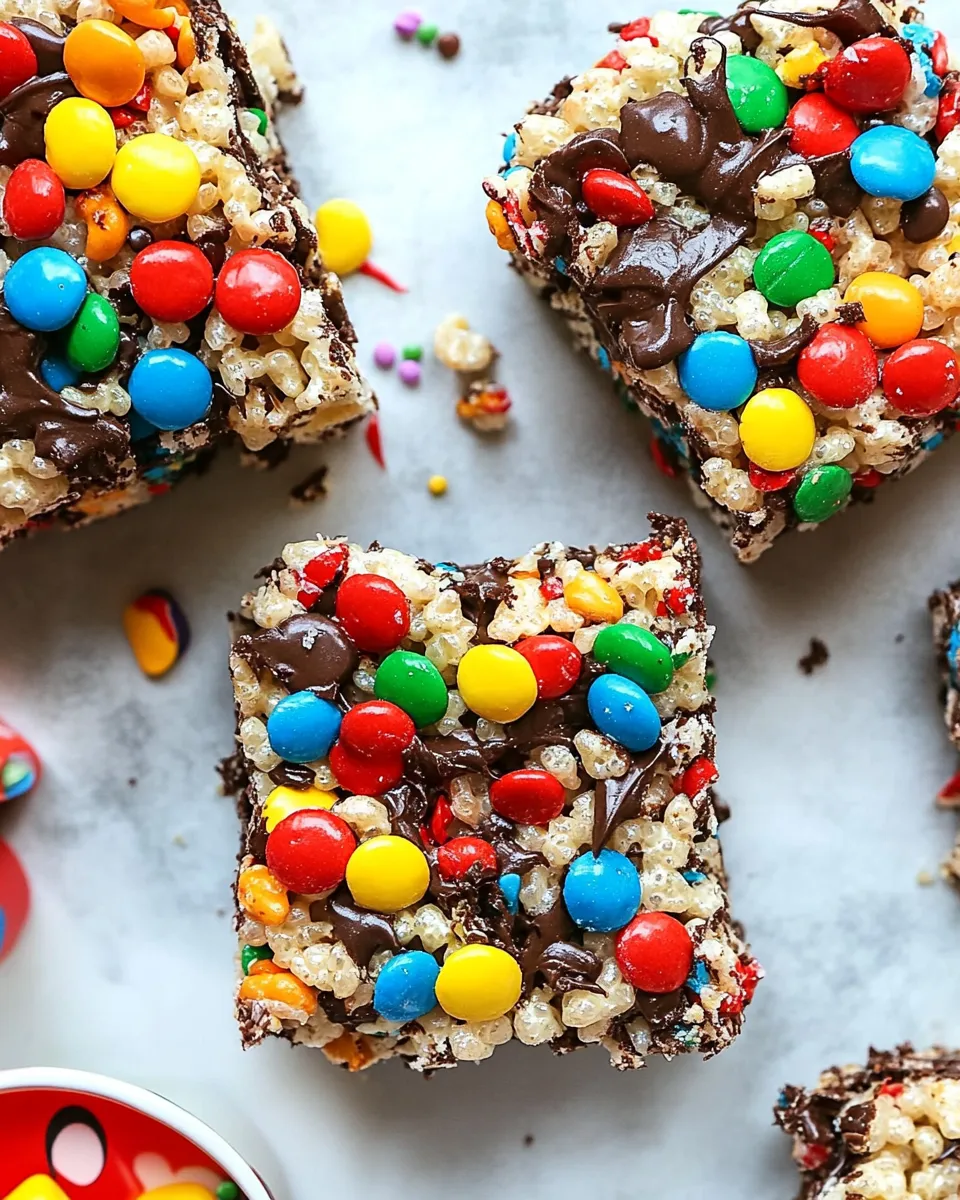
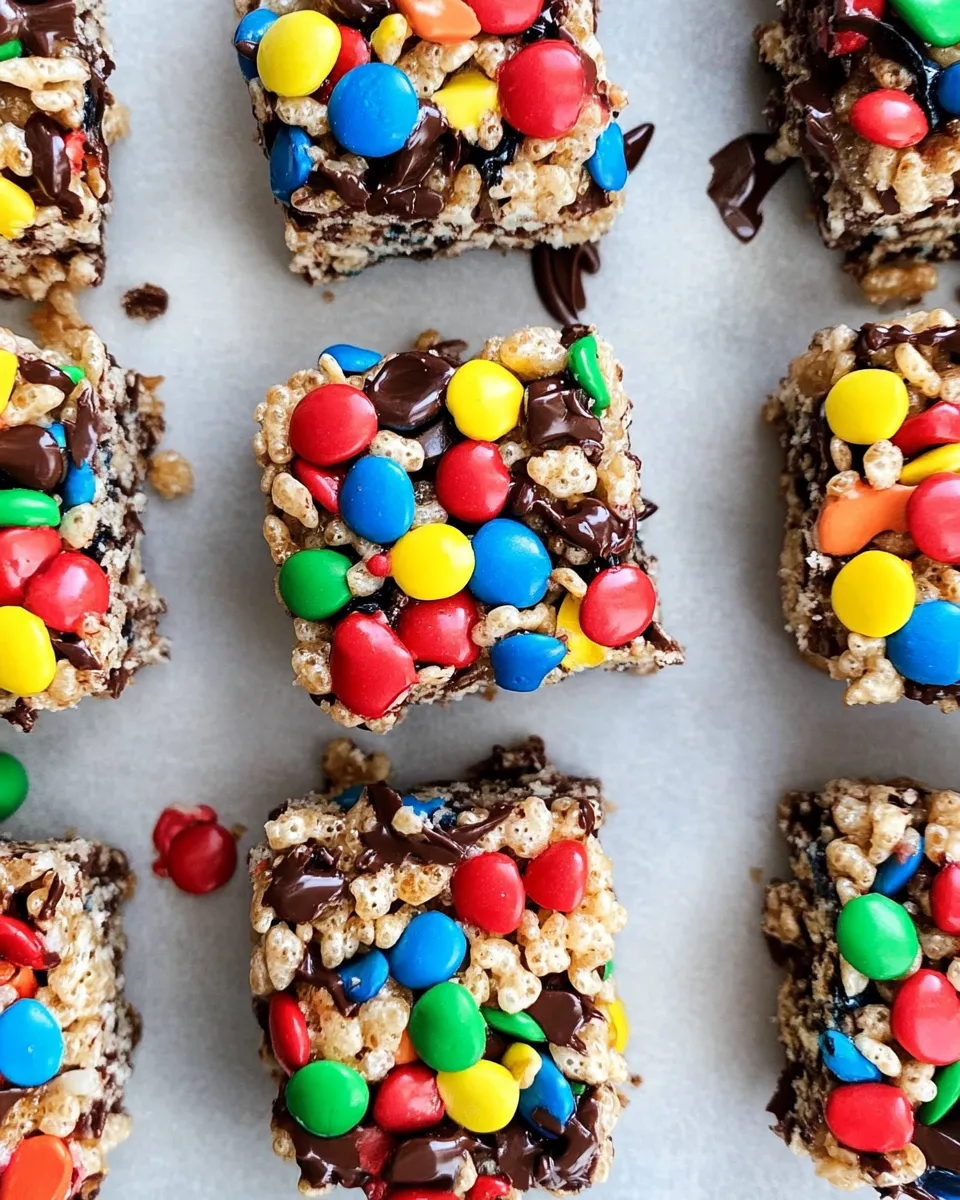
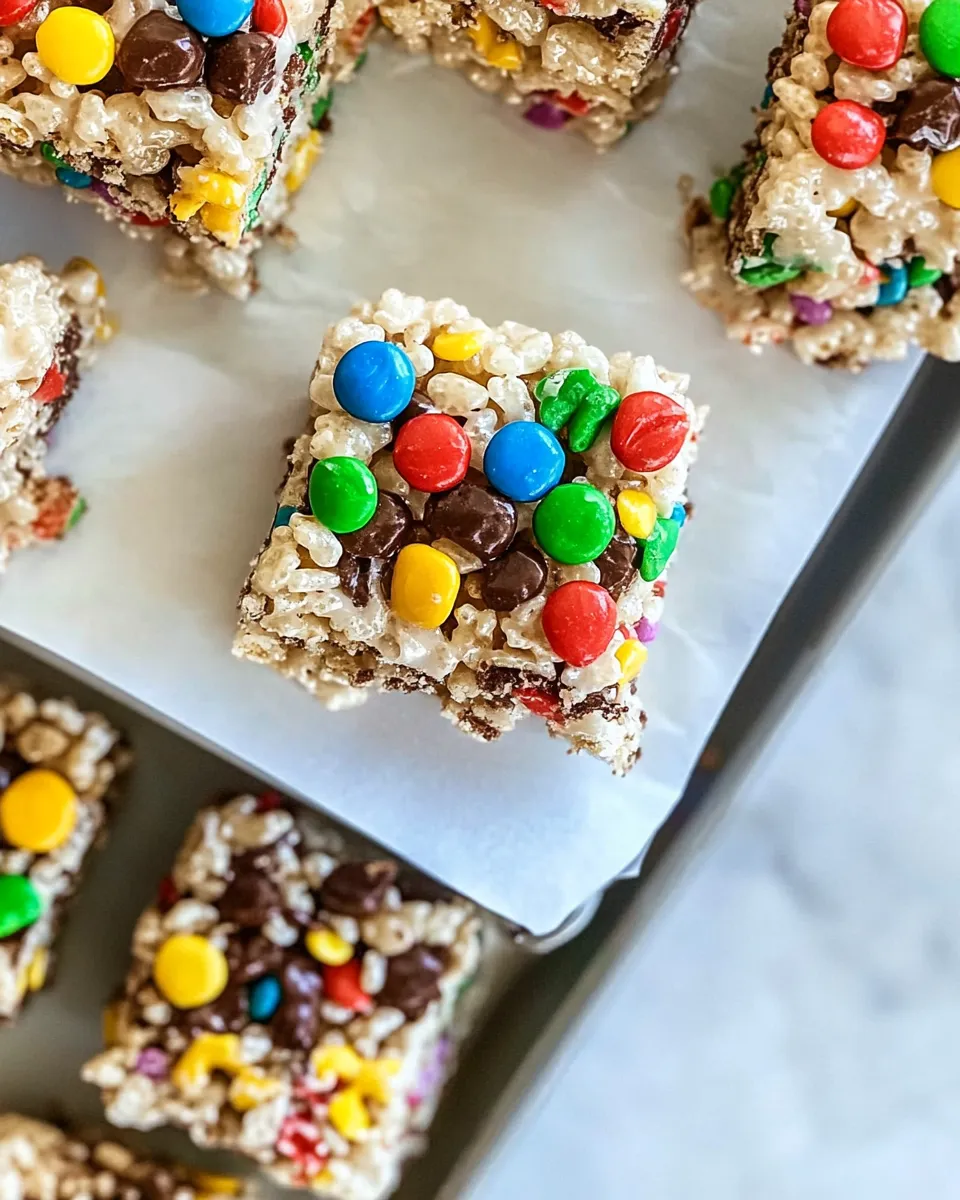
These Rice Krispie treats take the classic snack and give it a party-ready, Disney-themed finish. They’re straightforward: crisp cereal, melted marshmallow glue, a slick of chocolate, and bright Mini M&Ms pressed on while the coating is still wet. If you want to feed a group, make a themed dessert for a birthday, or keep kids busy with a hands-on activity, this is the kind of recipe that delivers every time.
Work in small batches, keep tools ready, and plan to move fast once the marshmallows are melted. The steps are simple, but timing matters: marshmallow mixtures set quickly and chocolate needs to be smooth for a clean dip. I’ll walk you through the exact ingredient list, the precise steps, and practical tips to make neat, sturdy Mickey shapes (or any cutter you prefer).
No fancy technique here—just good prep and a few tricks to keep cleanup and stress minimal. Follow the instructions and you’ll have glossy, colorful treats that look like they came from a theme-park bakery.
Ingredient List
- 9 cups (237 g) Rice Krispies Cereal — provides the crisp base and structure; measure into a large bowl and set aside so it’s ready when the marshmallow is melted.
- 20 ounces (566 g) mini marshmallows, divided — the binder and sweet component; melted with butter to coat the cereal evenly.
- 8 tablespoons (113 g) unsalted butter — melts with the marshmallows to create a smooth, spreadable mixture and adds richness.
- 1 teaspoon (15 ml) vanilla extract — a small amount that brightens flavor; stir in after removing the pan from heat.
- 8 ounces chocolate candy melts — used for coating the cut shapes; melts smoothly and sets with a glossy finish.
- 116.9 ounce (family size) bag Mini M&Ms — pressed into the melted chocolate for color and crunch; use as many as you like for decoration.
Cook Disney Rice Krispie Treats Like This
- Preheat no oven is needed. Line two 9-inch pans with foil or parchment and spray the lining lightly with nonstick cooking spray.
- Measure 9 cups (237 g) Rice Krispies cereal into a large bowl and set aside.
- In a large saucepan, melt 8 tablespoons (113 g) unsalted butter over medium heat.
- Add 20 ounces (566 g) mini marshmallows to the melted butter and stir constantly until the marshmallows are completely melted and the mixture is smooth. Remove the pan from the heat.
- Stir 1 teaspoon (15 ml) vanilla extract into the melted marshmallow mixture.
- Quickly pour the marshmallow mixture over the cereal in the large bowl. Fold and stir until all the cereal is evenly coated.
- Divide the coated cereal mixture between the two prepared pans. Using a buttered spatula or a piece of wax paper (spray the wax paper with nonstick spray so it won’t stick to your hands), press the mixture firmly and evenly into the pans to compact it.
- Let the Rice Krispie layers cool and set until firm at room temperature (about 20–30 minutes).
- Lift the set Rice Krispie slabs from the pans using the foil or parchment and peel the lining off the bottoms. Place the slabs on a cutting board or work surface.
- Use a Mickey Mouse–shaped cookie cutter to cut desired shapes from the slabs. Transfer the cut shapes to a wax-paper-lined baking sheet. Save any scraps to reshape or re-press if desired.
- Melt 8 ounces chocolate candy melts according to the package directions. (If using a microwave: place melts in a microwave-safe bowl and heat at 50% power in 30-second increments, stirring after each increment, until smooth.)
- Dip each Rice Krispie shape into the melted chocolate to coat as desired. Use a fork or dipping tool to lift the treat and let excess chocolate drip back into the bowl.
- Immediately press Mini M&Ms (from the 116.9 ounce (family size) bag) onto the chocolate-coated treats so they adhere. Place finished treats back on the wax-paper-lined sheet.
- Allow the chocolate to harden completely at room temperature (or refrigerate briefly to speed setting).
- Store the finished treats in an airtight container at room temperature for up to 3 days. To freeze: make sure treats are completely cool and set, cut into bars if not already individual, wrap each bar individually in wax paper, place in an airtight container, and freeze for up to 3 months.
Why This Recipe Belongs in Your Rotation
It’s fast. From start to finish you’re only working with a few clean-up-friendly steps and no oven. Families can rally around this one—kids enjoy pressing the M&Ms into the chocolate and watching shapes appear. Parties benefit because the final treats are portable, visually festive, and hold up well for serving.
It’s forgiving. The marshmallow-to-cereal ratio makes a sturdy slab that’s easy to cut. If you mess up the first press, scraps can be re-pressed and reused. The chocolate coating hides imperfections and adds a professional touch without specialist skills.
It scales. Want more? Double the recipe. Need fewer? Make half a slab and press smaller cutouts. The method stays the same, so you can tailor yield without changing technique.
Budget & Availability Swaps
If you can’t source a family-size bag of Mini M&Ms, smaller bags work fine—combine several or use fewer candies for a more economical topping. Store-brand puffed rice cereal labeled as equivalent to Rice Krispies will perform similarly and usually costs less.
Candy melts are convenient, but if you find a different chocolate coating more accessible at your store, use what you can melt and work with confidently. The key is smoothness and temper: the coating should be pourable and set firm enough to support the candies.
Setup & Equipment
Gather these items before you start to keep the process smooth:
- Two 9-inch pans lined with foil or parchment and lightly sprayed
- Large mixing bowl for the cereal
- Large saucepan for melting butter and marshmallows
- Butter or rubber spatula and a piece of wax paper for pressing
- Mickey Mouse–shaped cookie cutter (or any desired cutter)
- Wax-paper-lined baking sheet for finished shapes
- Microwave-safe bowl or double boiler for melting candy melts
- Forks or dipping tools for coating, and nonstick spray for wax paper or cutters
Small tips for setup
Have the cereal measured and the pans ready before you melt marshmallows. Once the marshmallows are liquid, you’ll need to work quickly to fold and press without the mixture setting in the pot or bowl.
What Not to Do
Don’t walk away when melting marshmallows. They can scorch quickly and will taste burnt. Don’t skip the nonstick spray on your pressing tools—wax paper or a buttered spatula avoids tearing and sticking.
Don’t over-press the mixture into the pans. Press firmly to compact, but avoid crushing the crispy texture completely; overworked slabs can become dense and lose the light bite that makes these treats satisfying.
Don’t dip pieces while the chocolate is grainy or too cool. Stir to maintain smoothness. If the coating starts to seize, it won’t coat neatly and candies won’t adhere properly.
Health-Conscious Tweaks
This is an indulgent treat, so small adjustments can help if you’re watching intake. Make slightly thinner slabs in the pans so each cut shape is smaller and the per-serving portion is reduced. Use fewer Mini M&Ms per piece to cut sugar and calories without changing the base recipe.
Serve these as a shared treat rather than individual portions at large gatherings to encourage moderation. The printed storage guidance (up to 3 days at room temperature or frozen up to 3 months) helps avoid letting extras sit out and get stale.
Cook’s Notes
Timing
Work quickly when the marshmallow mixture is hot—mix, pour, and press without delay. Allow the slab to firm at room temperature before cutting; chilling too quickly can make cutting messy unless you’re using a very sharp cutter.
Melting and Dipping
Melt the chocolate candy melts per package directions and keep them warm and smooth while you dip. If you must reheat, do so gently in short bursts to avoid overheating. Use a fork or dipping tool to lift and let excess drip back for a cleaner finish.
Decorating
Press Mini M&Ms immediately after dipping so they stick to the still-wet chocolate. If you prefer precision, arrange candies in patterns while the coating is still tacky.
Keep-It-Fresh Plan
Store the finished treats in an airtight container at room temperature for up to 3 days. Layer with parchment or wax paper to prevent sticking. If you need longer storage, freeze wrapped individual pieces in wax paper inside an airtight container for up to 3 months.
To thaw frozen treats, move them to the refrigerator for an hour or two, then bring to room temperature before serving to avoid condensation forming on the chocolate surface.
Ask the Chef
Q: Can I make the Rice Krispie slabs ahead of time?
A: Yes. Make the slabs and keep them uncut, wrapped, or stored in an airtight container. Cut, dip, and decorate on the day you plan to serve for best texture and appearance.
Q: What if I don’t have a Mickey-shaped cutter?
A: Any cookie cutter will work. Squares, circles, or rectangles cut with a sharp knife are totally fine. The method stays the same regardless of shape.
Q: My chocolate isn’t smooth after melting. Now what?
A: Stir thoroughly and warm gently in short bursts if using a microwave. If graininess persists, a small splash of neutral oil or shortening (if you have it) can sometimes smooth candy melts, but follow the candy-melt package guidance first.
In Closing
Disney Rice Krispie Treats are dependable, cheerful, and surprisingly versatile. Follow the simple method—measure, melt, mix, press, cut, dip, decorate—and you’ll end up with treats that look festive and taste familiar. Keep your tools ready, move with a plan, and enjoy the process as much as the result. These are perfect for gatherings, classroom parties, or a weekend project that makes everyone smile.
Disney Rice Krispie Treats
Ingredients
Equipment
Method
- Preheat no oven is needed. Line two 9-inch pans with foil or parchment and spray the lining lightly with nonstick cooking spray.
- Measure 9 cups (237 g) Rice Krispies cereal into a large bowl and set aside.
- In a large saucepan, melt 8 tablespoons (113 g) unsalted butter over medium heat.
- Add 20 ounces (566 g) mini marshmallows to the melted butter and stir constantly until the marshmallows are completely melted and the mixture is smooth. Remove the pan from the heat.
- Stir 1 teaspoon (15 ml) vanilla extract into the melted marshmallow mixture.
- Quickly pour the marshmallow mixture over the cereal in the large bowl. Fold and stir until all the cereal is evenly coated.
- Divide the coated cereal mixture between the two prepared pans. Using a buttered spatula or a piece of wax paper (spray the wax paper with nonstick spray so it won’t stick to your hands), press the mixture firmly and evenly into the pans to compact it.
- Let the Rice Krispie layers cool and set until firm at room temperature (about 20–30 minutes).
- Lift the set Rice Krispie slabs from the pans using the foil or parchment and peel the lining off the bottoms. Place the slabs on a cutting board or work surface.
- Use a Mickey Mouse–shaped cookie cutter to cut desired shapes from the slabs. Transfer the cut shapes to a wax-paper-lined baking sheet. Save any scraps to reshape or re-press if desired.
- Melt 8 ounces chocolate candy melts according to the package directions. (If using a microwave: place melts in a microwave-safe bowl and heat at 50% power in 30-second increments, stirring after each increment, until smooth.)
- Dip each Rice Krispie shape into the melted chocolate to coat as desired. Use a fork or dipping tool to lift the treat and let excess chocolate drip back into the bowl.
- Immediately press Mini M&Ms (from the 116.9 ounce (family size) bag) onto the chocolate-coated treats so they adhere. Place finished treats back on the wax-paper-lined sheet.
- Allow the chocolate to harden completely at room temperature (or refrigerate briefly to speed setting).
- Store the finished treats in an airtight container at room temperature for up to 3 days. To freeze: make sure treats are completely cool and set, cut into bars if not already individual, wrap each bar individually in wax paper, place in an airtight container, and freeze for up to 3 months.
Notes
You can use any size marshmallows, just make sure you’re only using 15ounces in the actual mixture – you’ll want mini ones to mix in or you’ll have toslice large ones to fold in at the end.
Only use FRESH marshmallows and not-stale cereal for best results.
You can use any color candy melts, chocolate chips, or white chocolate for different designs, but I recommend Ghirardelli candy melts.
You may have some M&Ms left over. My recipe made 14 but it will depend on the size of your cookie cutter.