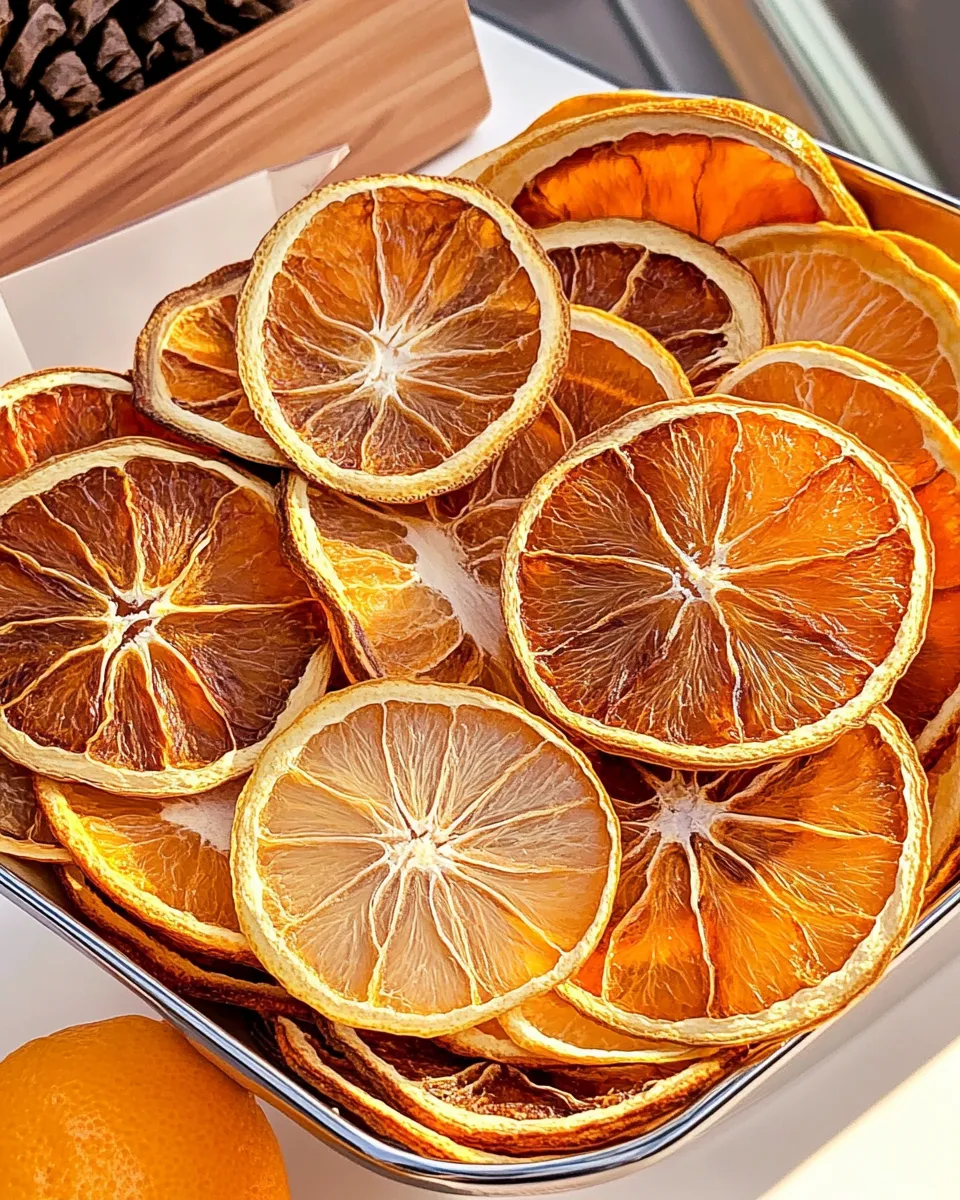
Easy Oven-Dried Orange Slices
I make oven-dried orange slices all year, and I turn to them for simple garnish, a pretty napkin-ring, or a long-lasting holiday ornament. They look fancy but take surprisingly little hands-on time. Mostly you wait and monitor, then enjoy the bright, concentrated citrus flavor in a dozen small ways.
This method keeps things practical: low heat, a little patience, and a couple of tricks I learned the hard way. You don’t need fancy equipment — just a sharp knife, parchment, and an oven that can go low. I’ll walk you through the exact steps I use every time.
Whether you want crisp cocktail toppers, tea flavoring, or natural potpourri, this recipe is forgiving. The slices can be leathery or crisp depending on thickness and oven time. Read the tips and the troubleshooting section so you get the result you want on your first batch.
The Essentials
Oven-dried orange slices are about controlling moisture, not cooking. Use the lowest oven temperature you have and keep the door cracked so steam escapes. Thin, even slices dry more quickly and more uniformly than thick ones.
Expect a long time in the oven. That’s normal. The work is short: wash, slice, arrange, and check. Most of the time is passive, so plan around other kitchen tasks or an afternoon at home.
Be prepared for two textures: if you slice very thin, you’ll get crisp rounds; if slices stay slightly thicker, they’ll be leathery but still beautifully preserved. Both are useful—decide on the finish you want before you start slicing.
Ingredients
- 5 oranges — the only ingredient. Choose firm, ripe oranges for the best color and aroma; peel blemishes won’t affect drying but choose ones without soft spots.
Oven-Dried Orange Slices Made Stepwise
- Preheat your oven to 140°F (or to its lowest temperature) and place a rack in the center of the oven.
- Wash and dry all 5 oranges. Using a sharp knife, slice each orange into thin, even rounds.
- Line one or more baking sheets with parchment paper. Set wire cooling racks on top of the parchment-lined sheets (or use the parchment-lined sheets alone), so air can circulate around the slices and any drips are caught on the parchment.
- Arrange the orange slices in a single layer on the wire racks (or parchment), making sure slices do not overlap.
- Place an oven thermometer on the same rack near the slices to monitor the actual temperature.
- Put the sheets/racks in the oven and leave the oven door slightly open to allow moisture to escape.
- Dry the slices, checking them regularly. Every 30–60 minutes, rotate the baking sheets or swap rack positions and, if needed, flip the slices so they dry evenly. Continue until the slices are dry to the touch and no longer tacky (they may be leathery or crisp, depending on thickness).
- Remove the trays and let the orange slices cool completely on the racks to room temperature.
- Once fully cooled, store the dried orange slices in an airtight container.
Why I Love This Recipe

This technique concentrates orange flavor and preserves the fruit’s aroma without added sugar or special equipment. The color deepens during drying, and the edges caramelize subtly, so the slices look as good as they taste. They make an instant upgrade for drinks and gifts.
They’re versatile. I use them for cocktail garnishes, tea infusions, wreaths, or to tie onto a package instead of a ribbon. They keep for weeks if stored properly, so one afternoon of work yields many small delights for future use.
Practically speaking, it’s a low-cost way to make seasonal decorations that smell great and compost cleanly at the end of their life. I also appreciate that the process teaches patience: check, rotate, and learn your oven’s quirks.
What to Use Instead

If you don’t have oranges or want a slightly different flavor, other citrus fruits work well. Lemons and limes dry quickly and give a sharper, brighter aroma. Grapefruit produces larger, more dramatic slices with a gentler bitterness. Tangerines and clementines make sweeter, smaller rounds.
For a non-citrus option, thin apple slices dry well and offer a warm, autumnal scent. They need a little more attention to avoid browning too fast, but they’re a good substitute for decorative and edible uses.
Tools of the Trade
What I always have on hand
- Sharp chef’s knife — for even, controlled slices.
- Baking sheets lined with parchment — catches drips and makes cleanup simple.
- Wire cooling racks — lift slices for better air circulation and more even drying.
- Oven thermometer — confirms the oven truly sits at a low temperature.
- Airtight storage container — keeps finished slices crisp and protects them from humidity.
Nice-to-have (optional)
- Mandoline — for very thin, uniform slices if you plan to make large batches.
- Cooling racks that fit inside baking sheets — handy for multi-level drying.
Don’t Do This
- Do not overcrowd the slices. Overlap traps moisture and invites uneven drying or mold.
- Do not bake at high heat to speed things up. High temperatures cook and brown rather than gently dry the fruit.
- Do not skip the oven thermometer. Many ovens read warmer than their setting and will over-brown or caramelize the slices too quickly.
- Do not store slices before they are fully cooled and dry. Trapped warmth and moisture create condensation and spoilage.
Make It Diet-Friendly
Dried orange slices are simply dehydrated fruit, so they contain concentrated natural sugars. If you’re watching sugar, use them sparingly as a garnish rather than a snack. A single slice adds big flavor to a drink without much sugar by quantity.
For low-carb or keto diets, these are best used for aroma, decor, or infusion where only a tiny piece is needed. The visual and flavor punch is large compared with the actual carbohydrate contribution when used sparingly.
Because there’s no added sugar or syrup, you’re preserving the fruit as-is. That keeps the ingredient list clean and predictable, which is often the goal in diet-focused kitchens.
What I Learned Testing
Thickness matters more than you think. Slices about 1/8 inch thick dry to a pleasant chew; thinner slices crisp and can shatter like a cookie. I tested several batches: at 1/16 inch the drying time dropped noticeably, but the slices required very careful handling.
Oven temperature stability is crucial. On one test, an oven that read 160°F on its dial was actually 180°F on the thermometer. The result was faster browning and a bitter finish at the edges. After that I always use an oven thermometer and set the dial a touch lower than usual.
Leaving the door slightly open makes a real difference. In a sealed oven, moisture accumulates and slows drying. Even a small gap helps the steam vent and shortens the overall time while keeping texture even.
Storage Pro Tips
Store cooled slices in an airtight container away from sunlight and heat. A glass jar with a tight lid or a good-quality plastic container works fine. If you live somewhere humid, include a small food-safe desiccant packet or a folded paper towel inside the container to absorb stray moisture.
Label the container with the date. Kept dry and sealed, the slices will stay attractive and usable for several weeks, sometimes a couple of months. If they begin to smell off or show any mold, discard them.
If you need longer storage, you can vacuum-seal the slices in a bag and keep them in a cool, dark place. I only do this for gifts because the vacuum-sealed bags also compress the slices and change their appearance slightly.
Troubleshooting Q&A
Q: My slices are sticky after cooling. What happened?
A: They weren’t fully dried. Return them to the oven and continue drying in short increments. Flip them and rotate the trays as described until they’re no longer tacky. Ensure your oven is truly at a low, steady temperature — an oven that’s too warm can caramelize sugars and leave a sticky surface.
Q: The slices browned at the edges but remained wet in the middle. Why?
A: That’s usually uneven slicing or crowded trays. Slice evenly and maintain a single layer without overlap. Rotate trays more frequently and flip slices to expose both sides evenly to circulating warm air.
Q: How thin is too thin?
A: If you slice paper-thin (less than about 1/16 inch), the slices can dry very quickly and become brittle. That’s not bad, but they’ll be fragile. Use a mandoline if you want perfect uniformity; otherwise, a steady hand with a sharp knife is fine for most home batches.
Q: Can I sweeten or candy these in the oven?
A: This recipe intentionally does not add sugar. If you want candied slices, you’ll need a different process that involves simmering in sugar syrup before drying. That’s a separate method because the syrup changes drying times and texture.
Q: How long will they last?
A: Properly dried and stored slices can last several weeks to a few months. Keep them in an airtight container and check periodically for any signs of moisture or mold.
The Takeaway
Oven-dried orange slices are an easy, low-effort project with high reward. The method is forgiving: low heat, good airflow, and patience. Use them for garnish, decor, or scent; store them right; and adjust slice thickness to get the texture you prefer.
Start with 5 oranges, follow the simple steps, and you’ll have a stack of bright, fragrant slices in a single afternoon. They’re small touches that make drinks and gifts feel personal. Try one tray and learn your oven’s quirks—I promise you’ll come back for more.

Easy Oven-Dried Orange Slices
Ingredients
Equipment
Method
- Preheat your oven to 140°F (or to its lowest temperature) and place a rack in the center of the oven.
- Wash and dry all 5 oranges. Using a sharp knife, slice each orange into thin, even rounds.
- Line one or more baking sheets with parchment paper. Set wire cooling racks on top of the parchment-lined sheets (or use the parchment-lined sheets alone), so air can circulate around the slices and any drips are caught on the parchment.
- Arrange the orange slices in a single layer on the wire racks (or parchment), making sure slices do not overlap.
- Place an oven thermometer on the same rack near the slices to monitor the actual temperature.
- Put the sheets/racks in the oven and leave the oven door slightly open to allow moisture to escape.
- Dry the slices, checking them regularly. Every 30–60 minutes, rotate the baking sheets or swap rack positions and, if needed, flip the slices so they dry evenly. Continue until the slices are dry to the touch and no longer tacky (they may be leathery or crisp, depending on thickness).
- Remove the trays and let the orange slices cool completely on the racks to room temperature.
- Once fully cooled, store the dried orange slices in an airtight container.