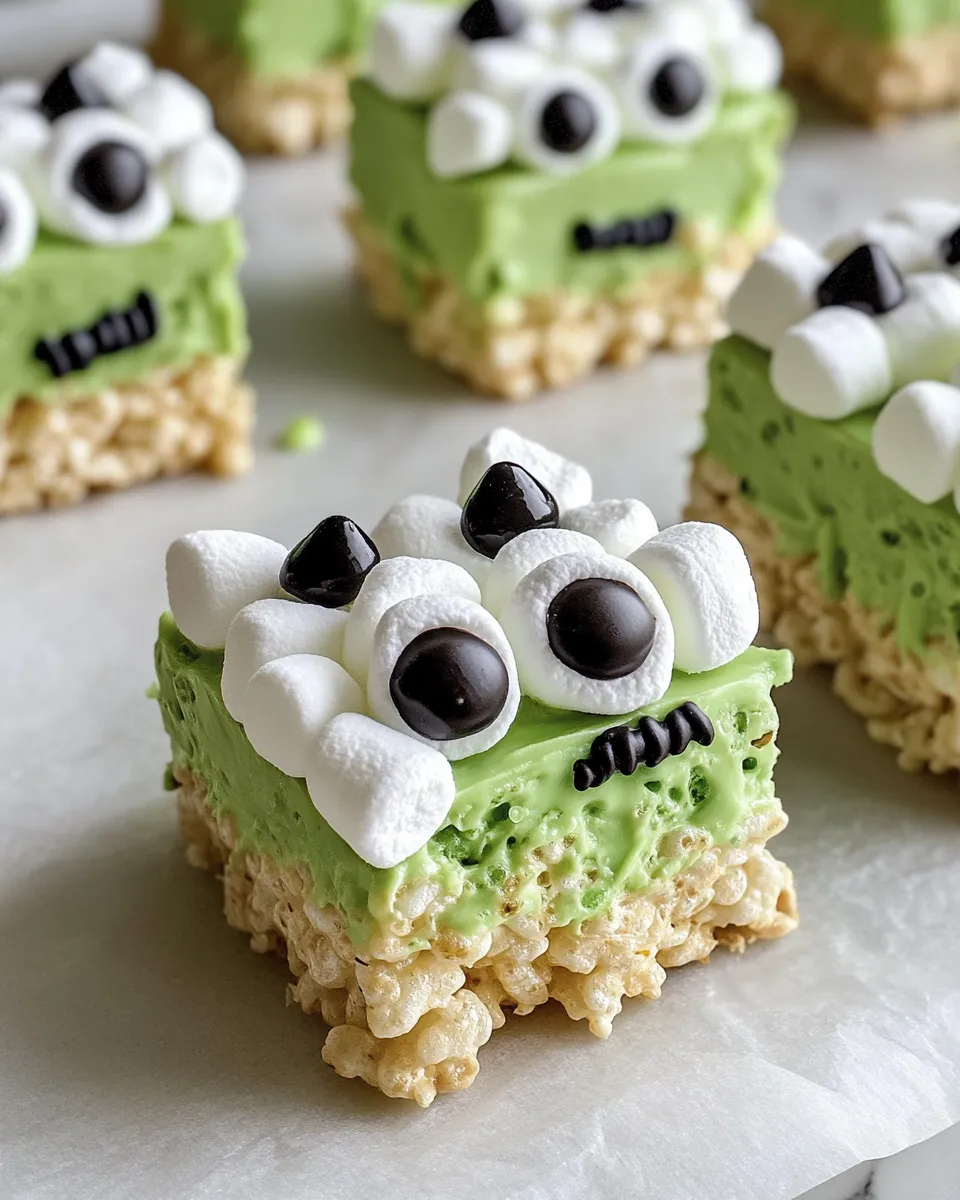
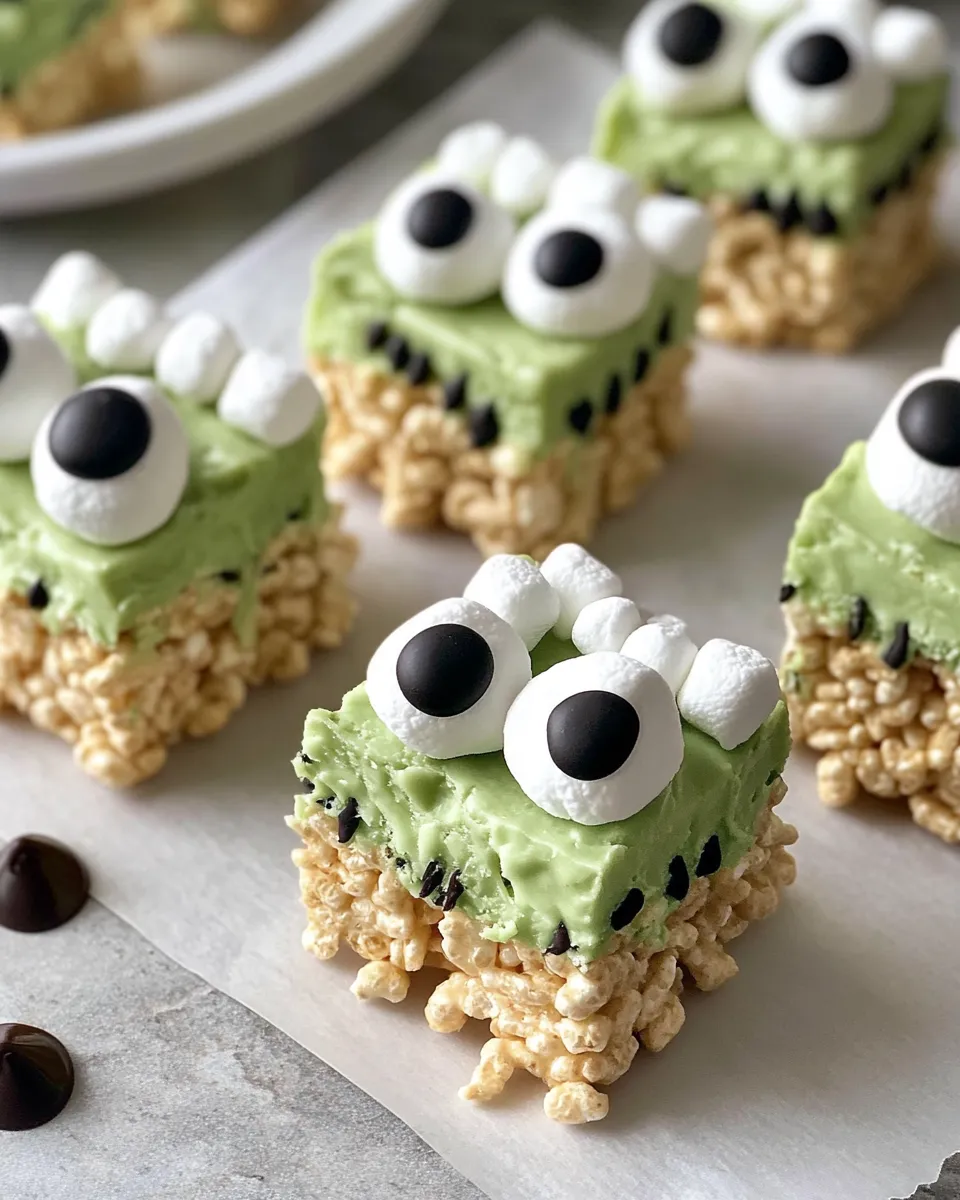
Frankenstein Rice Krispie Treats
These Frankenstein Rice Krispie Treats are a Halloween-ready riff on the classic no-bake snack. They come together fast, rely on a short ingredient list, and finish with playful decorations that kids and grown-ups both love. I test recipes like this in a tiny home kitchen and aim for reliably good results, not fanciful perfection.
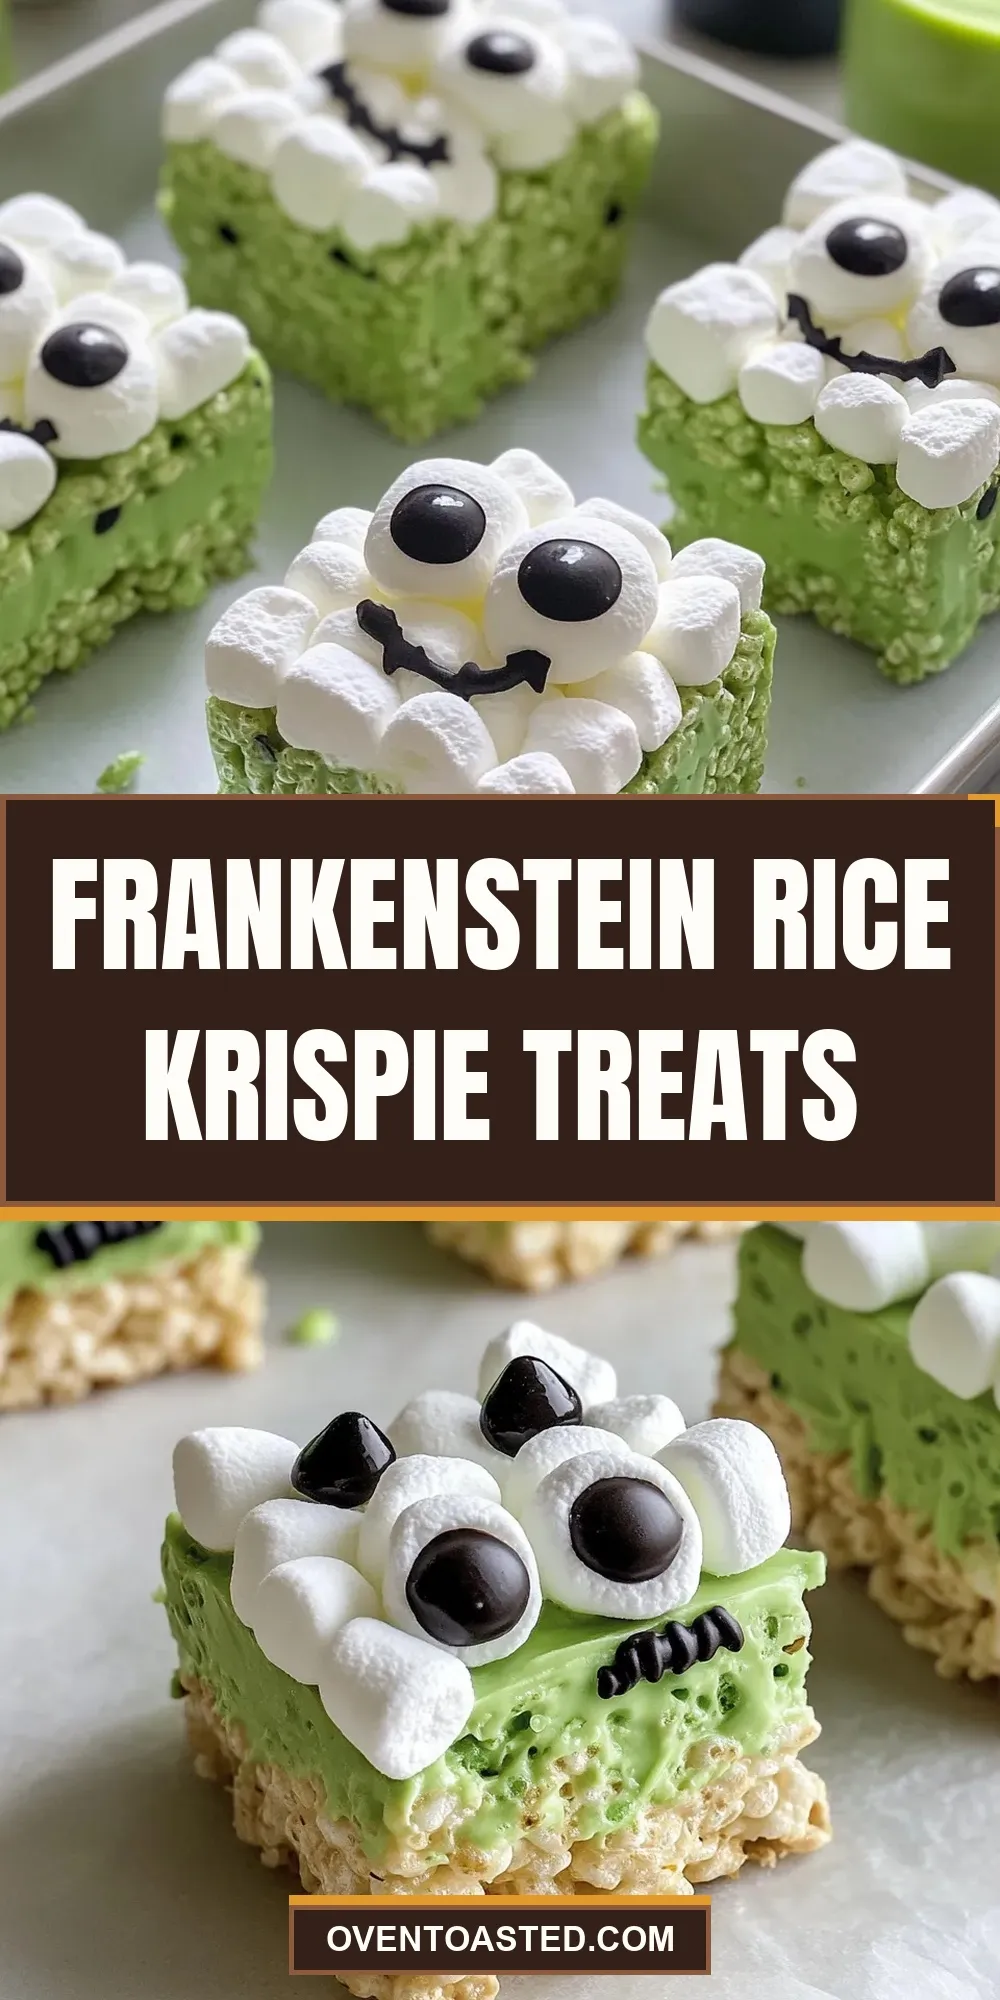
In this post I’ll walk you through exactly what goes into them, show the step-by-step method, and share practical tips I use when I make a big batch for school parties or a neighborhood potluck. The green color comes from a simple addition to a peanut-butter-and-honey base, and the black candy melt details give these bars their monster personality.
Read straight through for the recipe, or jump to the sections on troubleshooting, storage, or quick Q&A if you want a fast answer. These treats are forgiving, but a few tried-and-true habits make the difference between crumbly squares and tidy Frankenstein bars.
What Goes Into Frankenstein Rice Krispie Treats
Ingredients
- 1/2 cup peanut butter — binds the cereal and adds richness and chew.
- 1/3 cup honey, or maple syrup — sweetener and glue; maple syrup is the listed substitute if you prefer.
- 1 tsp vanilla — brightens the flavor and rounds out the sweetness.
- Pinch of salt — balances the sweetness and enhances peanut flavor.
- A few drops green food coloring — gives the peanut-butter mixture its Frankenstein hue; add gradually to reach the shade you want.
- 3 cups crispy brown rice cereal — the body of the bars; provides crunch and structure.
- Edible candy eyes — simple, ready-made eyes to create faces; use however many bars you make.
- Pretzel sticks — trimmed to look like bolts at the neck; they add texture and a salty contrast.
- 110 oz bag black candy melts (you won’t use it all) — melts into smooth black icing for hair, mouths, and glue; melts reliably in short bursts.
Build Frankenstein Rice Krispie Treats Step by Step
- Line an 8×8-inch baking pan with parchment paper or lightly spray it with nonstick cooking spray; set aside.
- Measure 3 cups crispy brown rice cereal into a large bowl and set aside.
- In a medium saucepan over low heat, combine 1/2 cup peanut butter, 1/3 cup honey (or maple syrup), 1 tsp vanilla, and a pinch of salt. Stir constantly until the mixture is smooth and combined. (Alternatively, place these ingredients in a microwave-safe bowl and heat in 30-second intervals, stirring between each, until smooth.)
- Remove the saucepan from the heat and add a few drops of green food coloring. Whisk until the color is evenly distributed and you have the desired shade of green.
- Pour the green peanut-butter mixture over the 3 cups of crispy brown rice cereal. Stir gently but thoroughly until every piece of cereal is coated.
- Transfer the coated cereal mixture to the prepared 8×8 pan. Use a spatula to spread it evenly, then press firmly and evenly to pack the mixture so the treats will hold together when set.
- Cover the pan and refrigerate for at least 3 hours, or until the mixture is firm.
- Carefully lift the set slab from the pan using the parchment paper, place on a cutting board, and cut into 16 bars.
- Place black candy melts (from the 110 oz bag black candy melts; you won’t use it all) in a small microwave-safe bowl. Microwave in 30-second intervals, stirring between each, until the melts are fully smooth.
- Transfer a portion of the melted black candy to a small piping bag or a plastic sandwich bag with a small slit cut at one corner. Use the melted candy to pipe hair and a squiggly mouth onto each bar and to “glue” edible candy eyes onto the face.
- Trim pretzel sticks to the desired length for bolts. Use a small dab of melted black candy as glue to attach one pretzel stick to each side of a bar; press gently so the pretzels stick.
- Allow the piped decoration and glued pieces to set at room temperature (or chill briefly) until the candy has hardened. Serve and enjoy.
Why This Frankenstein Rice Krispie Treats Stands Out
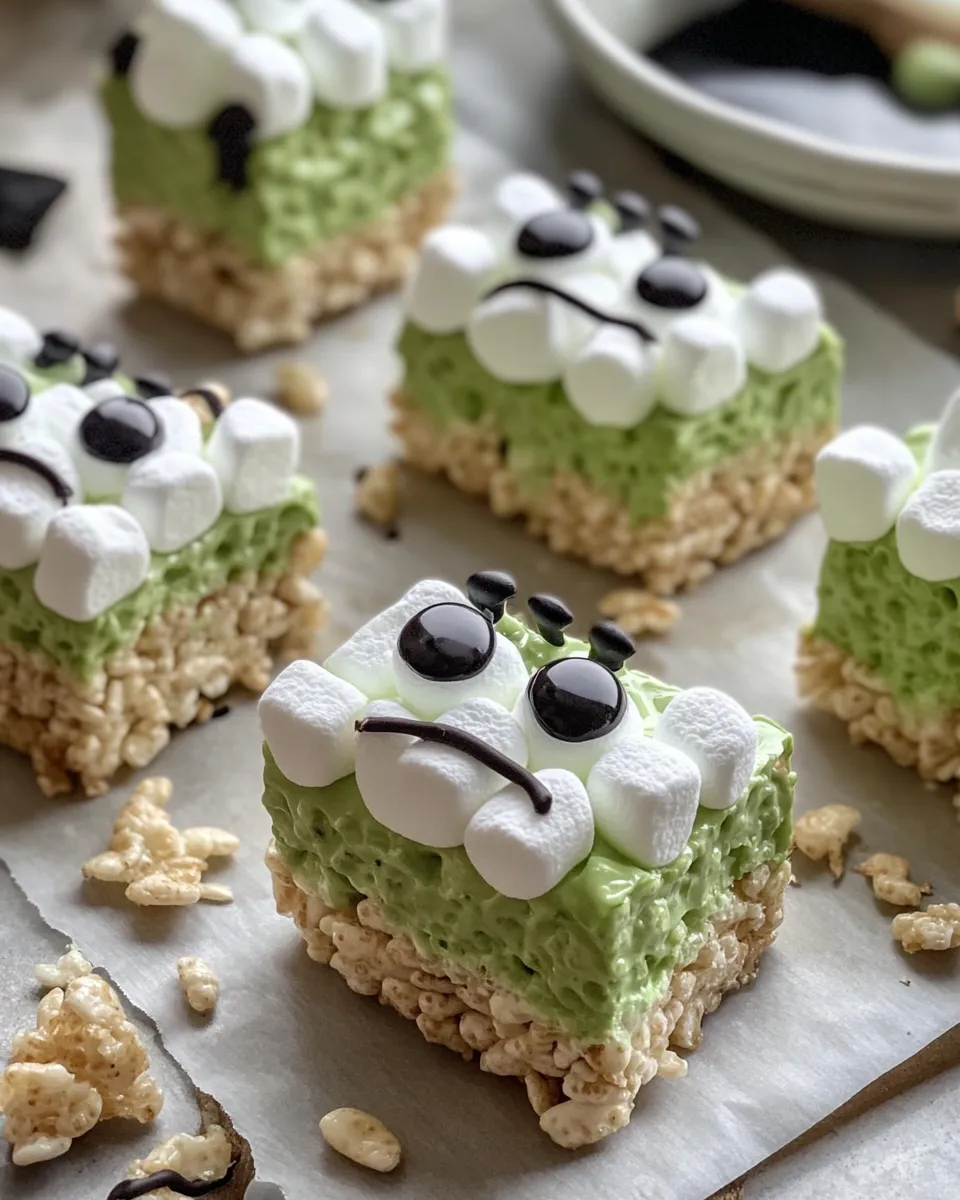
These bars are a smart twist on a simple treat. Swapping marshmallow for a peanut-butter-and-honey base gives them a denser, chewier texture and more flavor depth. The green tint is purely visual but makes a big playful impression, while black candy melts let you add crisp, graphic details—hair, mouths, even stitches—without fuss.
They’re also versatile: they require no oven, they hold up well for parties, and the recipe scales. Because everything sets in the fridge, you can make them a day ahead and finish the decorations the morning of your event.
If You’re Out Of…
If you’re missing one of the listed items, you have limited but practical options within the recipe’s own allowances:
- If you’re out of honey — use maple syrup (the recipe includes it as an alternative).
- If you don’t have a piping bag — a plastic sandwich bag with a tiny corner snipped works perfectly and is suggested in the instructions.
- If you don’t have parchment paper — lightly nonstick-spray the pan as directed to prevent sticking.
Before You Start: Equipment
Must-haves
- 8×8-inch baking pan — shapes the slab for even bars.
- Medium saucepan or microwave-safe bowl — for melting and combining the peanut butter and honey/maple syrup.
- Large mixing bowl and spatula — to combine cereal and coating and to transfer to the pan.
- Small microwave-safe bowl and piping bag or plastic sandwich bag — for melting and applying the black candy melts.
- Sharp knife and cutting board — for neat, even bars.
Nice-to-haves
- Parchment paper — makes removal and cutting much cleaner.
- Small spatula or bench scraper — helps press the mixture evenly into the pan.
Frequent Missteps to Avoid
- Pressing too lightly into the pan — the treats will fall apart. Press firmly and evenly so the cereal binds well.
- Overheating the peanut-butter mixture — keep heat low and stir constantly; burnt or overheated peanut butter becomes grainy and loses flavor.
- Adding too much food coloring at once — a few drops at a time prevents an overly dark hue and avoids strange aftertastes.
- Skipping the chill time — slicing warm bars will make a mess. Refrigerate for at least 3 hours, as instructed, before cutting.
- Working with candy melts that haven’t fully smoothed — stir until completely fluid; lumps make piping difficult and can break the thin lines you’ll use for faces.
Customize for Your Needs
Customization here is mostly visual and procedural rather than ingredient-heavy. A few easy adjustments keep you within the recipe’s framework:
- Color intensity — add green food coloring a drop at a time to reach a pale green for subtle effect or a bright one for full-on Frankenstein vibes.
- Bar size — the recipe yields 16 bars when you cut the 8×8 slab; cut larger or smaller pieces to suit your crowd.
- Decoration scale — pipe smaller details for a more refined look, or go big with hair and mouths for a playful presentation. The black candy melts are versatile for both.
Insider Tips
Small habits make this recipe effortless in practice. I use these every time:
- Warm the peanut butter a touch before measuring if it’s very stiff. It blends and melts faster that way.
- When pressing the mixture into the pan, place a piece of parchment over the slab and press with the palm of your hand or the bottom of a measuring cup for a smooth top.
- Cool the slab completely before cutting to get clean edges. Chill at least 3 hours per the recipe; overnight is fine.
- Use a clean, hot knife when slicing. Wipe the blade between cuts to prevent ragged edges from melted candy or sticky filling.
- Pipe a small dot of black candy where the pretzel will sit, then press the pretzel into that dot—the melted candy acts as glue and sets quickly.
Best Ways to Store
Store finished bars in an airtight container at room temperature for up to 2 days. If your kitchen is warm, or if you’ve used a softer candy melt decoration that could soften, store in the fridge in a single layer to keep the decorations intact. When refrigerated they’ll stay good for up to 5 days.
For longer storage, wrap bars individually in plastic wrap and freeze in a single layer for up to one month. Thaw wrapped at room temperature before unwrapping to avoid condensation on the candy details.
Handy Q&A
Can I make these nut-free?
The recipe as written uses peanut butter and is not nut-free. If you need to avoid nuts, do not make them as-is; the recipe does not include an alternative nut-free binder.
Can I skip the candy melts?
You can skip decorating with candy melts, but the black details are what create the Frankenstein face. If you skip them, consider using the edible candy eyes alone for a simpler look.
How far in advance can I make them?
Make the slabs and chill them up to 2 days ahead; finish piping and assembling pretzels the day of serving for the freshest look. Fully decorated bars keep best refrigerated for several days if needed.
Why refrigerate for 3 hours?
The peanut-butter-and-honey mixture needs time to cool and firm up so the cereal binds into a stable slab. Cutting too early leads to crumbly bars and smeared decorations.
Let’s Eat
When you’re ready to serve, arrange the bars on a tray and let them sit out 10–15 minutes if chilled, so the texture relaxes slightly. These bars are fun to eat with fingers—no forks required—and the salty pretzel bolts cut through the sweetness in a satisfying way.
Make a double batch for a party and leave a small bowl of extra candy eyes for guests to add their own faces. They’re an easy project to involve kids in assembly and a simple way to make an everyday treat feel festive.
If you try them, tell me how you decorated yours—messy squiggles, neat hairlines, or a wild eye pattern—I love seeing small variations and what folks do with a basic formula. Happy baking (well, no baking), and enjoy your Frankenstein Rice Krispie Treats.

Frankenstein Rice Krispie Treats
Ingredients
Equipment
Method
- Line an 8×8-inch baking pan with parchment paper or lightly spray it with nonstick cooking spray; set aside.
- Measure 3 cups crispy brown rice cereal into a large bowl and set aside.
- In a medium saucepan over low heat, combine 1/2 cup peanut butter, 1/3 cup honey (or maple syrup), 1 tsp vanilla, and a pinch of salt. Stir constantly until the mixture is smooth and combined. (Alternatively, place these ingredients in a microwave-safe bowl and heat in 30-second intervals, stirring between each, until smooth.)
- Remove the saucepan from the heat and add a few drops of green food coloring. Whisk until the color is evenly distributed and you have the desired shade of green.
- Pour the green peanut-butter mixture over the 3 cups of crispy brown rice cereal. Stir gently but thoroughly until every piece of cereal is coated.
- Transfer the coated cereal mixture to the prepared 8×8 pan. Use a spatula to spread it evenly, then press firmly and evenly to pack the mixture so the treats will hold together when set.
- Cover the pan and refrigerate for at least 3 hours, or until the mixture is firm.
- Carefully lift the set slab from the pan using the parchment paper, place on a cutting board, and cut into 16 bars.
- Place black candy melts (from the 110 oz bag black candy melts; you won’t use it all) in a small microwave-safe bowl. Microwave in 30-second intervals, stirring between each, until the melts are fully smooth.
- Transfer a portion of the melted black candy to a small piping bag or a plastic sandwich bag with a small slit cut at one corner. Use the melted candy to pipe hair and a squiggly mouth onto each bar and to “glue” edible candy eyes onto the face.
- Trim pretzel sticks to the desired length for bolts. Use a small dab of melted black candy as glue to attach one pretzel stick to each side of a bar; press gently so the pretzels stick.
- Allow the piped decoration and glued pieces to set at room temperature (or chill briefly) until the candy has hardened. Serve and enjoy.