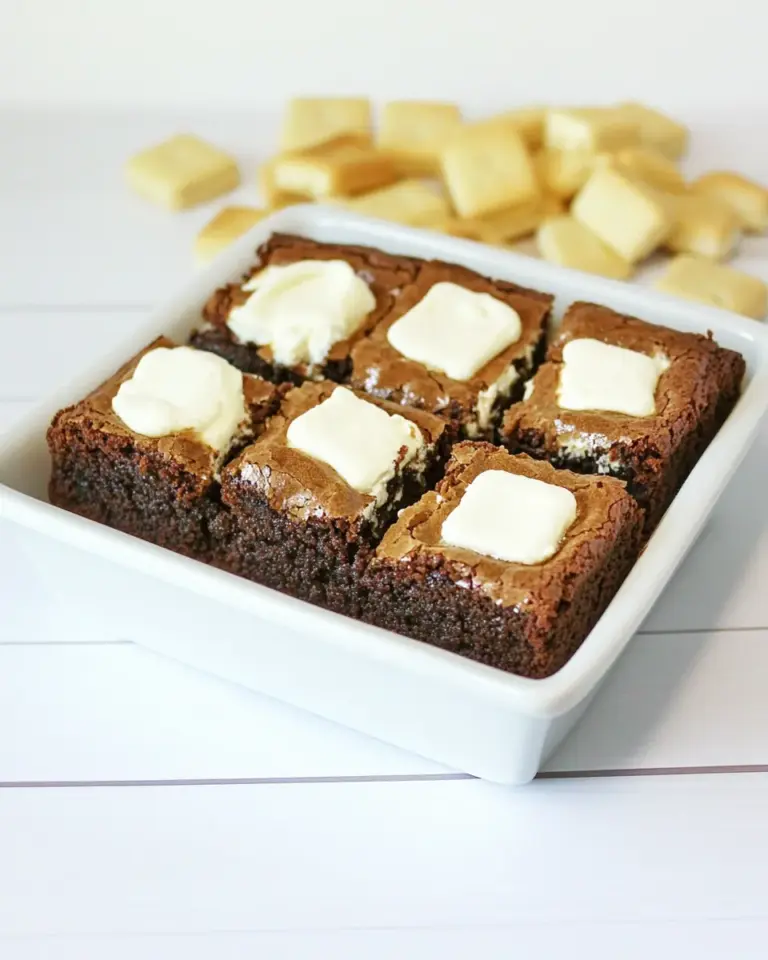
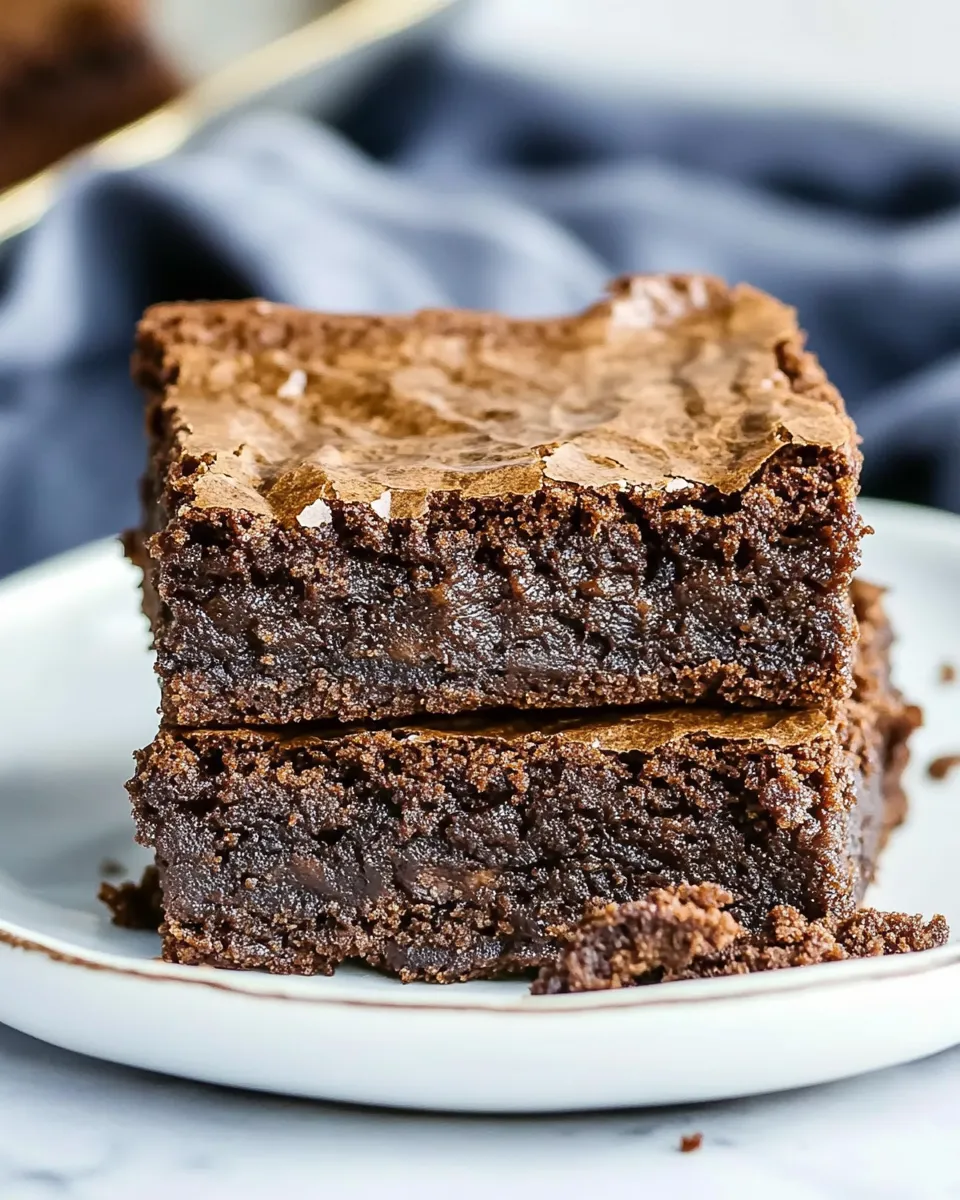
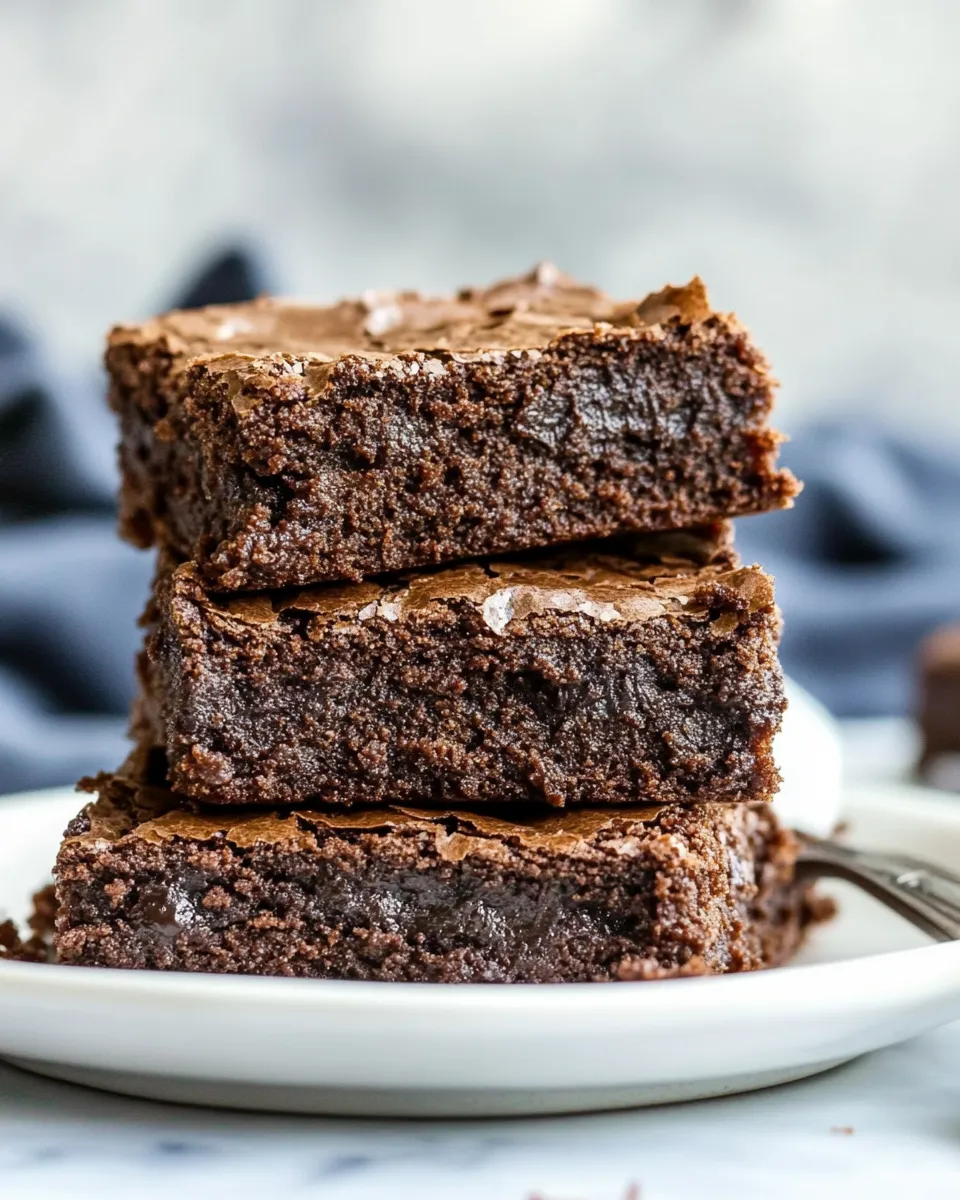
Gluten Free Brownies Recipe
These brownies are the kind I reach for when I want something reliably fudgy and straightforward — no fuss, just good chocolate and a texture that holds up whether you’re sharing or sneaking a square after dinner. I tested this version to make sure the crumb is dense but tender, and that the chocolate flavor comes through without any graininess or odd aftertaste that some gluten-free baked goods can have.
The recipe uses a gluten free flour blend and straightforward technique: melt chocolate with butter, fold in the dry mix, add eggs and sugar, fold in chips, and bake. Timing and a gentle hand are the two things that make the difference. Follow the steps below as written and you’ll end up with glossy, crackly-topped brownies that cut cleanly into squares.
I’ll walk you through what to gather, the exact steps I used, common mistakes I saw in testing (and how to fix them), substitutions that keep the texture right, and the simple storage plan that preserves fudginess. No gimmicks — just practical, tested guidance so these brownies come out consistently.
Ingredients
- 1¼ cups Gluten Free Flour — 185 grams — provides the structure for the brownies; use a cup-for-cup blend made for baking.
- ½ teaspoon coarse kosher salt — balances sweetness and brightens chocolate flavor.
- ¾ teaspoon Baking Powder — 3 grams — adds a touch of lift so the brownies aren’t flat.
- 12 tablespoons unsalted butter — 170 grams, cut into 1 inch pieces (1½ sticks) — melts with the chocolate to give richness and a glossy top.
- 6 ounces unsweetened chocolate — 170 grams, finely chopped — deep chocolate base; chop finely so it melts evenly.
- 2¼ cups granulated sugar — 450 grams — sweetens and helps create that shiny crumb.
- 4 large eggs — 200 grams — provide structure and moisture; add one at a time for even emulsification.
- 1 tablespoon pure vanilla extract — 12 grams — rounds out the chocolate with warm aromatics.
- 1 cup semisweet chocolate chips — 170 grams — folded in for pockets of melty chocolate.
What You’ll Gather
Gather the ingredients listed above and have a few basic tools ready: a 13×9-inch baking pan, aluminum foil, a microwave-safe bowl or double boiler, a medium mixing bowl, a large heatproof bowl, a rubber spatula, whisk, and a cooling rack. Prep is quick, but laying everything out first saves time and prevents rushed steps.
Make sure your unsalted butter and eggs are at room temperature before you begin. The butter melts with the chocolate, so it doesn’t need to be soft, but the eggs should not be cold — room-temperature eggs incorporate more smoothly into the warm chocolate.
Gluten Free Brownies Recipe: From Prep to Plate
- Adjust the oven rack to the middle position and preheat the oven to 325 degrees F.
- Line a 13×9-inch baking pan with two sheets of aluminum foil: place the first sheet across the pan one way and the second sheet perpendicular to it so they overlap. Cut the foil so it hangs about 3 inches over all edges. Smooth the foil and spray the foil-lined pan with nonstick cooking spray.
- In a medium bowl, whisk together the gluten free flour, coarse kosher salt, and baking powder until combined.
- Put the unsalted butter in a large heatproof bowl and add the finely chopped unsweetened chocolate. Stir and heat as needed in the microwave on HIGH in 10-second increments, stirring between each, until the mixture is completely smooth and melted.
- Gradually whisk the granulated sugar into the warm chocolate/butter mixture until incorporated.
- Add the eggs one at a time, whisking after each addition until fully combined. Whisk in the vanilla extract.
- Add the flour mixture to the chocolate mixture in three additions, folding gently with a rubber spatula after each addition until the batter is smooth and evenly combined. Stir in the semisweet chocolate chips.
- Transfer the batter to the prepared pan, spreading it into the corners and smoothing the surface.
- Bake for 30–35 minutes, or until a toothpick inserted into the center comes out with a few moist crumbs attached (not wet batter).
- Remove the pan from the oven and place it on a cooling rack. Cool the brownies completely to room temperature.
- Use the foil overhang to lift the cooled brownies from the pan, remove the foil, and cut into 2-inch squares.
- Serve immediately or store in an airtight container at room temperature for up to 3 days.
Why You’ll Love This Recipe
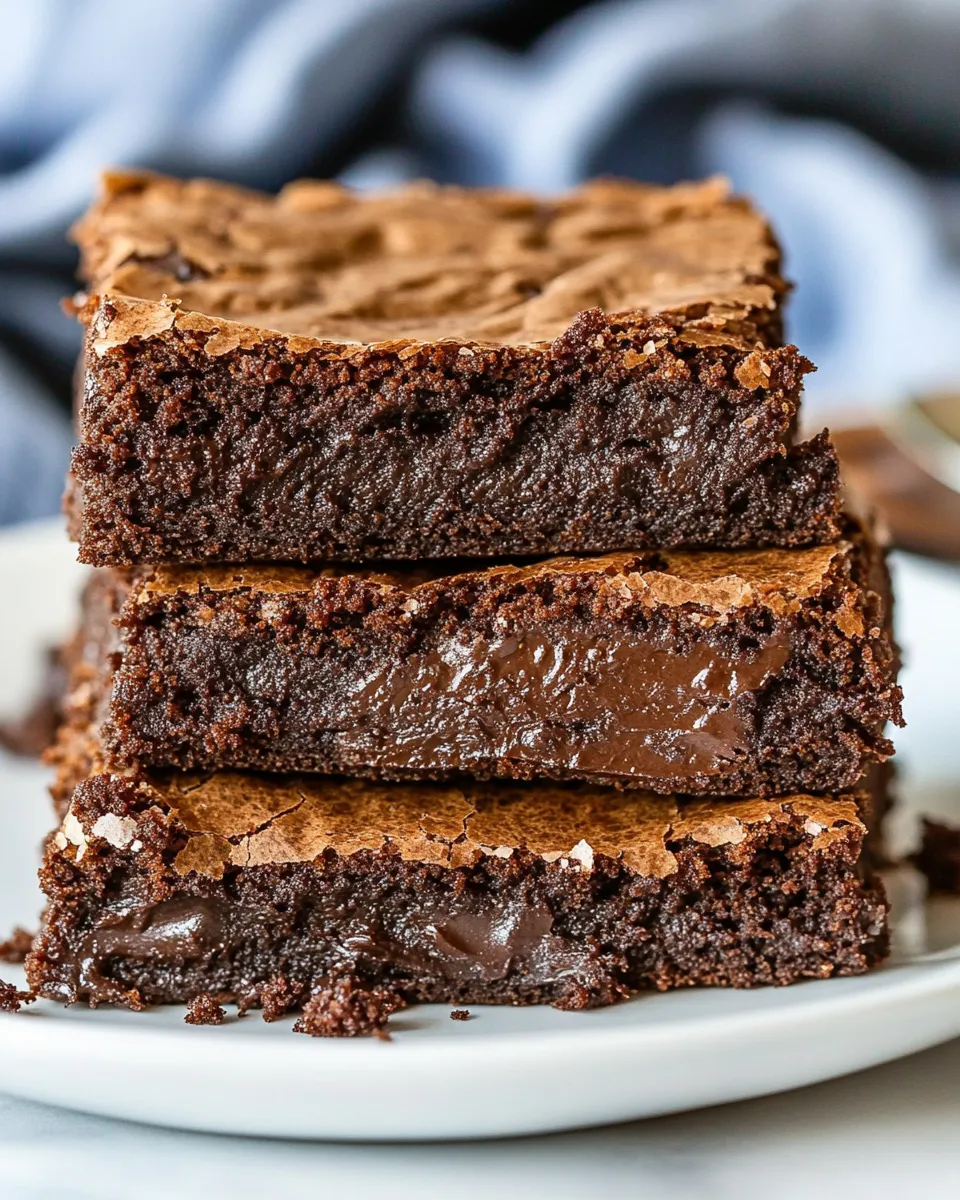
These brownies strike a balance between fudgy and chewy without relying on any tricky techniques. The unsweetened chocolate plus chips boost depth; the butter gives a glossy, rich mouthfeel; and the simple flour blend keeps the crumb cohesive. The bake time aims for that ideal center with moist crumbs — not runny, not dry.
They’re also forgiving. The method tolerates small timing variations and a light hand when folding, and the pan-lifting foil makes cleanup and serving easier. If you like your brownies slightly less dense, pull them out closer to 30 minutes; if you prefer a firmer square, give them the full 35.
Texture-Safe Substitutions
If you need to swap components, focus on substitutions that preserve fat, sugar, and binding balance. Here are practical options that keep the texture close to the original.
- Flour: Swap for another gluten free cup-for-cup blend. Do not replace with pure rice flour or oat flour alone — the crumb will be too gritty or crumbly.
- Chocolate: You can use bittersweet in place of unsweetened if you want a slightly sweeter end product, but reduce sugar by a tablespoon only if you prefer less sweetness. (This recipe is tuned for unsweetened chocolate as written.)
- Butter: You can use salted butter but omit added salt or reduce it slightly. Stick with butter rather than oil to preserve the glossy top and stable texture.
What’s in the Gear List
Tools matter more here than you might think. A sturdy 13×9-inch pan and aluminum foil with a 3-inch overhang make removing and slicing brownies mess-free. Use a large heatproof bowl that fits comfortably over a pot if you prefer a double boiler, or choose a microwave-safe bowl if you’ll melt in short bursts.
- 13×9-inch baking pan
- Aluminum foil (two sheets)
- Nonstick cooking spray
- Medium mixing bowl and large heatproof bowl
- Whisk and rubber spatula
- Microwave or double boiler setup
- Cooling rack
- Toothpick for doneness check
Common Errors (and Fixes)
These are the issues I saw while testing and how to prevent them.
- Undercooked center: If the toothpick comes out with wet batter, bake a few minutes longer and recheck. Oven temps vary — trust the toothpick test over time alone.
- Dry, cakey brownies: Overmixing after adding flour or overbaking will dry these out. Fold gently and test at 30 minutes; the center should still have moist crumbs on a toothpick.
- Grainy chocolate: If chocolate isn’t fully melted and smoothed with butter, it can leave bits. Chop chocolate finely and heat in short increments, stirring between each burst.
- Sticking to pan: If foil wasn’t sprayed or didn’t overhang, brownies can stick. Line the pan as described and spray the foil before pouring batter.
Variations for Dietary Needs
These brownies are already gluten free. For other dietary changes, keep the structure in mind so texture stays intact.
- Dairy-free: Replace butter with a high-quality vegan butter stick (same weight). Expect a slight change in flavor; texture should remain close if the swap is a butter-equivalent solid fat.
- Lower sugar: Reducing sugar will change the texture and top gloss. You can reduce sugar by up to 25% experimentally, but start with small reductions and test results.
- Nut-free: This recipe contains no nuts. Just ensure your gluten free flour blend is processed in a nut-free facility if necessary.
What I Learned Testing
Three things stood out during testing: temperature control, chocolate handling, and mixing technique. First, a middle-rack oven position and the slightly lower temperature of 325°F give you that fudgy interior without burning the edges. Second, chop the unsweetened chocolate finely and melt slowly with butter; rushing this step yields lumps and uneven texture. Third, fold the flour in gently in three additions — the batter should be smooth but not overworked.
I also discovered that the semisweet chips folded in at the end create delicious pockets of melty chocolate without making the batter too stiff. Skipping them makes a uniformly rich brownie, but including them gives textural contrast that most people prefer.
Keep-It-Fresh Plan
Store these brownies at room temperature in an airtight container for up to 3 days — that keeps them moist and pliable. If you want to keep them longer, wrap squares individually and freeze for up to 2 months; thaw at room temperature before serving. Avoid refrigeration unless your kitchen is very hot; refrigerating can dry them out.
Your Questions, Answered
Q: Can I halve the recipe in an 8×8 pan? A: Yes, but baking time will be shorter. Start checking at 20 minutes and use the toothpick test.
Q: Can I make this into bars with frosting? A: Yes. Frost after the brownies have fully cooled. A simple chocolate ganache will work, but remember that adding a wet frosting could alter moisture balance — let brownies sit at room temperature after frosting to set.
Q: Do I have to use a gluten free flour blend? A: Yes, use a cup-for-cup gluten free flour blend as specified. Substituting single flours will change texture negatively.
Next Steps
Make these as written once to learn how your oven performs, then tweak to preference: shorter bake for gooier centers, a minute or two longer for firmer slices. If you enjoyed these, try folding in toasted nuts or a swirl of salted caramel on top before baking for a different take — but test in small batches so you don’t overcommit to a change that alters texture.
When you make them, line the pan, prep the chocolate, and give yourself time to cool the pan fully. Pull a square, enjoy it with coffee or milk, and note whether you prefer slightly more or less bake time. Once you lock that in, you’ll have a dependable gluten-free brownie you can reach for any time.
Gluten Free Brownies Recipe
Ingredients
Equipment
Method
- Adjust the oven rack to the middle position and preheat the oven to 325 degrees F.
- Line a 13×9-inch baking pan with two sheets of aluminum foil: place the first sheet across the pan one way and the second sheet perpendicular to it so they overlap. Cut the foil so it hangs about 3 inches over all edges. Smooth the foil and spray the foil-lined pan with nonstick cooking spray.
- In a medium bowl, whisk together the gluten free flour, coarse kosher salt, and baking powder until combined.
- Put the unsalted butter in a large heatproof bowl and add the finely chopped unsweetened chocolate. Stir and heat as needed in the microwave on HIGH in 10-second increments, stirring between each, until the mixture is completely smooth and melted.
- Gradually whisk the granulated sugar into the warm chocolate/butter mixture until incorporated.
- Add the eggs one at a time, whisking after each addition until fully combined. Whisk in the vanilla extract.
- Add the flour mixture to the chocolate mixture in three additions, folding gently with a rubber spatula after each addition until the batter is smooth and evenly combined. Stir in the semisweet chocolate chips.
- Transfer the batter to the prepared pan, spreading it into the corners and smoothing the surface.
- Bake for 30–35 minutes, or until a toothpick inserted into the center comes out with a few moist crumbs attached (not wet batter).
- Remove the pan from the oven and place it on a cooling rack. Cool the brownies completely to room temperature.
- Use the foil overhang to lift the cooled brownies from the pan, remove the foil, and cut into 2-inch squares.
- Serve immediately or store in an airtight container at room temperature for up to 3 days.
Notes
Be sure to pre-heat your oven.
Line your baking tray with foil that is longer than the tray so there is overhang for easy removal.
Do be patient and let the brownies cool to room temperature before cutting them.
Because Bob's Red Mill is a 1:1 flour, you can easily make these brownies gluten-full by subbing in regular all-purpose flour.
Feel free to use milk or dark chocolate chips in place of the semisweet chips. I do not, however, recommend replacing the unsweetened chocolate.