How to Make Quesadillas with Spinach Dip
I love recipes that feel indulgent but are actually simple to make—and these quesadillas with spinach dip hit that sweet spot. They bring the creamy, garlicky comfort of spinach-artichoke dip into a handheld, golden-crisp package that’s perfect for weeknight dinners, party snacks, or a casual weekend lunch. The filling is rich enough to feel special, and the street taco tortillas make them crisp and satisfying without weighing you down.
In the post that follows I’ll walk you through the ingredients, the exact steps, and practical tips I use every time I make these. There are small choices—how much cheese to reserve, how dry to squeeze the spinach, when to flip—that change the final texture. You’ll get those little pointers so your quesadillas come out melty, not soggy.
Ingredient Notes
Below are concise notes about the key ingredients and how they behave in this recipe. These notes will help you make confident substitutions or adjustments while staying true to the flavor and texture.
Ingredients
- 8 ounces cream cheese, at room temperature — softens the filling and adds a silky, binding base.
- ¼ cup sour cream — lightens the cream cheese for a scoopable dip texture.
- 2 cups grated Havarti cheese, divided — provides melt and a mild, buttery flavor; part goes into the filling, part is reserved to assemble the quesadillas.
- ¼ cup grated Parmesan cheese — adds a touch of umami and sharpness to balance the cream cheeses.
- 2 cloves garlic, minced — gives aromatic punch; distribute evenly for consistent flavor.
- A pinch of red pepper flakes — optional kick; adjust to taste but a little goes a long way.
- ½ teaspoon kosher salt — seasons the filling; kosher salt is forgiving and easy to measure.
- ¼ teaspoon freshly ground black pepper — brightens the flavor and balances the richness.
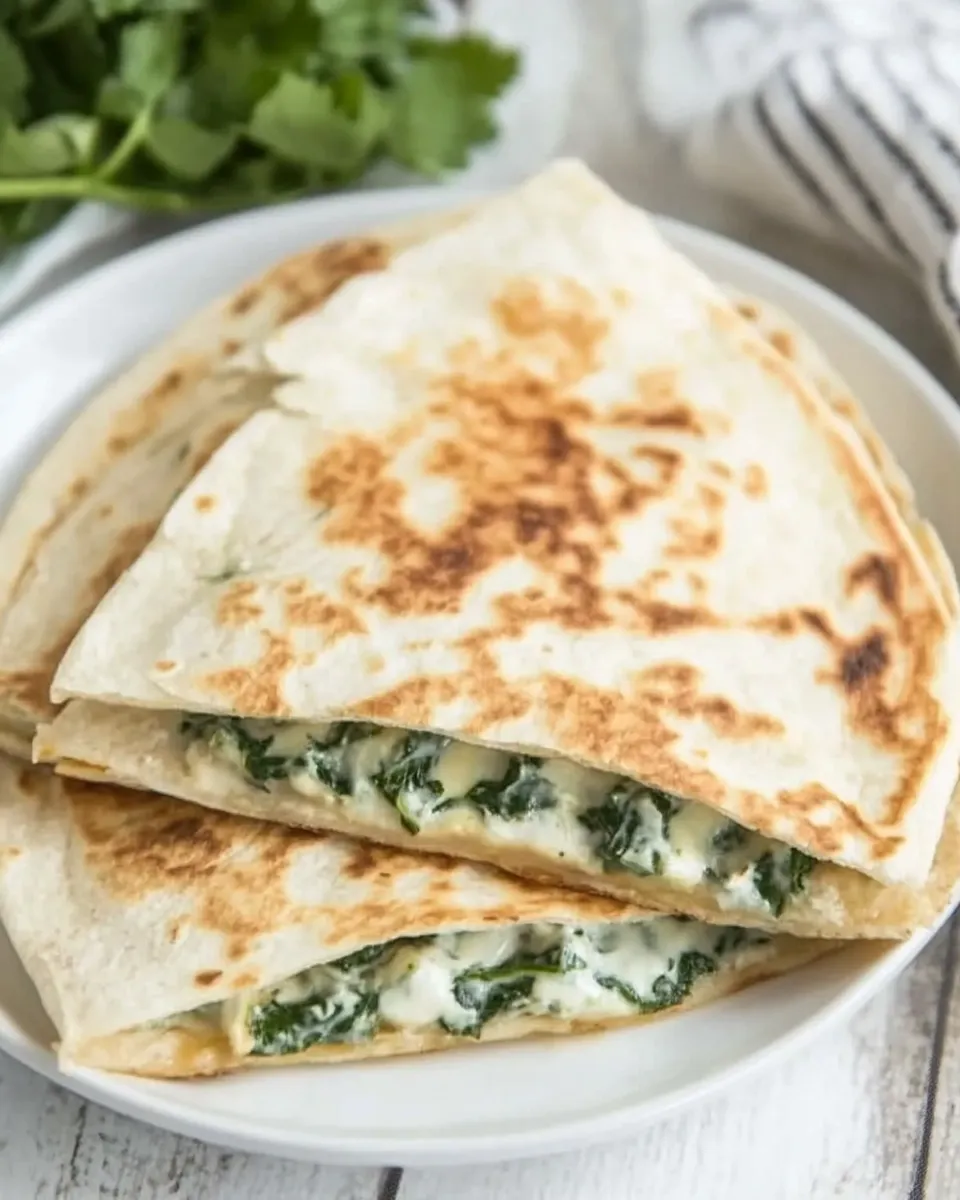
- 9-ounce package frozen chopped spinach, defrosted and squeezed dry — the backbone of the dip; squeeze until very dry to avoid soggy quesadillas.
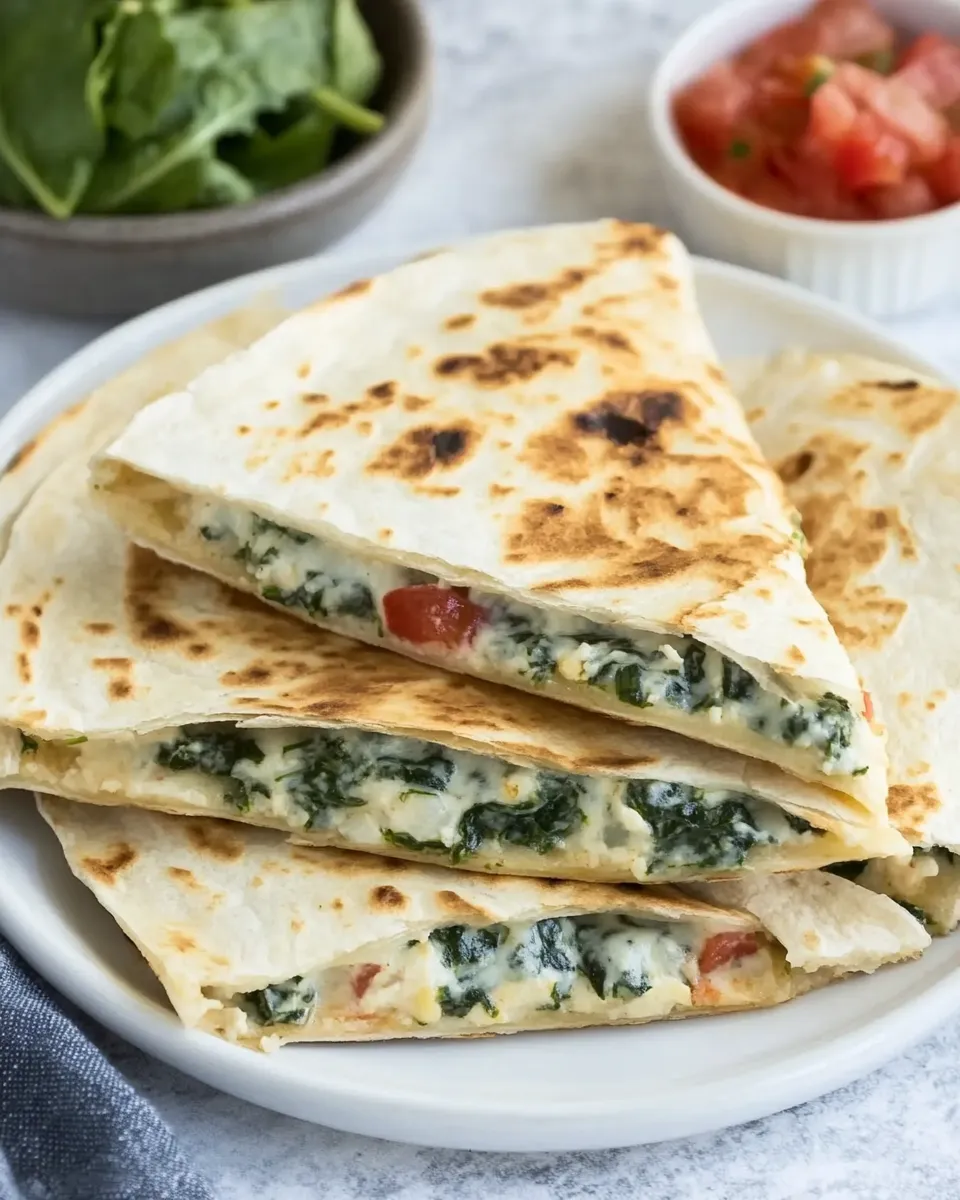
- 14-ounce can artichoke hearts, drained and chopped — adds texture and a slightly tangy note that pairs beautifully with the cheeses.
- 18 street taco tortillas — thin tortillas crisp quickly and fold easily; they’re perfect for small, snack-sized quesadillas.
- 1 tablespoon butter or olive oil — for frying; butter gives a richer flavor, olive oil is a lighter option.
Quesadillas with Spinach Dip, Made Easy
Follow these steps exactly as written for reliable results. I keep the assembly simple: one tortilla, cheese, filling, cheese, tortilla. Press, brown, flip, and enjoy.
- Place the 8 ounces cream cheese and ¼ cup sour cream in a large bowl. Beat with a hand mixer until smooth.
- Stir in ½ cup of the grated Havarti, ¼ cup grated Parmesan, 2 cloves minced garlic, a pinch of red pepper flakes, ½ teaspoon kosher salt, and ¼ teaspoon freshly ground black pepper until well combined.
- Add the defrosted, well–squeezed dry 9-ounce package of chopped spinach and the drained, chopped 14-ounce can of artichoke hearts. Fold until evenly mixed. Set the spinach-artichoke mixture aside.
- Reserve the remaining grated Havarti (the portion not added to the cream cheese mixture) for assembling the quesadillas.
- Heat a large skillet over medium heat and melt the 1 tablespoon butter or heat the 1 tablespoon olive oil in the pan.
- To assemble each quesadilla, lay one street taco tortilla in the skillet, sprinkle some of the reserved Havarti evenly over the tortilla, then spoon about ¼ cup of the spinach-artichoke mixture onto the cheese, spreading it slightly but keeping it away from the edges.
- Top with a second tortilla and press down gently with a spatula to flatten the filling and help the tortillas make contact with the pan.
- Cook until the bottom tortilla is golden brown and the cheese begins to melt (about 1–2 minutes), then carefully flip the quesadilla and cook the other side until golden and the filling is heated through (about 1–2 minutes more).
- Transfer the cooked quesadilla to a cutting board and cut in half if desired. Repeat steps 6–8 with the remaining tortillas, reserved Havarti, and filling.
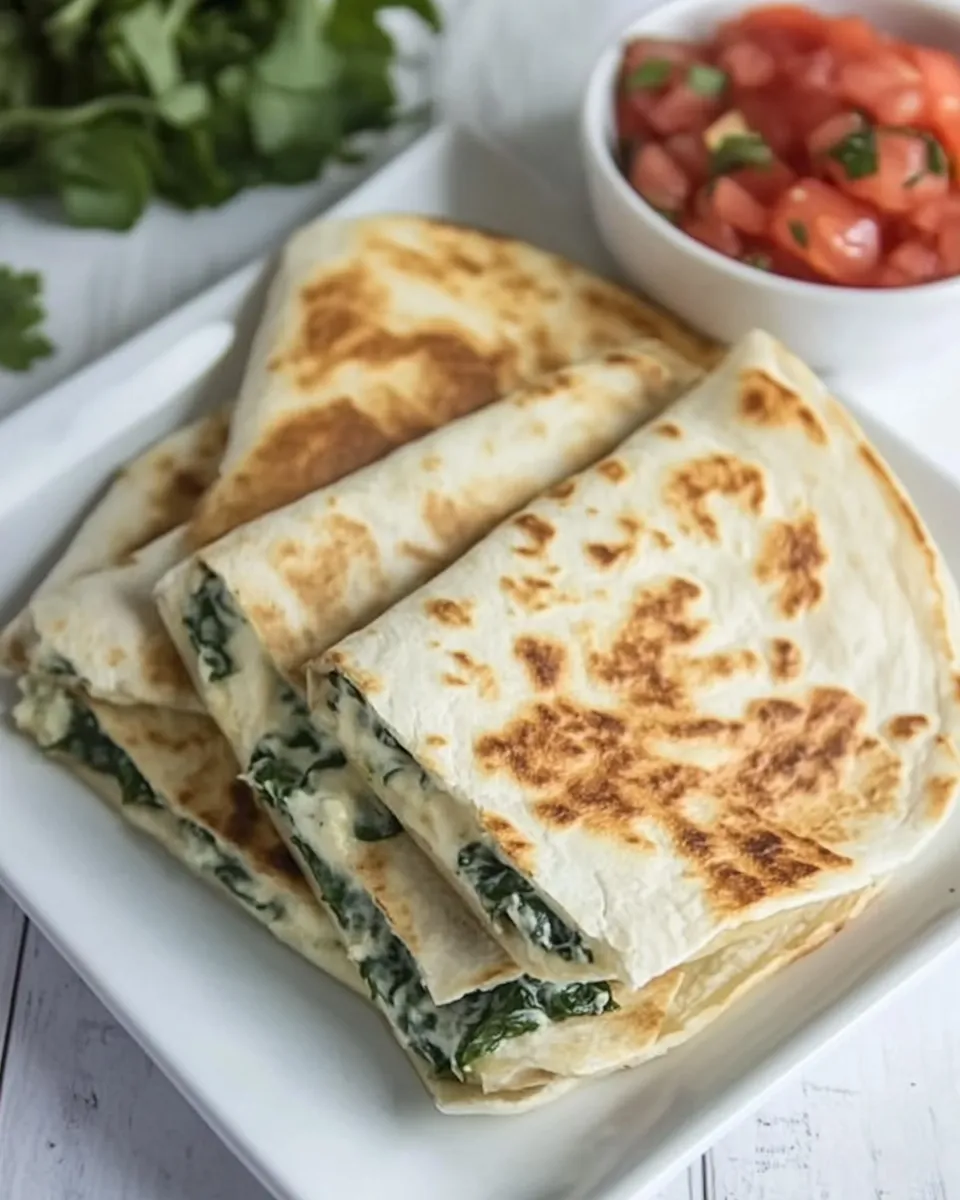
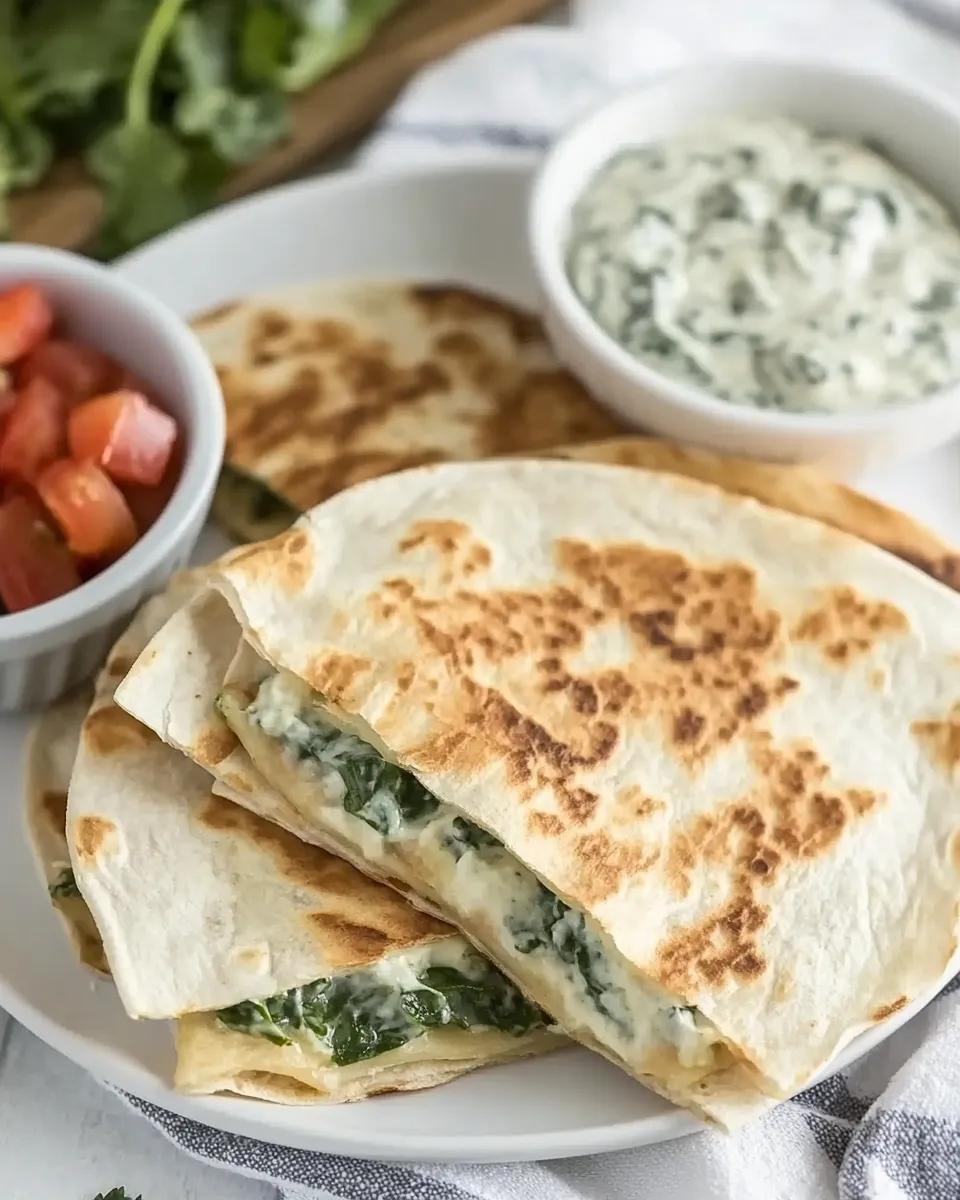
- Serve the quesadillas warm, with salsa if desired.
Why I Love This Recipe
This recipe turns a classic party dip into something you can eat with your hands. It’s comforting and a little luxurious thanks to the cream cheese and Havarti, but the spinach and artichoke keep it feeling fresh and bright. I love the contrast between the crunchy, browned tortilla and the creamy interior—each bite has a little crunch, a little melt, and big, familiar flavor.
It’s also forgiving. The mixing steps require no precision beyond proper draining of the spinach. Reserve some cheese so you get cheese pull and crisp exterior every time. It scales well: make a big batch of filling for a gathering or halve it for a solo snack. Because the filling is fully cooked and chilled-friendly, you can prep ahead and assemble in minutes when guests arrive.
Allergy-Friendly Substitutes
If you’re catering to allergies or dietary preferences, focus on the role each ingredient plays and replace with similar-functioning products. The filling relies on a creamy binder, melty cheese for taste and structure, and sturdy greens for body. Choose alternative products that give you those textures.
- For dairy allergies: look for plant-based cream cheese alternatives and dairy-free melting cheeses. Choose versions labeled for melting to preserve that gooey texture.
- For a nut allergy or ingredient sensitivity: follow package labels and choose substitutes free from the allergen; the recipe itself uses simple pantry items and needs no nuts.
- For a lower-fat approach: use a reduced-fat cream cheese alternative and keep the reserved cheese amount moderate; the filling will still bind but be less rich.
Tools & Equipment Needed
- Large mixing bowl — to beat and fold the filling.
- Hand mixer — speeds up smoothing the cream cheese and sour cream, though a sturdy whisk works in a pinch.
- Large skillet — for sautéing and browning the quesadillas; a nonstick skillet makes flipping easier.
- Spatula — a wide, thin spatula helps press and flip without spilling the filling.
- Cutting board and knife — to halve or quarter the cooked quesadillas for serving.
- Measuring cups and spoons — to keep seasonings balanced.
Frequent Missteps to Avoid
- Not squeezing the spinach dry enough — excess water makes soggy quesadillas. Squeeze until you barely see moisture.
- Adding too much filling to each tortilla — keep about ¼ cup per quesadilla to maintain crisp edges and even heating.
- Cooking on too high heat — the outside will brown before the filling warms through. Medium heat gives you even melting without burning.
- Skipping the reserved cheese layer on the tortilla — that cheese barrier helps protect tortillas from soggy filling and adds crucial melt.
- Over-handling the filling while assembling — spread gently and keep filling away from edges to prevent leaks during flipping.
Spring to Winter: Ideas
These quesadillas are seasonally flexible. In spring and summer, serve them with bright, fresh salsas—tomato-cilantro salsa or a tangy pico de gallo adds acidity to cut the richness. In cooler months, pair them with warm, roasted pepper sauce or a smoky chipotle salsa to enhance comfort flavors.
For casual entertaining year-round, create a small toppings bar: a mild salsa, pickled jalapeños, and a squeeze of lime let guests personalize each quesadilla without complicating the prep. The base filling remains the same, so you can switch accoutrements by season rather than the recipe itself.
Behind-the-Scenes Notes
Here are the small technique points I pay attention to when I make these at home:
- Bring the cream cheese to room temperature first. It mixes into a smoother base and avoids lumps.
- Drain and chop the artichokes thoroughly. Big pieces can make the filling uneven; small chunks distribute flavor and texture better.
- Reserve grated Havarti before mixing so you can use it as a buffer on the tortilla. That little extra step really improves the finish.
Leftovers & Meal Prep
Storage
Cool cooked quesadillas to room temperature, then store in an airtight container in the refrigerator for up to 3 days. If you’ve prepped the filling but not assembled, keep the filling chilled and the tortillas sealed separately; the filling will stay good for 3–4 days refrigerated.
Reheating
Reheat in a skillet over medium-low heat for best texture—this re-crisps the tortilla and warms the filling evenly. A few minutes per side should do it. Microwaving works in a pinch but will soften the tortilla and reduce crispness.
Popular Questions
- Can I make the filling ahead? Yes. The filling can be made and refrigerated for 1–3 days before assembly. Bring it to near room temperature for easier spreading.
- Do I have to use street taco tortillas? The recipe calls for street taco tortillas because they crisp quickly and make small, snackable portions. Larger tortillas will work but adjust filling amount and cook time accordingly.
- How can I prevent soggy quesadillas? Squeeze the cooked spinach well, reserve cheese on the tortilla as a barrier, and avoid overfilling.
- Can I bake these instead of pan-frying? You can bake assembled quesadillas on a sheet pan at 400°F (about 200°C) until golden and heated through; watch closely so they don’t dry out. (Note: this suggests a method but keeps the original stovetop as the primary instruction.)
- Is Havarti mandatory? Havarti gives a mild, buttery melt. If you prefer something sharper or milder, choose a melting cheese you like—but if maintaining the exact recipe, use the Havarti listed.
- Can I freeze assembled quesadillas? Freeze assembled, un-cooked quesadillas flat with parchment between layers, then reheat from frozen in a skillet over medium-low heat until warmed through, flipping once. Expect a change in texture; reheating in a skillet helps revive crispness.
Next Steps
Make the filling once and you’ll see how versatile it is. Use it as a dip with crusty bread or chips, spoon it into baked potatoes, or keep making quesadillas—the handheld format is unbeatable. If you host, prep filling ahead and assemble when guests arrive. The hands-on time is short and you get a warm, fresh snack every round.
If you try this recipe, take a photo and note any little tweaks you make. Small adjustments—more garlic, a different cheese, a touch of lemon—can personalize it without breaking the method. Happy cooking, and enjoy every melty, crisp bite.
How to Make Quesadillas with Spinach Dip
Ingredients
Equipment
Method
- Place the 8 ounces cream cheese and ¼ cup sour cream in a large bowl. Beat with a hand mixer until smooth.
- Stir in ½ cup of the grated Havarti, ¼ cup grated Parmesan, 2 cloves minced garlic, a pinch of red pepper flakes, ½ teaspoon kosher salt, and ¼ teaspoon freshly ground black pepper until well combined.
- Add the defrosted, well–squeezed dry 9-ounce package of chopped spinach and the drained, chopped 14-ounce can of artichoke hearts. Fold until evenly mixed. Set the spinach-artichoke mixture aside.
- Reserve the remaining grated Havarti (the portion not added to the cream cheese mixture) for assembling the quesadillas.
- Heat a large skillet over medium heat and melt the 1 tablespoon butter or heat the 1 tablespoon olive oil in the pan.
- To assemble each quesadilla, lay one street taco tortilla in the skillet, sprinkle some of the reserved Havarti evenly over the tortilla, then spoon about ¼ cup of the spinach-artichoke mixture onto the cheese, spreading it slightly but keeping it away from the edges.
- Top with a second tortilla and press down gently with a spatula to flatten the filling and help the tortillas make contact with the pan.
- Cook until the bottom tortilla is golden brown and the cheese begins to melt (about 1–2 minutes), then carefully flip the quesadilla and cook the other side until golden and the filling is heated through (about 1–2 minutes more).
- Transfer the cooked quesadilla to a cutting board and cut in half if desired. Repeat steps 6–8 with the remaining tortillas, reserved Havarti, and filling.
- Serve the quesadillas warm, with salsa if desired.