Keto Peanut Butter Bars
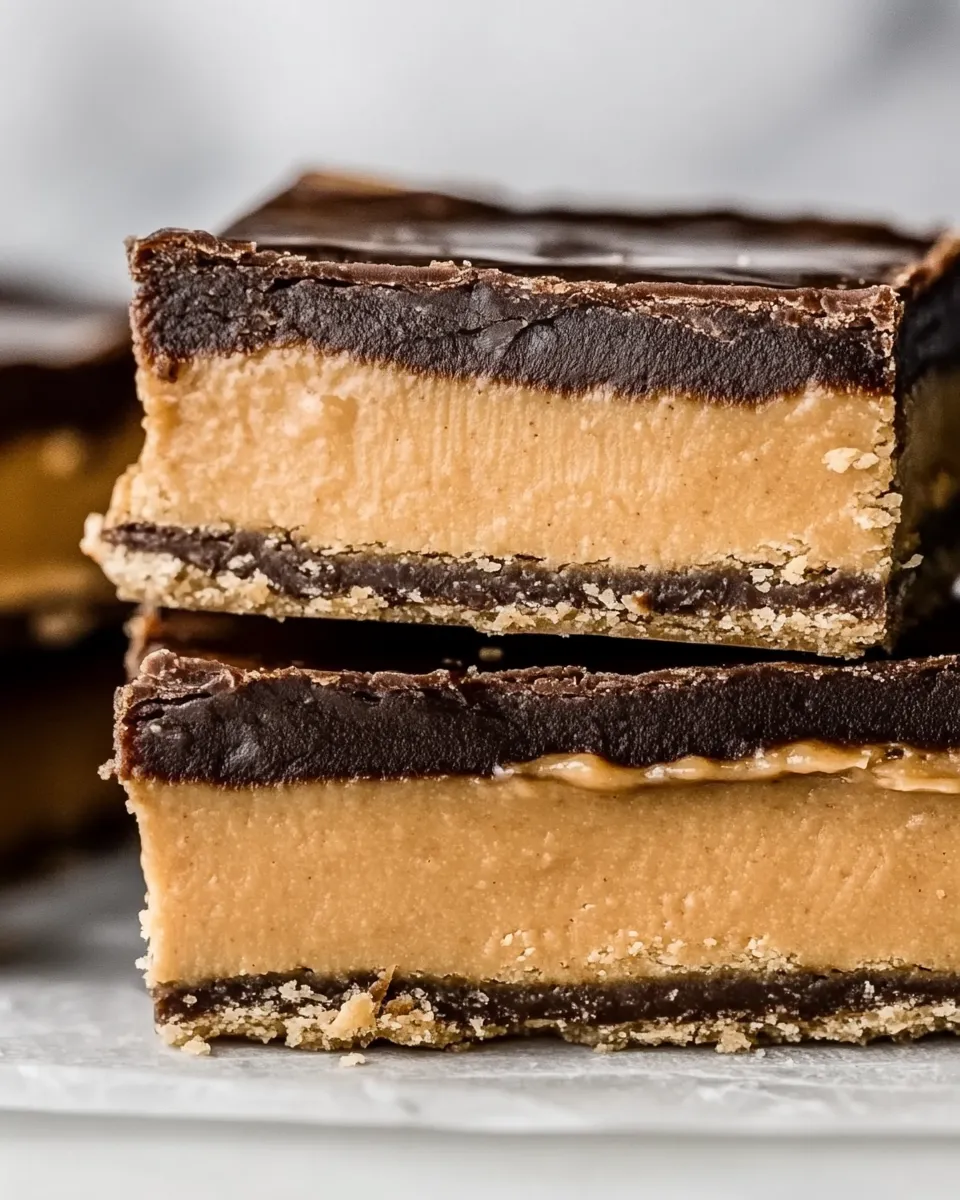
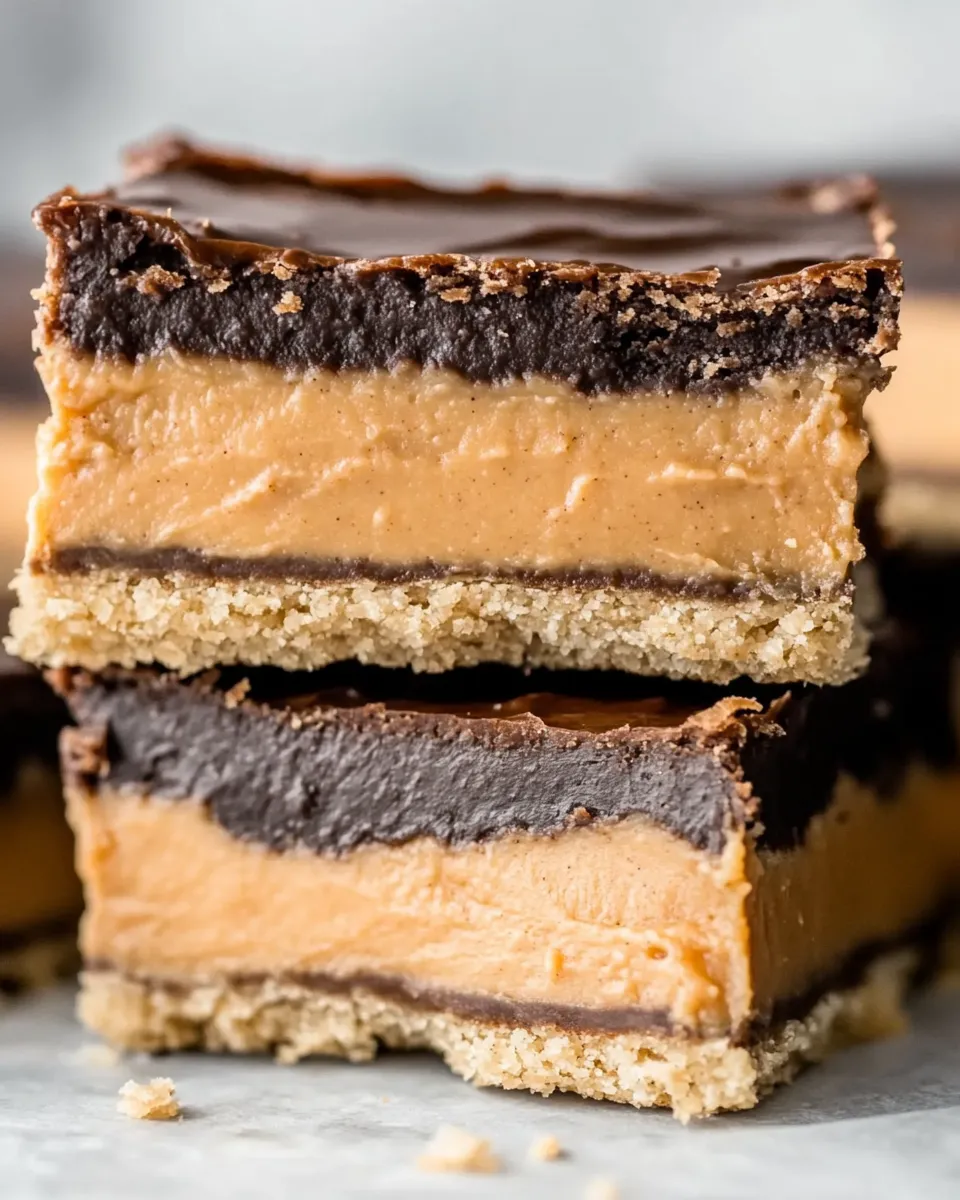
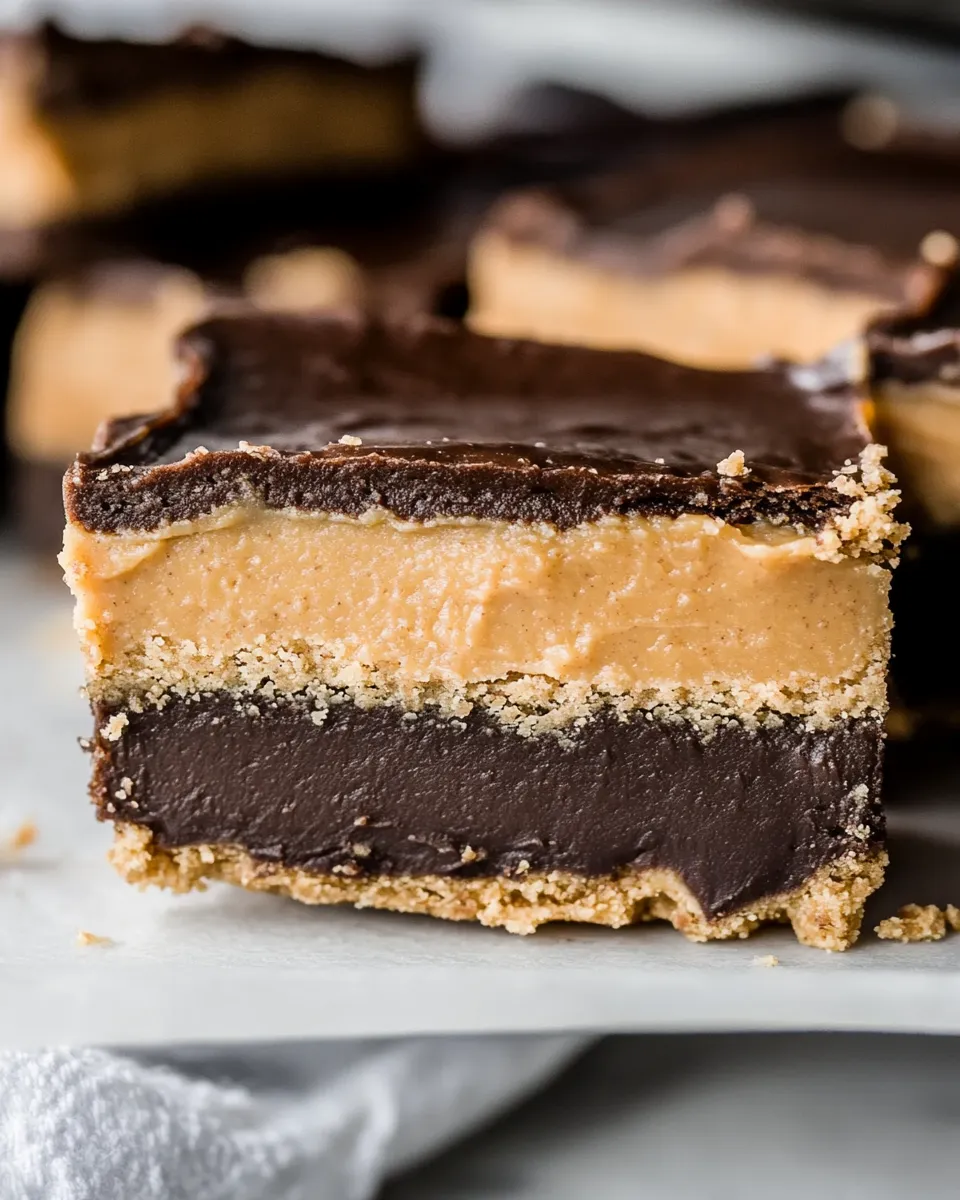
These keto peanut butter bars are the kind of low-carb treat I keep in the freezer for when I need something sweet that doesn’t derail my day. They have a tender almond base, a firm peanut butter center, and a glossy chocolate top that snaps when you bite into it. They feel indulgent but are surprisingly simple to pull together.
I developed this version because many low-carb bars either fall apart or taste grainy. The almond flour base gives a compact, slightly crumbly texture; the firm peanut butter keeps the middle sliceable; and the sugar-free chocolate melds everything into neat little bars. They travel well and make a great packed snack for busy mornings.
I’ll walk you through exactly what to do, what to watch out for, and how to store them so they stay perfect. No fluff — just practical pointers that save time and keep the bars intact and delicious.
What’s in the Bowl
Ingredients
- 1.5 cup / 150 g almond flour — the low-carb structure for the base; use blanched almond flour for a fine, tender crumb.
- 3 tbsp / 30 g Lakanto Classic — sweetens the base without sugar; adjust if you prefer slightly less sweet.
- 5 tbsp / 70 g butter, melted — binds the base and adds richness; melted butter helps the almond flour hold together.
- ¾ cup / 190 g peanut butter — use firm peanut butter (no runny oils); this is the main flavor and texture of the middle layer.
- 3 tbsp / 45 g butter, melted (or coconut oil) — loosens the peanut butter so the layer spreads smoothly; coconut oil works if you want a hint of tropical flavor.
- 2 tbsp / 20 g Lakanto Classic powdered — sweetens the peanut butter layer; powdered helps it dissolve and keeps the texture smooth.
- ½ teaspoon salt — balances the sweetness; taste and add a little more if you like a salty contrast.
- ⅔ cup / 4.4 oz / 125 g sugar-free chocolate or dark chocolate, at least 85% cocoa solids — the topping; use a good-quality sugar-free or very dark chocolate for sharp flavor.
- 2 tbsp / 28 g coconut oil (or butter) — thins the chocolate for a shiny, pourable finish and helps it set with a nice snap.
Directions: Keto Peanut Butter Bars
- Line a small baking tray (24 cm x 16 cm) with greaseproof paper, leaving a little overhang on the sides to lift the bars out later.
- Make the base: in a mixing bowl combine 1.5 cup / 150 g almond flour and 3 tbsp / 30 g Lakanto Classic. Stir to blend the dry ingredients. Add 5 tbsp / 70 g melted butter and mix until the mixture holds together and is evenly moistened.
- Press the base mixture firmly and evenly into the prepared tray using the back of a spoon or your fingers to form a compact layer. Chill in the fridge for 5–10 minutes (or the freezer for 3–5 minutes) to firm slightly before adding the next layer.
- Make the peanut butter layer: in a clean bowl combine 3/4 cup / 190 g firm peanut butter, 3 tbsp / 45 g melted butter (or coconut oil), 2 tbsp / 20 g Lakanto Classic powdered, and 1/2 teaspoon salt (or to taste). Whisk until smooth and well combined. If the peanut butter is too stiff, warm it briefly so it mixes easily.
- Spread the peanut butter mixture evenly over the chilled base and smooth the top with a spatula. Freeze until set, about 10–15 minutes (or chill in the fridge until firm).
- Make the chocolate topping: place 2/3 cup / 125 g sugar-free or dark chocolate (at least 85% cocoa) and 2 tbsp / 28 g coconut oil (or butter) in a heatproof bowl. Melt over a pan of simmering water (bain-marie), stirring until smooth. Remove from heat and let cool for a minute or two until still pourable but not piping hot.
- Pour the melted chocolate over the set peanut butter layer and spread evenly with a spatula.
- Chill the assembled bars in the fridge for at least 2 hours until fully set (or in the freezer for about 30 minutes).
- Remove the bars from the tray using the parchment overhang. Let them sit at room temperature for a few minutes to make cutting easier. Wipe a sharp knife under hot water, dry it, and use it to slice the bars, wiping the knife clean between cuts to prevent the chocolate from cracking.
The Upside of Keto Peanut Butter Bars
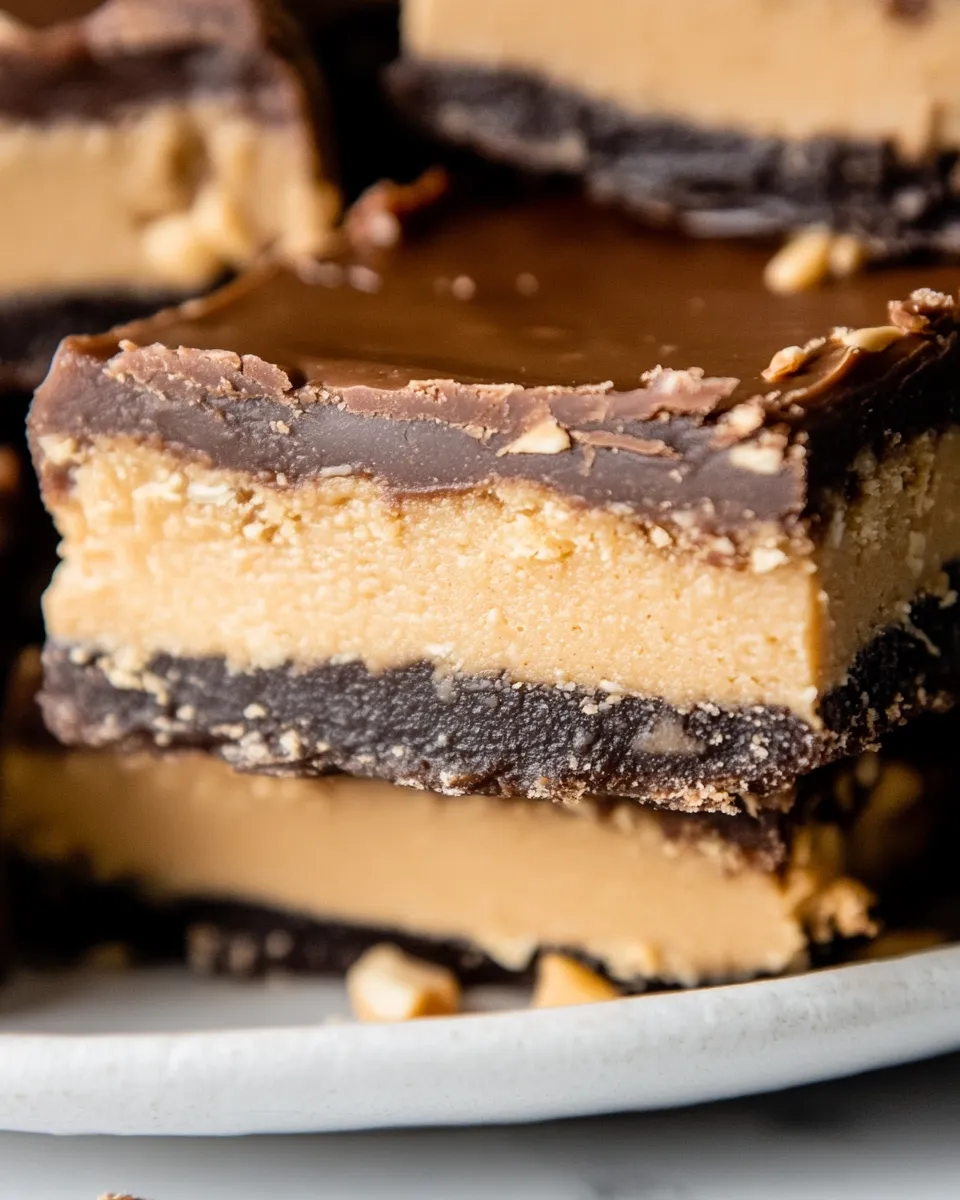
These bars hit a sweet spot: they’re satisfying, portable, and low in carbs. The almond flour base keeps net carbs low while adding a pleasantly nutty backdrop. The firm peanut butter layer gives a dense, chewy center that’s filling and protein-rich. The chocolate top provides contrast — both texture and flavor — without refining sugar if you choose sugar-free chocolate.
Make a batch and you’ll have ready-to-eat snacks for several days. One bar can serve as a quick post-workout nibble, a low-carb dessert after dinner, or a travel-friendly treat. They’re forgiving: the base and filling hold together well, so even if your cuts aren’t perfect, the bars still taste great.
Low-Carb/Keto Alternatives
If you want to tweak this recipe while keeping it keto-friendly, here are practical swaps that don’t break the carb bank:
- Sweeteners — Lakanto Classic and Lakanto powdered are used here, but you can substitute an equal amount of erythritol or a monk fruit blend if you prefer. Be mindful that granular erythritol may grain slightly unless powdered for the filling.
- Nut base — almond flour is best here for texture. If you have an allergy, try finely ground sunflower seed flour, but note the color will darken and the flavor will shift.
- Nut butter — the recipe uses firm peanut butter. If you prefer, try almond butter (same weight) for a milder flavor or sunflower seed butter to avoid tree nuts.
- Chocolate — if you can’t find sugar-free chocolate, opt for a 85%+ dark chocolate and cut the portion size. It raises the carbs slightly but keeps the flavor intense.
Kitchen Gear Checklist
These are the tools I reach for when I make these bars. Minimal, and every item earns its keep:
- 24 cm x 16 cm baking tray (or closest size) — the size matters for thickness and setting time.
- Greaseproof/parchment paper — makes lifting the bars out easy.
- Mixing bowls — at least two, one for the base and one for the peanut butter layer.
- Spoon or spatula — for pressing the base and smoothing layers.
- Heatproof bowl and saucepan for bain-marie — for melting chocolate gently.
- Sharp knife — for clean cuts; dip in hot water and dry between slices to keep edges neat.
Steer Clear of These
A few common mistakes will throw off texture or make cutting a mess. Avoid them:
- Using runny peanut butter — it won’t set into a firm layer. Use a firm, spoonable peanut butter that holds its shape.
- Skipping the chill times — each layer needs to cool to set properly. Rushing this step causes mixing and sloppy slices.
- Pouring piping-hot chocolate over the peanut butter — it can melt or thin the layer. Let the chocolate cool just enough to remain pourable but not scalding.
- Not lining the tray with an overhang — without the parchment overhang you’ll struggle to remove the bars cleanly.
Holiday & Seasonal Touches
These bars are great as-is, but small seasonal touches make them festive:
- Sprinkle flaky sea salt on the chocolate for a winter-salted caramel vibe (works especially well with dark chocolate).
- Top with finely chopped, toasted pecans or sliced almonds before the chocolate sets for crunch and a nutty holiday look.
- For Valentine’s Day, press a few heart-shaped sprinkles into the chocolate quickly before it sets (use sugar-free sprinkles if strict keto matters).
Cook’s Notes
Texture & Temperature
Temperature control is everything. If your kitchen is warm, use the fridge more often. Chill the base well before spreading the peanut butter — this prevents sinking and keeps clean layers. When melting the chocolate, lower the heat under your bain-marie and remove the bowl promptly once melted; residual heat can over-thin the chocolate.
Troubleshooting
If the peanut butter layer is too soft after chilling, put the whole tray in the freezer for 10–15 minutes before adding the chocolate. If the chocolate sets with white streaks (bloom), that’s typically from moisture or temperature shock; it’s cosmetic and still tastes fine.
Portioning
Let the bars sit a few minutes at room temperature before cutting so the chocolate doesn’t crack. A hot-water-dipped, dried knife yields the cleanest edges.
Storing, Freezing & Reheating
These bars store very well. Keep them refrigerated in an airtight container for up to 7 days. For longer storage, slice and place parchment between layers, then freeze in a sealed container for up to 3 months.
To serve from frozen, transfer a few bars to the fridge for 30–60 minutes, or to room temperature for 10–15 minutes. Avoid microwaving — that melts the chocolate and softens the peanut butter too much. If you prefer slightly softer centers, leave refrigerated bars at room temperature for 5–10 minutes before eating.
Ask & Learn
Questions I get most often: “Can I use natural peanut butter?” — Not ideal here; natural runny oils can separate and make the layer oily. “Can I halve the recipe?” — Yes, use a smaller tray and adjust chilling times slightly. “What if I don’t have Lakanto?” — Any granular low-carb sweetener with a similar sweetness can work, but powdered is preferred in the peanut butter layer for smooth texture.
If you try a swap, make a small test batch first. That saves time and ingredients if the change affects set or texture.
The Takeaway
These Keto Peanut Butter Bars are straightforward, satisfying, and reliable. They come together in stages, so the work is focused and easy to manage over a single afternoon. Chill instead of rush, use firm peanut butter, and respect the chocolate temperature — and you’ll end up with neat, delicious bars that travel well and keep you on plan. Make a double batch; they disappear fast.
Ingredients
Equipment
Method
- Line a small baking tray (24 cm x 16 cm) with greaseproof paper, leaving a little overhang on the sides to lift the bars out later.
- Make the base: in a mixing bowl combine 1.5 cup / 150 g almond flour and 3 tbsp / 30 g Lakanto Classic. Stir to blend the dry ingredients. Add 5 tbsp / 70 g melted butter and mix until the mixture holds together and is evenly moistened.
- Press the base mixture firmly and evenly into the prepared tray using the back of a spoon or your fingers to form a compact layer. Chill in the fridge for 5–10 minutes (or the freezer for 3–5 minutes) to firm slightly before adding the next layer.
- Make the peanut butter layer: in a clean bowl combine 3/4 cup / 190 g firm peanut butter, 3 tbsp / 45 g melted butter (or coconut oil), 2 tbsp / 20 g Lakanto Classic powdered, and 1/2 teaspoon salt (or to taste). Whisk until smooth and well combined. If the peanut butter is too stiff, warm it briefly so it mixes easily.
- Spread the peanut butter mixture evenly over the chilled base and smooth the top with a spatula. Freeze until set, about 10–15 minutes (or chill in the fridge until firm).
- Make the chocolate topping: place 2/3 cup / 125 g sugar-free or dark chocolate (at least 85% cocoa) and 2 tbsp / 28 g coconut oil (or butter) in a heatproof bowl. Melt over a pan of simmering water (bain-marie), stirring until smooth. Remove from heat and let cool for a minute or two until still pourable but not piping hot.
- Pour the melted chocolate over the set peanut butter layer and spread evenly with a spatula.
- Chill the assembled bars in the fridge for at least 2 hours until fully set (or in the freezer for about 30 minutes).
- Remove the bars from the tray using the parchment overhang. Let them sit at room temperature for a few minutes to make cutting easier. Wipe a sharp knife under hot water, dry it, and use it to slice the bars, wiping the knife clean between cuts to prevent the chocolate from cracking.
Notes
Makes 16 bars. 3.1g net carbs per bar.
The recipe uses Lakanto Classic for the base and powdered Lakanto Classic for the peanut butter layer. I simply blended 1 cup in the food processor until it was powdered and stored the rest.
Store in the fridge for up to 1 week or in the freezer for up to 3 months.