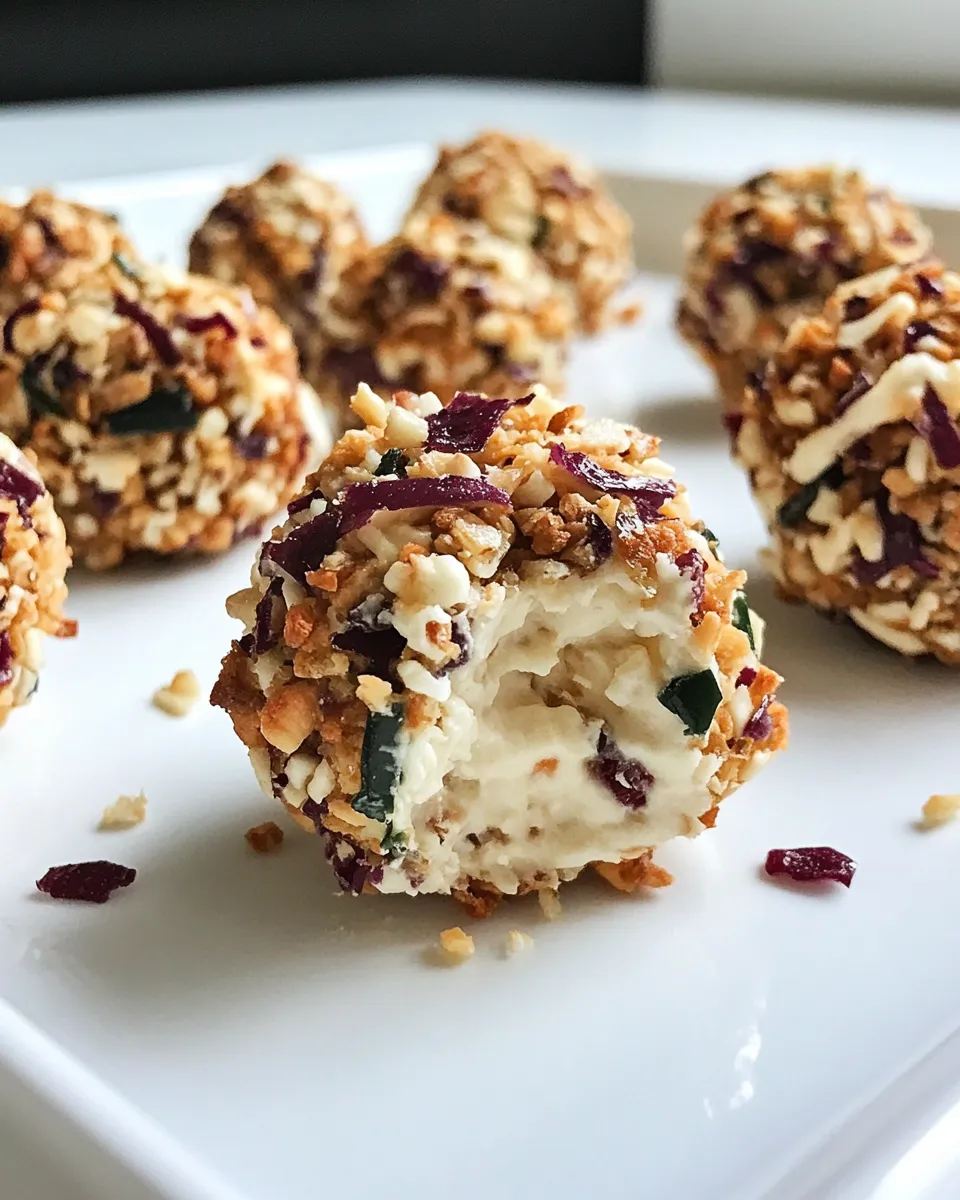
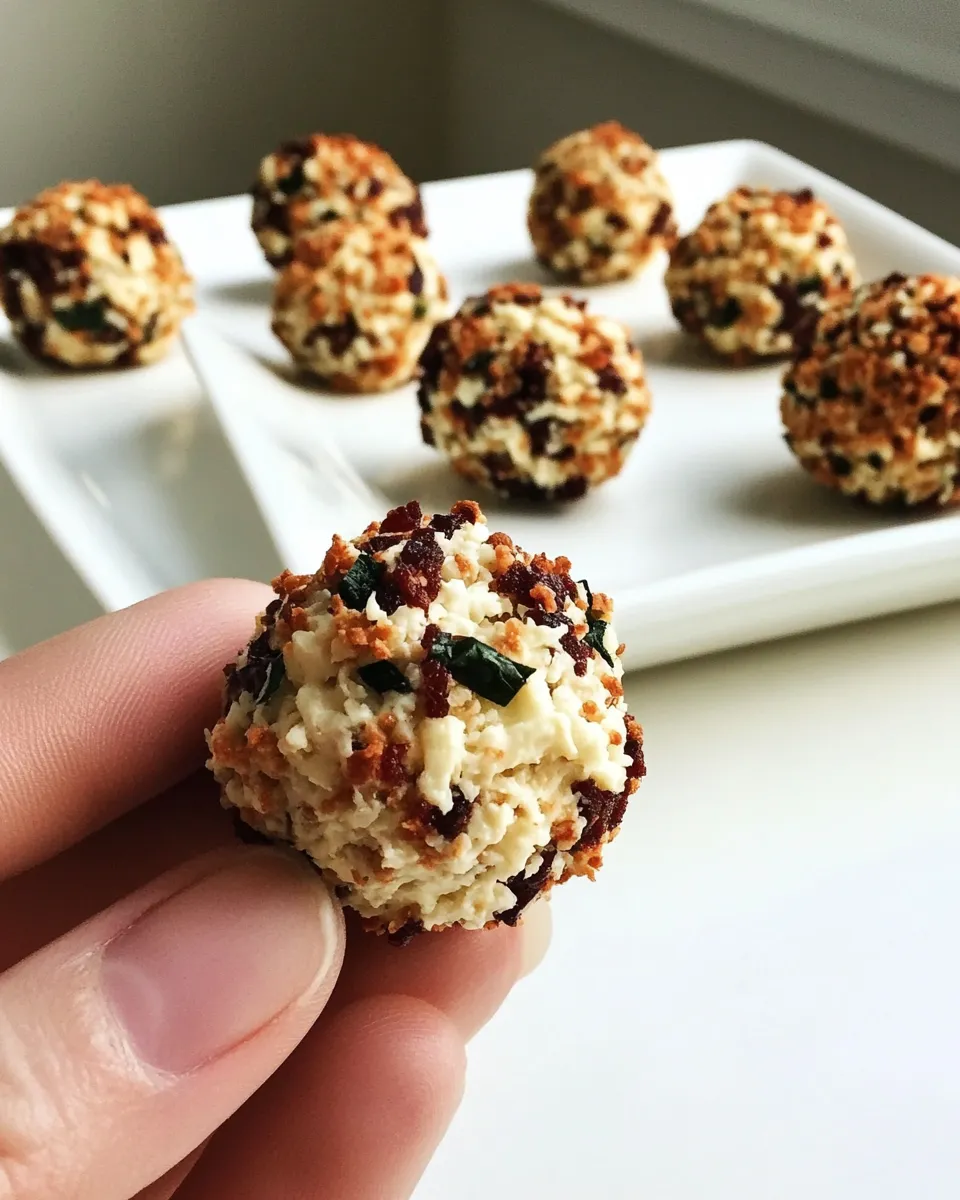
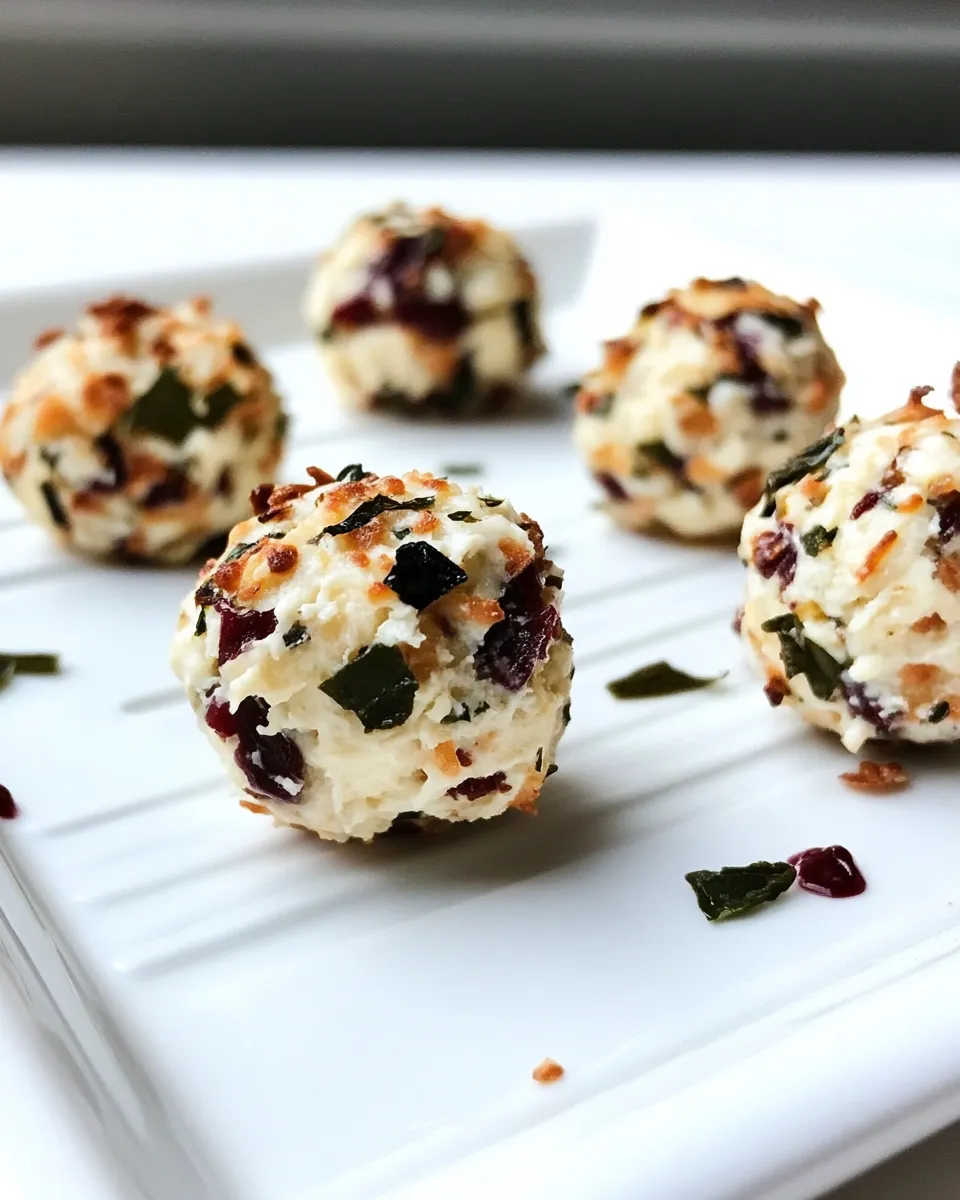
Mini Cheese Ball Bites
These little bites are exactly what you want on a crowded appetizer table: handheld, flavorful, and fast to assemble. They marry creamy, tangy cream cheese with sharp cheddar, then get a crunchy, colorful coating. Pretzel sticks turn each ball into a tidy pop you can grab without a plate.
No complicated steps or fancy equipment. Most of the work is mixing and chilling. The finishing touches — rolling in dried cranberries, crushed nuts, or chopped green onion — are forgiving and let you personalize texture and flavor without changing the base recipe.
If you’re feeding a crowd, make a double batch and refrigerate until the last minute. These keep their shape, travel well, and look polished on a platter. Below I walk you through what to buy, every step, smart swaps that respect texture issues, and the common mistakes to avoid so they set perfectly every time.
What to Buy
Stick to the ingredient list below for reliable results. Buy fresh cream cheese and a block of cheddar to shred yourself whenever possible — the texture will be smoother and the cheese will bind better. Pick a small bag of dried cranberries, a mixed nut bag (almonds, pecans, or walnuts) to crush, a bunch of green onions, and a box of thin pretzel sticks for handles.
If you plan to make these ahead, consider an extra tray or large plate to chill the balls on, and shallow bowls for the coatings so rolling is tidy and quick. The amounts in the recipe yield roughly 12–15 bite-sized balls; scale up for a larger gathering.
Ingredients
- 2 Tablespoons salted butter, room temperature — adds richness and softens the texture so the mixture is easy to shape.
- 8 ounces cream cheese, room temperature — the creamy base that gives structure and tang.
- 2 teaspoons fresh lemon juice — brightens the mix and balances the fat.
- 1/8 teaspoon Worcestershire sauce — a tiny umami boost; don’t skip if you want depth.
- 1/8 teaspoon hot sauce — optional heat that plays well with the sweet coatings.
- 1/8 teaspoon freshly ground black pepper — just enough pepper to wake up the flavors.
- 1/4 cup freshly shredded cheddar cheese — use freshly shredded for the best melt and texture.
- 1/3 cup dried cranberries — sweet and tart coating; chop if you want smaller pieces.
- 1/3 cup crushed nuts (almonds, pecans or walnuts) — provides crunch; toast lightly if you prefer more aroma.
- 1/3 cup green onion, finely chopped — bright, savory coating that keeps things fresh.
- 12–15 pretzel sticks — serve as handles for easy eating and a salty contrast.
Mini Cheese Ball Bites in Steps
- Put the salted butter and cream cheese at room temperature if they are not already. In a medium bowl combine the butter, cream cheese, fresh lemon juice, Worcestershire sauce, hot sauce, and freshly ground black pepper.
- Beat the mixture with an electric mixer on medium speed until well combined and smooth, scraping the bowl as needed.
- Stir in the freshly shredded cheddar cheese until evenly distributed.
- Using a spoon or a small cookie scoop, divide the mixture into 12–15 tablespoon-size portions and place them on a plate or baking sheet.
- Dip your clean hands briefly in cold water, then shape each portion into a small, smooth ball. Re-dip your hands in water as needed to prevent sticking.
- Cover the balls or the plate and refrigerate for at least 30 minutes (or longer if preparing ahead) to firm up.
- While the balls chill, spread the dried cranberries, crushed nuts, and the finely chopped green onion each in shallow bowls or separate areas of a tray for rolling.
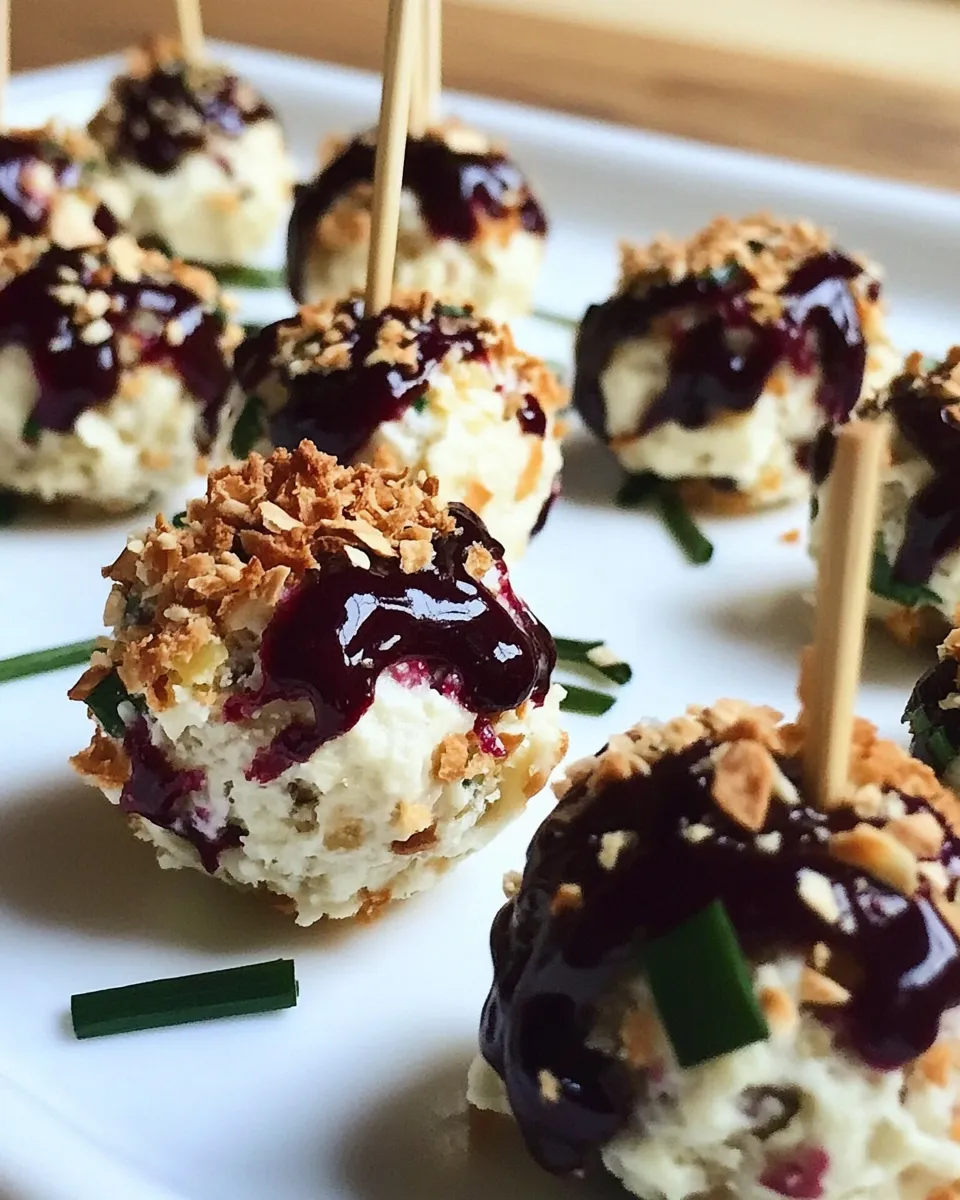
- Remove the chilled cheese balls from the refrigerator. Roll each ball in your choice of coating—dried cranberries, crushed nuts, finely chopped green onion, or a combination—pressing gently so the coating adheres.
- Insert one pretzel stick into each coated cheese ball to serve as a handle. Serve immediately or keep refrigerated until ready to serve.
Why It Deserves a Spot
Mini Cheese Ball Bites are a crowd-pleasing compromise between a classic cheese ball and easy finger food. They deliver the familiar cream-cheese-and-cheddar combination in a tidy, no-mess format. The pretzel handle makes them less messy than scooping from a shared bowl, and the variety of coatings lets you offer sweet, savory, and crunchy options on a single platter.
They also require minimal active time — most of the work is chilling. That makes them ideal for busy hosts who need to prep ahead but still want a freshly finished appetizer on the table.
Texture-Safe Substitutions
If you need to tweak textures without changing the recipe’s character, here are safe adjustments that use only the ingredients listed:
- For a smoother interior: beat the butter and cream cheese a little longer with the mixer to eliminate lumps and create a silkier base.
- If the nuts are too chunky for guests: pulse the nuts more finely when crushing so the coating is finer and less abrasive.
- For someone who can’t have nuts but still wants crunch: use crushed pretzel sticks as a crunchy, nut-free coating.
- To avoid large fruit pieces on the outside, finely chop the dried cranberries so they form a consistent external texture.
- Prefer a milder outside? Roll more balls in finely chopped green onion for a soft, savory finish without hard bits.
Equipment & Tools
- Medium mixing bowl — to combine the base ingredients.
- Electric mixer — for smooth, well-emulsified filling (hand whisk works but takes longer).
- Spoon or small cookie scoop — ensures uniform, tablespoon-size portions.
- Plate or baking sheet — to hold portions while they chill.
- Shallow bowls or a tray — for arranging coatings for rolling.
- Measuring spoons and cups — to measure small quantities accurately.
- Refrigerator — required to firm the balls before coating.
Avoid These Mistakes
Small missteps can lead to a greasy or fall-apart result. Watch for these common errors:
- Using cold butter or cream cheese — cold ingredients won’t blend smoothly and make shaping difficult. Bring them to room temperature first.
- Overbeating once the cheddar is added — you want the cheddar folded in, not whipped to stringiness. Mix until just combined.
- Skipping the chill — coating warm or soft cheese balls will cause the coatings to slide off. Chill for at least 30 minutes.
- Using pre-crushed nuts with large chunks — very large nut pieces can poke through coatings and make the bite awkward to eat; aim for a consistent crush.
- Inserting pretzel sticks too early — if you push the pretzel in before the ball chills and firms, the ball can split. Insert after coating and just before serving or chilling again briefly if needed.
Holiday-Friendly Variations
You don’t need extra ingredients to dress these up for a season. Small swaps and presentation changes signal holiday spirit:
- For winter/Christmas: roll some balls in dried cranberries and others in crushed pecans; arrange them on a platter with alternating colors for contrast.
- For a spring gathering: prioritize the green onion coating for a fresher look and garnish the platter with extra chopped green onion.
- New Year’s or game day: create an assortment of coatings and label each one so guests can choose between sweet and savory bites.
- Mix coatings on individual bites — half cranberry and half crushed nut for both crunch and chew in one bite.
Insider Tips
Timing and chilling
Chilling is not optional. The 30-minute firm-up is the single most important step for clean shapes and coatings that stick. If you need to prep further in advance, make the balls and refrigerate overnight on a covered tray; roll in coatings just before serving.
Coating technique
Press coatings gently into the surface rather than rolling forcefully. Gentle pressure helps them adhere without compressing the ball and changing the mouthfeel. If you want a uniform look, spread each coating in a thin layer in its own shallow bowl before rolling.
Serving
Keep the platter chilled until guests arrive, then serve right away. If the room is warm, set the platter over a shallow bed of ice (tray or bowl underneath) to maintain shape and safety.
Save It for Later
Refrigerate finished, coated cheese balls in an airtight container for up to 3 days. If you need to freeze them, place uncoated, shaped balls on a baking sheet and freeze until firm; transfer to a sealed container or freezer bag for up to 1 month. Thaw in the refrigerator, then roll in coatings and insert pretzel sticks before serving. Note that freezing can slightly change the texture of the dairy, so refrigerating is preferred when possible.
Helpful Q&A
Q: Can I make the mixture ahead and shape later?
A: Yes. You can make the base, store it covered in the refrigerator for up to 24 hours, then shape and chill before coating.
Q: What if I don’t have an electric mixer?
A: Use a sturdy whisk or wooden spoon. It will take longer to get a completely smooth texture, but it’s doable if you press and scrape the bowl frequently.
Q: Can I use pre-shredded cheddar?
A: You can, but freshly shredded cheddar binds a bit better because it lacks the anti-caking agents that sometimes interfere with melding into the cream cheese.
Q: My guests are allergic to nuts. What do I do?
A: Skip the nut coating and use crushed pretzel sticks or extra dried cranberries and green onion. Keep nut-containing coatings clearly labeled and separate.
In Closing
Mini Cheese Ball Bites are a smart, adaptable appetizer that looks thoughtful without demanding a lot of time. Follow the steps, respect the chill time, and pick coatings that match your crowd — you’ll have a platter that disappears fast. Make a batch for your next party; the easiest crowd-pleaser often becomes a new favorite.
Mini Cheese Ball Bites
Ingredients
Equipment
Method
- Put the salted butter and cream cheese at room temperature if they are not already. In a medium bowl combine the butter, cream cheese, fresh lemon juice, Worcestershire sauce, hot sauce, and freshly ground black pepper.
- Beat the mixture with an electric mixer on medium speed until well combined and smooth, scraping the bowl as needed.
- Stir in the freshly shredded cheddar cheese until evenly distributed.
- Using a spoon or a small cookie scoop, divide the mixture into 12–15 tablespoon-size portions and place them on a plate or baking sheet.
- Dip your clean hands briefly in cold water, then shape each portion into a small, smooth ball. Re-dip your hands in water as needed to prevent sticking.
- Cover the balls or the plate and refrigerate for at least 30 minutes (or longer if preparing ahead) to firm up.
- While the balls chill, spread the dried cranberries, crushed nuts, and the finely chopped green onion each in shallow bowls or separate areas of a tray for rolling.
- Remove the chilled cheese balls from the refrigerator. Roll each ball in your choice of coating—dried cranberries, crushed nuts, finely chopped green onion, or a combination—pressing gently so the coating adheres.
- Insert one pretzel stick into each coated cheese ball to serve as a handle. Serve immediately or keep refrigerated until ready to serve.
Notes
Make Ahead Tip: The cheese balls can be made a day in advance. Make them as instructed, but don't add the pretzels until right before serving.