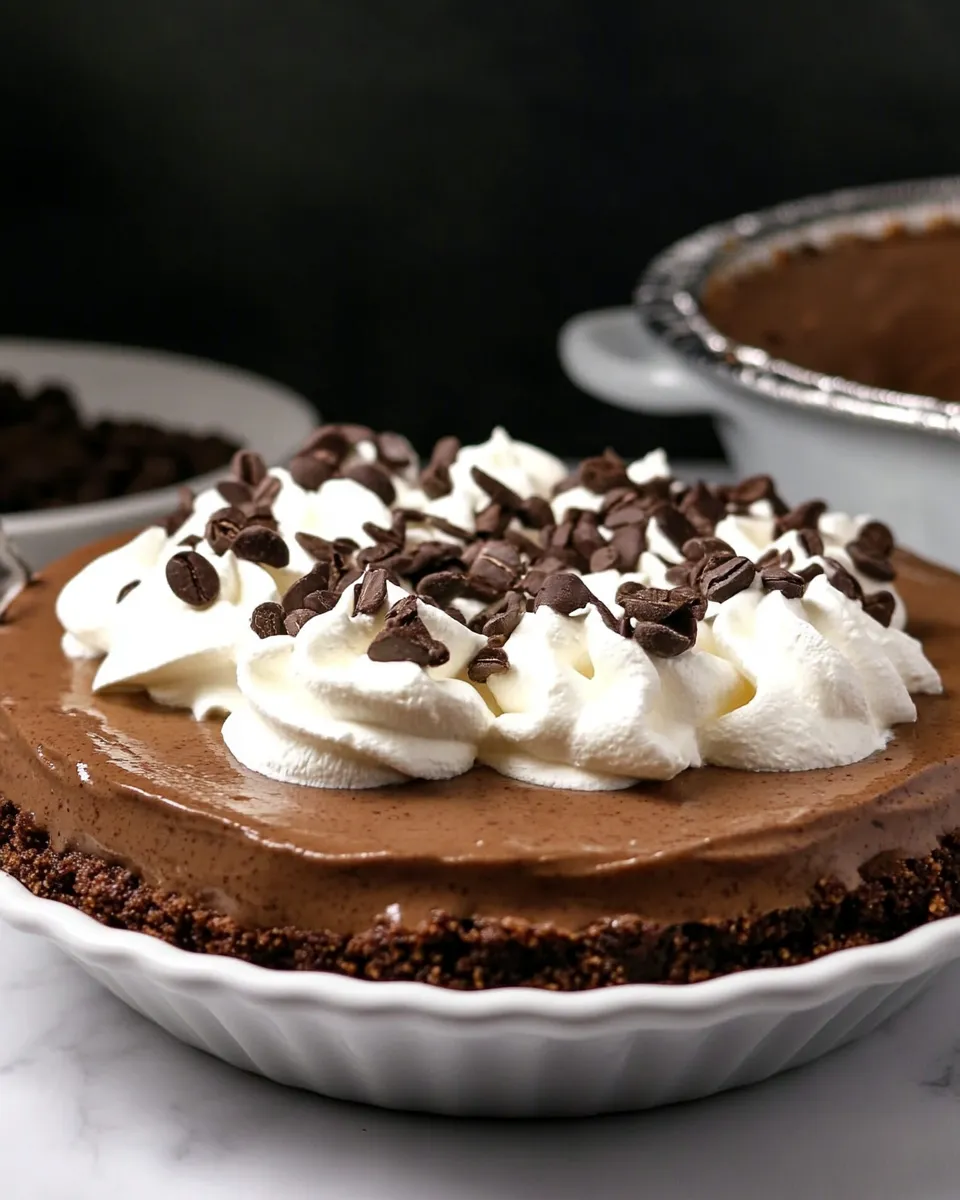
Mocha Pudding Pie
I love desserts that feel fancy but don’t require a bakery timetable. This Mocha Pudding Pie is one of those recipes: bold coffee flavor, chocolatey crust, and a forgiving, no-bake filling that comes together in minutes. It’s a perfect make-ahead dessert when you want something impressive with minimal fuss.
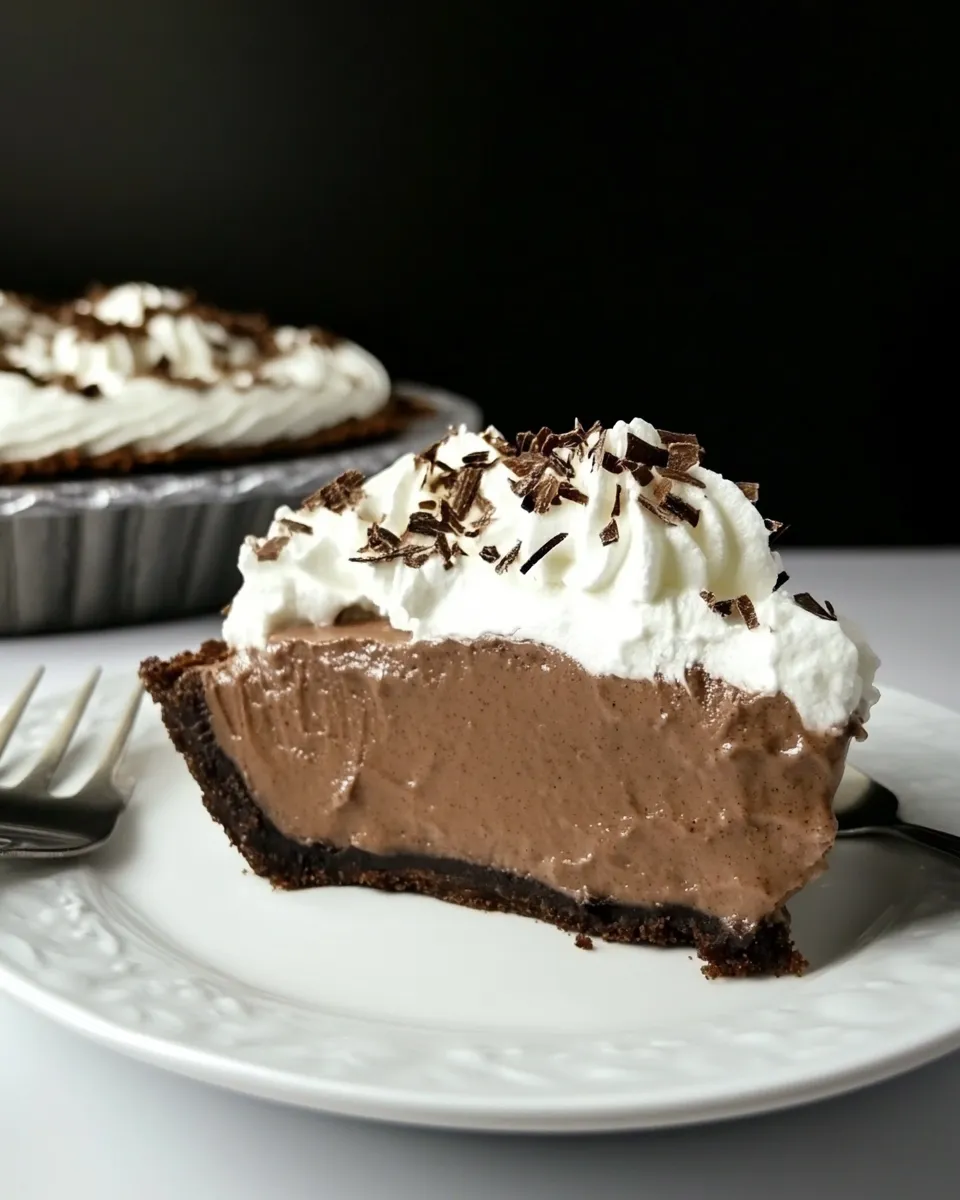
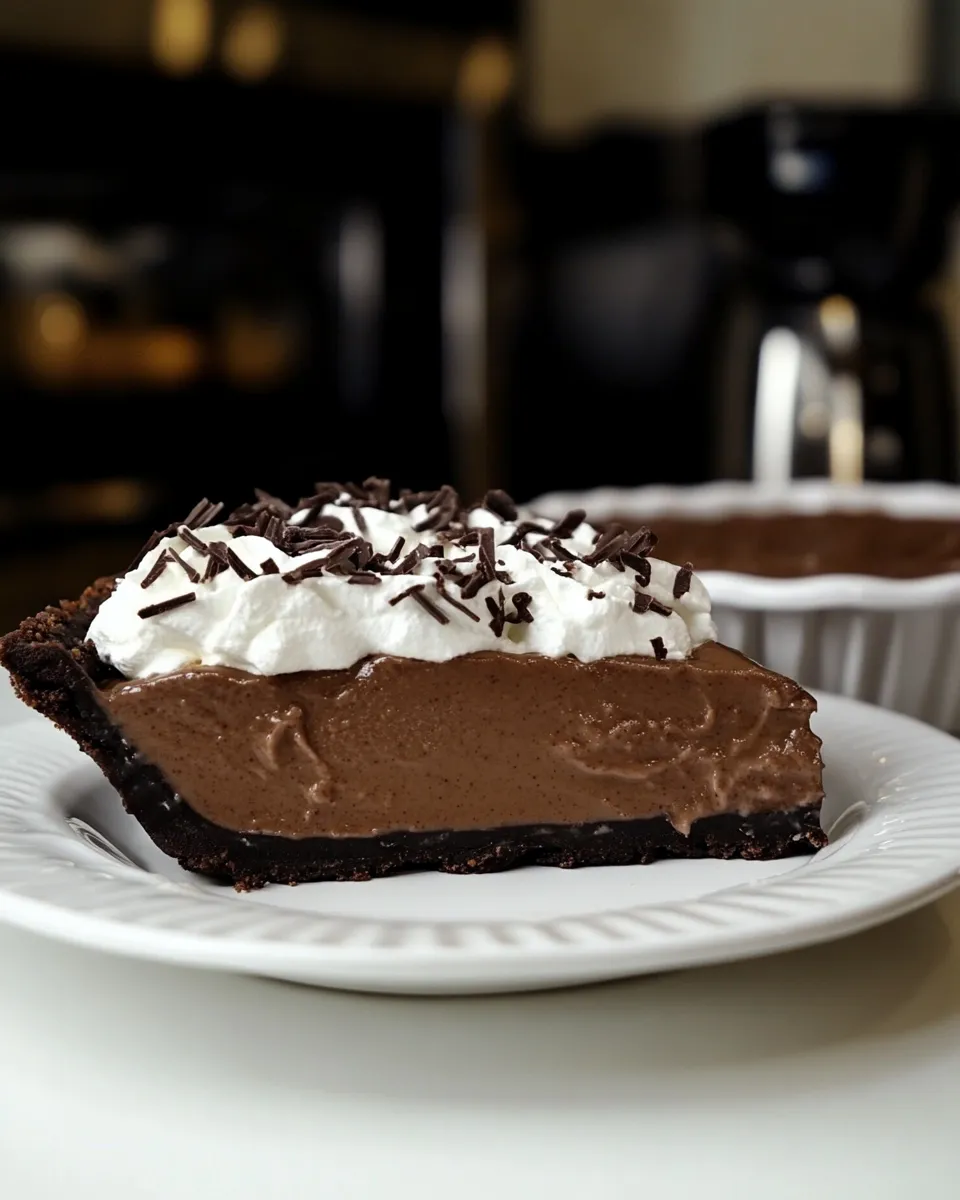
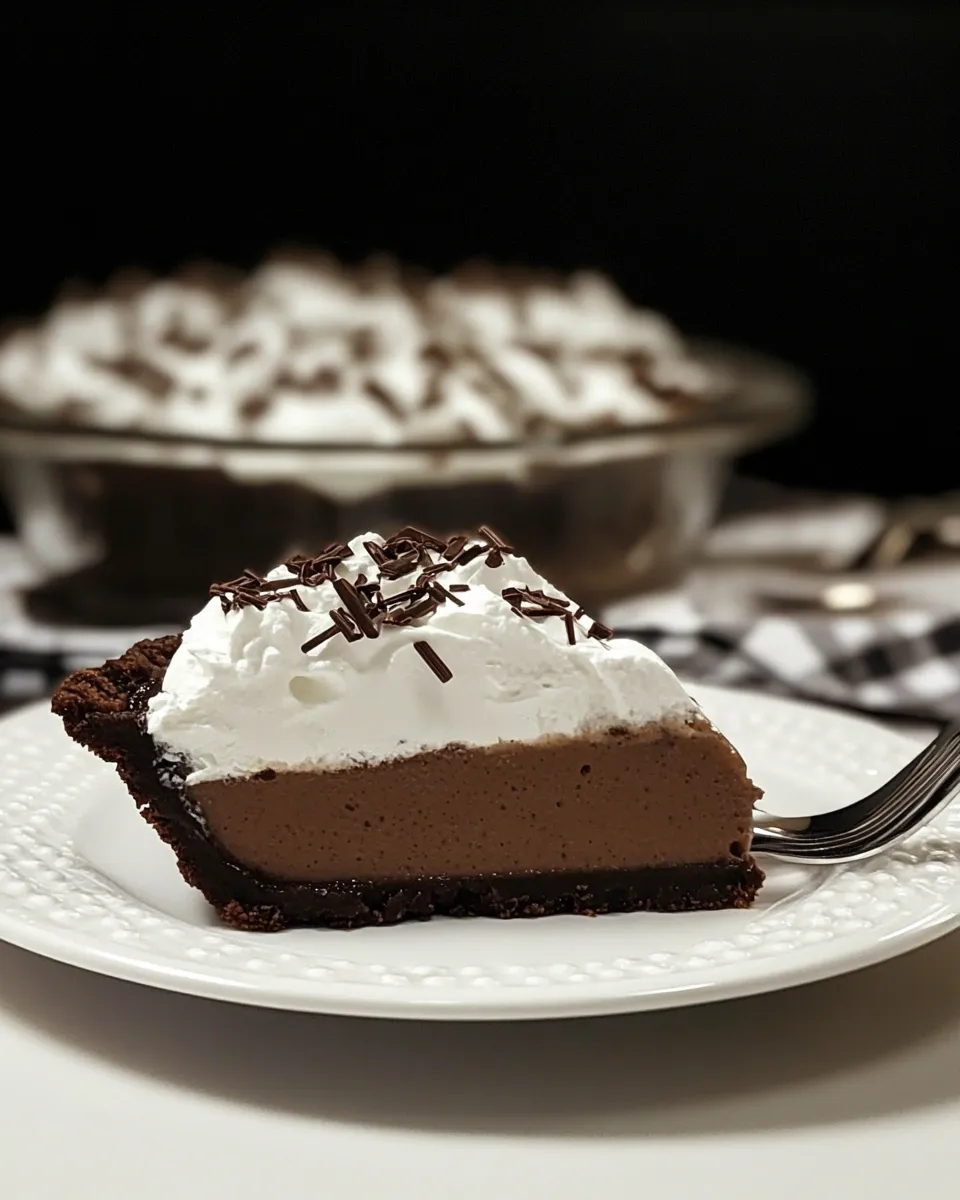
The filling is thick and scoopable thanks to instant pudding and softened coffee ice cream — that combination gives you coffee intensity without bitterness, and a texture that holds up sliced. The chocolate wafer crust adds crunch and balance, and the optional whipped cream finish keeps each bite from being too intense.
Below you’ll find the exact ingredient list and step-by-step directions, plus practical notes on equipment, common mistakes to avoid, and smart swaps for different seasons or dietary needs. Read the directions once, then gather your tools and ingredients — this pie rewards straightforward work.
Ingredients at a Glance
- 1 1/3 cups chocolate wafer cookies, crushed — forms the chocolate crust; crush finely for a compact base.
- 1/4 cup butter, melted — binds the cookie crumbs so the crust holds its shape.
- 3/4 cup milk — used to hydrate the instant pudding mix; measure precisely for correct set.
- 2 packages instant chocolate pudding (3 – 4 oz each – make sure it’s instant!) — provides the chocolate body and structure of the filling; use instant as labeled.
- 1/4 cup hot water — dissolves the instant coffee so it disperses evenly in the filling.
- 1 1/2 tablespoons instant coffee — gives the mocha kick; dissolve completely for best flavor integration.
- 1 pint coffee ice cream, softened — adds coffee flavor, sweetness, and creaminess to the filling; soften so it blends smoothly.
- Lightly sweetened fresh whipped cream (optional topping) — brightens the pie and adds a light contrast to the dense filling.
- Chocolate shavings (optional topping) — adds texture and a polished finish when serving.
Directions: Mocha Pudding Pie
- Place 1 1/3 cups chocolate wafer cookies in a resealable plastic bag and crush with a rolling pin until finely ground, or pulse in a food processor until fine.
- In a mixing bowl, combine the crushed cookies with 1/4 cup melted butter until the crumbs are evenly moistened.
- Grease a 9-inch pie plate. Press the cookie-butter mixture evenly into the bottom and up the sides of the greased pie plate to form a crust. Refrigerate the crust while you prepare the filling to help it firm.
- Dissolve 1 1/2 tablespoons instant coffee in 1/4 cup hot water and set aside.
- In a stand mixer fitted with the whip attachment, or using a hand whisk, combine 2 packages instant chocolate pudding mix with 3/4 cup milk on the lowest speed (or whisk gently) until just combined and beginning to thicken. Do not over-whip.
- Add the dissolved coffee to the pudding mixture and beat on low until incorporated; the mixture will be thick.
- Add 1 pint softened coffee ice cream and continue beating on low (or stir with a spatula) until just blended. The filling will be very thick.
- Spoon the filling into the prepared crust and smooth the top with a spatula.
- Refrigerate the pie for at least 4 hours (or overnight) to set. For a firmer texture you may freeze the pie, but avoid freezing for many days in a row or the crust may start to crumble.
- If desired, garnish with lightly sweetened fresh whipped cream and chocolate shavings before serving. Serve cold.
The Upside of Mocha Pudding Pie
This pie is fast to assemble and scales well for gatherings. The crust is forgiving — pressing crumbs into the plate takes seconds and gives you a crisp base without blind-baking. The filling uses instant pudding and softened ice cream, so you skip custard-cooking steps and tempering eggs.
It’s also make-ahead friendly. Refrigerate overnight for best slicing, or chill for at least four hours. Serve straight from the fridge for clean slices, or pop it into the freezer for a short while if you need firmer slices for transport. The coffee-forward flavor is grown-up but crowd-pleasing; add whipped cream to soften the intensity for kids or coffee-averse guests.
Texture-Safe Substitutions
- Crust: If you prefer a slightly less chocolatey crust, swap the chocolate wafer cookies for chocolate graham-style crumbs or another firm cookie — press firmly to avoid a crumbly edge.
- Butter: Unsalted or salted butter both work; if using salted, omit any additional salt in toppings or whipped cream.
- Milk: Use any cow’s milk you have on hand. For a lighter mouthfeel, low-fat milk will work; the setting may be a touch softer but still stable.
- Pudding: Use only instant chocolate pudding as called for — cook-and-serve varieties won’t set the same way with the no-cook method in this recipe.
- Coffee component: Instant espresso powder can substitute for instant coffee at the same measure if you want a slightly deeper coffee note.
- Ice cream: If coffee ice cream isn’t available, a strongly flavored coffee frozen yogurt or gelato can work; soften fully so it incorporates.
- Toppings: If you need a non-dairy option, use a high-quality whipped topping alternative that holds peaks for decoration.
Before You Start: Equipment
- 9-inch pie plate — standard size for even bake and good presentation.
- Food processor or resealable bag + rolling pin — either will crush the cookies; a processor is faster and more even.
- Mixing bowl and spatula — for combining crumbs and pressing into the pan.
- Stand mixer with whip or hand whisk — a stand mixer makes the pudding and ice cream blending effortless; a hand whisk works if you beat gently and use a sturdy bowl.
- Measuring cups and spoons — precise liquid measures are important for pudding set.
- Refrigerator space — the pie needs at least 4 hours of chilling, so plan space ahead.
Learn from These Mistakes
- Over-whipping the pudding. The directions warn you: mix only until beginning to thicken. Over-whipping introduces air and weakens the set, giving a loose filling.
- Not dissolving the coffee. Instant coffee granules can leave gritty pockets if not fully dissolved in hot water first. Dissolve completely and let it cool briefly before mixing into the pudding.
- Skipping refrigeration time. Cutting into a pie that hasn’t fully set will give you a sloppy slice. Respect the minimum 4 hours (overnight is better).
- Using rock-hard ice cream. If the ice cream is too frozen, it won’t blend and you’ll get lumps. Softened is key — let it sit at room temperature until scoopable but not melted.
- Pressing a loose crust. If you don’t press the crumbs firmly and evenly into the pie plate, the crust will crumble when you slice. Use the back of a measuring cup to compact the crumbs into a stable shell.
Seasonal Ingredient Swaps
Small seasonal tweaks keep this pie feeling fresh year-round. In cooler months, a rich dark-chocolate wafer and espresso boost leans into cozy flavors. Summer calls for cold serving and lighter garnish: a dollop of lightly sweetened whipped cream with a sprinkle of cocoa keeps it bright.
For holiday variations, fold a half teaspoon of cinnamon into the crust crumbs for warmth, or add a few pinches of ground cardamom to the whipped cream for an aromatic lift. In late spring, swap the coffee ice cream for a milder vanilla bean if you prefer less coffee intensity; the pudding and dissolved instant coffee will still carry the mocha note.
Behind the Recipe
This pie is built on two ideas: convenience and layered flavor. Instant pudding gives structure without custard-making, while the coffee ice cream provides depth and sweetness that pairs beautifully with a chocolate wafer crust. The dissolved instant coffee is the flavor amplifier — a little goes a long way to make the chocolate sing with mocha notes.
I developed this version for days when I wanted bold flavor but didn’t have time for a baked filling. The texture aims to be dense and sliceable rather than airy. Think of it as a chilled mousse crossed with an ice cream pie — robust, cold, and satisfying.
How to Store & Reheat
- Refrigerator: Store covered in the refrigerator for up to 3 days. Keep on a flat shelf to preserve shape and avoid condensation on the top.
- Freezer: You may freeze the pie for firmer texture, but avoid freezing for many days in a row to prevent the crust from softening and crumbling. If frozen, wrap tightly in plastic and a layer of foil; thaw in the refrigerator for a few hours before serving.
- Serving from fridge: Remove from refrigerator 5–10 minutes before slicing for cleaner cuts; this relaxes the filling slightly without melting it.
Popular Questions
- Can I make this without instant pudding? The recipe relies on instant pudding for structure in a no-cook filling. Cook-and-serve pudding won’t set the same way without additional stabilizers, so stick to instant pudding as directed.
- What if I don’t like coffee? Substitute a vanilla or chocolate ice cream in place of the coffee ice cream and omit or reduce the instant coffee. The pie will lean more toward chocolate than mocha but still be delicious.
- How do I get clean slices? Chill thoroughly. For perfect slices, use a sharp knife dipped in hot water and wiped dry between cuts.
- Can I make individual servings? Yes — press the crust into small tart pans or ramekins and portion the filling accordingly. Reduce chilling time slightly if the portions are shallower.
That’s a Wrap
Mocha Pudding Pie is one of my go-to desserts when I want something that looks intentional but doesn’t eat into the evening. The chocolate crust, coffee-forward filling, and easy assembly make it great for dinner parties, potlucks, or a weekend treat. Follow the steps, watch the texture rather than the clock, and let the pie chill fully before serving. You’ll have a rich, satisfying dessert that travels well, slices cleanly, and keeps happy bellies coming back for seconds.
Mocha Pudding Pie
Ingredients
Equipment
Method
- Place 1 1/3 cups chocolate wafer cookies in a resealable plastic bag and crush with a rolling pin until finely ground, or pulse in a food processor until fine.
- In a mixing bowl, combine the crushed cookies with 1/4 cup melted butter until the crumbs are evenly moistened.
- Grease a 9-inch pie plate. Press the cookie-butter mixture evenly into the bottom and up the sides of the greased pie plate to form a crust. Refrigerate the crust while you prepare the filling to help it firm.
- Dissolve 1 1/2 tablespoons instant coffee in 1/4 cup hot water and set aside.
- In a stand mixer fitted with the whip attachment, or using a hand whisk, combine 2 packages instant chocolate pudding mix with 3/4 cup milk on the lowest speed (or whisk gently) until just combined and beginning to thicken. Do not over-whip.
- Add the dissolved coffee to the pudding mixture and beat on low until incorporated; the mixture will be thick.
- Add 1 pint softened coffee ice cream and continue beating on low (or stir with a spatula) until just blended. The filling will be very thick.
- Spoon the filling into the prepared crust and smooth the top with a spatula.
- Refrigerate the pie for at least 4 hours (or overnight) to set. For a firmer texture you may freeze the pie, but avoid freezing for many days in a row or the crust may start to crumble.
- If desired, garnish with lightly sweetened fresh whipped cream and chocolate shavings before serving. Serve cold.
Notes
You will also need: Resealable plastic bag and rolling pin or food processor, mixing bowls, standing or hand mixer, 9-inch pie plate, plastic zipper bag
Adapted from Good Housekeeping's Party Pie Book (1958)