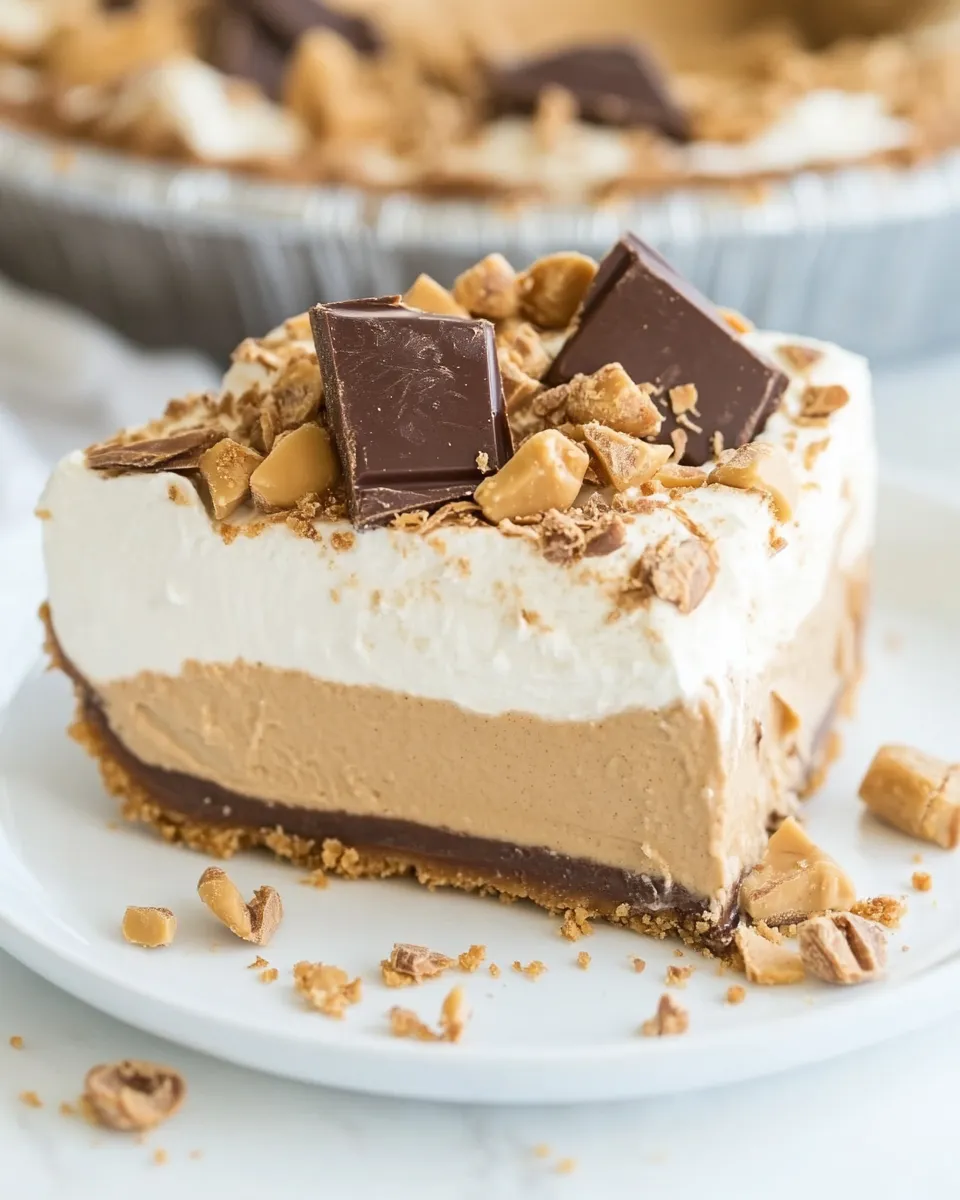
No-Bake Chocolate Peanut Butter Pie
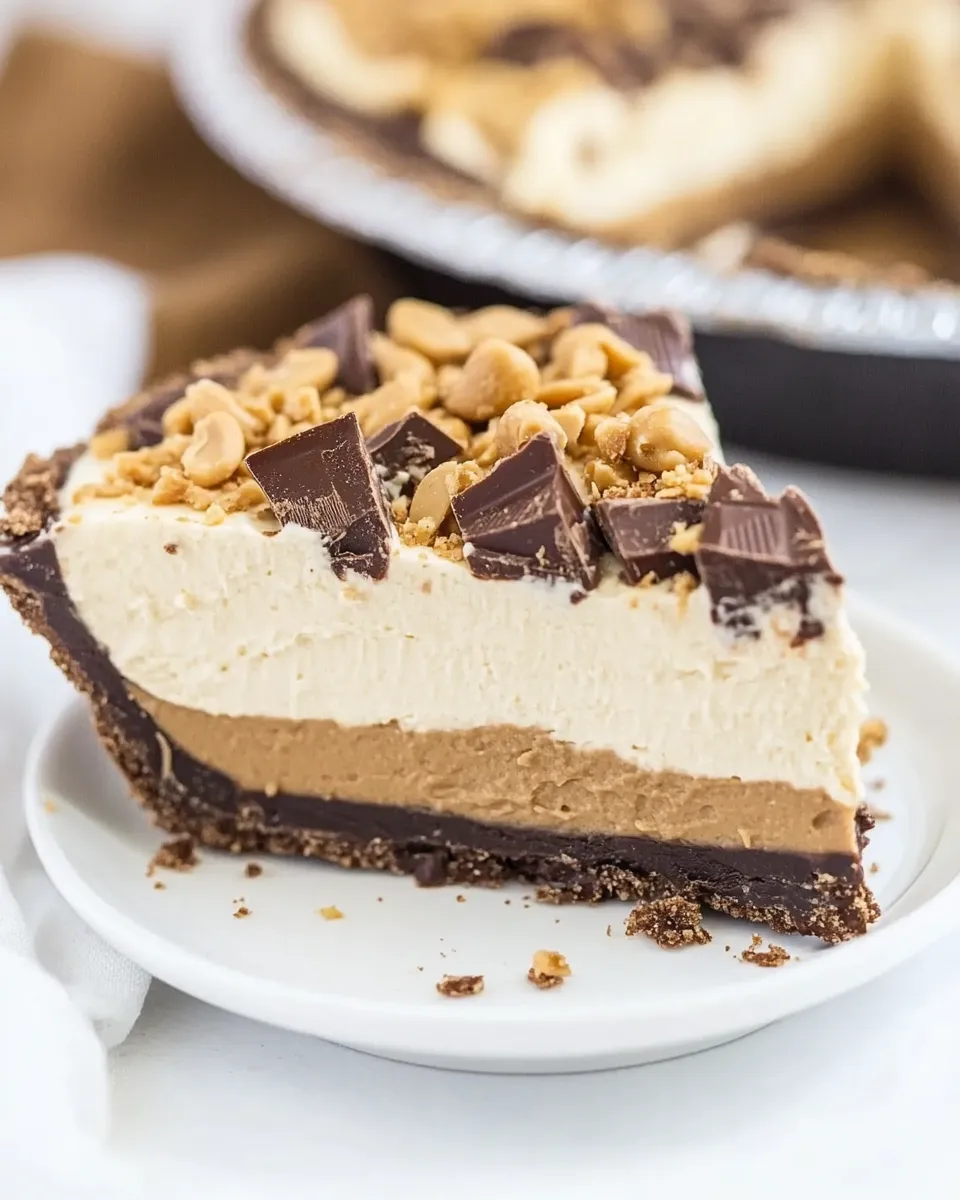
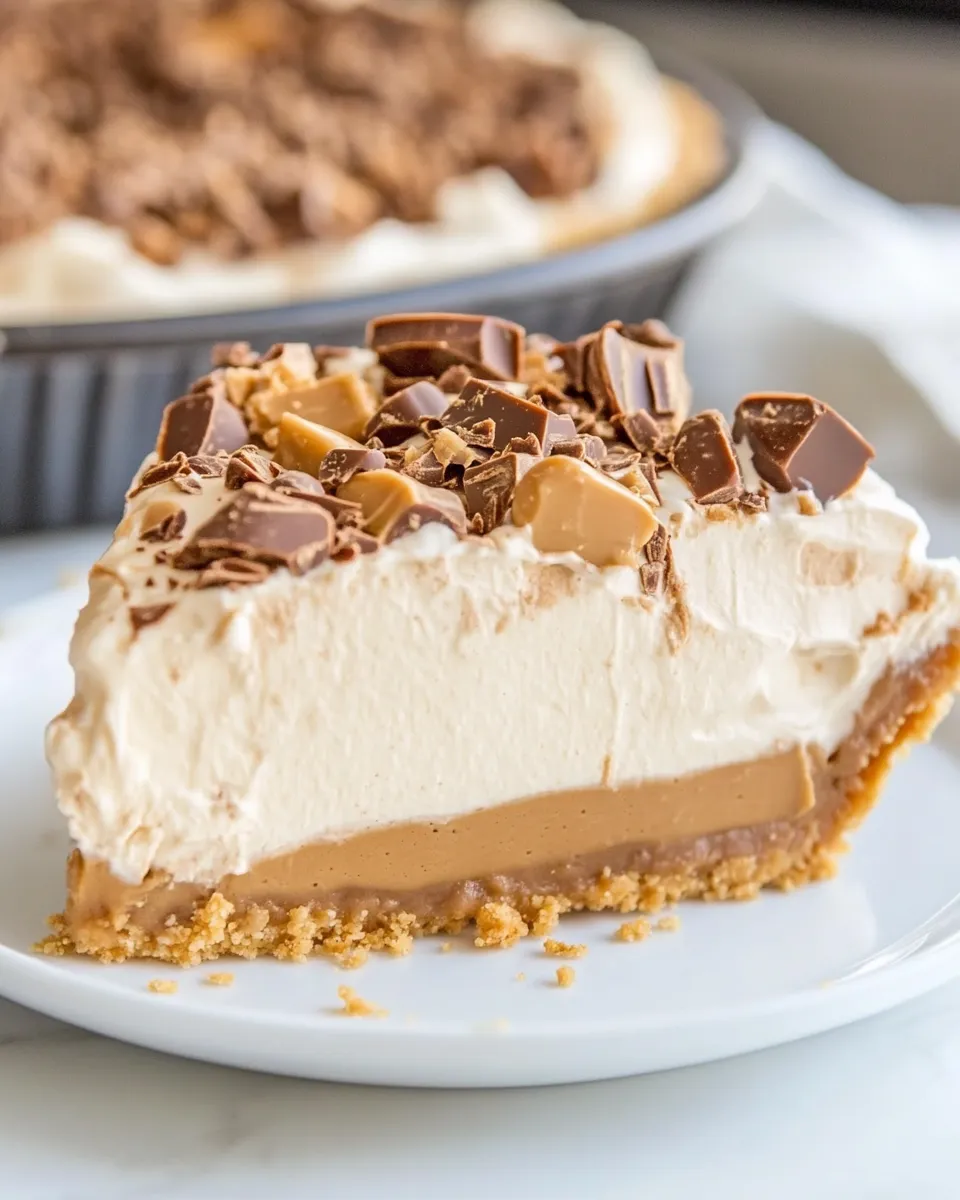
This pie is the shortcut dessert I reach for when a chocolate-and-peanut-butter craving hits and I don’t want to fuss with ovens. It’s simple: a whipped, peanut-butter-forward filling set in a premade chocolate crust, topped with Cool Whip and an optional sprinkle of chopped peanut butter cups. The texture is creamy, not too sweet, and it slices into clean wedges if you give it the recommended chill time.
I’ll keep this practical. You’ll find an exact ingredients list, step-by-step instructions taken directly from my tested method, troubleshooting tips, storage notes, and a few smart tweaks for dietary preferences. No guessing about amounts or steps — follow the directions and you’ll have a reliable, crowd-pleasing pie.
If you’ve never worked with a soft cream cheese in a cold filling, I’ll point out when to bring it to room temperature and why. There are a few easy traps — overbeating, underchilling, or using a crust that’s too fragile — but they’re all fixable. Let’s get to it.
What We’re Using
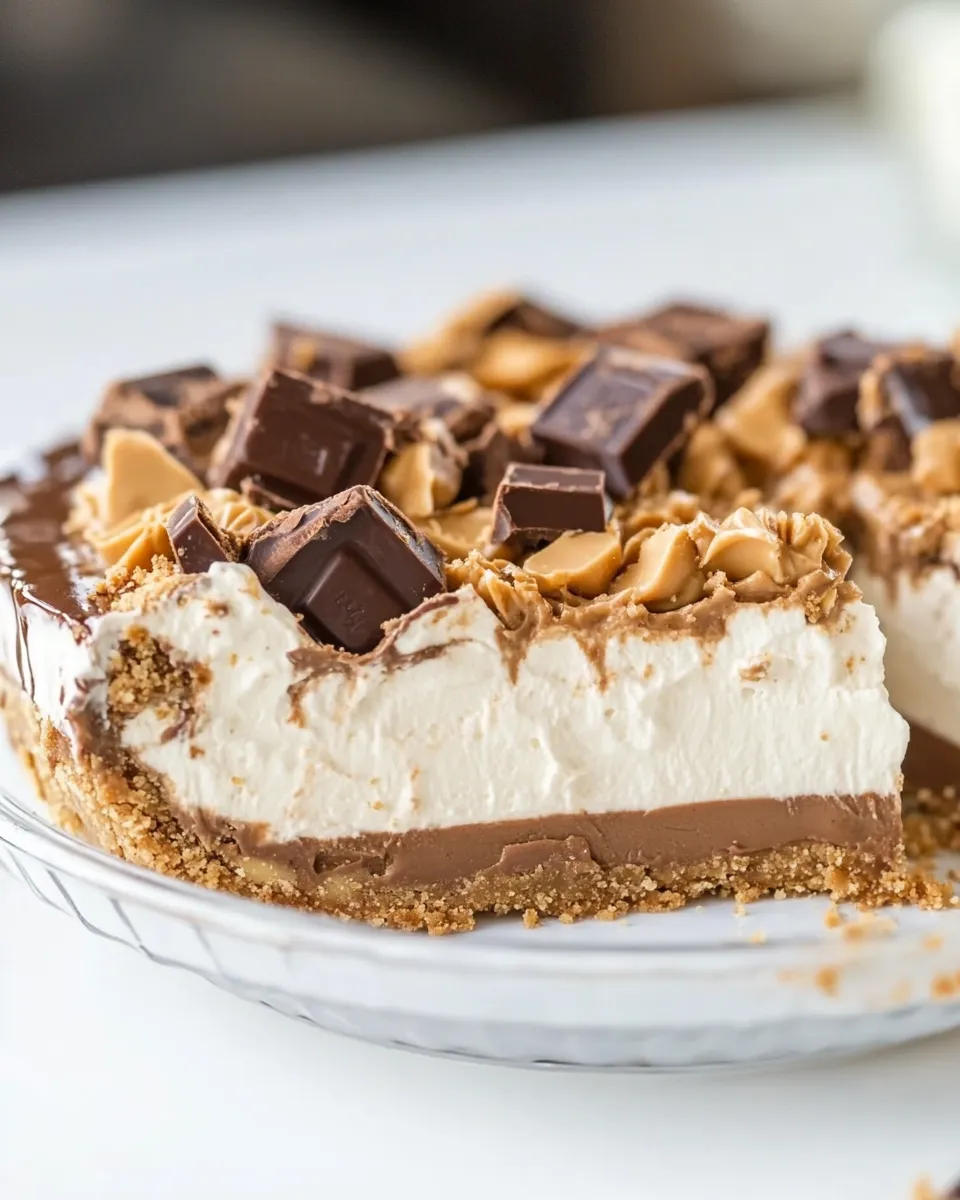
Here’s the practical view of what appears in the pie: a salty-sweet peanut butter base balanced with smooth cream cheese, powdered sugar for structure and sweetness, a bit of milk to loosen the filling, and a premade chocolate crust to make this truly no-bake. Cool Whip keeps the top airy and sliceable without extra effort. Optional chopped peanut butter cups add texture and a decorative finish.
Ingredients
- ⅔ cup peanut butter — provides the peanut butter flavor and body; creamy peanut butter blends easiest.
- 4 ounces cream cheese — adds tang and stabilizes the filling; soften slightly for smooth beating.
- 1 cup powdered sugar — sweetens and helps thicken the filling for clean slices.
- ½ cup milk — adjusts the filling to a spreadable consistency; add gradually.
- 1 premade chocolate crust — the no-bake shell; chocolate flavor pairs with the filling and saves time.
- 8 ounces Cool Whip — light, whipped topping layered on the filling for a smooth finish.
- chopped peanut butter cups (optional garnish) — adds crunch, extra chocolate, and a finishing touch when desired.
Mastering No-Bake Chocolate Peanut Butter Pie: How-To
- If the cream cheese is cold, let it sit at room temperature until slightly softened (about 15 minutes) so it is easy to beat.
- In a large bowl, beat 2/3 cup peanut butter and 4 ounces cream cheese together until smooth and well combined.
- Add 1 cup powdered sugar to the bowl and beat until fully incorporated and the mixture is smooth.
- Gradually add 1/2 cup milk, beating between additions, until the filling is smooth and spreadable. Scrape the sides of the bowl as needed.
- Pour the filling into the 1 premade chocolate crust and spread it evenly with a spatula.
- Spread 8 ounces Cool Whip evenly over the top of the filling.
- If desired, sprinkle chopped peanut butter cups over the Cool Whip as a garnish.
- Freeze the pie for at least 3 hours, until firm.
- Remove the pie from the freezer about 10 minutes before cutting to make slicing easier, then serve.
Top Reasons to Make No-Bake Chocolate Peanut Butter Pie
First: speed. With a premade crust and a few mixing steps, you can have this in the freezer in under 20 minutes. Second: reliability. The structure comes from powdered sugar and cream cheese rather than baking time, so results are consistent. Third: flavor. Chocolate and peanut butter are a classic pairing that’s hard to get wrong — the salty-sweet balance works for most palates.
Finally, it’s flexible. The optional chopped peanut butter cups let you customize texture and sweetness. Serve it at a summer cookout straight from a short thaw, or bring it to a holiday table as a cool counterpoint to warm desserts. It looks impressive, but it’s forgiving.
No-Store Runs Needed
This recipe is designed to minimize last-minute trips to the store. The premade crust and Cool Whip are pantry/freezer items many home cooks keep on hand. If you already have peanut butter, cream cheese, powdered sugar, and milk, you’re set. The only truly optional item is the chopped peanut butter cups for garnish; skip them if you don’t have them and the pie will still be satisfyingly finished.
Essential Tools for Success
Keep tool needs basic so you can pull this off in any kitchen:
- Electric mixer (hand or stand) — makes beating the peanut butter and cream cheese smooth and lump-free.
- Rubber spatula — for scraping the bowl and spreading the filling evenly into the crust.
- 9-inch pie plate (usually the premade crust is in one) — the crust size should match the filling volume.
- Measuring cups and spoons — accuracy with 2/3 cup and 1/2 cup measurements matters for texture.
- Freezer-safe flat surface — to keep the pie level while it firms up for at least 3 hours.
Avoid These Traps
Trap: using rock-cold cream cheese. If you beat it straight from the fridge, it will stay lumpy and the filling won’t smooth out. Let it rest about 15 minutes so it yields slightly when pressed.
Trap: skipping the freeze time. The filling benefits from firming so slices hold their shape. Less than 3 hours will give you a softer, messier slice. If you need it earlier, plan to serve it with a spoon rather than as neat wedges.
Trap: overworking the filling after adding too much milk. The directions call for gradually adding 1/2 cup milk until spreadable. If the mixture gets too thin, you’ll have a runnier pie. Add milk slowly and stop once you reach a spreadable consistency.
Nutrition-Minded Tweaks
If you want to reduce sweetness or tweak macros, these swaps help while keeping the pie largely the same:
- Use natural peanut butter with only peanuts and salt — it contains no added sugar and gives a purer peanut flavor. Expect a slightly looser texture; you may need to chill longer.
- Swap part of the powdered sugar for a powdered erythritol blend (1:1 sweetener) to lower sugar content. Texture can change slightly; mix until smooth.
- Use lower-fat cream cheese and a lighter whipped topping if you want a reduced-fat version. The pie will be slightly less rich but still enjoyable.
- To increase protein, fold in a scoop of unflavored protein powder with the powdered sugar — mix carefully to maintain smoothness.
What I Learned Testing
Testing this pie taught me that small details matter. For instance, the order of mixing affects final texture: beat the peanut butter and cream cheese until completely homogenous before adding powdered sugar. If the peanut butter is lumpier, powdered sugar won’t fully integrate and you’ll get small pockets of dry sugar.
I also learned the power of the rest time. The 3-hour freeze gives the filling body without turning it rock solid — it becomes scoopable yet slices neatly once you allow a brief 10-minute thaw. Too quick a freeze or too little thaw makes cutting uneven and messy.
Finally, the premade crust quality matters. A sturdier chocolate crust holds fillings better and prevents sogginess. The very flimsy crusts can crack when you slice; if yours feels delicate, use a sharp knife warmed under hot water and wiped dry for cleaner cuts.
Best Ways to Store
Short-term (serve within a week)
Keep the pie in the freezer covered with plastic wrap or in a freezer-safe container. It holds its texture best frozen. When ready to serve, remove about 10 minutes before cutting so the slices aren’t rock-hard. If you prefer a softer slice, transfer the pie to the refrigerator for 30–60 minutes before serving.
Long-term (over a week)
Freeze for up to one month for best quality. Beyond that, textures and flavors can decline. Wrap the pie tightly in plastic wrap and then a layer of foil to prevent freezer burn. Label with the date so you can use it within a month for best taste.
No-Bake Chocolate Peanut Butter Pie Q&A
Q: Can I use crunchy peanut butter instead of creamy?
A: Yes. Crunchy will add extra texture. Expect a slightly less smooth filling; fold gently to preserve crunch if you like that contrast.
Q: Can I refrigerate instead of freezing?
A: You can, but the filling will be softer and may not slice as cleanly. Refrigerate for at least 6 hours; freezing for 3 hours is more reliable for neat slices.
Q: What’s the best way to slice the pie?
A: Use a sharp knife warmed briefly under hot water and wiped dry between slices. Remove the pie from the freezer about 10 minutes before cutting to avoid shattering the filling.
Q: Can I make this ahead for a party?
A: Absolutely. Make it a day or two ahead and keep frozen. Thaw slightly before serving. Add the optional chopped peanut butter cups right before presenting to keep them fresh and crunchy.
Save & Share
If this pie becomes a favorite, save the recipe and freezer tip. It’s the kind of dessert that travels well to potlucks because it arrives firm and looks polished. Share a picture or a note about your favorite garnish — chopped peanut butter cups, a drizzle of chocolate, or a sprinkle of flaky sea salt all work nicely.
Keep one in the freezer as an easy, impressive dessert option. It’s quick to make, requires minimal equipment, and reliably satisfies the chocolate-and-peanut-butter crowd.
No-Bake Chocolate Peanut Butter Pie
Ingredients
Equipment
Method
- If the cream cheese is cold, let it sit at room temperature until slightly softened (about 15 minutes) so it is easy to beat.
- In a large bowl, beat 2/3 cup peanut butter and 4 ounces cream cheese together until smooth and well combined.
- Add 1 cup powdered sugar to the bowl and beat until fully incorporated and the mixture is smooth.
- Gradually add 1/2 cup milk, beating between additions, until the filling is smooth and spreadable. Scrape the sides of the bowl as needed.
- Pour the filling into the 1 premade chocolate crust and spread it evenly with a spatula.
- Spread 8 ounces Cool Whip evenly over the top of the filling.
- If desired, sprinkle chopped peanut butter cups over the Cool Whip as a garnish.
- Freeze the pie for at least 3 hours, until firm.
- Remove the pie from the freezer about 10 minutes before cutting to make slicing easier, then serve.
Notes
Refrigerating peanut butter cups for 10 minutes makes them much easier to chop.
If your crust is in a foil tin, pop it in a glass pie plate to give you added stability when transferring it in and out of the freezer.