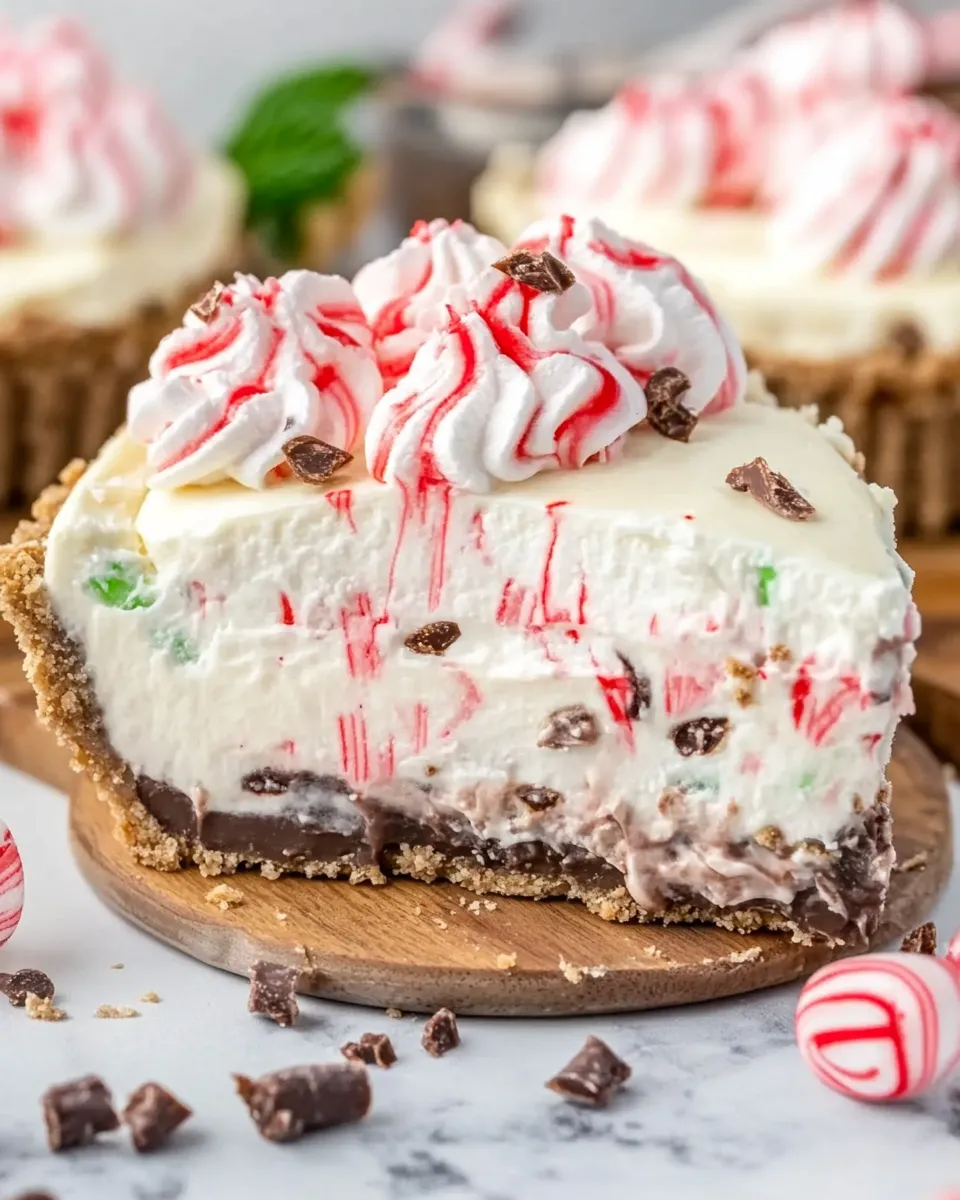
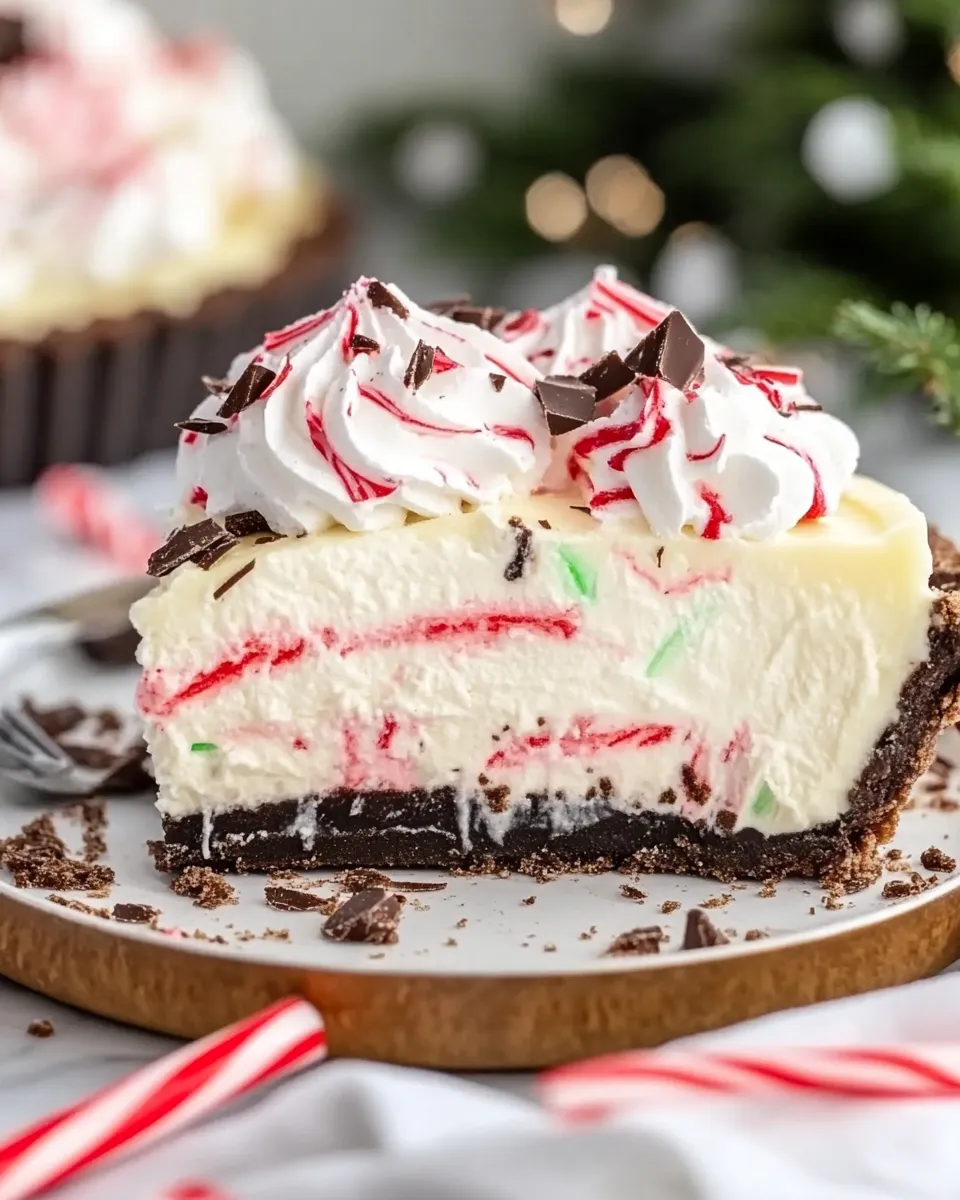
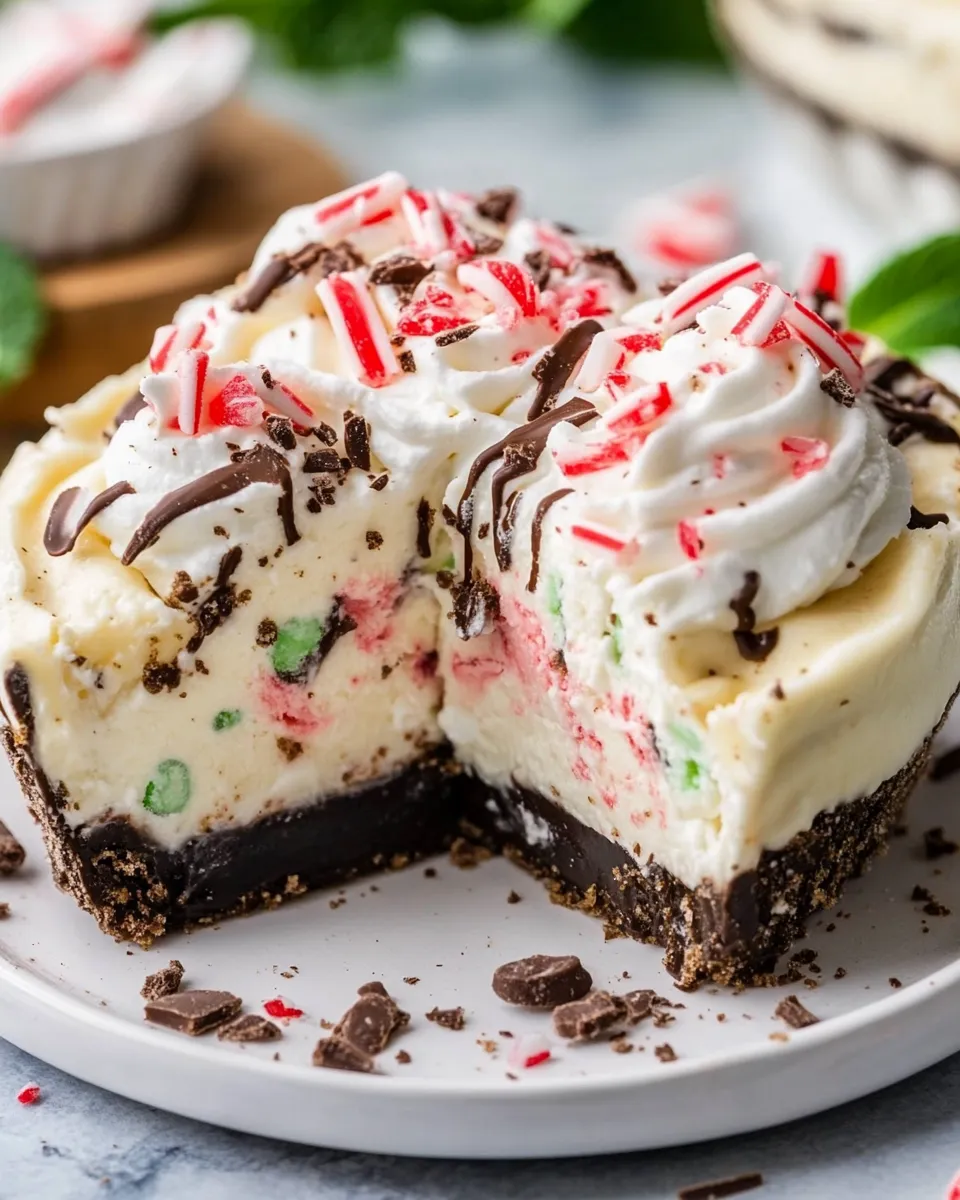
No Bake Peppermint Pie
If you’re searching for the perfect festive dessert that combines ease and incredible flavor, look no further than this No Bake Peppermint Pie. With a luscious peppermint ice cream filling nestled in a classic Oreo cookie crust, this pie is a delightful treat for all peppermint lovers. Whether you’re hosting a holiday gathering, a cozy family dinner, or simply treating yourself, this pie will surely impress. The combination of cool peppermint and rich chocolate creates a refreshing dessert that everyone will adore.
Why This Recipe Is a Must-Try

No Bake Peppermint Pie is more than just a dessert; it’s an experience! This recipe is incredibly simple to make, requiring minimal effort and no oven. Perfect for warmer weather or busy holiday seasons, it allows you to create a gorgeous, delicious pie without the hassle of baking. The creamy peppermint ice cream filling is complemented perfectly by the crunchy Oreo crust while the crushed peppermint candies add a delightful festive touch. Your friends and family will be coming back for seconds and thirds, so be ready to share!
Ingredients
- 24 Oreo cookies (almost a full package)
- ¼ cup butter, melted
- ½ gallon peppermint ice cream
- 8 ounces Cool Whip (1 tub)
- 20 peppermint candies, divided (wrappers removed)
- Whipped cream for garnish
- Chocolate syrup for garnish
How To Make No Bake Peppermint Pie
Step 1: Prepare the Oreo Crust
Begin by crushing the Oreo cookies into fine crumbs. You can do this by placing them in a zip-top bag and using a rolling pin, or by pulsing them in a food processor until finely crushed. Once you have your cookie crumbs, transfer them to a mixing bowl.
Step 2: Add Butter and Mix
Pour the melted butter into the bowl with the cookie crumbs. Mix well until all the crumbs are moistened with butter. The mixture should hold together when pressed.
Step 3: Form the Crust
Press the cookie mixture firmly into the bottom and up the sides of a 9-inch pie pan. Ensure it’s evenly compacted to create a sturdy crust. Once done, place the crust in the freezer while you prepare the filling.
Step 4: Soften the Peppermint Ice Cream
Remove the peppermint ice cream from the freezer and let it sit at room temperature for about 10 minutes to soften slightly. This will make it easier to mix with the Cool Whip.
Step 5: Mix the Filling
In a large bowl, combine the softened peppermint ice cream and the entire tub of Cool Whip. Use a spatula to gently fold the two together until well combined, creating a light and fluffy filling.
Step 6: Add Crushed Peppermint Candies
Take 15 of the peppermint candies and crush them into small pieces. You can do this with a rolling pin or use a food processor. Add these crushed candies to the ice cream mixture and fold them in gently, reserving the remaining candies for garnishing.
Step 7: Fill the Pie Crust
Remove the Oreo crust from the freezer and pour the peppermint filling into it. Spread it out evenly with a spatula, and then smooth the top. You can even create a little swirl for a fancy touch!
Step 8: Freeze the Pie
Cover the pie with plastic wrap or aluminum foil and place it in the freezer. Let it freeze for at least 4 hours, or until firm. For the best results, freeze it overnight.
Step 9: Serve the Pie
When you’re ready to serve, remove the pie from the freezer. Allow it to sit at room temperature for about 10 minutes before slicing. This will make cutting easier. Garnish with dollops of whipped cream, a drizzle of chocolate syrup, and sprinkle the reserved crushed peppermint candies on top for a festive look!
Expert Tips
- For a twist on the flavor, consider using chocolate peppermint ice cream instead of regular peppermint ice cream.
- Ensure that the Oreo crust is well-pressed to avoid crumbling when slicing the pie.
- If you can’t find peppermint ice cream, vanilla ice cream mixed with peppermint extract works wonderfully too!
- Let the pie sit for a few minutes after removing from the freezer to make cutting easier.
Variations and Customizations
- Substitute the Cool Whip with a homemade whipped cream for a heavier, more decadent version.
- Swap the peppermint candies for crushed candy canes for added crunch and festive flair.
- Add a layer of chocolate fudge sauce inside the pie crust before adding the peppermint filling for an extra chocolatey treat.
- Incorporate a layer of chocolate mousse beneath the peppermint filling for a multi-layered pie experience.
How to Store Leftovers
Leftover No Bake Peppermint Pie can be stored in the freezer for up to 2 weeks. Make sure to cover the pie tightly with plastic wrap or foil to prevent freezer burn. When you’re ready to enjoy it again, simply let it thaw in the refrigerator for about an hour before serving. You can also slice individual pieces and store them in an airtight container in the freezer for a quick, sweet treat anytime!
FAQ
Can I use a different type of cookie for the crust?
Absolutely! If you’re not a fan of Oreos, you can use any chocolate sandwich cookie or even graham crackers for a different flavor profile.
Is there a dairy-free option for the ice cream?
Yes! Look for dairy-free peppermint ice cream alternatives, which are available at many grocery stores. Just make sure to check the ingredients to ensure they meet your requirements.
Can I make this pie ahead of time?
Yes! This pie is perfect for making ahead of time. You can prepare it a day or two in advance, allowing the flavors to meld beautifully in the freezer.
What if I can’t find peppermint candies?
If peppermint candies are hard to find, crushed candy canes are a great substitute! Alternatively, you can also skip the candies altogether for a simple mint flavor without the crunch.
Conclusion
This No Bake Peppermint Pie is a dessert that will bring joy and sweetness to any occasion, especially during the festive season. With its easy preparation and delightful flavors, it’s perfect for both beginners and seasoned bakers. Best of all, it’s a no-fuss treat that leaves everyone wanting more. So, gather your ingredients and get ready to create a dessert that will become a new holiday favorite! Enjoy each creamy, minty slice, and bask in the compliments you’ll undoubtedly receive from your guests. Happy baking!

No Bake Peppermint Pie
Equipment
- Mixing Bowl
- Food Processor
- 9-inch Pie Pan
- Spatula
- Plastic Wrap
Ingredients
Oreo Crust
- 24 cookies Oreo cookies Almost a full package
- ¼ cup butter Melted
Filling
- ½ gallon peppermint ice cream
- 8 ounces Cool Whip 1 tub
- 20 pieces peppermint candies Divided, wrappers removed
Garnishes
- Whipped cream For garnish
- Chocolate syrup For garnish
Instructions
- Step 1: Begin by crushing the Oreo cookies into fine crumbs. You can do this by placing them in a zip-top bag and using a rolling pin, or by pulsing them in a food processor until finely crushed. Once you have your cookie crumbs, transfer them to a mixing bowl.
- Step 2: Pour the melted butter into the bowl with the cookie crumbs. Mix well until all the crumbs are moistened with butter. The mixture should hold together when pressed.
- Step 3: Press the cookie mixture firmly into the bottom and up the sides of a 9-inch pie pan. Ensure it’s evenly compacted to create a sturdy crust. Once done, place the crust in the freezer while you prepare the filling.
- Step 4: Remove the peppermint ice cream from the freezer and let it sit at room temperature for about 10 minutes to soften slightly. This will make it easier to mix with the Cool Whip.
- Step 5: In a large bowl, combine the softened peppermint ice cream and the entire tub of Cool Whip. Use a spatula to gently fold the two together until well combined, creating a light and fluffy filling.
- Step 6: Take 15 of the peppermint candies and crush them into small pieces. You can do this with a rolling pin or use a food processor. Add these crushed candies to the ice cream mixture and fold them in gently, reserving the remaining candies for garnishing.
- Step 7: Remove the Oreo crust from the freezer and pour the peppermint filling into it. Spread it out evenly with a spatula, and then smooth the top. You can even create a little swirl for a fancy touch!
- Step 8: Cover the pie with plastic wrap or aluminum foil and place it in the freezer. Let it freeze for at least 4 hours, or until firm. For the best results, freeze it overnight.
- Step 9: When you’re ready to serve, remove the pie from the freezer. Allow it to sit at room temperature for about 10 minutes before slicing. This will make cutting easier. Garnish with dollops of whipped cream, a drizzle of chocolate syrup, and sprinkle the reserved crushed peppermint candies on top for a festive look!