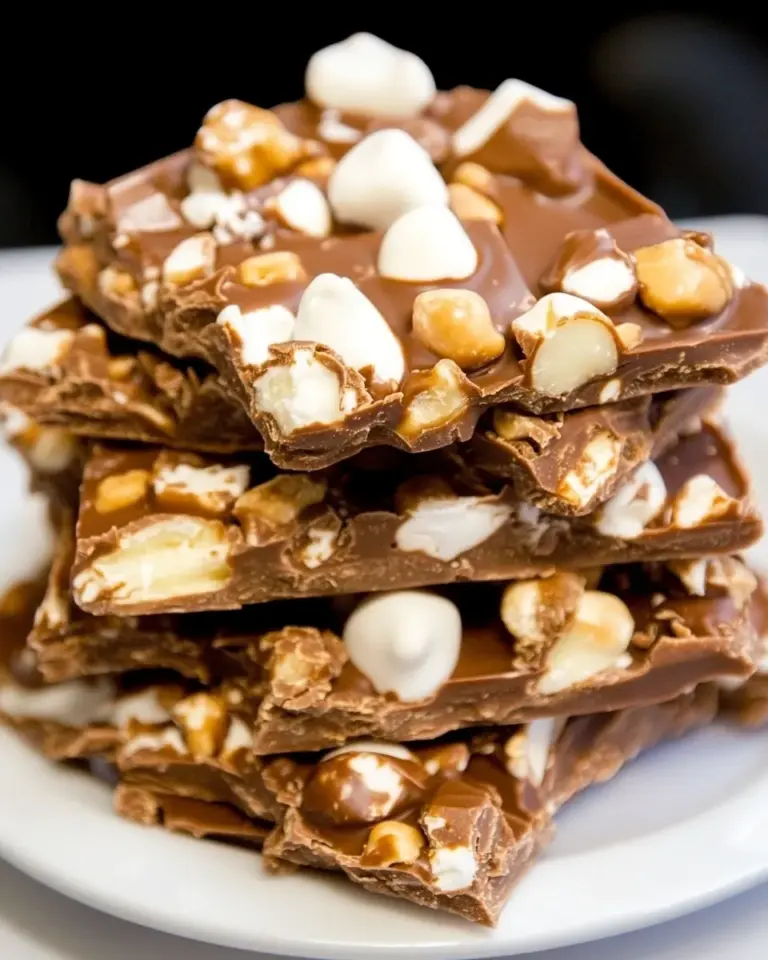
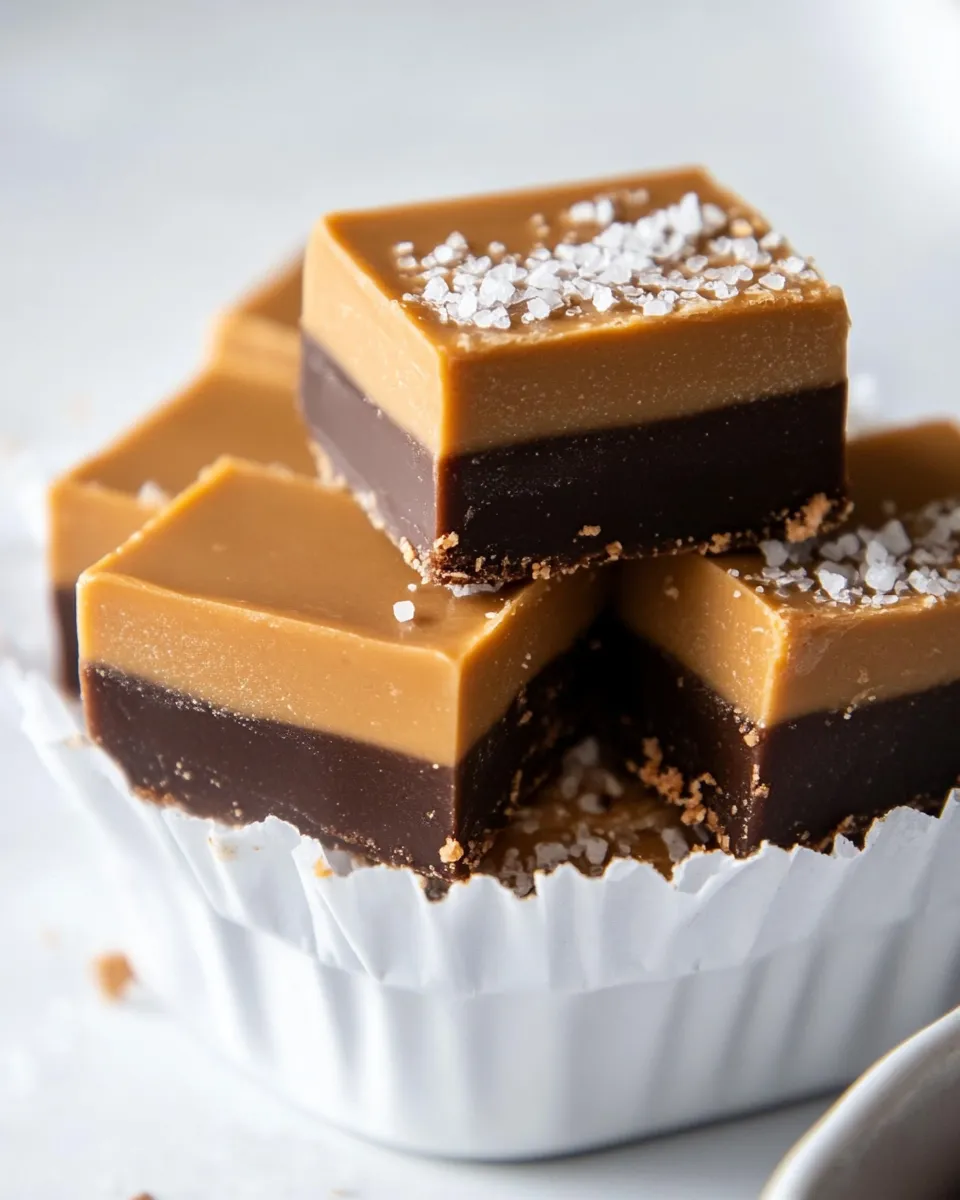
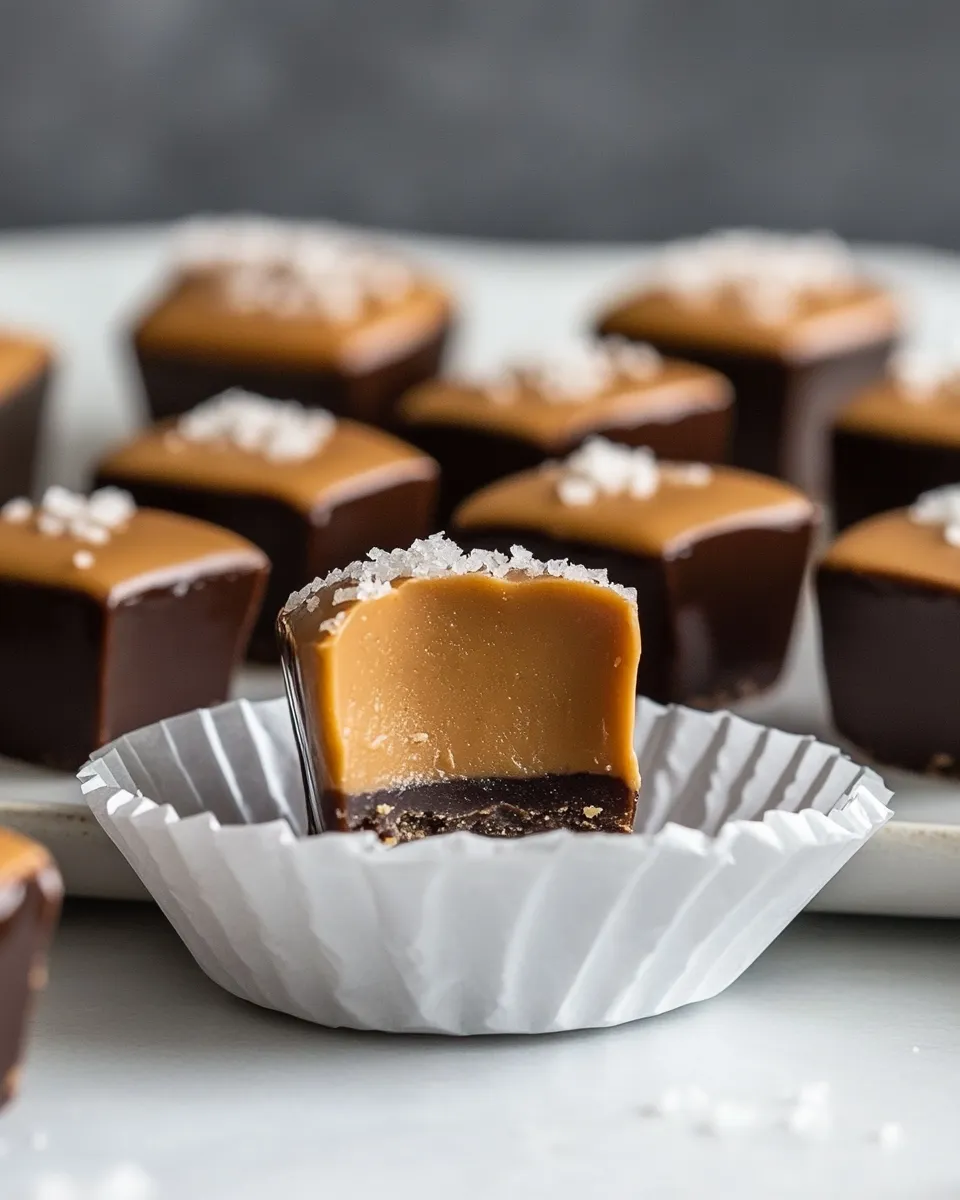
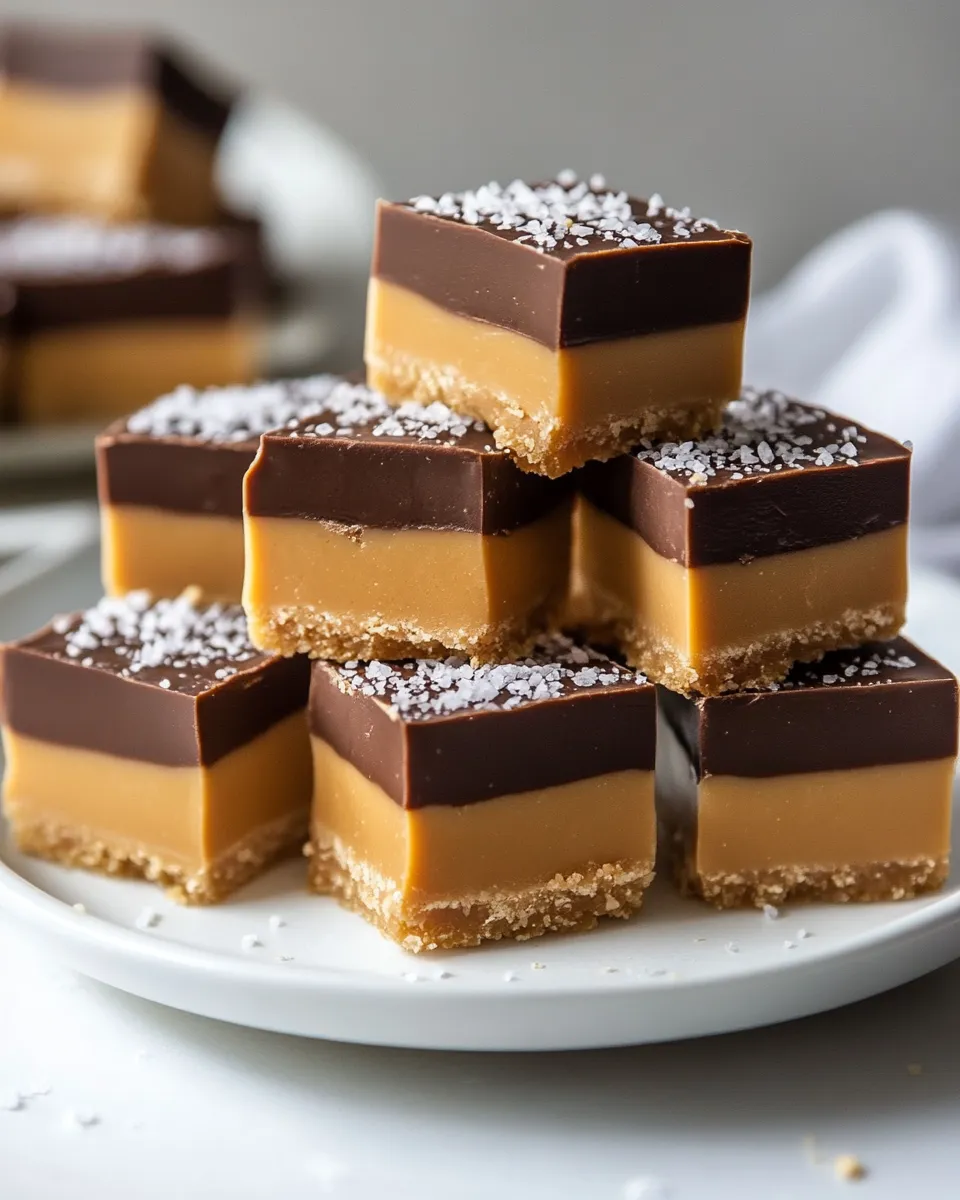
Peanut Butter Candy
This candy is a small, concentrated joy — salty-sweet peanut butter layered with a thin chocolate topping. It’s the sort of recipe that delivers reliably: minimal equipment, straightforward steps, and results that hold up for snacking or gifting.
I’ve tested this exact method so the peanut butter layer is smooth and fudgy, and the chocolate layer sets just firm enough to give a little bite. You don’t need tempering or complicated techniques; a microwave and an 8×8 pan are all it takes.
Read through the ingredients and steps once before you start. Measure and prep everything so the work goes quickly and the candy comes out uniform.
What You’ll Gather
Ingredients
- 1 cup creamy peanut butter — the main flavor and texture; creamy gives an even, fudgy layer.
- 1 cup salted butter — adds richness and structure; keep it salted as written for balance.
- 2 teaspoons vanilla extract — rounds the peanut butter and deepens flavor.
- ½ teaspoon salt — enhances the overall sweetness and offsets the chocolate.
- 3 ½ cups powdered sugar — sweetens and firms the peanut butter base to a dough-like consistency.
- ¼ cup semisweet chocolate chips — forms the quick chocolate topping; semisweet keeps it balanced.
- 3 tablespoons butter — melts with the chocolate to create a spreadable ganache-like layer.
- ½ cup powdered sugar — sweetens and slightly thickens the chocolate layer.
- 1–2 teaspoons milk — thins the chocolate mixture if needed so it spreads; use as little as required.
Peanut Butter Candy: From Prep to Plate
- Line an 8×8-inch baking dish with parchment paper. Place one large and one small microwave-safe bowl on your counter.
- In the large bowl combine 1 cup creamy peanut butter, 1 cup salted butter, 2 teaspoons vanilla extract, and ½ teaspoon salt.
- Microwave the large bowl in 1-minute increments, stirring between each increment, until the butter and peanut butter are fully melted and the mixture is smooth and pourable.
- Stir 3 ½ cups powdered sugar into the melted peanut butter mixture a little at a time until fully incorporated and the mixture becomes a smooth, fudgy dough.
- Transfer the peanut butter fudge to the prepared pan and press it into an even layer. Use a butter knife to make shallow ridges or gashes across the top to create crevices for the chocolate layer.
- In the small bowl combine ¼ cup semisweet chocolate chips and 3 tablespoons butter.
- Microwave the chocolate bowl in 1-minute increments, stirring between each increment, until the chocolate and butter are melted and the mixture is smooth.
- Stir ½ cup powdered sugar and 1 teaspoon milk into the chocolate mixture until combined. If the chocolate mixture is too thick to pour or spread, stir in the second teaspoon of milk (use 1–2 teaspoons total as needed).
- Pour the chocolate mixture over the peanut butter layer and gently spread it to cover. Press lightly so the chocolate works into the ridges and crevices you made.
- Refrigerate the pan for at least 3 hours, until the candy is firm. Lift the fudge from the pan using the parchment paper, cut into 1-inch squares, and store the pieces in an airtight container at room temperature for up to two weeks.
Why This Recipe Is Reliable
This recipe runs on straightforward chemistry: melted fats (butter and peanut butter) plus powdered sugar create a dense, stable matrix that sets firm but not rock-hard. The physics are forgiving. You don’t need precise temperatures or special techniques to succeed.
The two-layer approach is equally robust. The peanut butter layer is slightly roughened to help the chocolate adhere; that small trick keeps the topping from sliding off or separating. Microwaving in short increments prevents overheating and preserves texture.
Measurements are generous where they matter — enough powdered sugar to stabilize the base and just enough chocolate to add contrast without overwhelming. Follow the order and timing, and you’ll get even, sliceable squares every time.
Swap Guide
- Peanut butter — you can try natural-style peanut butter but expect a looser texture; if you use it, stir well and monitor consistency before adding all the powdered sugar.
- Salted butter — if you only have unsalted, add an extra ¼ to ½ teaspoon salt to the peanut butter mixture to reach similar balance.
- Semisweet chocolate chips — swap for dark or milk chocolate to change sweetness and depth. Dark will cut sweetness; milk will be sweeter.
- Powdered sugar — do not replace with granulated sugar; powdered sugar dissolves and binds the peanut base in a way granulated cannot.
- Milk — use cream for a richer, glossier chocolate layer, but add sparingly to avoid a runny top.
Appliances & Accessories
- Microwave — heats the butter, peanut butter, and melts the chocolate quickly and safely in short bursts.
- 8×8-inch baking dish — gives the candy the right thickness for 1-inch squares.
- Parchment paper — makes lifting and slicing the set candy straightforward.
- Two microwave-safe bowls — one large for the peanut butter base, one small for the chocolate top; prevents cross-contamination and keeps work tidy.
- Butter knife or offset spatula — for pressing the base and scoring ridges so the top adheres.
- Measuring cups and spoons — accurate dry and wet measurements matter for texture.
Mistakes That Ruin Peanut Butter Candy
- Overheating the peanut butter — microwave too long in one go and the oils can separate. Heat in 1-minute increments and stir between each.
- Adding powdered sugar too fast — dump it all at once and you’ll end up with lumps. Add gradually and work it in until smooth.
- Skipping the ridges — if you don’t score the peanut butter, the chocolate may sit on top and risk cracking or sliding when cut.
- Using the wrong chocolate-to-butter ratio — too little butter with the chocolate makes it stiff and hard to spread; too much makes it runny. Stick to ¼ cup chips and 3 tablespoons butter.
- Not chilling long enough — cut before set and the pieces will be misshapen. Wait at least 3 hours.
Fresh Takes Through the Year
Simple tweaks make this candy seasonal without changing the base method. For winter gifts, press a few crushed peppermint pieces into the chocolate before it sets. In spring, garnish with a light dusting of flaky sea salt for contrast.
Pair the candy with warm drinks in colder months — coffee, chai, or cocoa — and with iced tea or sparkling water in summer. You can also press chopped toasted nuts on top of the chocolate for texture and presentation during holidays.
Notes from the Test Kitchen
Use a smooth peanut butter for the most consistent results. Natural peanut butters separate and will require more stirring and attention; the end texture can still be lovely, but expect slight differences.
When stirring the powdered sugar into the melted peanut butter, the mixture will feel shaggy at first and then come together. Work patiently. If it becomes too dry, a teaspoon of milk can help, but usually the fat content is enough to bind it.
For even slices, chill completely and use a sharp knife warmed briefly under hot water, wiped dry between cuts. This creates cleaner edges and less chocolate cracking.
Keep-It-Fresh Plan
Store the finished candy in an airtight container at room temperature for up to two weeks, as the original instructions advise. Keep it in a cool, dry spot away from direct sunlight or heat sources to prevent sweating or softening.
If your kitchen runs warm, store in the refrigerator; be aware refrigeration can firm the candy more than intended and slightly change mouthfeel. Bring back to room temperature for about 20–30 minutes before serving so the texture is at its best.
Common Questions
- Can I make this without a microwave? — Yes. Melt the butter and peanut butter in a heatproof bowl set over a pan of simmering water (double boiler) and proceed the same way. Melt the chocolate and butter for the topping the same way.
- Why two amounts of powdered sugar? — The larger amount (3 ½ cups) turns the peanut butter mixture into a stable, sliceable base. The smaller amount (½ cup) sweetens and thickens the chocolate topping without making it grainy.
- Can I freeze these? — Yes. Freeze in a single layer on a tray, then transfer to a freezer-safe container. Thaw in the refrigerator or at room temperature before serving. Freezing may slightly change texture but preserves flavor.
- How do I get perfect 1-inch squares? — Use a ruler to score lightly before cutting, chill fully, and use a warmed, sharp knife for clean cuts.
Serve & Enjoy
These Peanut Butter Candy squares are ideal for a grab-and-go sweet, a thoughtful homemade gift, or a plate at a casual gathering. Arrange on a simple platter or pack in small boxes with parchment separators for gifting.
They’re portable, shelf-stable (at room temp) for two weeks, and unapologetically indulgent. Slice them small for parties or keep them 1-inch as written for reliable portioning and balance between peanut butter and chocolate.
Make a batch, label it, and you’ll have one of the quickest, most satisfying candies you can turn out with minimal fuss. Enjoy.
Peanut Butter Candy
Ingredients
Equipment
Method
- Line an 8×8-inch baking dish with parchment paper. Place one large and one small microwave-safe bowl on your counter.
- In the large bowl combine 1 cup creamy peanut butter, 1 cup salted butter, 2 teaspoons vanilla extract, and ½ teaspoon salt.
- Microwave the large bowl in 1-minute increments, stirring between each increment, until the butter and peanut butter are fully melted and the mixture is smooth and pourable.
- Stir 3 ½ cups powdered sugar into the melted peanut butter mixture a little at a time until fully incorporated and the mixture becomes a smooth, fudgy dough.
- Transfer the peanut butter fudge to the prepared pan and press it into an even layer. Use a butter knife to make shallow ridges or gashes across the top to create crevices for the chocolate layer.
- In the small bowl combine ¼ cup semisweet chocolate chips and 3 tablespoons butter.
- Microwave the chocolate bowl in 1-minute increments, stirring between each increment, until the chocolate and butter are melted and the mixture is smooth.
- Stir ½ cup powdered sugar and 1 teaspoon milk into the chocolate mixture until combined. If the chocolate mixture is too thick to pour or spread, stir in the second teaspoon of milk (use 1–2 teaspoons total as needed).
- Pour the chocolate mixture over the peanut butter layer and gently spread it to cover. Press lightly so the chocolate works into the ridges and crevices you made.
- Refrigerate the pan for at least 3 hours, until the candy is firm. Lift the fudge from the pan using the parchment paper, cut into 1-inch squares, and store the pieces in an airtight container at room temperature for up to two weeks.
Notes
It’s best to cut the fudge while it is cold. However, the fudgy texture is best at room temperature.
Add coarse sea salt to the tops if desired!