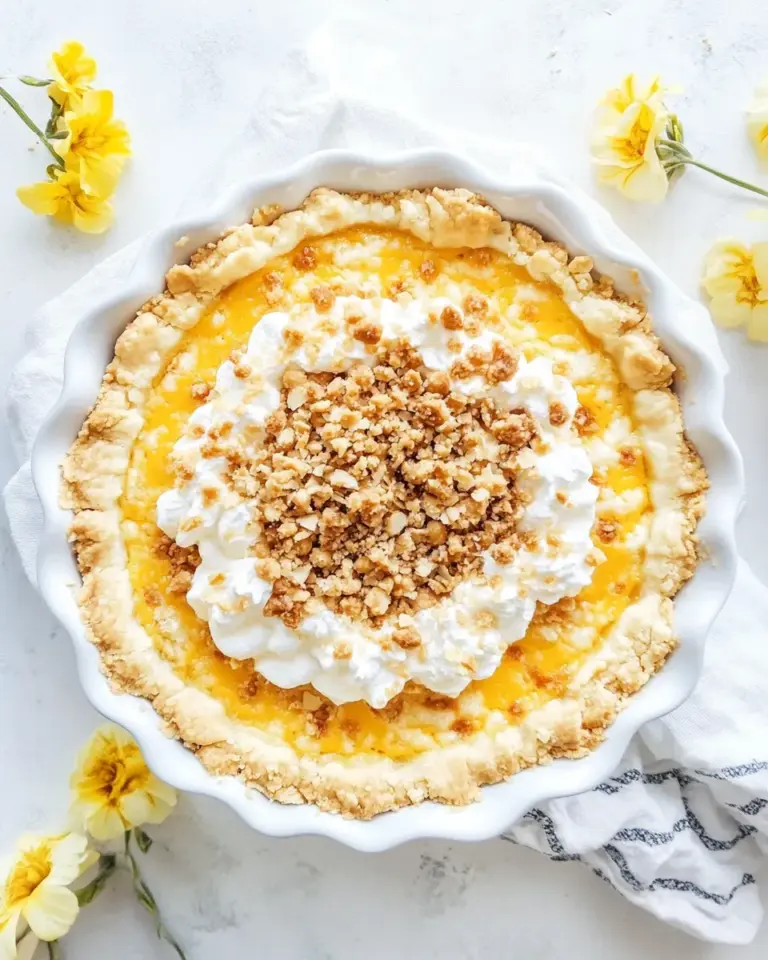
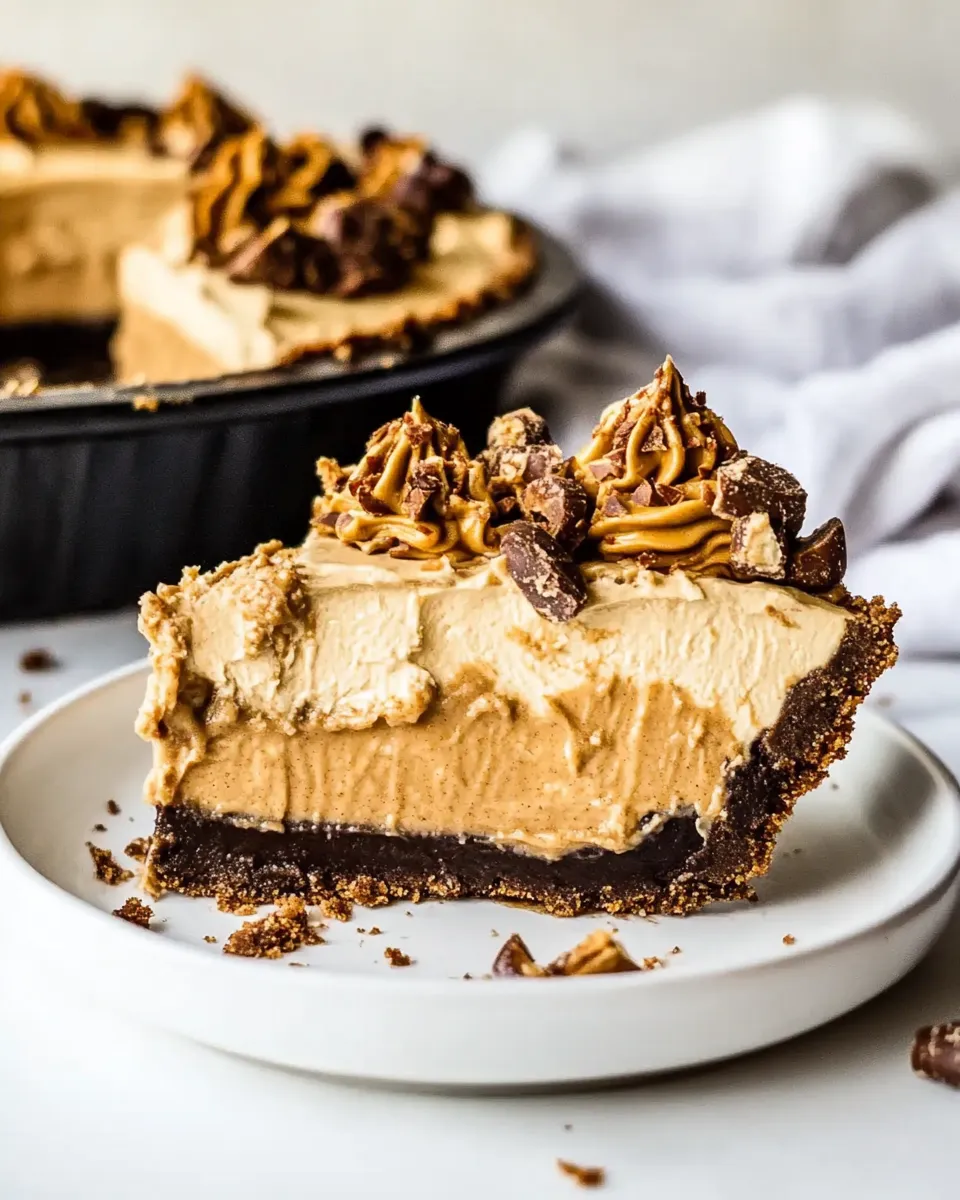
Peanut Butter Pie
This Peanut Butter Pie is the kind of dessert I turn to when I want something that feels indulgent but comes together without drama. It’s rich, creamy, and has that perfect contrast between a crunchy Oreo crust and a pillowy peanut butter filling. You don’t need advanced pastry skills — just a little chilling time and thoughtful folding.
I’ll walk you through every step, from crushing the cookies to drizzling the final chocolate. Small techniques make a big difference: room-temperature cream cheese, chilled whipped cream, and pressing that crust firmly into the pan. Follow those, and the pie will slice cleanly and look as good as it tastes.
Whether you’re making this for a weeknight treat, a potluck, or a quick celebration, this version hits familiar peanut-butter-and-chocolate notes while staying reliably simple. Read the ingredient notes and the pitfalls section — they’ll save you time and keep the pie set and creamy.
Ingredient Rundown
Below I list the ingredients exactly as they’re used in the recipe and include a short note about each one’s role. These notes are practical: what it does and one quick tip so you can get consistent results.
Ingredients
- 24Oreo sandwich cookies — Forms the chocolate cookie crust; tightly packed crumbs hold the filling. Use a food processor for fine crumbs or crush in a heavy-duty bag with a rolling pin.
- 5tablepoonssalted butter,melted — Binds the cookie crumbs and adds flavor. Salted butter balances the sweetness from the filling and Oreos.
- 1cupcold heavy whipping cream — Whipped into stiff peaks to lighten the peanut butter filling; keep it cold for better volume.
- 2tablespoonsconfectioner’s sugar — Sweetens the whipped cream without making it grainy; sift if it’s lumpy.
- 8ouncesfull-fat brick cream cheese,at room temperature — Provides structure and tang to the filling; must be soft to avoid lumps.
- 1cupcreamy conventional peanut butter,like Skippy or Jif — The core peanut butter flavor; creamy versions blend smoothly for a silky filling.
- 3/4cupconfectioner’s sugar — Sweetens the peanut butter-cream cheese base and helps firm the filling slightly.
- 1 1/2teaspoonspure vanilla extract — Adds depth and rounds the flavors; pure vanilla is worth it here.
- Pinchof flaky sea salt — Enhances sweetness and highlights peanut flavor; sprinkled into the filling for balance.
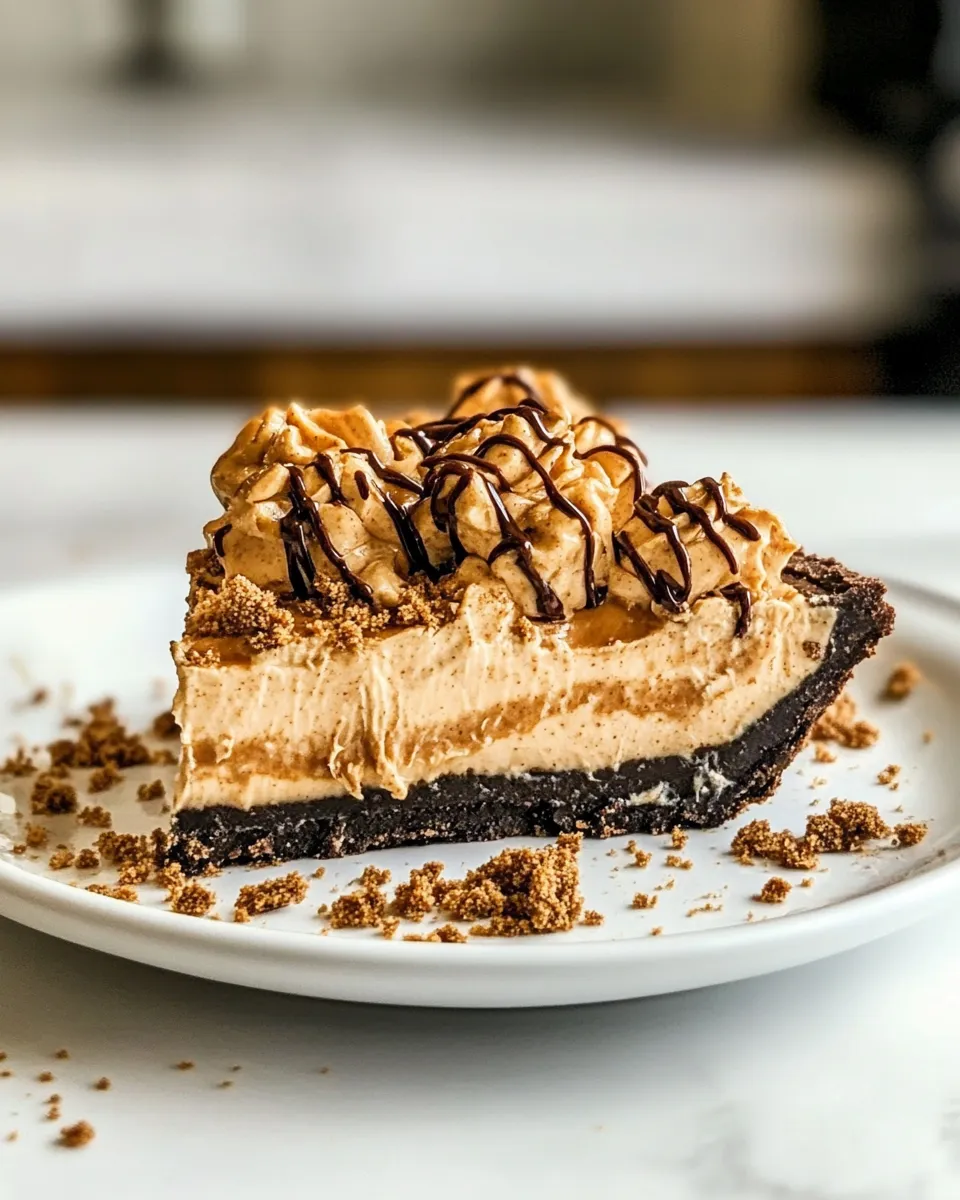
- Peanut butter cups,chopped — Topping that adds texture and extra peanut-chocolate flavor; scatter just before serving so they don’t soften.
- 3tablespoonschocolate chips,melted, for drizzling — A glossy finish that ties the pie together; melt gently to avoid seizing.
- Extra whipped cream,for serving, if desired — Optional garnish that echoes the filling and lightens each bite.
Directions: Peanut Butter Pie
- Preheat oven to 350°F.
- Place the 24 Oreo sandwich cookies in a food processor and pulse until they are fine crumbs. (If you don’t have a food processor, put the cookies in a heavy-duty zip-top bag and crush them with a rolling pin.)
- Pour the cookie crumbs into a medium bowl and add the 5 tablespoons salted butter, melted. Stir until the crumbs are evenly moistened.
- Transfer the crumb mixture into a 9-inch pie pan. Press the crumbs firmly and evenly into the bottom and up the sides of the pan, packing them tightly. Bake for 10 to 12 minutes. Remove from oven and let the crust cool completely on a wire rack.
- While the crust cools, make the whipped cream: in the bowl of a stand mixer (or using a hand mixer) with the whisk attachment, beat the 1 cup cold heavy whipping cream on medium-high until it begins to thicken. Add the 2 tablespoons confectioner’s sugar and continue beating until stiff peaks form. Transfer the whipped cream to a separate bowl and refrigerate until ready to fold into the filling.
- In the same (clean) mixing bowl, beat the 8 ounces full-fat brick cream cheese (at room temperature), 1 cup creamy peanut butter, 3/4 cup confectioner’s sugar, 1 1/2 teaspoons pure vanilla extract, and a pinch of flaky sea salt on medium speed until the mixture is smooth and light, about 2 to 3 minutes.
- Using a spatula, gently fold the chilled whipped cream into the peanut butter–cream cheese mixture until combined and no large streaks remain. Fold carefully to keep the mixture light.
- Pour or spoon the peanut butter filling into the cooled Oreo crust and spread it into an even layer.
- Cover the pie and chill in the refrigerator for at least 4 hours or overnight, until set.
- When ready to serve, chop the peanut butter cups and scatter them over the top of the chilled pie.
- Melt the 3 tablespoons chocolate chips (microwave in short 15-second bursts, stirring between bursts, or melt over a double boiler) until smooth. Use a spoon to drizzle the melted chocolate over the chopped peanut butter cups.
- Slice and serve the pie cold. Add extra whipped cream, if desired.
Why This Recipe Works
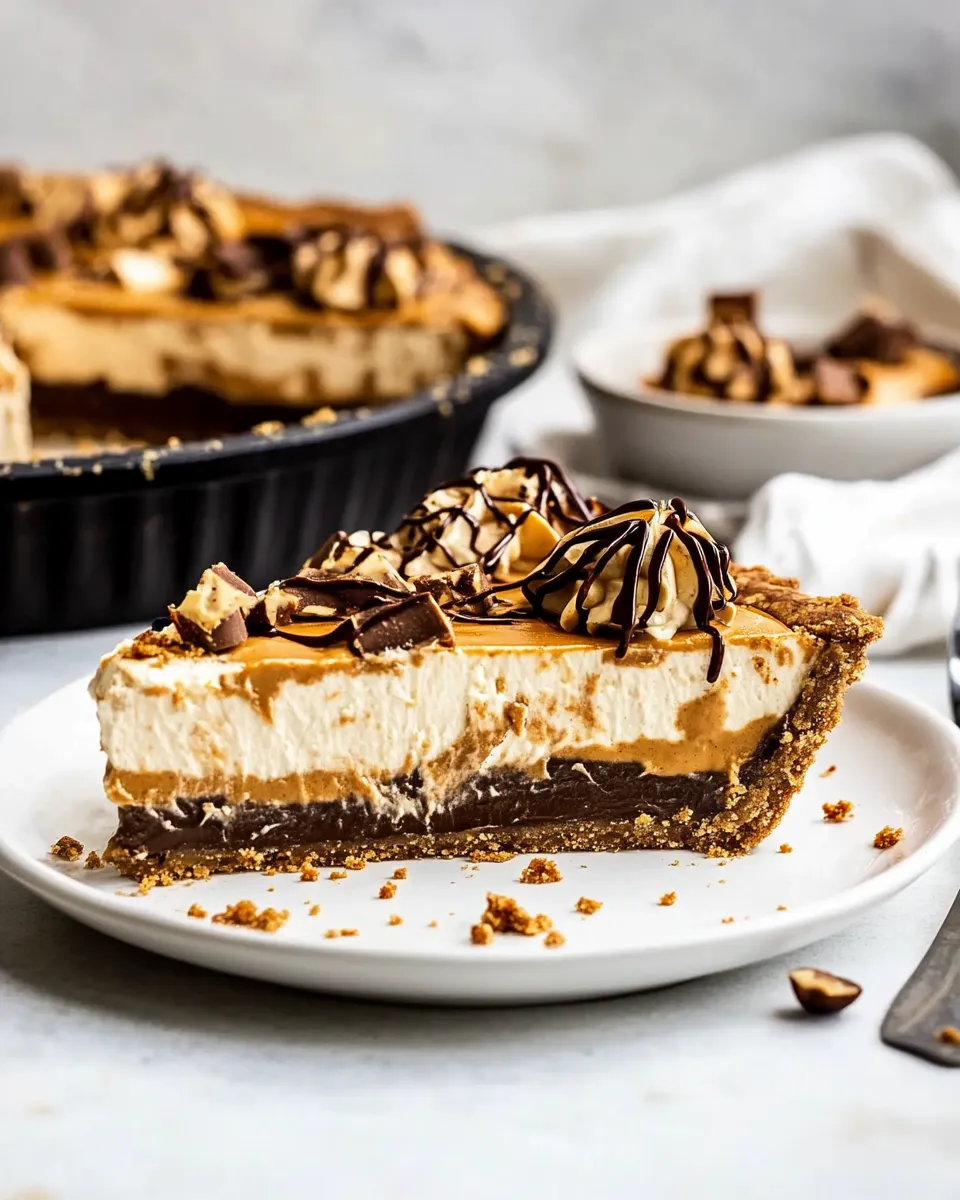
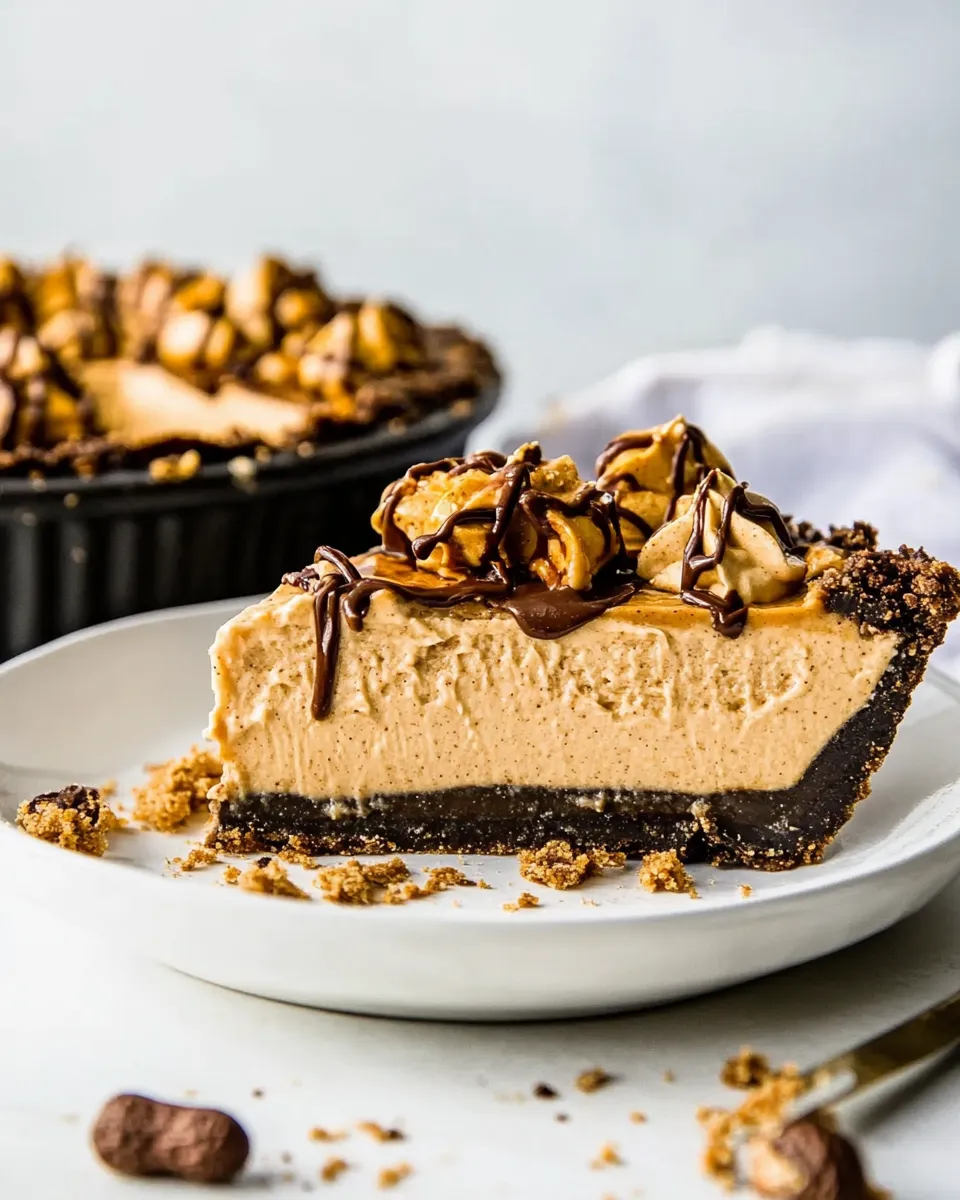
The Oreo crust is both flavorful and sturdy. Chocolate cookie crumbs with melted butter pack tightly and bake into a shell that supports a soft filling without becoming soggy. Baking the crust briefly removes excess moisture and helps it set.
The filling relies on two textures: dense cream cheese–peanut butter base and light whipped cream folded in. The cream cheese gives structure and tang, creamy peanut butter supplies the signature flavor and richness, and the whipped cream keeps the texture airy so slices don’t feel heavy.
Chilling is essential. The refrigerated rest time helps the fats firm up and the filling stabilize. The topping and melted chocolate add contrast in texture and sweet-salty balance that rounds out every bite.
Ingredient Flex Options
- Cookies: Swap Oreos for chocolate sandwich cookies or gluten-free chocolate cookies if needed. The crust will behave the same as long as crumbs are fine and well-moistened.
- Peanut butter: If you prefer natural peanut butter, use it — but expect a slightly different texture and possibly a small amount of oil separation; stir well before measuring.
- Sweeteners: Confectioner’s sugar is used to keep the filling smooth. Granulated sugar will make the texture grainier, so avoid swapping if you can.
- Chocolate: Use dark or milk chocolate chips for the drizzle depending on your sweetness preference. A mix of chopped dark chocolate and chips gives a more complex finish.
- Dairy alternatives: This recipe relies on heavy cream and cream cheese for structure. Substitutions will affect texture and set — use at your own risk and expect a softer pie.
Kitchen Gear Checklist
- Food processor or heavy-duty zip-top bag and rolling pin (for cookie crumbs)
- 9-inch pie pan
- Mixing bowls (one for crumbs, one for whipped cream, one for filling)
- Stand mixer with whisk attachment or hand mixer
- Spatula for folding and scraping
- Wire rack for cooling the crust
- Measuring cups and spoons
- Microwave-safe bowl or double boiler for melting chocolate
- Sharp knife for chopping peanut butter cups and slicing the pie
Pitfalls & How to Prevent Them
- Problem: Lumpy filling. Prevention: Make sure the cream cheese is fully softened at room temperature and beat until smooth before adding other ingredients.
- Problem: Over-whipped cream (grainy or separated). Prevention: Stop as soon as stiff peaks form; transfer to a separate bowl immediately and chill.
- Problem: Crust falls apart when slicing. Prevention: Press crumbs tightly into the pan and bake the full 10–12 minutes to set the butter. Use a warm, sharp knife for clean slices.
- Problem: Oil separation from natural peanut butter. Prevention: Stir oil back into the peanut butter thoroughly before measuring, or choose conventional creamy peanut butter as specified.
- Problem: Filling too soft after chilling. Prevention: Ensure whipped cream is stiff and folded gently but completely. Chill at least 4 hours or overnight for best firmness.
Fresh Seasonal Changes
Small seasonal additions can make this pie feel new without changing the mechanics. In summer, serve with fresh banana slices or strawberries on the side to add brightness. In fall, a light dusting of cinnamon or a thin layer of salted caramel between crust and filling brings warmth.
For winter holidays, top the pie with chopped toasted pecans and a sprinkle of sea salt for contrast. These are all finishing touches — keep the core recipe the same to preserve texture and setting time.
Cook’s Notes
Room temperature cream cheese blends smoother — take it out about 30 minutes before you start. Keep the heavy cream very cold until you whip it. That’s the single biggest trick for achieving good volume quickly.
When folding the whipped cream into the peanut butter mixture, use wide, gentle strokes. Think of scooping from the bottom and lifting; you want to preserve air, not beat it out. The mixture should be uniform but still light.
If you want cleaner slices for serving, chill the pie longer. You can also dip a sharp knife in hot water, wipe it dry, and slice between each cut — heat helps cut through the filling cleanly.
Keep It Fresh: Storage Guide
Refrigerate the pie, covered, for up to 3–4 days. The crust will stay reasonably crisp the first day and soften slightly over time but will remain flavorful. If you plan to store longer, remove the peanut butter cup topping and drizzle before serving to keep those pieces from softening.
Freezing: You can freeze the assembled pie (without chopped peanut butter cups or chocolate drizzle) for up to one month. Wrap tightly in plastic and then foil. Thaw overnight in the refrigerator, then add toppings fresh before serving.
Quick Q&A
- Can I make this ahead? Yes. Make the pie a day ahead and chill overnight for the best texture.
- Can I use crunchy peanut butter? Yes, but the filling will have more texture. It’s fine if you like a bit of crunch.
- Is baking the crust necessary? Baking firms it and keeps it from crumbling; it’s recommended but you can chill an unbaked crust if short on time (texture will be softer).
- How do I get clean slices? Chill well and use a hot, clean knife wiped between cuts.
Ready, Set, Cook
This Peanut Butter Pie is forgiving and fast to assemble. Follow the steps in order: build and bake the crust, whip and chill the cream, blend the filling, fold carefully, chill thoroughly, and add toppings at the last minute. Small technique choices — temperature, folding, and chill time — will determine whether you get a light, sliceable pie or a runny one.
Make it once, note the tweaks you prefer (a little more chocolate, extra peanut butter cups), and you’ll have a go-to dessert that looks like you spent hours on it. Now put on a timer, line up your ingredients, and enjoy the process — and the pie.
Peanut Butter Pie
Ingredients
Equipment
Method
- Preheat oven to 350°F.
- Place the 24 Oreo sandwich cookies in a food processor and pulse until they are fine crumbs. (If you don’t have a food processor, put the cookies in a heavy-duty zip-top bag and crush them with a rolling pin.)
- Pour the cookie crumbs into a medium bowl and add the 5 tablespoons salted butter, melted. Stir until the crumbs are evenly moistened.
- Transfer the crumb mixture into a 9-inch pie pan. Press the crumbs firmly and evenly into the bottom and up the sides of the pan, packing them tightly. Bake for 10 to 12 minutes. Remove from oven and let the crust cool completely on a wire rack.
- While the crust cools, make the whipped cream: in the bowl of a stand mixer (or using a hand mixer) with the whisk attachment, beat the 1 cup cold heavy whipping cream on medium-high until it begins to thicken. Add the 2 tablespoons confectioner’s sugar and continue beating until stiff peaks form. Transfer the whipped cream to a separate bowl and refrigerate until ready to fold into the filling.
- In the same (clean) mixing bowl, beat the 8 ounces full-fat brick cream cheese (at room temperature), 1 cup creamy peanut butter, 3/4 cup confectioner’s sugar, 1 1/2 teaspoons pure vanilla extract, and a pinch of flaky sea salt on medium speed until the mixture is smooth and light, about 2 to 3 minutes.
- Using a spatula, gently fold the chilled whipped cream into the peanut butter–cream cheese mixture until combined and no large streaks remain. Fold carefully to keep the mixture light.
- Pour or spoon the peanut butter filling into the cooled Oreo crust and spread it into an even layer.
- Cover the pie and chill in the refrigerator for at least 4 hours or overnight, until set.
- When ready to serve, chop the peanut butter cups and scatter them over the top of the chilled pie.
- Melt the 3 tablespoons chocolate chips (microwave in short 15-second bursts, stirring between bursts, or melt over a double boiler) until smooth. Use a spoon to drizzle the melted chocolate over the chopped peanut butter cups.
- Slice and serve the pie cold. Add extra whipped cream, if desired.
Notes
If you don’t have a food processor you can crush the cookies by placing them into a Ziploc bag and pounding them with a rolling pin until a fine crumb is formed.