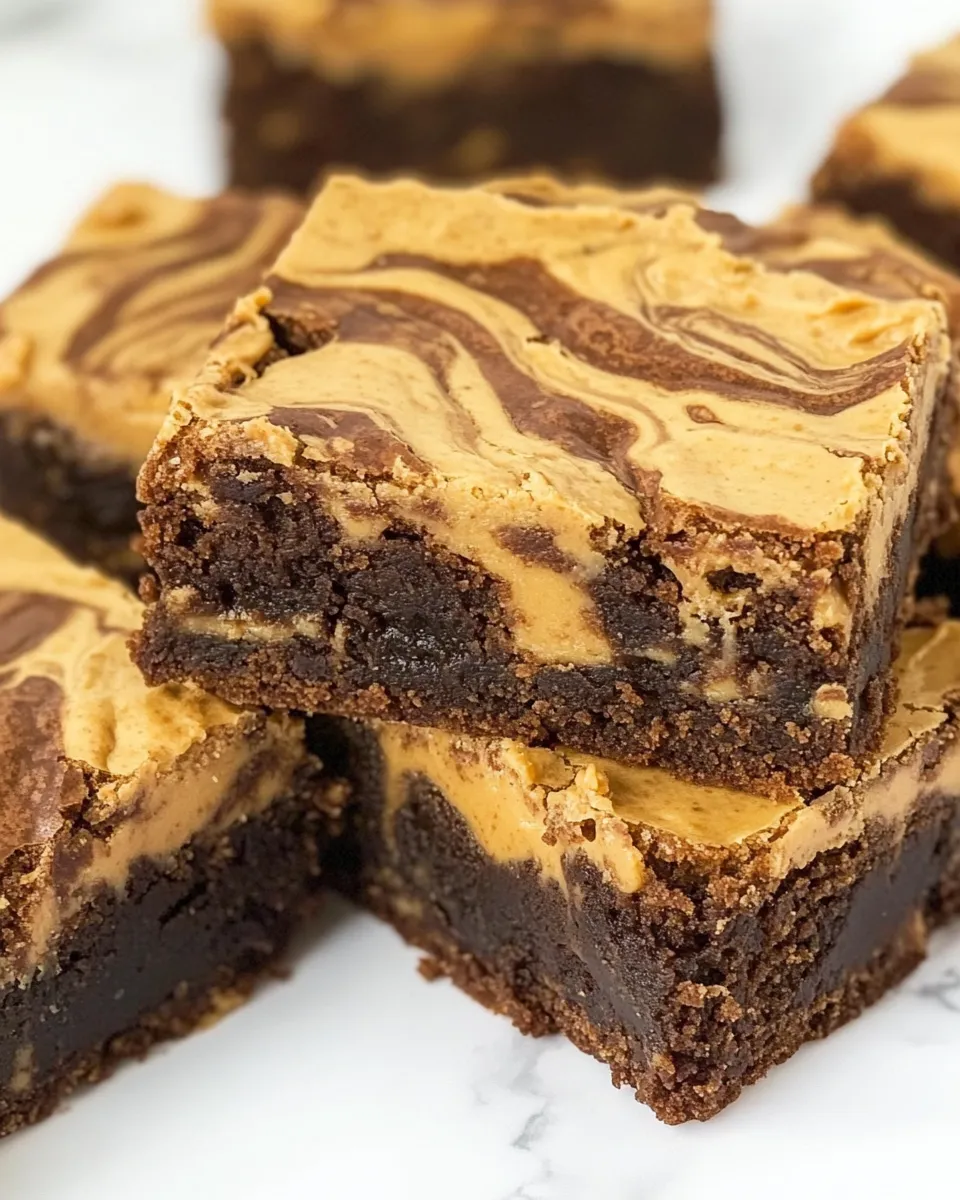
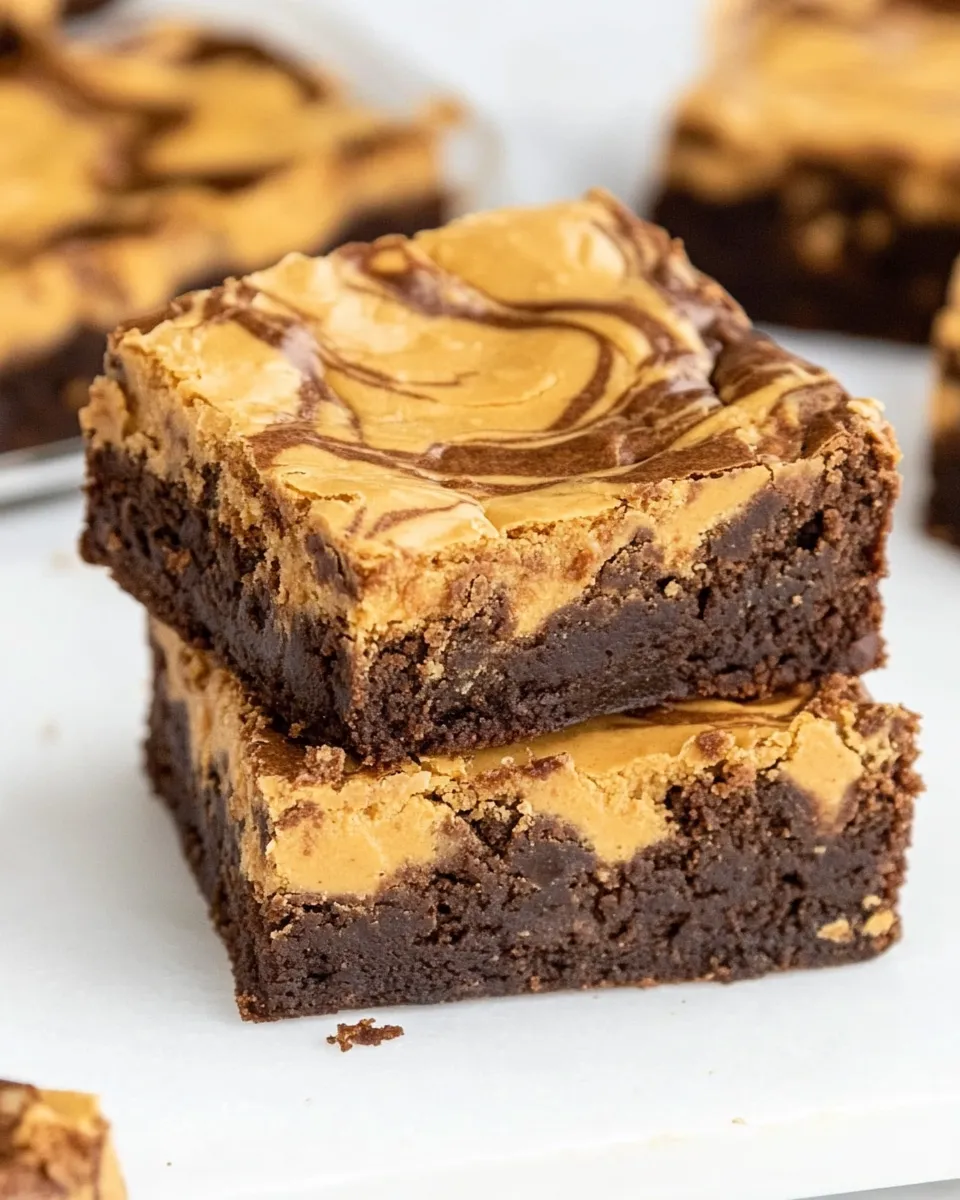
Peanut Butter Swirl Brownies
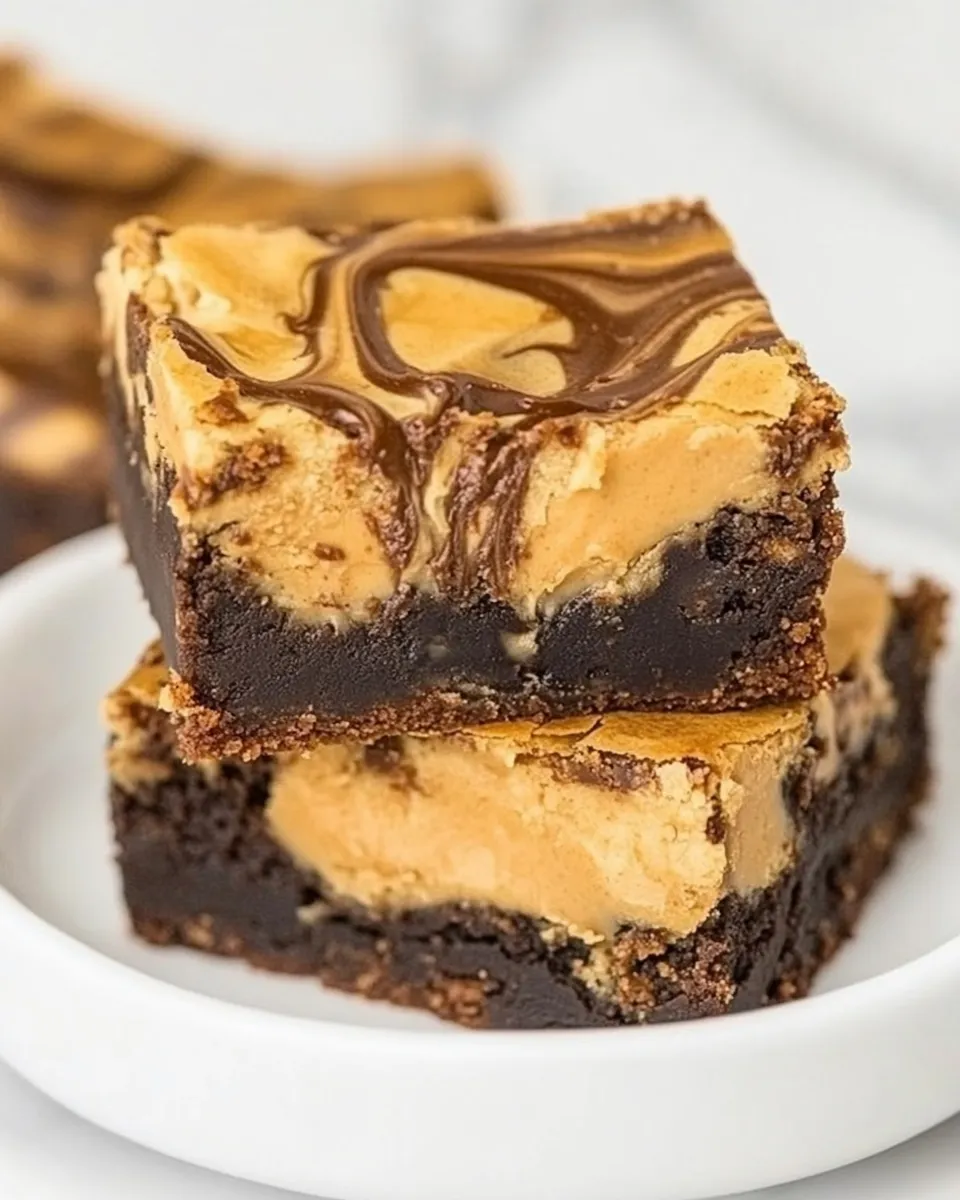
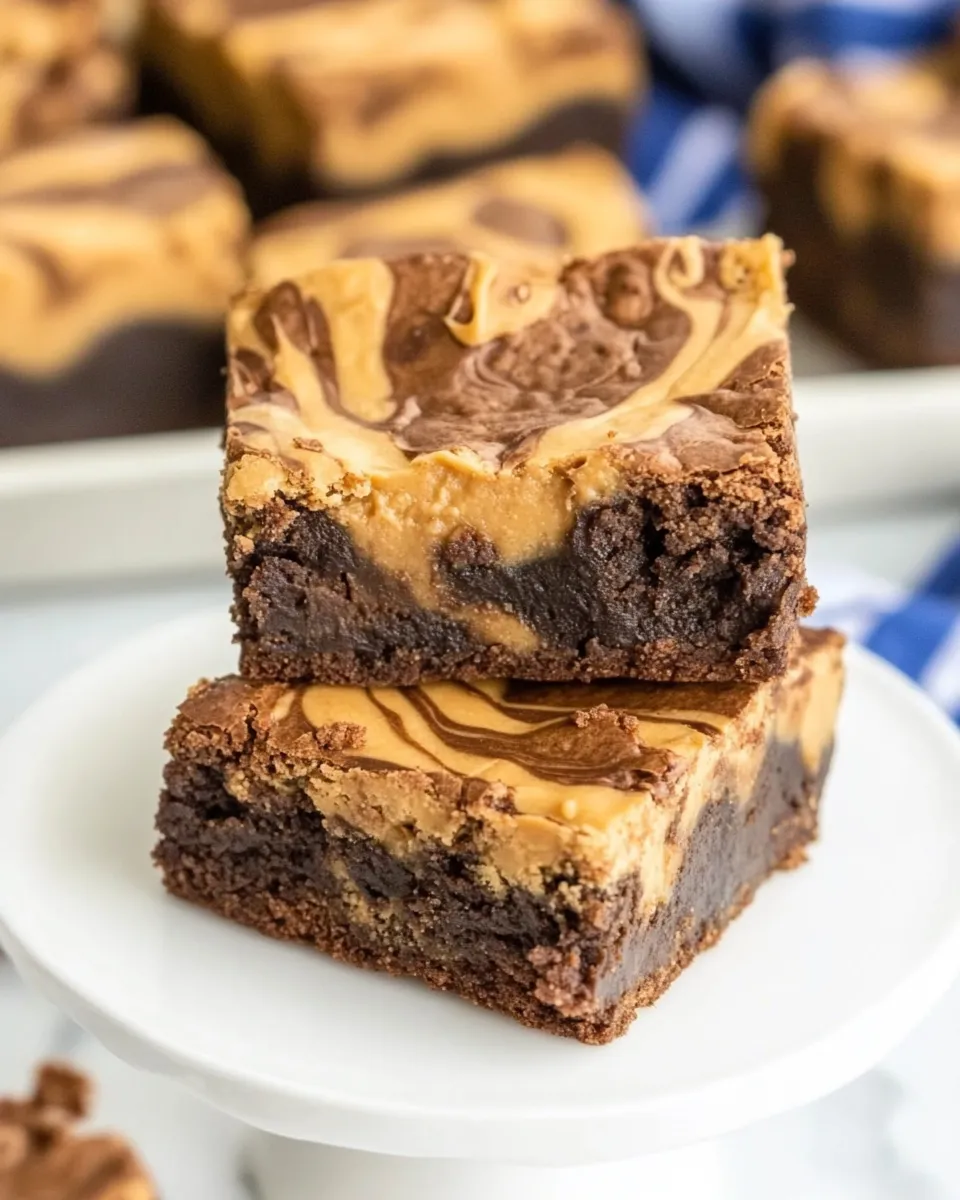
These brownies are the kind I make when I want something fast, comforting, and reliably delicious. They’re fudgy and chocolate-forward, with cheeky pockets of peanut butter woven through so every bite hits that sweet-and-salty note. The recipe is straightforward—nothing fussy—and it yields a pan you’ll be proud to bring to a potluck or keep on the counter for midnight snacking.
I love how the peanut butter swirls read as intentional even if you’re rushed: big dollops, a few light drags with a knife, and the swirls look like you meant them to be that way. The method leans on simple pantry staples and a short bake time, which leaves the center fudgy rather than cake-like.
This post lays out the recipe in a clear order, highlights common pitfalls, and gives small, practical tweaks so your batch turns out exactly how you want it—chewy edges, gooey center, and pretty peanut butter ribbons. No fluff—just what you need to get from bowl to brownies.
Ingredients at a Glance
- 1/2 cup butter (melted, 1 stick, salted) — adds richness and keeps the texture fudgy; if using unsalted, see notes in the equipment/tips section.
- 2 large eggs — bind the batter and provide structure; room temperature helps with even mixing.
- 1/2 cup granulated sugar — for sweetness and a bit of snap in the crumb.
- 1/2 cup brown sugar — brings moisture, depth, and chew through its molasses content.
- 1 teaspoon vanilla extract — brightens the chocolate and rounds the flavors.
- 1/2 cup all purpose flour — keeps the brownies tender; measured properly to avoid a dry result.
- 1/2 cup cocoa powder (unsweetened) — the chocolate backbone; unsweetened ensures you control the sweetness.
- 1/2 cup chocolate chips — melts into pockets of extra chocolate; semi-sweet is a good neutral choice.
- 1/2 cup peanut butter chips — echoes the peanut butter flavor in smaller bursts throughout the batter.
- 1/2 cup peanut butter (creamy or crunchy) — used for the swirls; crunchy gives texture, creamy gives silkiness.
From Start to Finish: Peanut Butter Swirl Brownies
- Preheat the oven to 350°F. Line a square pan with parchment paper (leave an overhang for easy removal) or grease the pan well.
- Put 1/2 cup (1 stick) salted butter in a small microwave-safe bowl and microwave about 45 seconds, until melted. Stir and let cool slightly.
- Crack 2 large eggs into a large mixing bowl and beat with a whisk or fork until the yolks are broken.
- Add 1/2 cup granulated sugar, 1/2 cup brown sugar, and 1 teaspoon vanilla extract to the eggs. Stir with a silicone spatula until combined.
- Pour the slightly cooled melted butter into the wet ingredients and mix with the spatula until incorporated.
- In a separate bowl, combine 1/2 cup all-purpose flour and 1/2 cup unsweetened cocoa powder. Add the dry mixture to the wet ingredients and fold with the spatula until just combined—stop as soon as there are no streaks of flour or cocoa to avoid overmixing.
- Fold 1/2 cup chocolate chips and 1/2 cup peanut butter chips into the batter until evenly distributed.
- Pour the batter into the prepared pan and spread it into an even layer with your spatula.
- Place 1/2 cup peanut butter (creamy or crunchy) in a small bowl and microwave about 20 seconds to loosen. Spoon the peanut butter into large dollops across the batter (about 9 dollops), then drag a knife or chopstick through the batter and dollops to create light swirls—less swirling gives better-defined swirls.
- Bake for 25–27 minutes, or until a toothpick inserted near the center comes out with fudgy moist crumbs but not wet batter.
- Cool the brownies completely in the pan on a wire rack. Use the parchment overhang to lift them out (or invert onto a cutting board), then slice and enjoy.
Why It Deserves a Spot
These brownies strike a balance: intensely chocolatey without being overly sweet, and the peanut butter adds a savory contrast that keeps you coming back for another square. They’re an excellent midweek dessert—quick enough to assemble after dinner but special enough for guests.
Technically, this recipe is forgiving. The folding technique prevents overdeveloping the gluten, so you’ll get a tender but dense crumb instead of a dry, cakey bar. The melted butter approach concentrates flavor and makes the texture dense and fudgy, which is what most brownie lovers want.
If You’re Out Of…
If you’re missing one of the chips, there are simple in-recipe workarounds using items already listed:
- If you’re out of peanut butter chips — increase the chocolate chips slightly and rely on the 1/2 cup peanut butter swirled on top to deliver the peanut flavor.
- If you’re out of chocolate chips — use a bit more peanut butter chips and accept a nuttier, less melty interior; the batter will still set into fudgy brownies.
- If you don’t have crunchy peanut butter and want texture — use crunchy as indicated; if you only have creamy, your swirls will be silkier but still delicious (both are listed as options).
Before You Start: Equipment
- Square baking pan (8×8-inch or similar) — the recipe assumes a square pan; adjust oven time only if you change the pan size.
- Parchment paper — for easy removal and clean lines when slicing.
- Microwave-safe bowl — for melting butter and loosening peanut butter.
- Large mixing bowl and separate small bowl for dry ingredients — keeps things tidy and makes folding easier.
- Silicone spatula and whisk or fork — spatula for folding; whisk/fork for beating the eggs.
- Wire rack — cools the pan quickly and prevents a soggy underside.
- Knife or chopstick — for creating the peanut butter swirls.
Mistakes That Ruin Peanut Butter Swirl Brownies
- Overmixing the batter — stirring too long after adding the flour/cocoa will develop gluten and produce cakier, dryer brownies. Fold only until no streaks remain.
- Baking too long — the window is 25–27 minutes. Bake until a toothpick shows fudgy moist crumbs. If it comes out clean, the brownies are overbaked and will be drier.
- Using piping-thin peanut butter for swirls without thickening — if your peanut butter is very runny, it will sink and blend rather than form pretty ribbons. Loosen it briefly in the microwave and dollop rather than pour.
- Skipping the parchment overhang — you’ll make slicing and cleanup harder. The overhang makes lifting the whole slab out effortless.
- Not letting them cool completely — cutting warm brownies can tear them and ruin the swirl pattern; they firm up as they cool and slice much nicer.
Warm & Cool Weather Spins
These brownies are versatile by temperature. In cool weather, serve warmed slices straight from the oven (let them rest 10–15 minutes) to highlight melty chocolate and soft peanut butter veins. In warm weather, cool them fully and refrigerate for firmer, chewier bars that are easy to transport.
Small tweaks you can make without changing the ingredient list:
- For a softer swirl, spoon a few extra small dollops of the 1/2 cup peanut butter across the top before baking and barely drag to keep defined pockets.
- For a more pronounced chocolate hit, scatter an extra handful of the listed chocolate chips across the top before baking—this uses what’s already in the ingredient list.
- To serve chilled treats on a hot day, fully cool, then refrigerate slices for an hour to set the swirls and make clean slices.
Cook’s Commentary
I started making a version of these when I wanted more peanut butter presence than chips alone provide. The dollop-and-drag technique gives you visually appealing swirls without extra steps. My preferred texture is fudgy center with slightly firmer edges—pull them at the lower end of the bake time, let them cool, then enjoy.
One practical habit: measure the flour by spooning it into the measuring cup and leveling it off rather than scooping directly with the cup. That small step prevents a dense, flour-heavy batter. Also, if you prefer intense cocoa notes, use a dutch-process cocoa if you have it, but stick to the 1/2 cup amount as written.
Storage Pro Tips
Short-term (room temperature)
Keep cooled brownies in an airtight container at room temperature for up to 3 days. Layer with parchment between slabs to prevent sticking. Room temperature keeps them soft and easy to bite.
Longer-term (refrigerator & freezer)
Refrigerate for up to a week—this firms them up and is fine if you like denser bars. For longer storage, wrap individual squares tightly in plastic then foil and freeze up to 2 months. Thaw in the fridge or at room temperature, or warm briefly in a low oven or microwave for that just-baked feel.
Your Top Questions
Q: Can I use unsalted butter?
A: Yes. The ingredient list specifies salted, but if you use unsalted, add a pinch of salt to the batter to balance the sweetness.
Q: How do I tell when they’re done?
A: Insert a toothpick near the center. You want fudgy moist crumbs clinging to it—not wet batter and not a completely clean pick. The center will set as they cool.
Q: Can I double the recipe?
A: Yes—use a larger pan and watch the baking time closely. You’ll likely need to add bake time, but begin checking at the time range provided and adjust in 3–5 minute increments.
Q: Do I have to microwave the peanut butter?
A: Microwaving for about 20 seconds loosens it enough to dollop cleanly. If your peanut butter is already soft, you can spoon it straight on. Avoid overheating so it doesn’t become runny.
Make It Tonight
Pull out your pan and your peanut butter: these brownies come together quickly and deliver a reliable crowd-pleaser. Follow the steps in order, watch the bake time, and don’t overwork the batter. You’ll end up with glossy, chocolatey squares streaked with peanut butter ribbons—an easy, comforting dessert that’s worth making on any night of the week.
Peanut Butter Swirl Brownies
Ingredients
Equipment
Method
- Preheat the oven to 350°F. Line a square pan with parchment paper (leave an overhang for easy removal) or grease the pan well.
- Put 1/2 cup (1 stick) salted butter in a small microwave-safe bowl and microwave about 45 seconds, until melted. Stir and let cool slightly.
- Crack 2 large eggs into a large mixing bowl and beat with a whisk or fork until the yolks are broken.
- Add 1/2 cup granulated sugar, 1/2 cup brown sugar, and 1 teaspoon vanilla extract to the eggs. Stir with a silicone spatula until combined.
- Pour the slightly cooled melted butter into the wet ingredients and mix with the spatula until incorporated.
- In a separate bowl, combine 1/2 cup all-purpose flour and 1/2 cup unsweetened cocoa powder. Add the dry mixture to the wet ingredients and fold with the spatula until just combined—stop as soon as there are no streaks of flour or cocoa to avoid overmixing.
- Fold 1/2 cup chocolate chips and 1/2 cup peanut butter chips into the batter until evenly distributed.
- Pour the batter into the prepared pan and spread it into an even layer with your spatula.
- Place 1/2 cup peanut butter (creamy or crunchy) in a small bowl and microwave about 20 seconds to loosen. Spoon the peanut butter into large dollops across the batter (about 9 dollops), then drag a knife or chopstick through the batter and dollops to create light swirls—less swirling gives better-defined swirls.
- Bake for 25–27 minutes, or until a toothpick inserted near the center comes out with fudgy moist crumbs but not wet batter.
- Cool the brownies completely in the pan on a wire rack. Use the parchment overhang to lift them out (or invert onto a cutting board), then slice and enjoy.
Notes
If using unsalted butter, mix 1/4 teaspoon of salt into the flour before adding it to the wet ingredients.
Don’t add the butter until after adding the brown sugar and white sugar as the warm butter can cause the eggs to begin to cook. This will cause the possibly of having tiny bits of cooked scrambled eggs in the brownies.
I used a metal baking pan for this recipe. If you use a glass pan, the baking time may be slightly more as it takes glass longer to heat in the oven.
I don’t recommend using natural peanut butter with the oil that needs mixed in for these brownies. Natural peanut butter can easily separate and make the brownies feel a little oily.
To measure the peanut butter, first spray the measuring cup with spray cooking oil. The peanut butter then slides right out of the measuring cup.
Don’t heat the peanut butter for any more then 20-30 seconds or it can become too runny. If the peanut butter is too warm and runny it will make the peanut butter swirl look not as pretty on top of the brownies.