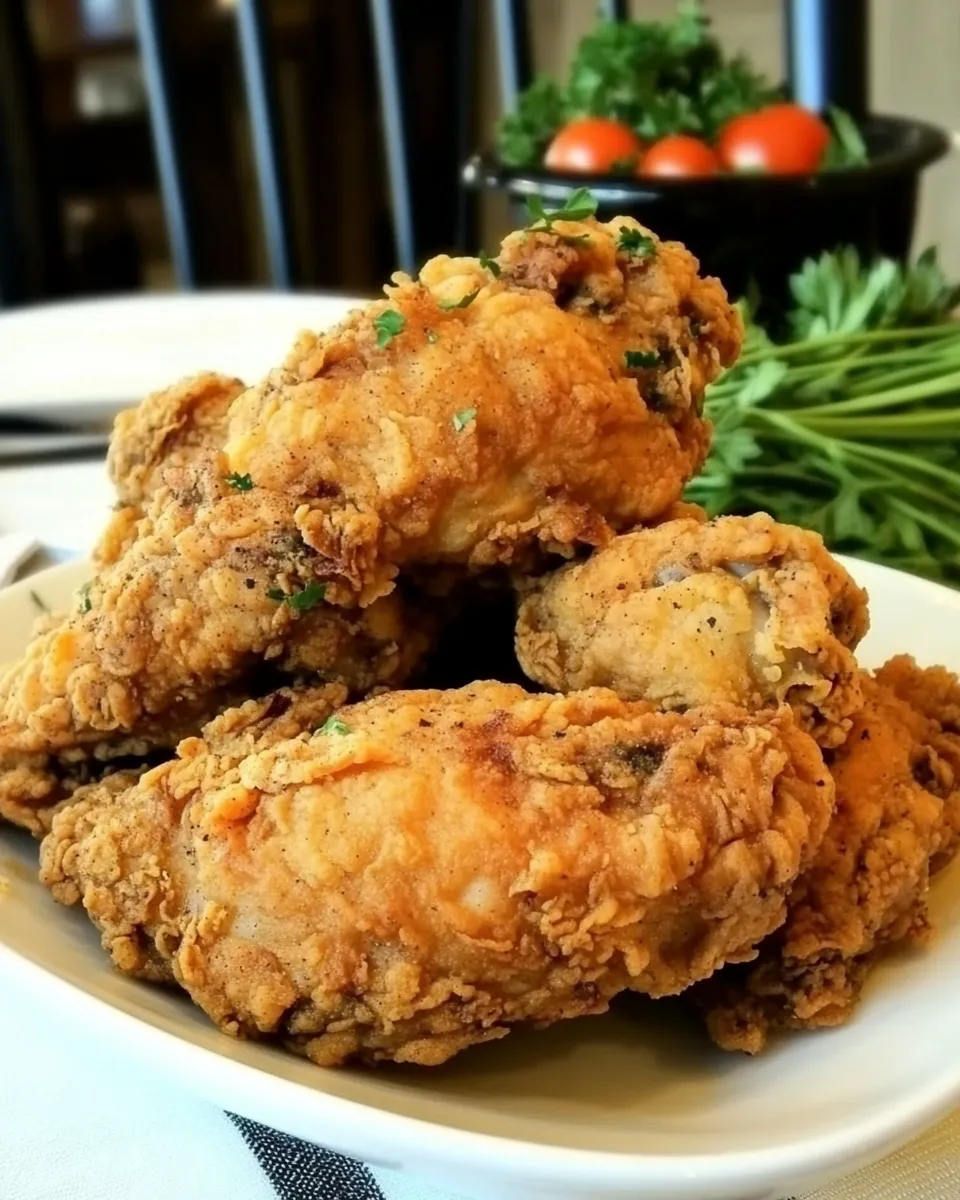
Perfect Fried Chicken
I make fried chicken the way my kitchen actually works: straightforward, reliable, and built around a few well-chosen techniques. No tricks for trickiness, just good salt, time, and heat. This recipe focuses on a brine-forward approach, a double-dredge for an extra-crisp crust, and careful temperature control so the meat cooks through without burning the coating.
Expect a marinade that tames and seasons, an airy egg wash that helps the crust cling, and frying in small batches so the oil stays steady. The method is deliberate: brine, dry, dredge, fry, rest. Each step matters and I’ll tell you why along the way.
Below you’ll find exactly what to buy, exactly how to do it, and what to do if something goes sideways. I’ve tested this in a busy home kitchen and on quiet Sunday nights; it behaves in both places. Let’s get into it.
What Goes Into Perfect Fried Chicken

Ingredients
- 1 ½ cups kosher salt — the backbone of the brine; seasons the meat through so the inside is flavorful.
- ¼ cup sugar — balances the salt and helps with browning during frying.
- 2 Tbsp paprika — adds color and a mild, sweet warmth to the brine and flour mix.
- 3 heads of garlic — cloves smashed — gives savory aromatics in the brine; smashed cloves release more flavor than whole.
- 3 bay leaves — subtle savory note in the brine that complements the garlic.
- 1 quart buttermilk — acid and tenderness; the buttermilk helps break down proteins for juicy meat.
- 4 cups whole milk — dilutes the buttermilk and increases the total brine volume so pieces submerge.
- 4 Tbsp white vinegar — adds acidity to help tenderize and flavor the brine.
- 8–12 pieces of chicken — use your preferred cuts; the recipe works with bone-in pieces for best flavor and texture.
- 4 cups all-purpose flour — the main dry coating; provides structure for the crispy crust.
- 1 Tbsp kosher salt — seasoning for the flour; makes the crust savory on the outside.
- 1 Tbsp paprika — echoes the brine’s color and mild flavor in the dredge.
- 1 Tbsp onion powder — adds a sweet, rounded onion note without raw onion texture.
- 1 Tbsp garlic powder — layered garlic in the crust to support the brined garlic.
- 1 Tbsp black pepper — bright, sharp heat in the coating; freshly cracked is best.
- 3 large eggs — part of the wet binder; helps the second flour coat adhere.
- 3 teaspoons baking powder — lightens the egg wash and adds slight lift to the crust.
- 1 ½ teaspoons baking soda — paired with acids in the brine, it promotes a crisp, blistered crust.
- 4 cups peanut oil — high smoke point and neutral flavor; the frying medium for even browning.
Perfect Fried Chicken Made Stepwise
- In a large stainless-steel stockpot or a large plastic kitchen bowl, combine 1 ½ cups kosher salt, ¼ cup sugar, 2 Tbsp paprika, the smashed cloves from 3 heads of garlic, 3 bay leaves, 1 quart buttermilk, 4 cups whole milk, and 4 Tbsp white vinegar. Stir until the salt and sugar dissolve completely (a few minutes).
- Submerge 8–12 pieces of chicken in the brine. Cover the pot or bowl with plastic wrap and refrigerate for 4 hours.
- After 4 hours, remove the chicken from the refrigerator. Working piece by piece, lift each chicken piece from the brine, shake off excess liquid, and place it on a wire rack set over a sheet pan. Do not place the rack or pan near uncovered fruits, vegetables, or other ready-to-eat foods to avoid cross-contamination.
- Place the rack with the chicken UNcovered back into the refrigerator and let the chicken air-dry for 2 hours.
- After the 2-hour drying period, remove the chicken from the refrigerator. You may cover the chicken with plastic wrap and keep it refrigerated until you are ready to cook.
- When ready to cook, preheat your oven to its lowest setting (for reference, the original recipe used 170°F). Line a rimmed baking sheet with paper towels and place it in the oven to keep warm for finished chicken.
- Measure 4 cups all-purpose flour into a 9×13-inch pan. Add 1 Tbsp kosher salt, 1 Tbsp paprika, 1 Tbsp onion powder, 1 Tbsp garlic powder, and 1 Tbsp black pepper. Stir well to combine and break up any clumps.
- In a medium bowl, whisk together 3 large eggs, 3 teaspoons baking powder, and 1 ½ teaspoons baking soda until blended. The mixture will foam—this is expected.
- Pour 4 cups peanut oil into a heavy 8-quart Dutch oven (the oil should come up roughly 2–3 inches in the pot). Affix a thermometer to the side of the pot so it reads the oil temperature accurately. Heat the oil over medium heat until it reaches 365°F.
- While the oil is heating, dredge each chicken piece: coat the chicken thoroughly in the seasoned flour, then dip into the egg mixture (pat the egg mixture lightly onto the chicken if needed), then return the piece to the seasoned flour for a second coating. Place dredged pieces on a plate while you finish coating the rest.
- When the oil is at 365°F, fry no more than 3 pieces at a time so you do not overcrowd the pot. Carefully lower the chicken into the hot oil.
- Fry the chicken 5–6 minutes on the first side. Using tongs, flip each piece and fry 5–6 minutes on the second side. Monitor the thermometer and allow the oil to come back up to 365°F between batches.
- When a piece is finished frying, transfer it to the paper-towel–lined rimmed baking sheet in the preheated oven to rest and stay warm. Repeat frying in batches until all chicken pieces are cooked.
- When all batches are complete, remove the sheet pan from the oven and let the chicken rest a few minutes before serving.
What Makes This Recipe Special

This version centers on a heavy, flavorful brine. Brining with buttermilk and milk gives deep, even seasoning and tender results because the salt penetrates the meat while the acids and enzymes in buttermilk help break down muscle proteins. The two-hour uncovered chill after brining is a quiet but crucial step — it dries the skin surface so the flour adheres and crisps into a crackly crust.
The double dredge (flour → egg wash → flour) creates thickness and texture that hold up during frying. The baking powder and small amount of baking soda in the egg wash react with the brine’s acidity and the heat of frying to produce tiny air gaps in the crust—crispness you can hear.
What to Use Instead

- Peanut oil — substitute: vegetable oil or canola oil if you have a peanut allergy; they have comparable smoke points and neutral flavor.
- Buttermilk — substitute: plain yogurt thinned with a bit of milk, or 1 quart milk plus 4 Tbsp white vinegar left to sit for 5–10 minutes.
- All-purpose flour — substitute: a 50/50 mix of all-purpose and cornstarch for an even lighter, crisper crust.
- Kosher salt — substitute: sea salt, but measure by weight or reduce a bit by volume since grain sizes differ.
Gear Up: What to Grab
- Large stainless-steel stockpot or plastic bowl — for the brine and to hold the chicken submerged.
- Wire rack and sheet pan — for draining the brined chicken and for air-dry time; also for resting fried chicken in the oven.
- 9×13-inch pan — to hold the seasoned flour and make dredging easy.
- 8-quart heavy Dutch oven — retains steady oil temperature and is safer than a shallow skillet for deep frying.
- Deep-fry thermometer — essential for hitting and holding 365°F.
- Tongs — for safe handling when flipping and removing chicken.
- Paper towels and rimmed baking sheet — for initial oil drainage, then transfer to the warm oven.
Watch Outs & How to Fix
- Oil too hot (coating darkens before chicken cooks): lower the heat, remove the pot briefly from the burner to drop temperature, monitor with your thermometer, and fry at the correct 365°F.
- Oil too cool (greasy, pale crust): don’t overcrowd the pot; let the oil return to 365°F between batches. Increase heat gradually if needed.
- Under-seasoned meat: the brine does most of the work. If the chicken tastes flat, ensure you used 1 ½ cups kosher salt in the brine and allowed the full 4-hour brine time.
- Coating falls off: pat excess brine off before dredging, and press the coating so it adheres. The double dredge and brief resting on a plate before frying help the crust set.
- Doughy interior crust: make sure the oil reaches and holds 365°F and fry each side 5–6 minutes as written; adjust time slightly for very large or small pieces.
Seasonal Flavor Boosts
In spring and summer, add a tablespoon of finely chopped fresh herbs like tarragon or thyme to the post-fry finishing salt and toss lightly when the chicken comes out of the oven. In fall and winter, a pinch of smoked paprika and a dusting of ground coriander in the flour mix gives warmth and depth. For a citrus lift year-round, finely grate 1 teaspoon of lemon zest into the flour blend.
Chef’s Rationale
I use a wet brine with buttermilk and milk for two reasons: it seasons and it tenderizes. The acid and culture in the buttermilk change the texture gently; the salt gives consistent seasoning through the meat. The uncovered chill dries the skin and prepares it to brown without steaming. The double-dredge yields a robust crust that stays attached while frying and keeps the interior juicy by creating a thermal barrier.
Temperature control is non-negotiable. 365°F is a practical compromise: hot enough to brown the crust quickly and not so hot that the outside burns before the interior reaches a safe temperature. Fry in small batches to keep the oil from falling too far in temperature between additions.
Storing Tips & Timelines
- Short-term (2 hours): keep fried chicken in a warm, low oven (about 170°F) on a rack to maintain crispness before serving.
- Refrigerating: cool the chicken to room temperature, then refrigerate in an airtight container for up to 3 days. Re-crisp in a 375°F oven on a wire rack for 10–15 minutes.
- Freezing: freeze cooled pieces in a single layer on a sheet pan until solid, then transfer to a freezer-safe bag for up to 2 months. Reheat from frozen in a 375°F oven for 20–30 minutes, checking for even heating.
Questions People Ask
- Can I use boneless chicken? — Yes. Reduce frying time depending on piece size; watch internal temperature (165°F for poultry). Brownies won’t form the same on small thin pieces, so adjust accordingly.
- Why rest in the oven? — It keeps chicken warm and lets juices redistribute while preserving crispness on a wire rack.
- Is peanut oil required? — No; use a neutral high-smoke-point oil if allergic. Peanut oil is traditional for its flavor neutrality and stability at frying temperatures.
- How do I know when the chicken is done? — The recommended times are a reliable guide for typical bone-in pieces. For precision, check internal temperature near the bone: 165°F minimum.
Before You Go
Follow the brine times, let the chicken air-dry, and respect oil temperature. Those three points make this recipe repeatable. The method is approachable: plan the brine ahead, do the drying step when your schedule allows, and fry small batches. You’ll get crunchy, flavorful chicken every time.
Make it your own by tweaking the seasonings in the flour or finishing with an herb or citrus touch. And if you try it, take a quick note of what you changed so the next batch gets even better.
Perfect Fried Chicken
Ingredients
Equipment
Method
- In a large stainless-steel stockpot or a large plastic kitchen bowl, combine 1 ½ cups kosher salt, ¼ cup sugar, 2 Tbsp paprika, the smashed cloves from 3 heads of garlic, 3 bay leaves, 1 quart buttermilk, 4 cups whole milk, and 4 Tbsp white vinegar. Stir until the salt and sugar dissolve completely (a few minutes).
- Submerge 8–12 pieces of chicken in the brine. Cover the pot or bowl with plastic wrap and refrigerate for 4 hours.
- After 4 hours, remove the chicken from the refrigerator. Working piece by piece, lift each chicken piece from the brine, shake off excess liquid, and place it on a wire rack set over a sheet pan. Do not place the rack or pan near uncovered fruits, vegetables, or other ready-to-eat foods to avoid cross-contamination.
- Place the rack with the chicken UNcovered back into the refrigerator and let the chicken air-dry for 2 hours.
- After the 2-hour drying period, remove the chicken from the refrigerator. You may cover the chicken with plastic wrap and keep it refrigerated until you are ready to cook.
- When ready to cook, preheat your oven to its lowest setting (for reference, the original recipe used 170°F). Line a rimmed baking sheet with paper towels and place it in the oven to keep warm for finished chicken.
- Measure 4 cups all-purpose flour into a 9x13-inch pan. Add 1 Tbsp kosher salt, 1 Tbsp paprika, 1 Tbsp onion powder, 1 Tbsp garlic powder, and 1 Tbsp black pepper. Stir well to combine and break up any clumps.
- In a medium bowl, whisk together 3 large eggs, 3 teaspoons baking powder, and 1 ½ teaspoons baking soda until blended. The mixture will foam—this is expected.
- Pour 4 cups peanut oil into a heavy 8-quart Dutch oven (the oil should come up roughly 2–3 inches in the pot). Affix a thermometer to the side of the pot so it reads the oil temperature accurately. Heat the oil over medium heat until it reaches 365°F.
- While the oil is heating, dredge each chicken piece: coat the chicken thoroughly in the seasoned flour, then dip into the egg mixture (pat the egg mixture lightly onto the chicken if needed), then return the piece to the seasoned flour for a second coating. Place dredged pieces on a plate while you finish coating the rest.
- When the oil is at 365°F, fry no more than 3 pieces at a time so you do not overcrowd the pot. Carefully lower the chicken into the hot oil.
- Fry the chicken 5–6 minutes on the first side. Using tongs, flip each piece and fry 5–6 minutes on the second side. Monitor the thermometer and allow the oil to come back up to 365°F between batches.
- When a piece is finished frying, transfer it to the paper-towel–lined rimmed baking sheet in the preheated oven to rest and stay warm. Repeat frying in batches until all chicken pieces are cooked.
- When all batches are complete, remove the sheet pan from the oven and let the chicken rest a few minutes before serving.
Notes
Different cuts of chicken will require a slightly different cook time.