Pickled Vegetables Recipe (Giardiniera)
I make giardiniera the way I like my pantry: practical, bright, and ready to lift whatever’s on the table. This Pickled Vegetables (Giardiniera) is crisp, tangy, and a little wild with herbs and seeds. It’s the kind of thing I jar up and reach for when sandwiches, salads, or a charcuterie board need an immediate pep.
There’s no fuss in the process — just basic prep, a quick brine, and a short wait while flavors marry in the fridge. If you like texture, control over heat, and a condiment that ages well in cold storage, this recipe will become a steady habit.
I’ll walk you through shopping, the exact step-by-step, troubleshooting, substitutions that work without wrecking texture, and how to store your jars. Practical tips, honest notes, and clear timing so the first batch comes out exactly as intended.
Your Shopping Guide
Buy firm, fresh vegetables and evenly sized pieces when possible. Uniform pieces pickle more evenly and deliver consistent crunch. Choose tight cauliflower florets without brown spots; select carrots and celery that snap when bent; pick a red bell pepper that’s glossy and heavy for its size.
For the olives and chiles, look for pitted green olives in a brine or jar and serrano chiles that are firm with a smooth skin. If the olives are in brine or oil, drain them before using. The seeds and whole spices—fennel, mustard, celery seeds—can be purchased in small spice jars and will last a long time in your pantry.
Use white vinegar and plain water for the brine. You’ll need standard kitchen measurements for cups, tablespoons, and teaspoons. Four clean pint jars with lids are required; if you don’t have jars, pick them up along with new lids to ensure a tight seal when refrigerated.
Ingredients
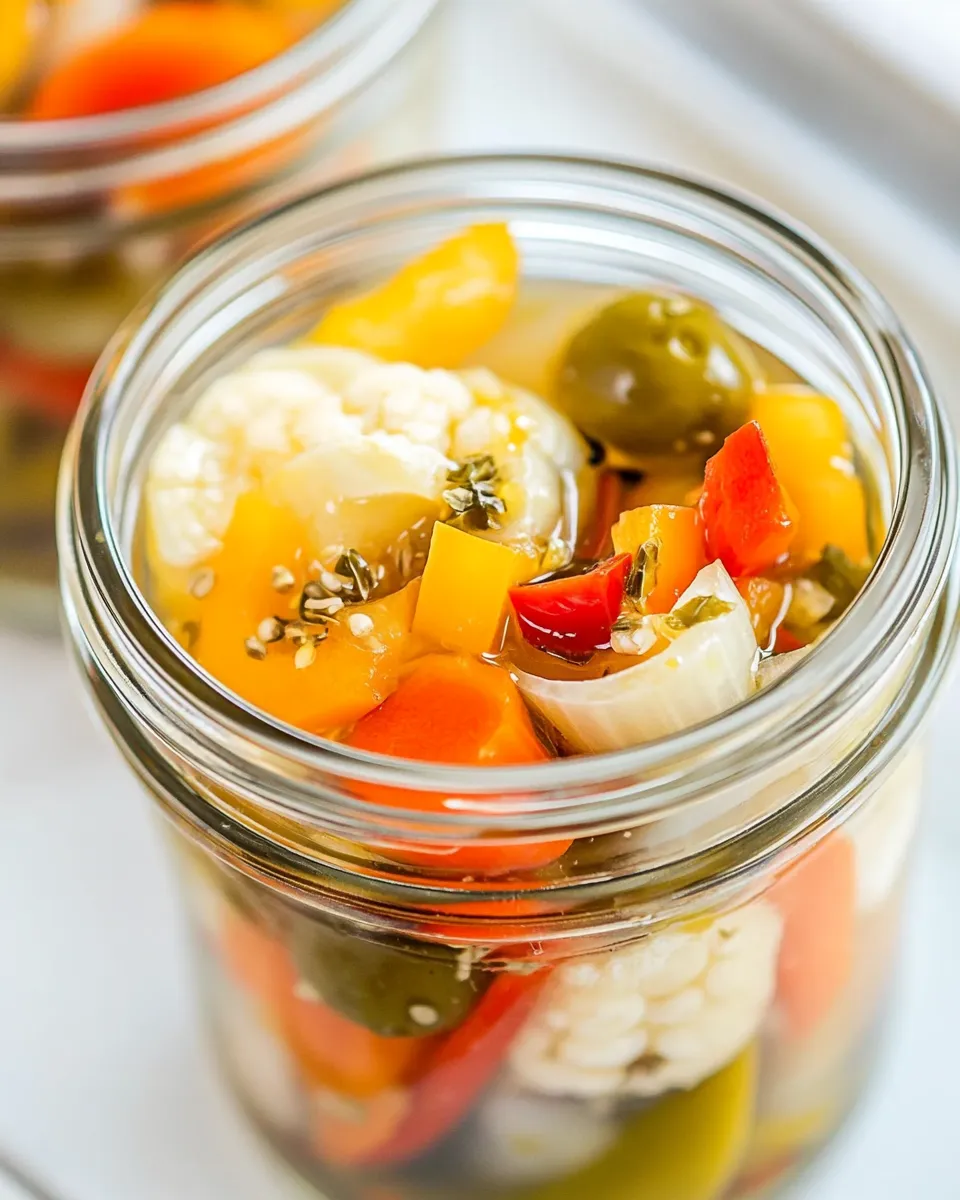
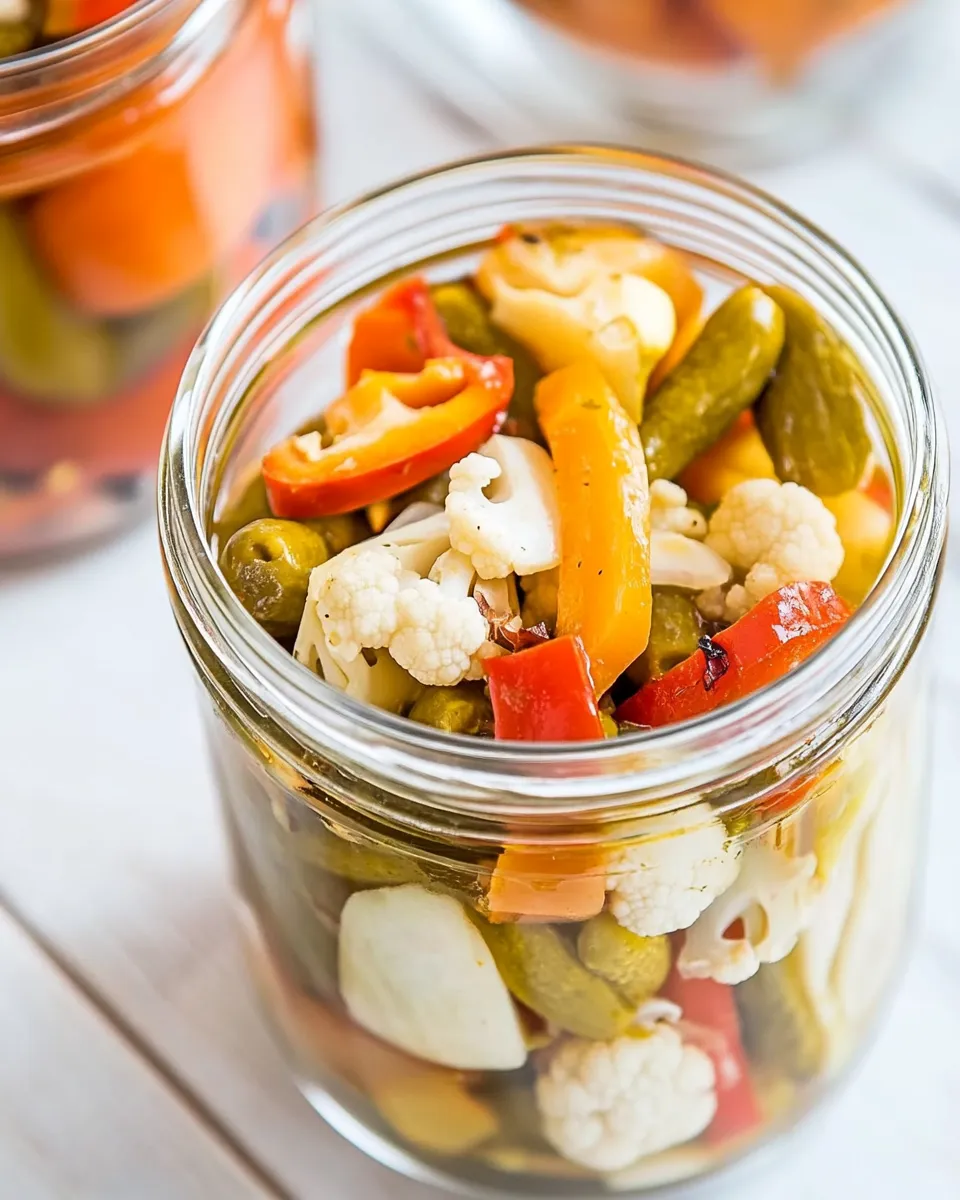
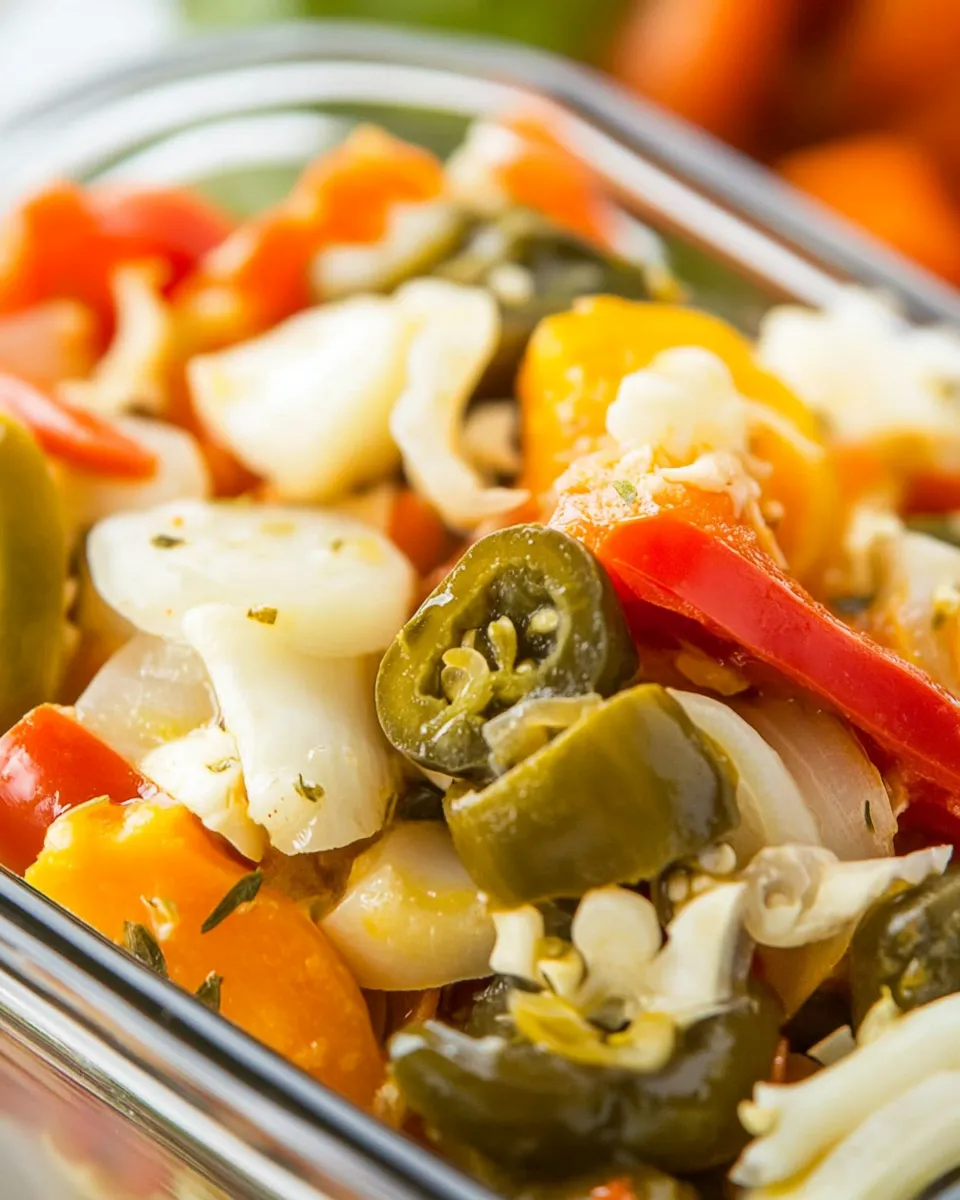
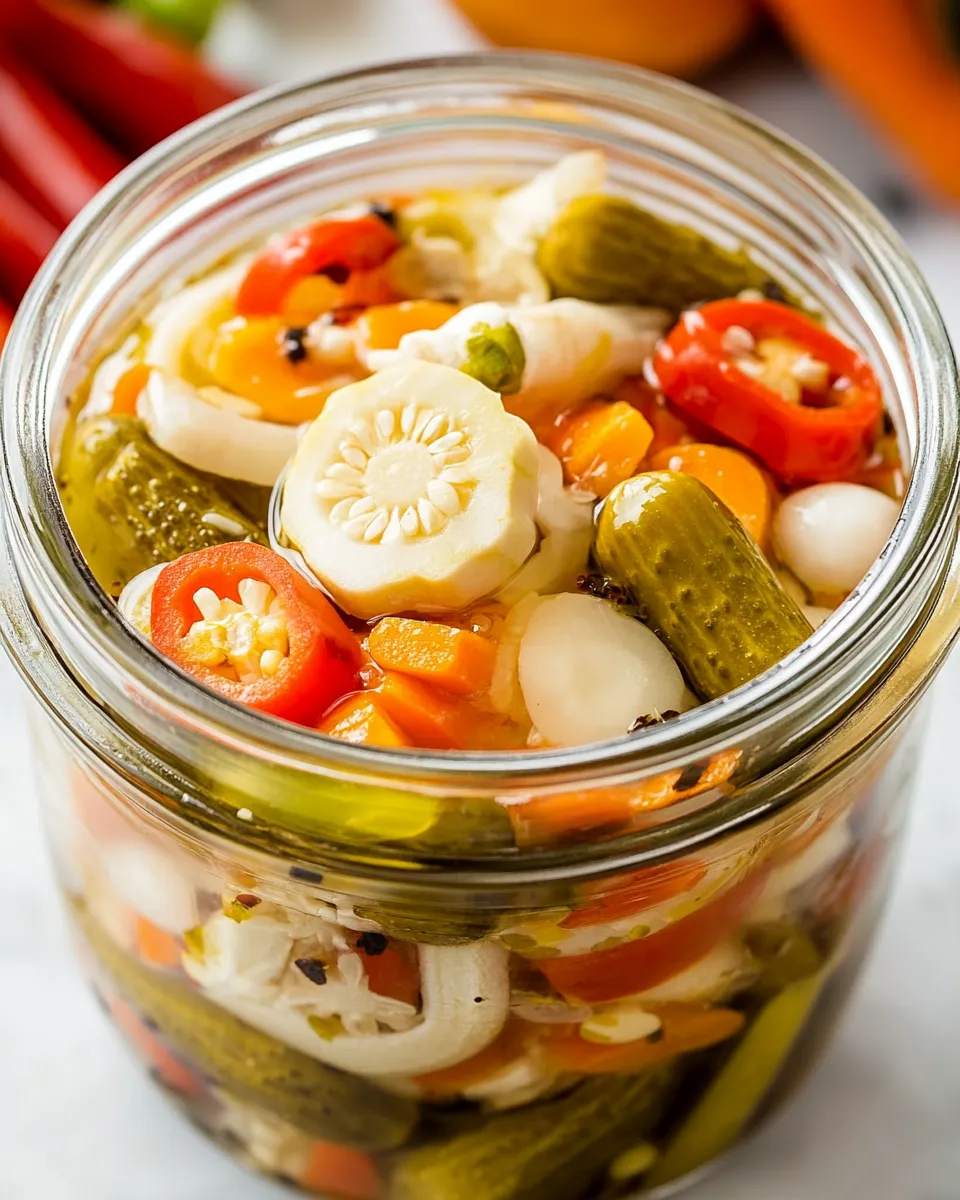
- 3 cups small cauliflower florets — choose firm, similar-sized florets for even pickling.
- 1 ½ cups sliced carrots — slice to bite-size for a crisp bite that soaks up brine.
- 1 ½ cups sliced celery — use crisp ribs for structure and celery flavor.
- 1 ½ cups sliced red bell pepper — adds sweetness and color contrast.
- 1 cup pitted green olives — briny contrast and savory depth; drain before adding.
- 4 tablespoons olive oil — a tablespoon per jar to round flavors and coat spices.
- 4 cloves garlic, smashed — one smashed clove per jar to impart gentle garlic aromatics.
- 4 bay leaves — one bay leaf per jar for background herbal notes.
- 2–4 serrano chiles — split across jars to control heat; adjust count to your tolerance.
- 2 teaspoons dried oregano — split between jars for savory warmth.
- 1 teaspoon celery seeds — dispersed between jars for concentrated celery note.
- 1 teaspoon fennel seeds — lends a subtle anise lift when divided across jars.
- 1 teaspoon yellow mustard seeds — tiny pops of mustard flavor in the brine.
- 3 cups water — bulk of the brine; balances the vinegar.
- 3 cups white vinegar — primary acidic agent; keeps the mix bright and safe.
- 2 tablespoons salt — dissolves into the brine to season and preserve.
- 2 tablespoons sugar — softens the sharpness of the vinegar and balances flavors.
Step-by-Step: Pickled Vegetables (Giardiniera)
- Wash all vegetables. Drain the pitted green olives and set them aside. Set out four clean pint jars.
- Cut the cauliflower into small florets if needed. Slice the carrots, celery, and red bell pepper into small, bite-size pieces. Cut each serrano chile in half (lengthwise or crosswise, as you prefer); you will distribute ½–1 pepper per jar.
- Place the following into each jar: 1 tablespoon olive oil, 1 smashed garlic clove, 1 bay leaf, ½ teaspoon dried oregano, ¼ teaspoon celery seeds, ¼ teaspoon fennel seeds, and ¼ teaspoon yellow mustard seeds.
- Divide the cauliflower, sliced carrots, sliced celery, sliced red bell pepper, and the drained olives evenly between the four jars. Pack the vegetables in so the jars are filled to the top but still allow a small bit of space for the brine.
- In a medium saucepan, combine 3 cups water, 3 cups white vinegar, 2 tablespoons salt, and 2 tablespoons sugar. Set the pot over high heat, bring the mixture to a full boil, and stir to dissolve the salt and sugar.
- Carefully pour the boiling brine into each jar, fully covering the vegetables. If needed, press the vegetables down with a clean utensil so they are submerged. Leave a little headspace at the top of each jar.
- Let the jars cool to room temperature (about 30–60 minutes). Wipe the jar rims if any brine spilled, then cover each jar with its lid and close tightly.
- Shake each jar gently to distribute the oil and spices, then refrigerate. Let the giardiniera sit in the refrigerator for 36–48 hours before serving.
Why You’ll Keep Making It
Giardiniera is simple to prep but multiplies in usefulness. It wakes up sandwiches, lends crunchy contrast to soft cheeses, and provides bright acidity for roasted meats. The blend of garlic, bay, and seeds gives each jar a layered flavor profile that evolves in the fridge. You’ll appreciate how a small jar can change a meal from ho-hum to memorable.
There’s also a practical comfort: the recipe uses inexpensive, long-lasting pantry staples—vinegar, a little sugar and salt, and a handful of spices—while putting seasonal or leftover vegetables to good use. It’s a productive, low-effort way to preserve freshness and reduce waste.
Texture-Safe Substitutions
Keep texture in mind: pickling keeps crunch, but cutting and brief heat treatments will change it.
- To soften slightly without losing structure: cut cauliflower into slightly larger florets and allow the jars to sit an extra day before serving.
- To increase crunch: slice carrots and celery thinner and pack the jars more tightly; the cold brine will maintain snap.
- To control heat: distribute serrano halves so some jars get a single half and others get none. That way you have a range from mild to spicy without changing the base recipe.
- To change the oil profile: keep the same tablespoon-per-jar approach but gently swirl the jar to distribute oil; this keeps spice contact and mouthfeel balanced.
Prep & Cook Tools
- Four clean pint jars with lids — for pickling and storage.
- Medium saucepan — to bring the brine to a full boil.
- Measuring cups and spoons — accurate amounts keep flavor balanced.
- Sharp knife and cutting board — for uniform vegetable pieces.
- Large bowl or colander — for washing and draining vegetables.
- Clean utensil or tamper — to press vegetables so they stay submerged in the brine.
- Jar lifter or towel — for safely handling hot jars if you prefer to warm them first.
Problems & Prevention
Cloudy brine: harmless in most home pickling, often caused by spices or air; if the jars and water are clean and you used the recipe amounts, it’s usually fine. To minimize cloudiness, dissolve salt and sugar fully and avoid splashing solids into the brine when pouring.
Soft vegetables: if you want maximum crunch, avoid pre-cooking. Keep pieces uniform and use fresh, crisp produce. Overpacking jars or exposing them to high heat after pickling can soften vegetables; keep them refrigerated.
Off tastes: always wipe jar rims clean before sealing. Any residue can interfere with the seal and introduce off-flavors. Use fresh spices—old seeds lose intensity and can taste stale.
Tailor It to Your Diet
Control the elements you can: heat, saltiness, and sweetness. If one of those matters for your diet, adjust how you assemble jars rather than the core recipe amounts—distribute serranos unevenly for milder jars, or remove an olive or two from a serving to reduce sodium per bite.
If you’re watching sugar or salt, you can taste a jar after it has aged for the minimum 36–48 hours and then rinse a portion under cold water before serving to remove surface brine. That lowers immediate salt and acid intensity without altering the preserved jar as a whole.
Behind the Recipe
Giardiniera has roots in Italian home preserving—an easy way to keep summer vegetables through colder months. The version here keeps that spirit but leans on practicality: an oil-and-seed profile with garlic and bay to create depth. Think of it as a family-style jar you can customize by heat level and how tightly you pack the veg.
This recipe bridges the slow pantry tradition and the quick refrigerator pickle. It doesn’t require canning or pressure processing because it’s intended for cold storage and short-term fridge life. That makes it approachable for weekday cooks who want big flavor without specialized equipment.
Store, Freeze & Reheat
Refrigerate the sealed jars after they’ve cooled and shaken. These are refrigerator pickles: store them cold, and they’re ready to eat after the 36–48 hour resting window. Do not freeze — freezing will break the cell walls of the vegetables and make them mushy when thawed.
When serving, use clean utensils to avoid introducing contaminants into the jars. If you finish a jar, transfer leftovers to a smaller container or keep the jar sealed and cold. The oil and brine will keep flavors lively; just avoid leaving a jar out at room temperature for extended periods once it’s been opened.
Ask & Learn
Q: Can I use other chiles? A: You can, but because the recipe distributes 2–4 serranos across jars, choose chiles with comparable heat if you want the same effect. If you prefer no heat, leave them out entirely and enjoy the pure briny, herbal character.
Q: Do I have to use bay leaves and whole seeds? A: The bay, mustard, fennel, and celery seeds build the aromatic backbone. They’re split evenly across jars so each jar gets balanced flavor. Leaving one out changes the profile but won’t ruin the pickles—just expect a different note.
Q: How long before I can serve? A: The recipe requires a refrigerator rest of 36–48 hours. That’s when the brine does its thing and the jars reach a delicious balance.
See You at the Table
Make a batch on a quiet afternoon. Fill one jar with more heat, one with fewer olives, one with extra red pepper for color, and one that’s just plain and mild. You’ll learn which jar goes with which dish and soon be reaching for giardiniera the same way you reach for salt and pepper.
If you try this Pickled Vegetables (Giardiniera), take notes on how long you let it sit, which jar you liked best, and what you paired it with. Little adjustments build a signature jar that suits your table. I’m excited for you to taste the first crunchy bite—simple, bright, and endlessly useful.
Pickled Vegetables Recipe (Giardiniera)
Ingredients
Equipment
Method
- Wash all vegetables. Drain the pitted green olives and set them aside. Set out four clean pint jars.
- Cut the cauliflower into small florets if needed. Slice the carrots, celery, and red bell pepper into small, bite-size pieces. Cut each serrano chile in half (lengthwise or crosswise, as you prefer); you will distribute ½–1 pepper per jar.
- Place the following into each jar: 1 tablespoon olive oil, 1 smashed garlic clove, 1 bay leaf, ½ teaspoon dried oregano, ¼ teaspoon celery seeds, ¼ teaspoon fennel seeds, and ¼ teaspoon yellow mustard seeds.
- Divide the cauliflower, sliced carrots, sliced celery, sliced red bell pepper, and the drained olives evenly between the four jars. Pack the vegetables in so the jars are filled to the top but still allow a small bit of space for the brine.
- In a medium saucepan, combine 3 cups water, 3 cups white vinegar, 2 tablespoons salt, and 2 tablespoons sugar. Set the pot over high heat, bring the mixture to a full boil, and stir to dissolve the salt and sugar.
- Carefully pour the boiling brine into each jar, fully covering the vegetables. If needed, press the vegetables down with a clean utensil so they are submerged. Leave a little headspace at the top of each jar.
- Let the jars cool to room temperature (about 30–60 minutes). Wipe the jar rims if any brine spilled, then cover each jar with its lid and close tightly.
- Shake each jar gently to distribute the oil and spices, then refrigerate. Let the giardiniera sit in the refrigerator for 36–48 hours before serving.
Notes
You can keep the Giardiniera in the refrigerator for up to four months.
If you plan to “can” the Giardiniera, you will need to blanch the fresh produce in salty water before adding to the jars. Then the use classic
canning method
of boiling the jars for 10 minutes to seal.
If you find the pickled vegetables too salty after 48 hours, you can pour one-third of the brine water off the top and fill with fresh water before placing back in the refrigerator.