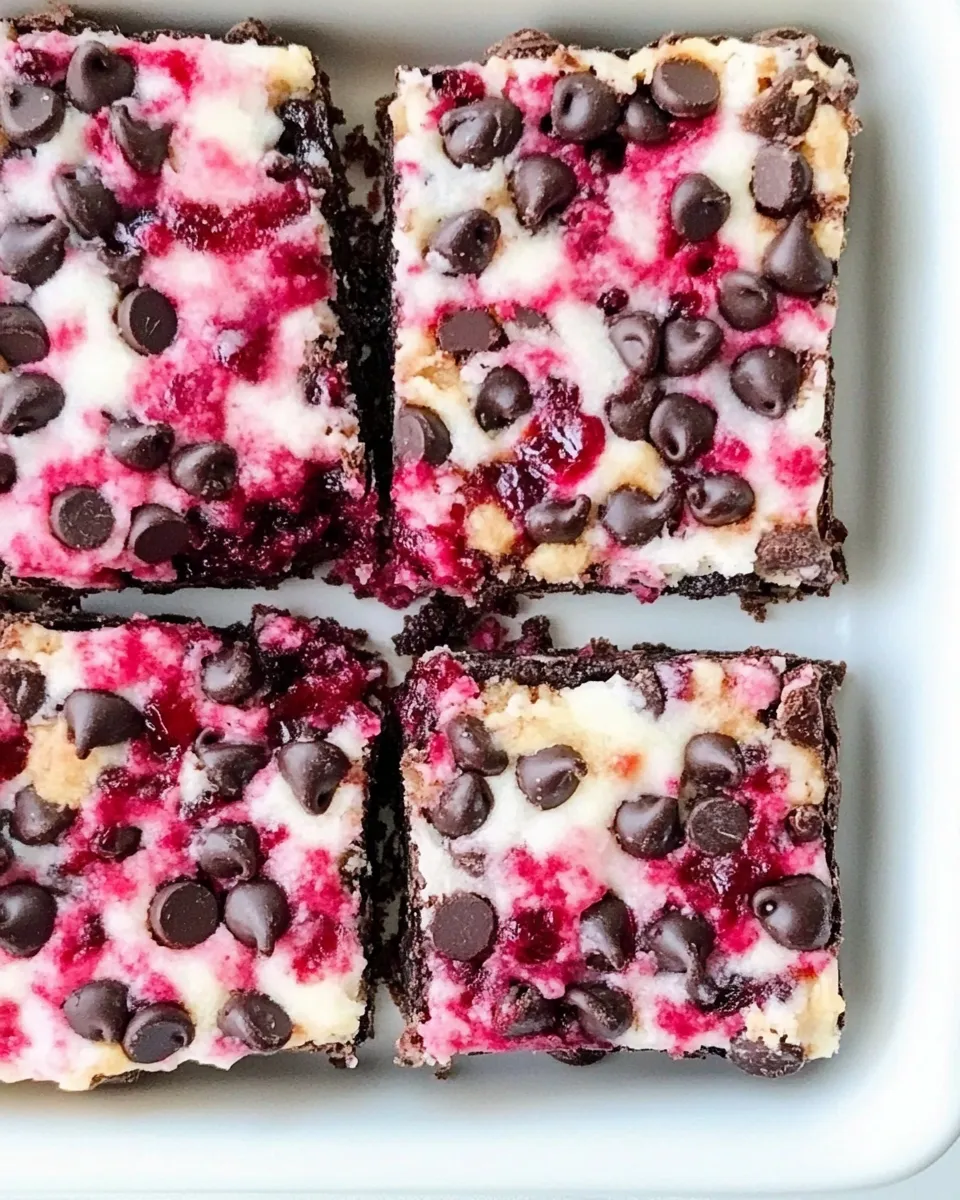
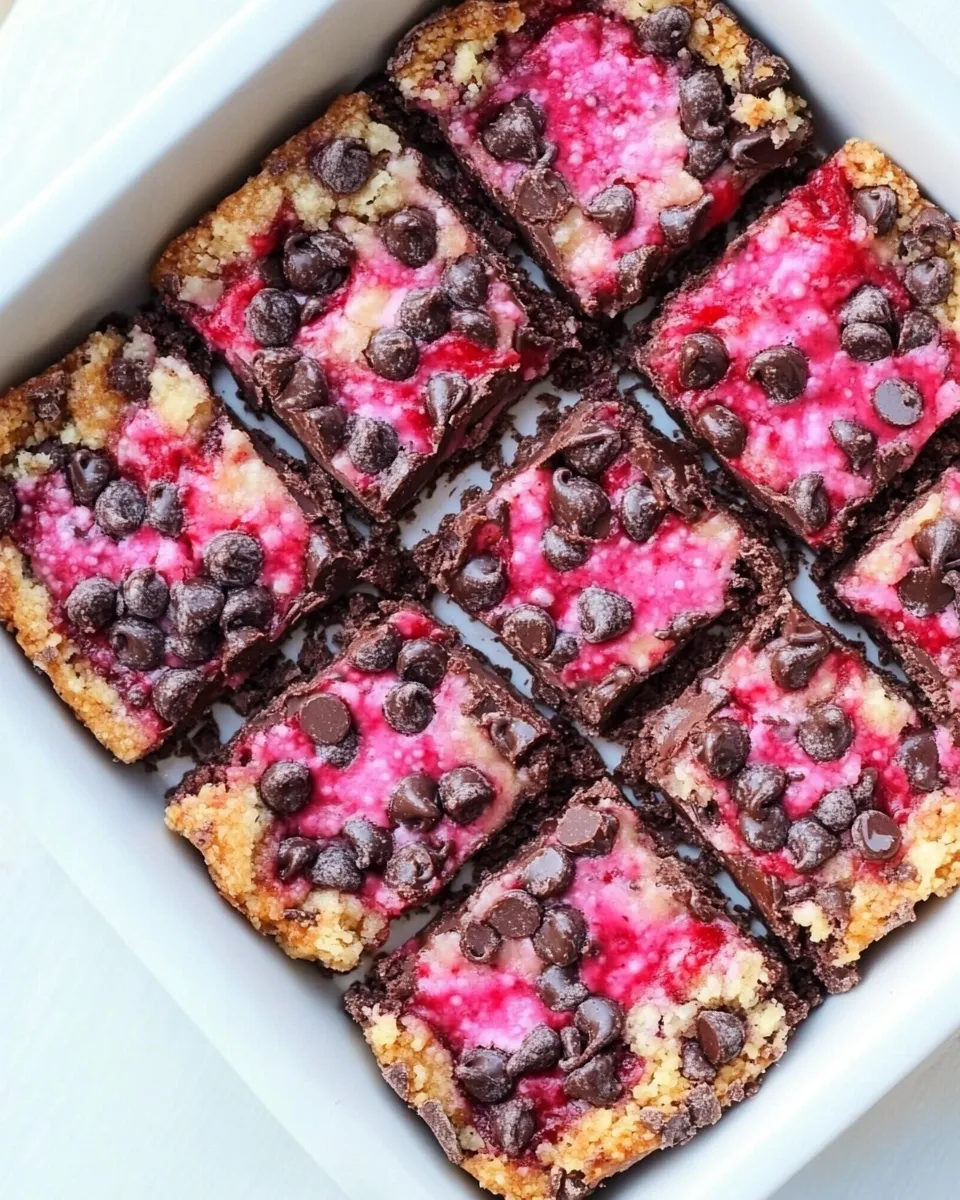
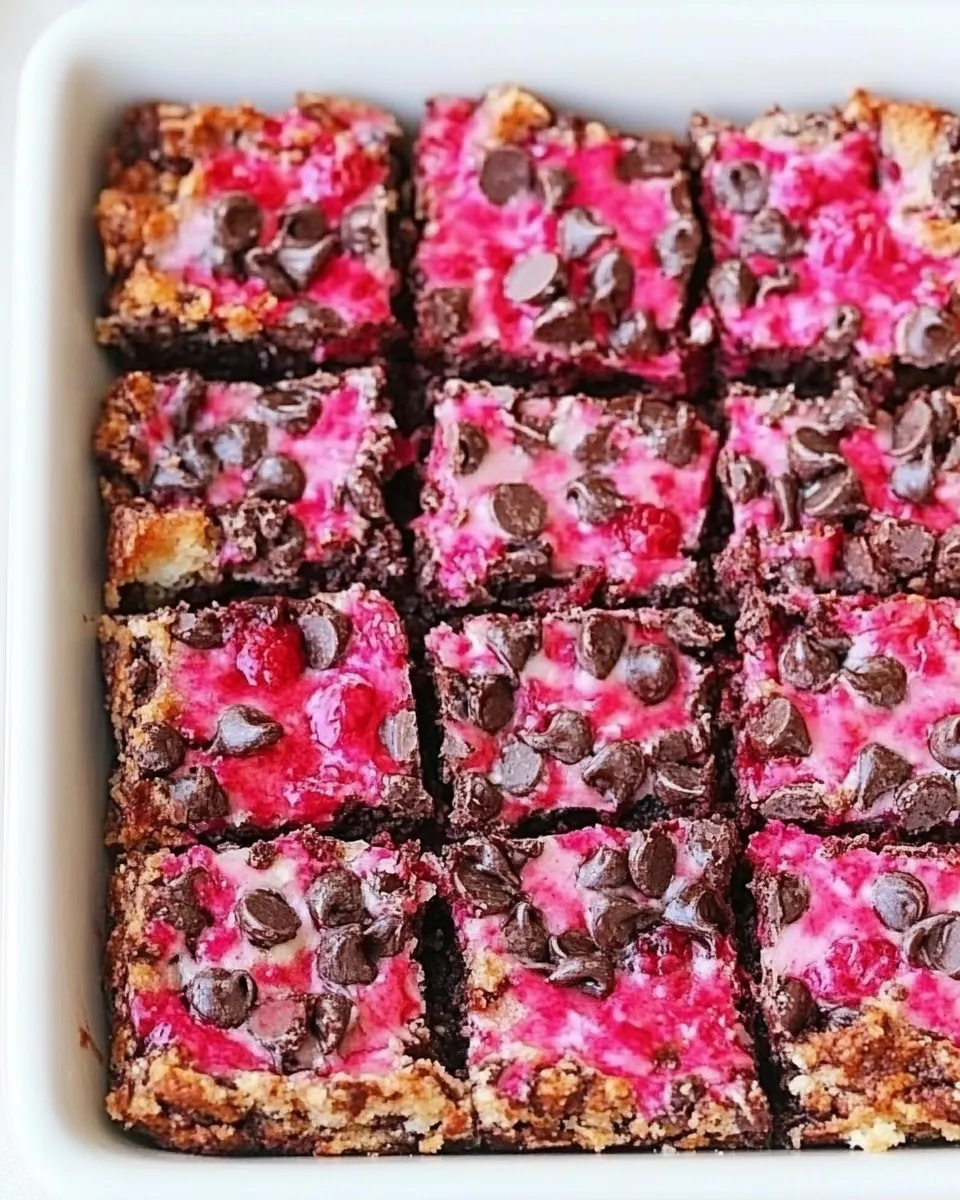
Raspberry Chocolate Chip Magic Squares
These Raspberry Chocolate Chip Magic Squares are a weekday-friendly dessert that looks like you spent hours in the kitchen. They layer a crunchy graham crust with a bright raspberry layer, two passes of mini chocolate chips, a blanket of shredded coconut, and a rich pour of full‑fat canned coconut milk. The result is forkable, slightly custardy squares with pockets of jammy fruit and chocolate — a crowd-pleaser that’s also simple to assemble.
I keep this recipe in rotation because it’s forgiving and flexible: the crust presses in, the berries soften into a bright layer, and the coconut milk bakes up into a loose, set filling that holds when chilled. You don’t need perfect piping or tempering skills — just an 8‑inch pan, parchment, and a steady hand for pressing and slicing.
Below you’ll find a clear shopping note, the exact ingredient list used in testing, step‑by‑step bake instructions taken straight from the test kitchen method, and practical tips for swaps, common mistakes, and storage. Read once, bake once — these squares travel well and make a lovely contribution to potlucks, lunches, or a quiet weekend coffee break.
What to Buy
Shop for: graham cracker crumbs (or a fine graham alternative), your preferred sweetener (maple syrup, sugar, or uncut stevia if you keep it on hand), fresh or frozen raspberries, mini chocolate chips, full‑fat shredded coconut, and canned full‑fat coconut milk. Pick up a block of parchment paper, an 8‑inch square pan, and a small offset spatula if you want tidy edges.
Optional: a neutral oil or buttery spread for a slightly firmer crust and easier cutting. If you prefer less sweetness, choose unsweetened shredded coconut and adjust the sprinkling of mini chips.
Ingredients
- 1 1/2 cups fine graham cracker crumbs — the base/crust; presses into the pan to form a crunchy foundation (for keto, try these Keto Magic Bars).
- pinch uncut stevia OR 2 tbsp pure maple syrup or sugar of choice — sweetener for the crust; pick one option.
- if using stevia, add 2 tbsp water — hydrates the stevia so it mixes into the crumbs.
- 1 1/4 cup raspberries, or berries of choice — lightly mashed to create the fruit layer; fresh or thawed frozen both work.
- 1/2 cup mini chocolate chips — sprinkle over berries and again on top for chocolate pops throughout.
- 2/3 cup full-fat shredded coconut, sweetened or unsweetened — adds chew and toasty flavor; either works depending on sweetness preference.
- 1 1/4 cup full-fat canned coconut milk — the pouring liquid that bakes into a custardy set.
- 3 tbsp oil or buttery spread, optional — enriches and firms the crust if you choose to use it.
From Start to Finish: Raspberry Chocolate Chip Magic Squares
- Preheat the oven to 350°F (175°C). Line an 8-inch square pan with parchment paper, leaving an overhang on two sides for easy removal.
- In a medium bowl, combine 1 1/2 cups graham cracker crumbs with your chosen sweetener: either a pinch of uncut stevia (add 2 tbsp water if you select stevia) OR 2 tbsp pure maple syrup or sugar of choice. If using the optional 3 tbsp oil or buttery spread, add it to the crumbs now.
- Mix until the crumbs are evenly moistened, then transfer the crumb mixture to the prepared pan. Press the crumbs firmly and evenly into the bottom of the pan to form the crust.
- Mash 1 1/4 cups raspberries (or other berries) lightly with a fork, then spread the mashed berries in an even layer over the crust.
- Sprinkle 1/2 cup mini chocolate chips evenly over the berries, then sprinkle 2/3 cup shredded coconut over the chocolate chips, then sprinkle the remaining mini chocolate chips on top.
- Pour 1 1/4 cups full-fat canned coconut milk evenly over the layered ingredients so it soaks through the top.
- Bake in the preheated oven for 33 minutes, until the edges are set and the center is mostly set (it may be slightly jiggly).
- Remove from the oven and let the pan sit at room temperature for 15 minutes to firm up.
- Using the parchment overhang, lift the slab from the pan and place on a cutting surface. Slice into bars (size as you prefer), wiping the knife clean between each cut for neat slices.
Why It’s My Go-To
This recipe hits a satisfying textural balance: the crust gives a clean bite, raspberries bring brightness, chocolate adds richness, coconut keeps things silky, and the coconut milk ties it together into a tender set. It’s quick to assemble, needs no special equipment, and looks more intricate than it is. I can make it ahead and bring it to a gathering without fuss.
It’s also forgiving. Measurements and order are straightforward, and small swaps (like using mixed berries or different sweeteners) don’t break the bake. The 33‑minute bake time leaves a slightly jiggly center that firms as it cools — that give is part of its magic.
Vegan & Vegetarian Swaps

This recipe is naturally vegetarian and can be fully vegan as written if you use a plant‑based buttery spread or oil for the optional crust fat and confirm your graham crumbs are vegan. The canned full‑fat coconut milk provides the richness you’d expect from dairy.
Swap ideas
– If you can’t find vegan graham crumbs, pulse vegan cookies to a fine crumb.
– Use maple syrup or sugar instead of stevia if you prefer natural sugar.
– For a nutty twist, stir a tablespoon of finely ground almonds into the crust crumbs (optional, but still keeping original ingredient quantities unchanged).
Kitchen Gear Checklist
Minimal gear is required:
- 8-inch square baking pan
- Parchment paper (enough to create an overhang)
- Medium mixing bowl and spoon or spatula
- Fork for mashing berries
- Measuring cups and spoons
- Sharp knife and cutting board for slicing
An offset spatula or the bottom of a measuring cup helps press the crust evenly; a bench scraper helps lift portions cleanly.
Missteps & Fixes
If the crust feels too loose or sandy: you probably skipped the optional oil/buttery spread. Stirring in the optional 3 tbsp of oil or buttery spread will bind crumbs better. If you used stevia without adding the 2 tbsp water, the crumb mix may be dry — add a splash of water and press again.
If the center is too wobbly after cooling: the center should be slightly jiggly when it comes out and will set as it cools. Let it rest the full 15 minutes at room temperature, then chill for another 20–30 minutes before slicing for firmer bars. If it collapses entirely, it may have been underbaked or the oven temperature was low — add 3–5 minutes next time.
If the top is too browned before the center sets: tent loosely with foil for the last 10 minutes of baking to prevent over-browning while the center finishes setting.
Better Choices & Swaps
Choices you can make to tailor these squares:
- Graham crumbs vs. gluten-free cookie crumbs — choose based on dietary needs.
- Maple syrup vs. sugar vs. stevia — choose to control sweetness and texture. Note: if using stevia, include the 2 tbsp water called for.
- Sweetened vs. unsweetened shredded coconut — sweetened will add extra sugar; unsweetened keeps it more fruit-forward.
- Fresh vs. frozen raspberries — frozen work well; thaw and drain slightly to avoid excess liquid.
For a less sweet bar, reduce the mini chocolate chips slightly or choose dark chocolate chips. For more coconut flavor, toast the shredded coconut lightly before adding it to the pan — do this carefully so it doesn’t overbrown.
Notes from the Test Kitchen
During testing, pressing the crust firmly and evenly into the pan produced the cleanest slices. I use the bottom of a measuring cup to achieve a compact base. When layering the mashed raspberries, smear them gently in a single thin layer so the chips and coconut sit evenly without sinking.
The double sprinkling of mini chocolate chips (one layer below and one above the coconut) creates chocolate pockets rather than one continuous top layer — it distributes chocolate flavor throughout the bar. Pour the coconut milk slowly and try to pour evenly to avoid displacing the top layer.
Oven temperatures vary. If your oven runs hot, check the bars at 30 minutes. The goal is set edges and a center that’s mostly set but with a slight jiggle.
Make-Ahead & Storage
These bars keep well. After cooling on the counter for the initial 15 minutes, transfer to the refrigerator to chill completely for best slicing. Store airtight in the refrigerator for up to 5 days. For transport, layer between parchment paper to prevent sticking.
Freezing: cut into squares and freeze in a single layer on a sheet pan until firm, then stack with parchment between layers in an airtight container for up to 2 months. Thaw in the fridge or at room temperature for about 30–60 minutes before serving.
Raspberry Chocolate Chip Magic Squares FAQs
Can I use mixed berries instead of raspberries? Yes. Use the same amount (1 1/4 cups) of mixed berries, lightly mashed, and spread as directed.
Do I need to toast the coconut? No — the recipe works well with shredded coconut as-is. Toasting adds flavor but isn’t required.
Can I make this nut-free? Yes — the recipe as written is nut-free. If you substitute any crust ingredient, double-check labels for nut traces.
Why is there so much coconut milk? The 1 1/4 cups of full-fat canned coconut milk is the liquid that bakes into the top layer, creating a custardy set that binds the berries, chips, and coconut together.
How do I get neat slices? Let the bars cool at room temperature for 15 minutes, then chill briefly if needed. Use the parchment overhang to lift the slab, and wipe your knife between cuts for clean edges.
See You at the Table
These Raspberry Chocolate Chip Magic Squares are an approachable dessert that makes a statement without drama. Keep the method in mind — press, layer, pour, bake — and you’ll get consistent results. Share them warm for a softer center or chilled for cleaner slices. Either way, they’re easy to love and easy to bring to any table.
Try them once as written, then tweak the coconut, chocolate, or sweetener to make them perfectly yours. Happy baking — I’ll be making another batch this weekend.
Raspberry Chocolate Chip Magic Squares
Ingredients
Equipment
Method
- Preheat the oven to 350°F (175°C). Line an 8-inch square pan with parchment paper, leaving an overhang on two sides for easy removal.
- In a medium bowl, combine 1 1/2 cups graham cracker crumbs with your chosen sweetener: either a pinch of uncut stevia (add 2 tbsp water if you select stevia) OR 2 tbsp pure maple syrup or sugar of choice. If using the optional 3 tbsp oil or buttery spread, add it to the crumbs now.
- Mix until the crumbs are evenly moistened, then transfer the crumb mixture to the prepared pan. Press the crumbs firmly and evenly into the bottom of the pan to form the crust.
- Mash 1 1/4 cups raspberries (or other berries) lightly with a fork, then spread the mashed berries in an even layer over the crust.
- Sprinkle 1/2 cup mini chocolate chips evenly over the berries, then sprinkle 2/3 cup shredded coconut over the chocolate chips, then sprinkle the remaining mini chocolate chips on top.
- Pour 1 1/4 cups full-fat canned coconut milk evenly over the layered ingredients so it soaks through the top.
- Bake in the preheated oven for 33 minutes, until the edges are set and the center is mostly set (it may be slightly jiggly).
- Remove from the oven and let the pan sit at room temperature for 15 minutes to firm up.
- Using the parchment overhang, lift the slab from the pan and place on a cutting surface. Slice into bars (size as you prefer), wiping the knife clean between each cut for neat slices.
Notes
Readers also love these
Zucchini Brownies
.