Rocky Road Chocolate Bark
I love snacks that feel indulgent but actually take less than an hour from start to finish. This Rocky Road Chocolate Bark is exactly that — three pantry-friendly ingredients, a couple of simple steps, and a treat that looks like you spent much longer on it than you did. It’s a no-fuss dessert I turn to when I need something to bring to a gathering or to stash in the fridge for a quick afternoon pick-me-up.
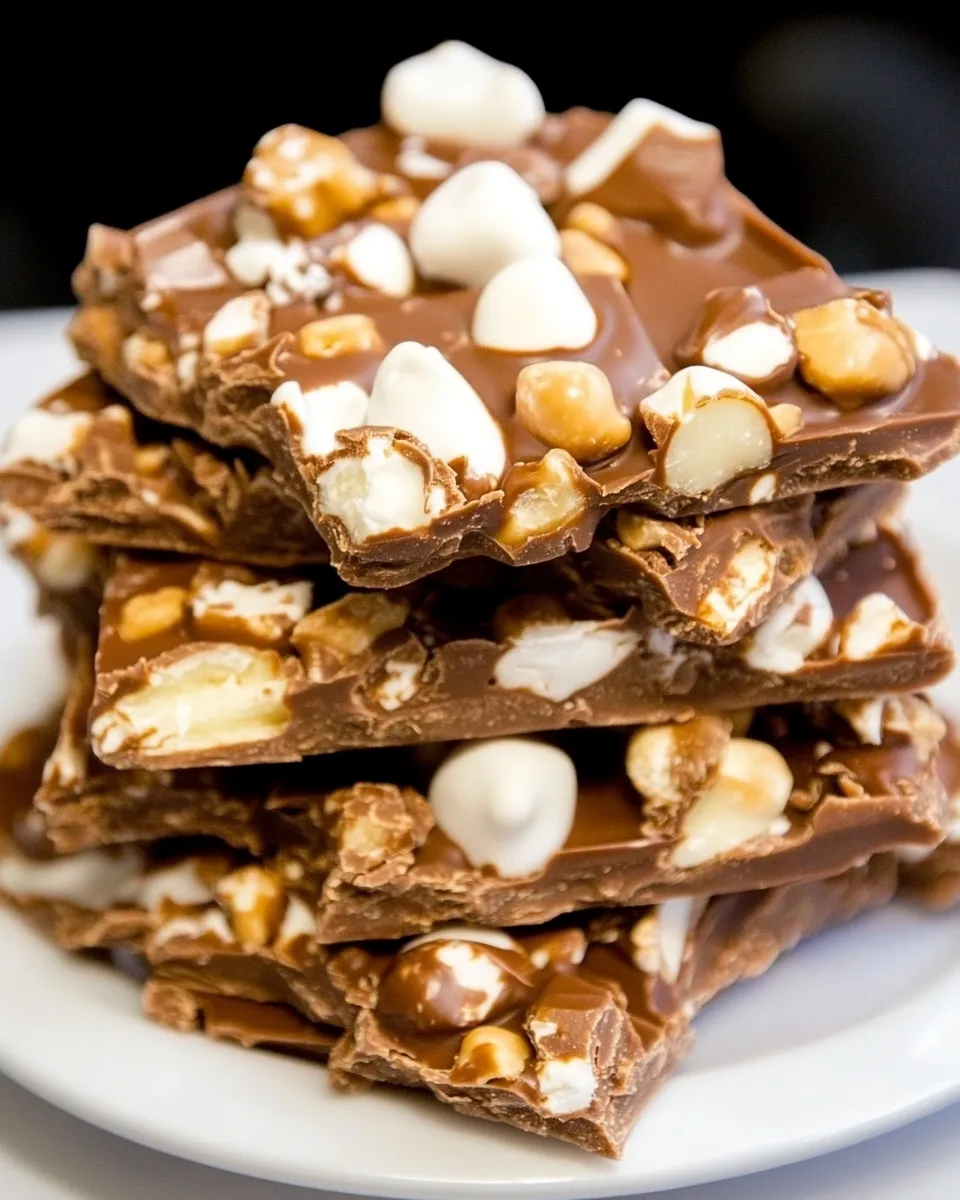
The texture here is the point: glossy, snappy chocolate flecked with pillowy marshmallows and crunchy walnuts. Use the best chocolate you can reasonably source; it makes a real difference in shine and mouthfeel. Other than that, this recipe rewards precision in a relaxed way — measure once, melt gently, and let the fridge do the rest.
Below you’ll find the exact ingredients and the step-by-step directions I follow every time. I’ll also include swaps, tools that speed the job, storage tips, and a few common troubleshooting notes so you can get the same good result in your kitchen.
What We’re Using
Ingredients
- 16ounces(453.59g)good-quality milk or semisweet chocolate,finely chopped — the backbone of the bark; choose chocolate you enjoy eating straight for the best flavor and sheen.
- 1cup(75g)miniature marshmallows — add chew and sweet pockets throughout the chocolate; use miniature for even distribution.
- 1cup(117g)coarsely chopped walnuts — bring crunch and a slight bitterness to balance the sweet chocolate and marshmallows; toast briefly if you like extra depth.
From Start to Finish: Rocky Road Chocolate Bark
- Line a baking sheet with parchment paper and set aside.
- Melt the chopped chocolate using one of these methods:
- Double boiler: place a heatproof bowl over a pot of simmering water (bowl should not touch the water). Stir the chocolate until smooth and fully melted.
- Microwave: heat the chocolate in a microwave-safe bowl in 30-second intervals at 50% power, stirring between each interval, until mostly melted. Stir until smooth.
- Remove the chocolate from the heat and let it cool for about 3–5 minutes, stirring occasionally, until it is slightly thickened but still pourable.
- Add the miniature marshmallows and coarsely chopped walnuts to the warm chocolate and stir gently until the marshmallows and walnuts are evenly coated and distributed.
- Pour the mixture onto the prepared parchment and use an offset spatula or the back of a spoon to spread it into an even layer about 7 x 7 inches (it does not need to be exact).
- Refrigerate the baking sheet for at least 30 minutes, or until the chocolate is completely set and firm.
- Remove the bark from the parchment and cut into pieces with a sharp knife, or break into pieces by hand. Store the pieces in an airtight container in the refrigerator.
Why I Love This Recipe
Rocky Road Chocolate Bark is straightforward and rewarding. It hits three favorite textures at once: silky chocolate, soft marshmallow, and crunchy nuts. That contrast keeps every bite interesting, whether you eat a small shard with coffee or a generous piece for dessert.
Another reason: timing and effort are minimal. Most of the work is melting and folding; the fridge does the heavy lifting. That makes this recipe perfect for busy afternoons, last-minute gifts, or a simple holiday platter. It also scales easily — double the batch if you’re hosting.
Swap Guide
- Milk or semisweet chocolate — you can swap for dark chocolate if you prefer a less sweet bark; remember darker chocolate will set firmer and taste more bitter.
- Miniature marshmallows — replace with chopped regular marshmallows if that’s what you have, though distribution will be slightly chunkier.
- Walnuts — swap for pecans, almonds, or hazelnuts for different flavor notes. Toasted nuts add more aroma and a deeper nutty flavor.
Recommended Tools
- Heatproof mixing bowl — for melting chocolate over a double boiler or in the microwave; stainless steel or glass works well.
- Offset spatula or the back of a spoon — essential for spreading the melted chocolate into an even bark.
- Parchment-lined baking sheet — makes removing and breaking the bark effortless.
- Sharp knife or sturdy rimmed baking sheet (for breaking) — a knife gives clean pieces; breaking by hand gives a rustic look.
Steer Clear of These
Avoid overheating the chocolate. If it scorches or becomes grainy, the texture suffers and the sheen disappears. Always melt gently and stir frequently. When using the microwave, follow the 30-second-at-half-power routine — it’s slow but reliable.
Don’t skip the cooling step in the refrigerator. Trying to cut or break the bark before it’s fully set will create ragged, sticky pieces and a soft center. Chill for at least 30 minutes, or until the chocolate is completely firm.
Seasonal Twists
Rocky Road is flexible. For winter, stir in a pinch of ground cinnamon or a few crushed candy canes for a peppermint twist and sprinkle extra crushed candy on top before the chocolate sets. In late summer or early fall, fold in freeze-dried raspberries for a bright pop of acid and color.
If you want a spring-appropriate version, swap walnuts for toasted pistachios and scatter a few edible flower petals on top just before chilling. Keep additions light so the bark remains easy to cut and store.
Recipe Notes & Chef’s Commentary
Chocolate selection matters. “Good-quality” doesn’t mean artisanal only — it means chocolate you like. A bar you would happily eat plain will give you the best flavor and texture in the finished bark. Avoid chips formulated to hold shape in baking; they often contain stabilizers that make melting uneven.
Work on a cool, dry day when possible. Warm kitchens can make the melted chocolate thin and slow to set. If your kitchen is hot, chill the baking sheet briefly after spreading the bark to speed setting. Use gentle, even pressure when spreading to avoid entraining air bubbles that can dull the surface.
Make-Ahead & Storage
Make-ahead: You can prepare this bark up to a week in advance. Store pieces in an airtight container in the refrigerator to maintain the crisp snap and prevent marshmallows from becoming overly soft. If you prefer room temperature texture, bring pieces to room temp for 10–15 minutes before serving, but don’t leave them out for hours.
Freezing: If you want a longer storage life, freeze the bark in a single layer for up to 2 months. Thaw in the refrigerator to avoid condensation forming on the chocolate surface, which can affect appearance and texture.
Quick Q&A
Q: Can I use chocolate chips? A: You can, but some chips contain stabilizers that make them slower to melt and may affect final texture. If chips are your only option, chop them finely first and be patient while melting.
Q: Can I add dried fruit? A: Yes. Add small pieces of dried cherries or cranberries for a fruity lift. Keep the amount modest to avoid making the bark too thick and hard to set evenly.
Q: Why did my chocolate bloom (white streaks)? A: Bloom occurs when chocolate and fat separate or when condensation develops. Store the bark chilled and avoid temperature swings. If bloom appears, the bark is still edible — it’s a cosmetic issue only.
The Last Word
Rocky Road Chocolate Bark is one of those simple, satisfying recipes that rewards a small investment of attention with big flavor. It’s forgiving, versatile, and perfect for sharing (or keeping all to yourself). Follow the basic steps, choose a chocolate you enjoy, and don’t rush the cooling — those three things make the difference between so-so and reliably excellent bark.
Make a batch this week. It’s quick, transportable, and a little indulgent — exactly the kind of thing I like to have on hand for unexpected guests or quiet evenings at home.
Rocky Road Chocolate Bark
Ingredients
Equipment
Method
- Line a baking sheet with parchment paper and set aside.
- Melt the chopped chocolate using one of these methods: - Double boiler: place a heatproof bowl over a pot of simmering water (bowl should not touch the water). Stir the chocolate until smooth and fully melted. - Microwave: heat the chocolate in a microwave-safe bowl in 30-second intervals at 50% power, stirring between each interval, until mostly melted. Stir until smooth.
- Remove the chocolate from the heat and let it cool for about 3–5 minutes, stirring occasionally, until it is slightly thickened but still pourable.
- Add the miniature marshmallows and coarsely chopped walnuts to the warm chocolate and stir gently until the marshmallows and walnuts are evenly coated and distributed.
- Pour the mixture onto the prepared parchment and use an offset spatula or the back of a spoon to spread it into an even layer about 7 x 7 inches (it does not need to be exact).
- Refrigerate the baking sheet for at least 30 minutes, or until the chocolate is completely set and firm.
- Remove the bark from the parchment and cut into pieces with a sharp knife, or break into pieces by hand. Store the pieces in an airtight container in the refrigerator.
Notes
Note: I recommend Ghiradelli or Lindt chocolate.
Nutritional values are based on one serving