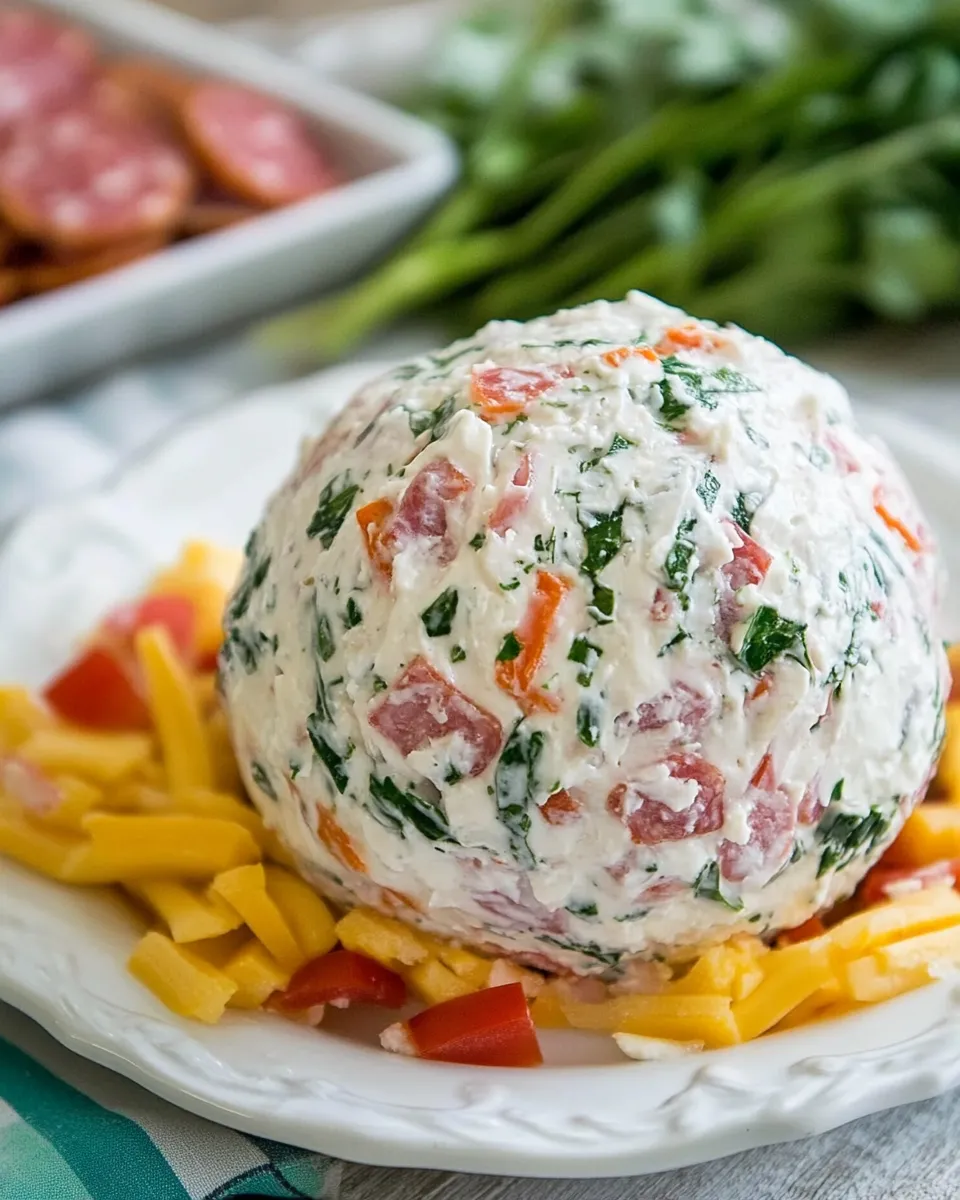
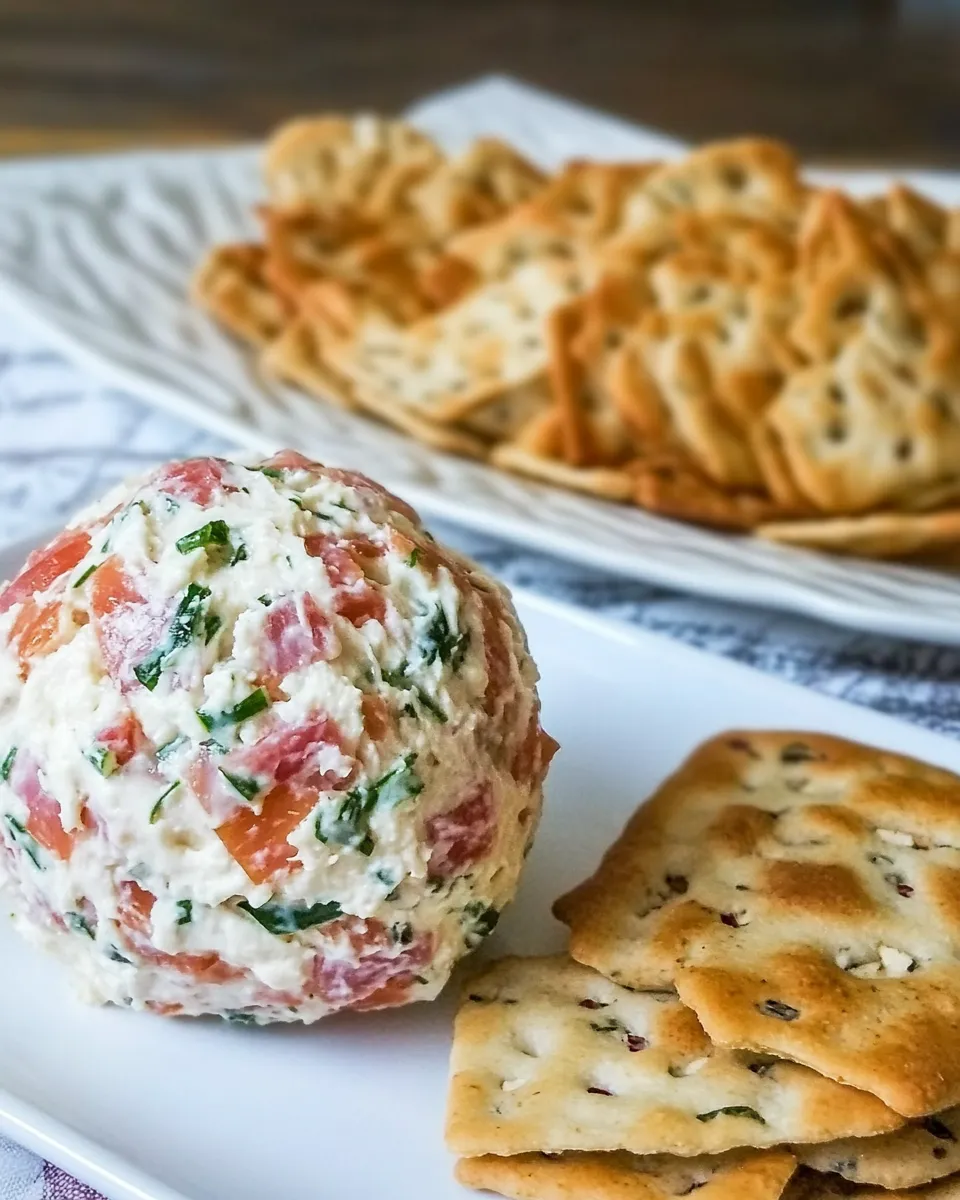
Salami Cream Cheese Ball
This salami cream cheese ball is my go-to for potlucks and last-minute guests. It comes together fast, stores well, and always disappears first. The mix of tangy cream cheese, salty salami, bright green onions, and sharp cheddar is simple but exactly the kind of savory hit people crowd around.
It’s forgiving, too. You don’t need fancy tools. A stand mixer speeds things up, but a sturdy bowl and a strong spatula work fine. Make it a few hours ahead and let it firm in the fridge so it slices and scoops cleanly.
Below I’ll walk you through the ingredients, the exact steps I follow, ways to change it up, what to watch for, and how to serve it so it shines. Practical tips and troubleshooting are included — no fluff, just useful details.
Ingredient List
- 28oz packages cream cheese, softened — the base and binder; soften to room temperature so it mixes smoothly.
- 1bunch of green onions,chopped — adds brightness and a mild onion bite; include some green for color.
- 1/4lb- 1/3 lb. hard salami,I use Cervelat from the deli, cut into small pieces — the salty, meaty star; small pieces disperse flavor without big chewy bites.
- 3tbspmayo — adds silkiness and helps the ball hold its shape; use full-fat for best texture.
- 1cupshredded cheddar cheese — sharp cheddar provides depth and structure; freshly shredded melts into the cream cheese better than pre-shredded.
- 1/4tspsalt — seasons the mixture; be cautious because salami and cheddar are already salty.
- 1/8tspblack pepper — a little pepper lifts the flavors; freshly ground is preferable.
Salami Cream Cheese Ball — Do This Next
- If the cream cheese is not fully softened, let it sit at room temperature until soft enough to mix (soft but still cool).
- Place the softened cream cheese, chopped green onions, small pieces of salami, mayo, shredded cheddar cheese, salt, and black pepper into a stand mixer fitted with the paddle attachment.
- Mix on low to medium speed, scraping the bowl as needed, until the ingredients are evenly combined and the mixture is uniform in texture.
- Lay a large sheet of plastic wrap on your work surface. Spoon the cheese mixture onto the center of the plastic wrap.
- Place a second sheet of plastic wrap over the mixture. Using your hands through the plastic wrap, shape the mixture into a ball (or your preferred shape), pressing to remove air and smooth the surface.
- Twist and seal the plastic wrap around the shaped cheese ball, then refrigerate for 20 to 30 minutes to firm up.
- Unwrap the cheese ball, transfer to a serving plate, and serve with butter crackers and fresh cut veggies.
The Upside of Salami Cream Cheese Ball
This recipe is a real crowd-pleaser for a few reasons. First, it’s quick to make. A soft cream cheese and a handful of mix-ins turn into something that looks and tastes thoughtful. Second, it’s portable and keeps well: you can make it ahead and transport it wrapped in plastic with no fuss. Third, it pairs with so many carriers — crackers, toasted baguette slices, pretzels, cut vegetables — which makes it versatile for any gathering.
Beyond convenience, it offers texture contrast. The creamy base, the little bits of chewy salami, and the shredded cheddar create a satisfying bite. Flavors balance too: the mayo and cream cheese mellow the salt while green onions add a fresh lift. If you want an appetizer that’s easy to scale and reliably popular, this is it.
Ingredient Flex Options

- Swap the hard salami for another cured meat like soppressata or peppered salami if you prefer a little more spice. Keep the same weight.
- Substitute the shredded cheddar with Monterey Jack, Gouda, or a smoked cheddar for a different profile. Texture stays similar with the same 1 cup measure.
- If you don’t have mayo, a neutral-flavored plain yogurt or crème fraîche can work in the same amount, but expect a slightly tangier finish.
- If you want extra bite, add a couple teaspoons of Dijon mustard or a pinch of cayenne; adjust to taste.
- For a softer spreadable ball, use an extra tablespoon of mayo. For a firmer, more sliceable ball, chill longer.
Gear Up: What to Grab

- Stand mixer with paddle attachment — makes mixing effortless and even. If you don’t have one, a hand mixer or sturdy spatula and elbow grease will do.
- Cutting board and sharp knife — to chop the green onions and cut the salami into small pieces.
- Measuring spoons and a measuring cup — to keep the balance of mayo, cheese, and seasonings consistent.
- Plastic wrap — two large sheets to shape, seal, and chill the ball without it sticking to your hands.
- Serving plate and your favorite crackers/veggies — plan the presentation so it’s ready the moment you unwrap it.
Watch Outs & How to Fix
Here are the common issues I see and the fixes I use:
- Too stiff or hard to mix — the cream cheese wasn’t soft enough. Let it sit at room temperature a bit longer until soft but still cool, then proceed. If mixing is already difficult, stop and wait 10–15 minutes, then try again.
- Too salty — both salami and cheddar add salt. Taste before serving and skip or reduce the added 1/4 tsp salt next time. For this batch, serve with unsalted crackers or fresh veggies to balance the saltiness.
- Mushy texture — overmixing with high speed can make the mixture too loose. Use low to medium speed and stop when evenly combined. If it’s already mushy, chill longer to firm up before shaping.
- Wonky shape — if the ball is uneven, rewrap in plastic and shape again with your hands through the wrap. Chilling for the full 20–30 minutes helps it hold form.
Dietary Customizations
There are a few simple swaps to make this fit different diets:
- Lower sodium: choose a low-sodium salami and reduced-sodium cheddar, and omit the added salt. Taste and adjust.
- Lower fat: use a lower-fat cream cheese and light mayo, though texture will be softer and less creamy. Chill well before serving.
- Gluten-free: serve with gluten-free crackers or sliced cucumbers and bell pepper strips instead of traditional crackers.
- Vegetarian (not vegan): replace salami with finely chopped roasted red pepper or smoked marinated tofu for a meaty texture without meat.
- Vegan: replace cream cheese with a firm vegan cream cheese, use vegan mayo, plant-based cheddar shreds, and swap salami for smoked seitan or marinated mushrooms. Results will vary; chill to firm up.
Pro Tips & Notes
Make-Ahead and Timing
Make the ball up to 24 hours in advance. Wrap tightly and chill; flavors meld and texture firms up, making it easier to slice or scoop. For travel, keep it chilled in an insulated bag until serving.
Texture and Mixing
Use the paddle attachment or a sturdy spatula. The goal is an even distribution of salami and onions through the cream cheese without turning the mixture gluey. Low to medium speed is optimal. Scrape the bowl a couple times so nothing sticks to the sides.
Presentation Tricks
Unwrap the ball onto a slightly larger plate. Surround it with two or three cracker types and a variety of cut vegetables. Garnish with a few whole green onion tops or small salami slices for an attractive finish.
Save It for Later
Storage is straightforward. Wrapped tightly in plastic wrap, the cheese ball keeps in the refrigerator for 3–4 days. For longer storage, you can freeze it for up to one month. Thaw overnight in the fridge, then re-wrap and chill a bit so it firms up before serving.
Leftovers reheat poorly, so plan to eat within a few days. If it becomes drier after refrigeration, stir in a teaspoon of mayo or a splash of cream and re-form to refresh the texture.
Top Questions & Answers
Q: Can I make this without a stand mixer?
A: Yes. Use a hand mixer or mix by hand with a spatula. The key is to have the cream cheese soft so it’s easy to combine evenly.
Q: How finely should I chop the salami?
A: Small, bite-sized pieces are best — think pea- to corn-kernel size. They distribute well and give a meaty bite without overwhelming the creamy texture.
Q: Is 20 to 30 minutes of chilling enough?
A: Twenty to thirty minutes firms the exterior and makes it easier to unwrap and serve. If you prefer a firmer, sliceable ball, chill for 1–2 hours.
Q: Can I add herbs or spices?
A: Yes. Minced parsley or a pinch of smoked paprika work well. Add modestly and taste as you go.
Serve & Enjoy
To serve, set the Salami Cream Cheese Ball on a platter with butter crackers, water crackers, toasted baguette slices, and an assortment of fresh cut veggies — carrots, celery, cucumber, and bell peppers all pair nicely. Offer a small butter knife or spreader so guests can easily scoop or spread.
This recipe is about simple ingredients working together. It’s fast, flexible, and reliably good. Make it for a weeknight gathering or the holiday table — people will ask for the recipe, and you’ll already know exactly what you did.
Salami Cream Cheese Ball
Ingredients
Equipment
Method
- If the cream cheese is not fully softened, let it sit at room temperature until soft enough to mix (soft but still cool).
- Place the softened cream cheese, chopped green onions, small pieces of salami, mayo, shredded cheddar cheese, salt, and black pepper into a stand mixer fitted with the paddle attachment.
- Mix on low to medium speed, scraping the bowl as needed, until the ingredients are evenly combined and the mixture is uniform in texture.
- Lay a large sheet of plastic wrap on your work surface. Spoon the cheese mixture onto the center of the plastic wrap.
- Place a second sheet of plastic wrap over the mixture. Using your hands through the plastic wrap, shape the mixture into a ball (or your preferred shape), pressing to remove air and smooth the surface.
- Twist and seal the plastic wrap around the shaped cheese ball, then refrigerate for 20 to 30 minutes to firm up.
- Unwrap the cheese ball, transfer to a serving plate, and serve with butter crackers and fresh cut veggies.
Notes
*to soften cream cheese quickly, unwrap the cream cheese and place on a microwave safe dish. Microwave each brick of cream cheese separately for just 20 seconds.