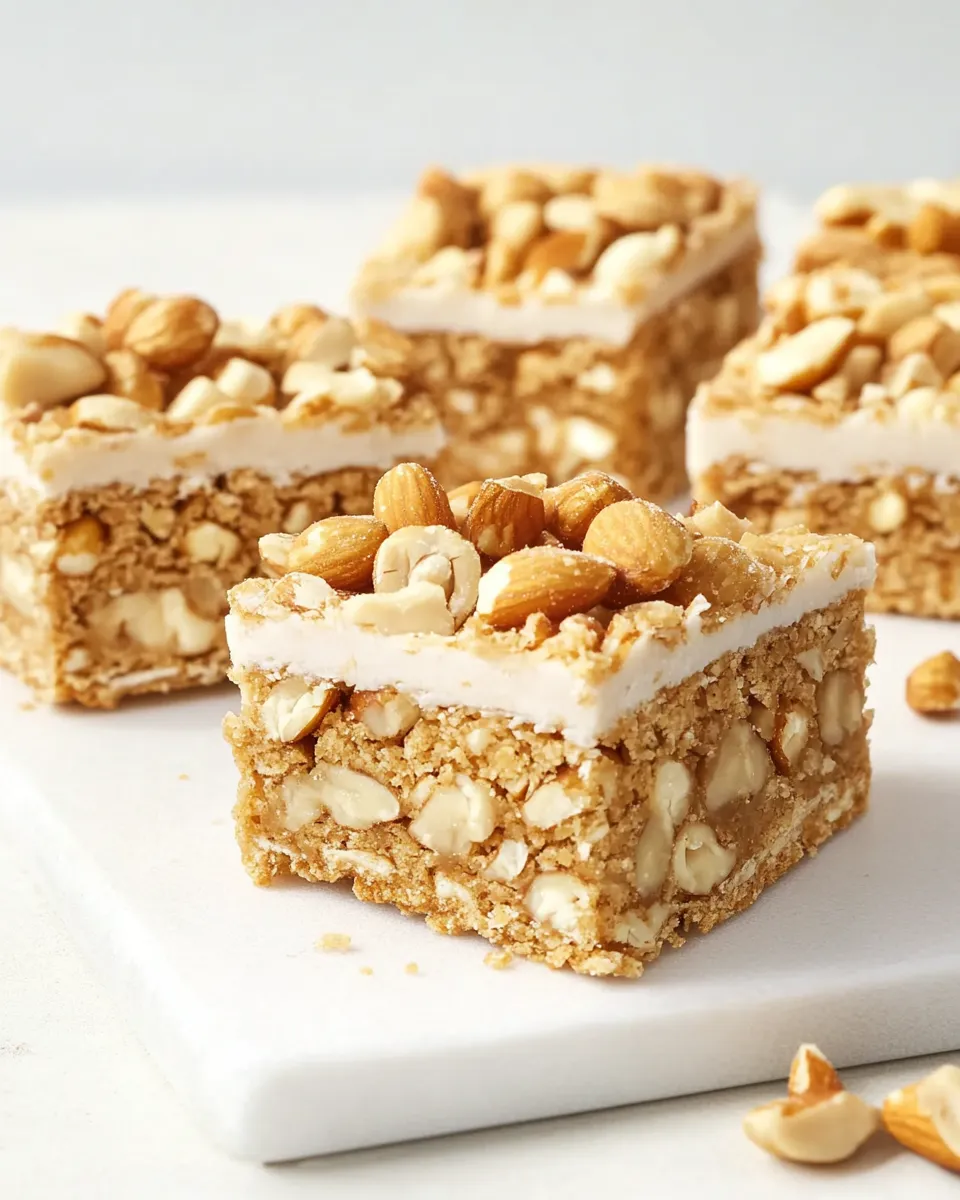
Salted Nut Roll Bars
These Salted Nut Roll Bars capture the nostalgic crunch and gooey middle of a classic candy bar, but in tray-bake form so you can slice and share. They marry a buttery cookie crust, a sticky peanut-butter-chip center, puffy marshmallows, and a crunchy peanut and cereal topping. The result is salty, sweet, and texturally interesting with every bite.
I test recipes obsessively and focus on practical, repeatable tips. Below you’ll find a clear ingredient list, step-by-step instructions taken from the tested method, and sensible troubleshooting and swap ideas so the bars turn out reliably in your kitchen.
Read through the full post if you like, or jump to the Stepwise Method to start. I include small technique notes throughout so you can finish the pan with confidence.
Ingredients
- 16 ounces peanut butter sandwich cookies, Nutter Butters — the base of the crust; finely pulsed they form a sturdy, flavorful crumb.
- ½ cup unsalted butter, melted — binds the cookie crumbs for a sliceable crust; melted butter ensures even coating.
- 2 cups peanut butter chips — provide the peanut-butter-flavored sauce that glues marshmallows and topping together.
- ⅔ cup light corn syrup — keeps the peanut chip mixture smooth and pliable once cooled.
- 4 tablespoons unsalted butter — adds richness to the peanut mixture; keep this separate from the crust butter.
- 1 teaspoon vanilla extract — brightens the peanut mixture; add at the end off the heat so the flavor stays fresh.
- 2 cups miniature marshmallows — melt slightly and puff to create a soft, chewy middle layer.
- 2 cups dry roasted peanuts — give the topping its crunchy, salty character; dry roasted is preferred for texture.
- 2 cups crisp rice cereal, Rice Krispies — adds light, crispy structure to the warm peanut topping so it sets with a pleasant snap.
The Essentials
Before you start: preheat the oven and line your pan. The recipe is designed for a 9×13-inch pan and works best when you follow the order of steps — crust first, then partial peanut spread, marshmallows, and a final peanut-cereal topping. Timing matters, particularly when baking the marshmallows for only a couple of minutes.
Key techniques: pulse the cookies to fine crumbs, press the crust evenly, and work while the topping is warm so it spreads without cooling into lumps. Use a silicone spatula and keep a light spray of non-stick if the topping sticks. Cooling fully before cutting keeps bars tidy.
Stepwise Method: Salted Nut Roll Bars
- Preheat oven to 350°F. Line a 9×13-inch baking pan with parchment paper and lightly spray the parchment with non-stick cooking spray.
- Place the 16 ounces peanut butter sandwich cookies in a food processor and pulse until fine crumbs form.
- Add the ½ cup unsalted butter (melted) to the cookie crumbs and process until the crumbs clump together.
- Press the crumb mixture evenly into the bottom of the prepared 9×13 pan. Bake for 15 minutes or until the crust is golden brown. Remove from oven and leave oven on.
- While the crust bakes, combine 2 cups peanut butter chips, ⅔ cup light corn syrup, 4 tablespoons unsalted butter, and 1 teaspoon vanilla extract in a medium saucepan. Cook over medium-low heat, stirring, until the mixture is smooth, about 5 minutes. Remove from heat.
- Measure and spread ½ cup of the melted peanut mixture evenly over the hot baked crumb base.
- Evenly sprinkle 2 cups miniature marshmallows over the layer from step 6. Return the pan to the oven and bake just until the marshmallows puff up, about 2 minutes. Do not let the marshmallows brown. Remove the pan from the oven.
- To the remaining peanut mixture in the saucepan, add 2 cups dry roasted peanuts and 2 cups crisp rice cereal. Stir until the peanuts and cereal are evenly coated.
- Working while the topping is warm, drop spoonfuls of the peanut/peanut-butter-chip mixture over the marshmallow layer and carefully spread to cover as evenly as possible using a non-stick silicone spatula. If the mixture sticks to the spatula, lightly spray the spatula with non-stick cooking spray and continue spreading.
- Let the bars cool completely in the pan before cutting into bars.
The Upside of Salted Nut Roll Bars
These bars deliver layered texture: a crisp cookie base, a slightly gooey marshmallow middle, and a crunchy, salted top. That contrast is the whole point; it echoes the experience of a Salted Nut Roll candy bar but makes it shareable. They’re also quite forgiving. The crust and topping set firmly, so slight differences in spreading won’t ruin the bake.
Make-ahead friendly? Yes. Once cooled they hold shape well and travel nicely, which makes them great for potlucks or holidays. They also cut into tidy squares when fully cooled, so you can prep a batch the day before an event.
Swap Guide
Need to swap something? I keep swaps minimal because the ingredient list is tight. Here are safe changes without inventing new ingredients:
- Cookie type — You can use other peanut butter sandwich cookies in place of Nutter Butters; the flavor will shift slightly but the crust function remains the same.
- Peanut chips — Avoid subbing a different flavored chip unless you want a different taste profile; their melting behavior is important for the topping texture.
- Rice cereal — Any crisp rice cereal that provides a similar airy crunch works; keep the 2 cups measurement.
Equipment at a Glance
Minimal and common tools make this easy:
- 9×13-inch baking pan — the recipe is sized for this to get the right thickness.
- Food processor — for fine cookie crumbs and even crust texture.
- Medium saucepan — to melt and smooth the peanut-butter-chip mixture.
- Non-stick silicone spatula — for spreading the warm topping without tearing the marshmallow layer.
- Parchment paper and non-stick spray — for clean release and easier cleanup.
Problems & Prevention
Common issues and how to avoid them.
Crust too crumbly
If the crust doesn’t hold when you press it, your cookie crumbs may be too coarse or there wasn’t enough melted butter fully mixed in. Pulse until fine and ensure the ½ cup melted unsalted butter is evenly combined before pressing.
Marshmallows browning
The marshmallow step is short — about 2 minutes. Watch closely. Puffing is the cue; brown edges mean overbaked. Remove promptly and work while the marshmallows are still soft.
Topping won’t spread
The peanut/peanut-butter-chip mixture must be warm to spread easily. If it cools and firms up, gently rewarm it over very low heat just until pliable, then continue. Lightly spraying the spatula prevents sticking and tearing the marshmallow layer.
Customize for Your Needs
Want to tailor these bars for texture or flavor intensity? Here are practical, focused ideas.
- Salt level — The recipe relies on the dry roasted peanuts for salty contrast. If you prefer more salt, sprinkle a few pinches of flaky sea salt over the top right after spreading the warm topping. If you want less, choose lightly salted peanuts.
- Chocolate layer — If you love chocolate, melt a thin layer of chocolate chips separately and drizzle over the cooled bars after they’ve set. This is optional and not part of the base ingredient list, so do this only if you have chocolate on hand.
- Portion size — Cut into smaller squares for bite-size treats or larger bars for a satisfying dessert. Cooling fully is essential for clean cuts.
Method to the Madness
Step timing and pacing matter. Start by preheating, then process the cookies and get the crust in the oven first. While the crust bakes (15 minutes), gather and measure the peanut chips, corn syrup, butter, vanilla, marshmallows, peanuts, and cereal. That overlap keeps you moving smoothly.
When you take the pan out for the half-cup peanut spread, spread it carefully and then add the marshmallows so they only need the quick 2-minute puff. Use that oven time wisely: prep your saucepan mixture and be ready to combine the remaining peanut mixture with the peanuts and cereal right when you remove the pan from the oven. Working quickly while the topping is warm prevents clumping.
Keep It Fresh: Storage Guide
Storage is straightforward. Once the bars are completely cool, cover the pan tightly with plastic wrap or transfer cut bars to an airtight container. They store well at room temperature for 3–4 days. If you need longer, refrigerate in an airtight container for up to a week. Let refrigerated bars come to room temperature for 20–30 minutes before serving so the textures relax.
Freezing is possible but not ideal because marshmallows can change texture. If you must freeze, slice into individual bars, wrap each tightly, and store in a freezer-safe container for up to one month. Thaw overnight in the refrigerator, then sit at room temperature before serving.
Frequently Asked Questions
Q: Can I use a different pan size? A: The recipe is developed for a 9×13-inch pan to achieve the intended thickness and bake time. Using a smaller pan will yield thicker bars and may require longer baking; a larger pan will make them thinner.
Q: My topping sank into the marshmallows. What happened? A: If the peanut/peanut-butter-chip mixture is too fluid or you pressed too hard while spreading, it can compress the marshmallow layer. Drop spoonfuls and gently spread without pressing down; the marshmallows should still be puffy.
Q: Do I have to use light corn syrup? A: The corn syrup helps keep the peanut chip mixture smooth and pliable; using a different syrup can change texture. Stick with light corn syrup for the best, predictable results.
Serve & Enjoy
Cut into bars once completely cooled and serve at room temperature. These are rich, so smaller portions often satisfy. They pair well with coffee or a cold glass of milk. If you’re bringing them to a gathering, put the pan on a tray and place a small knife nearby so guests can slice to their preferred size.
I hope these Salted Nut Roll Bars become a reliable go-to in your repertoire. They’re straightforward, crowd-pleasing, and deliver that perfect mix of sweet, salty, and crunchy. If you make them, let me know how you adapted the topping or if you tried any of the swaps—I’ll always tweak and test with you in mind.
Salted Nut Roll Bars
Ingredients
Equipment
Method
- Preheat oven to 350°F. Line a 9×13-inch baking pan with parchment paper and lightly spray the parchment with non-stick cooking spray.
- Place the 16 ounces peanut butter sandwich cookies in a food processor and pulse until fine crumbs form.
- Add the ½ cup unsalted butter (melted) to the cookie crumbs and process until the crumbs clump together.
- Press the crumb mixture evenly into the bottom of the prepared 9×13 pan. Bake for 15 minutes or until the crust is golden brown. Remove from oven and leave oven on.
- While the crust bakes, combine 2 cups peanut butter chips, ⅔ cup light corn syrup, 4 tablespoons unsalted butter, and 1 teaspoon vanilla extract in a medium saucepan. Cook over medium-low heat, stirring, until the mixture is smooth, about 5 minutes. Remove from heat.
- Measure and spread ½ cup of the melted peanut mixture evenly over the hot baked crumb base.
- Evenly sprinkle 2 cups miniature marshmallows over the layer from step 6. Return the pan to the oven and bake just until the marshmallows puff up, about 2 minutes. Do not let the marshmallows brown. Remove the pan from the oven.
- To the remaining peanut mixture in the saucepan, add 2 cups dry roasted peanuts and 2 cups crisp rice cereal. Stir until the peanuts and cereal are evenly coated.
- Working while the topping is warm, drop spoonfuls of the peanut/peanut-butter-chip mixture over the marshmallow layer and carefully spread to cover as evenly as possible using a non-stick silicone spatula. If the mixture sticks to the spatula, lightly spray the spatula with non-stick cooking spray and continue spreading.
- Let the bars cool completely in the pan before cutting into bars.