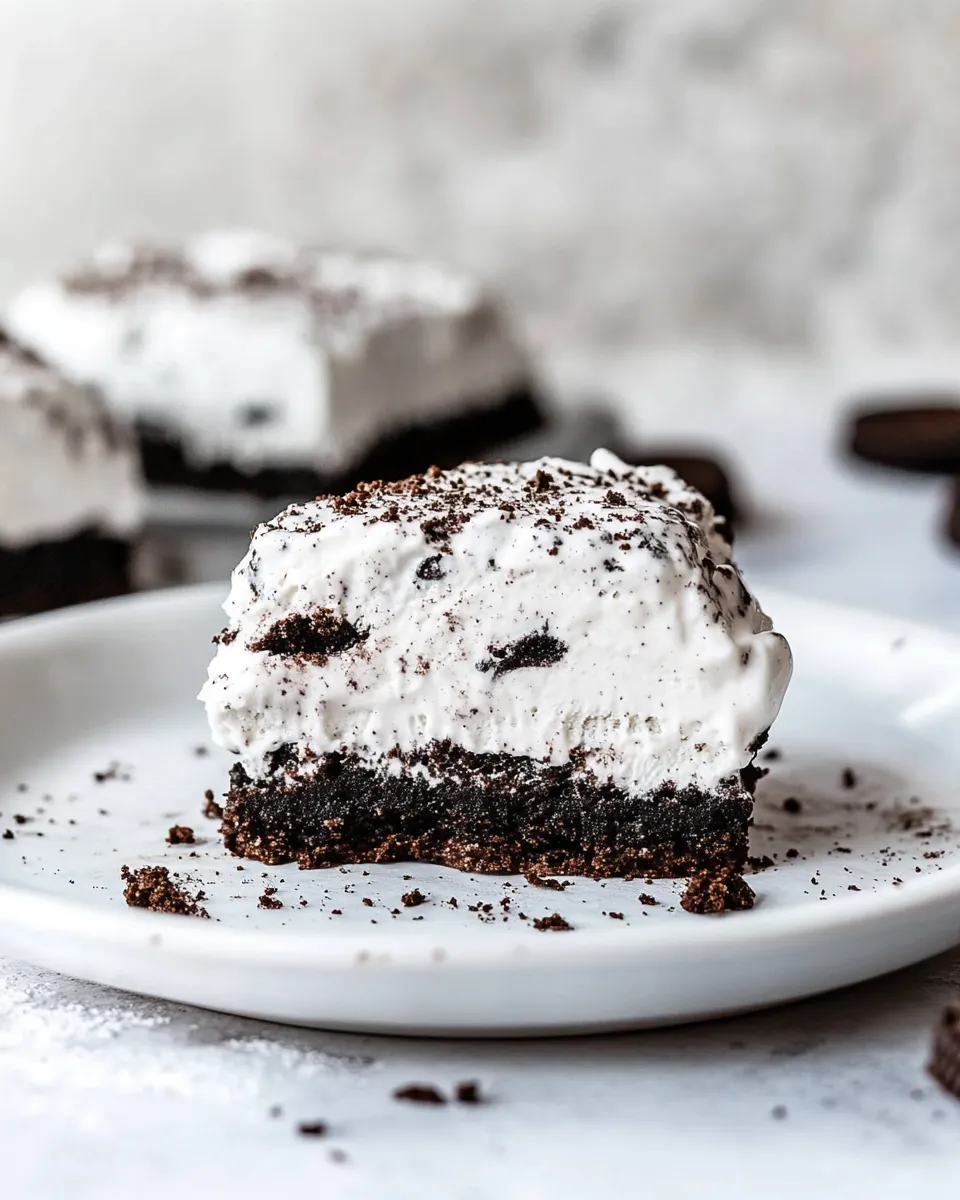
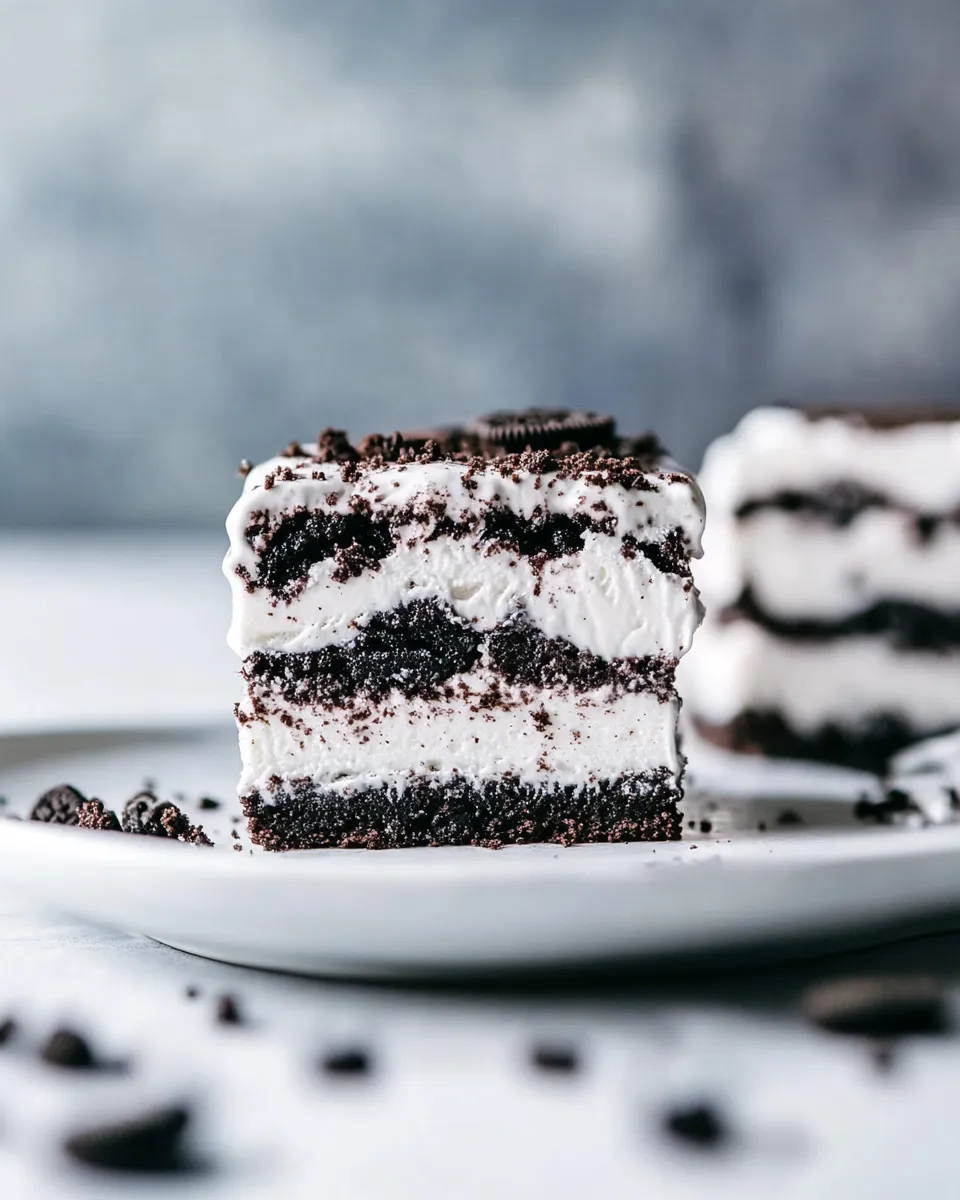
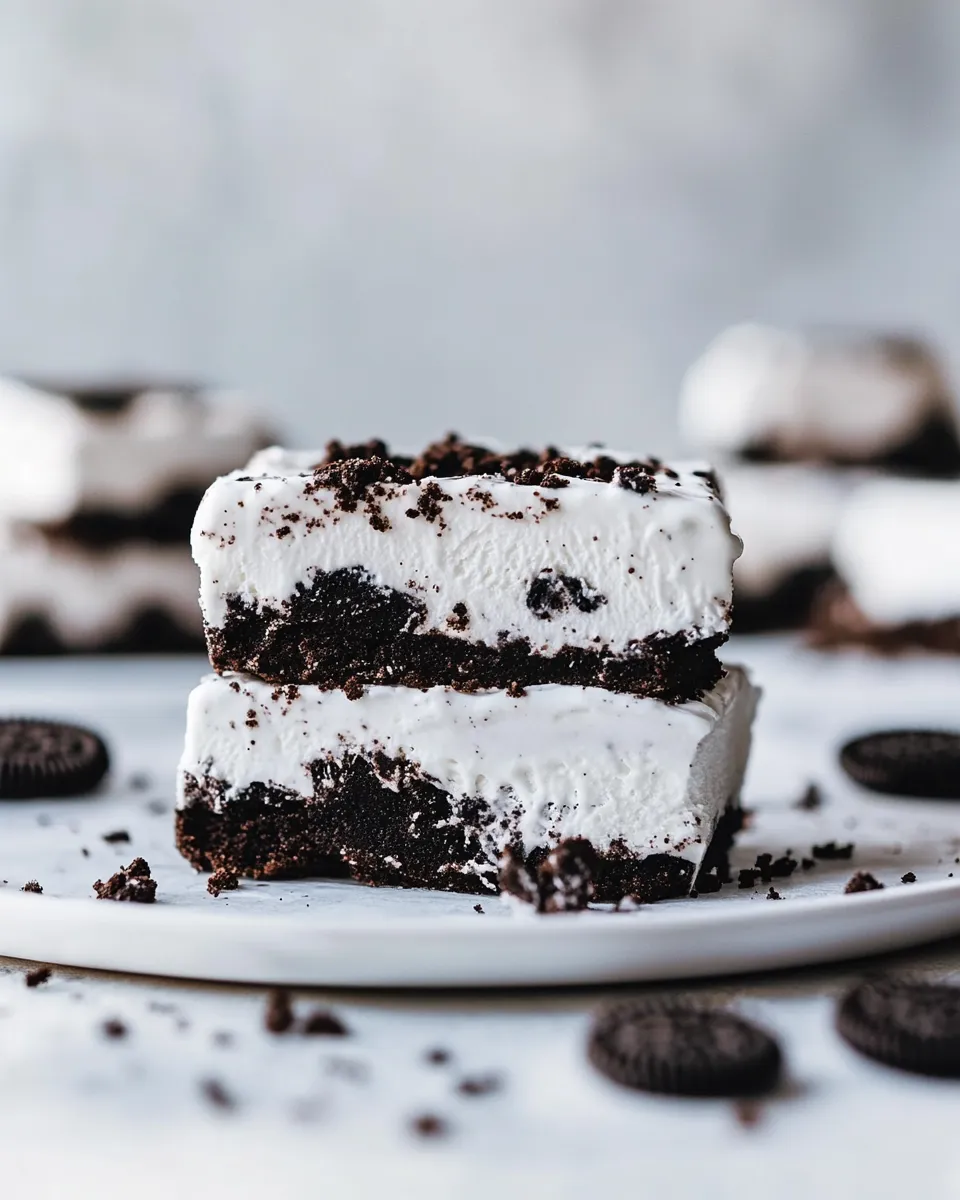
Brownie Oreo Ice Cream Bars
These bars are exactly what they sound like: a fudgy brownie base, a crunchy layer of Oreos, a glossy hot fudge seal, and a thick slab of cookies-and-cream ice cream finished with whipped topping. They look impressive and they travel well straight from the freezer to a party platter. They also come together faster than you might think because the brownie mix and store-bought toppings do a lot of the heavy lifting.
I love this recipe for weekday celebrations and weekend indulgences alike. It’s forgiving, and it scales — make it for a crowd, or halve the tray for a smaller gathering. The structure is simple: bake, top, freeze, slice. If you follow the sequence and timing, the layers come out neat and the bars hold up cleanly for serving.
In the steps below I walk through each stage in plain terms, and I share the gear and troubleshooting tips I use every time. If you bake a little and freeze a lot, these bars will become one of your go-to make-ahead desserts.
What You’ll Need
Ingredients
- 1 (18.4-ounce) package fudge brownie mix — fully prepared according to package directions; this is your fudgy base.
- 27 regular Oreos — divided: reserve 3 whole for garnish and chop the other 24 to press into the brownies.
- 1 (11.75-ounce) container hot fudge topping — warmed and spread to seal the Oreo layer and keep the ice cream from soaking in.
- 1 (48-ounce) container cookies and cream ice cream — softened slightly before spreading so it smooths easily into a uniform layer.
- 1 (8-ounce) container frozen whipped topping — completely thawed and spread over the firm ice cream as a final, creamy crown.
Brownie Oreo Ice Cream Bars in Steps
- Line a 9×13-inch pan with parchment paper, leaving an overhang for easy removal. Preheat the oven according to the fudge brownie mix package directions.
- Prepare the 18.4-ounce fudge brownie mix according to the package directions. Pour the batter into the prepared 9×13-inch pan.
- Bake the brownies according to the package directions but remove them from the oven 3 minutes before the package’s recommended time (slightly underbaked). The brownies should be set but still soft. Let the brownies cool in the pan about 20 minutes.
- While the brownies cool, set aside 3 Oreos. Coarsely chop the remaining 24 Oreos (for example, cut each into 4 pieces).
- Gently press the chopped 24 Oreos in an even layer over the cooled brownie surface.
- Warm the entire 11.75-ounce container of hot fudge topping in the microwave about 30 seconds (microwave times vary). Stir and drizzle dollops of the warm hot fudge over the Oreo layer, then use the back of a spoon to spread the fudge into an even layer.
- Place the pan in the freezer for 10 minutes to set the hot fudge.
- Remove the 48-ounce container of cookies and cream ice cream from the freezer and let it sit at room temperature about 5 minutes to soften slightly.
- Remove the pan from the freezer. Scoop large portions of softened ice cream onto the frozen hot fudge layer and use a spatula to gently press and smooth the ice cream into an even layer.
- Freeze the pan for at least 2 hours (preferably overnight) until the ice cream is firm.
- Spread the completely thawed 8-ounce container of frozen whipped topping evenly over the firm ice cream. If desired, garnish with the 3 reserved Oreos (whole or chopped). Cover the pan and return it to the freezer for 30 minutes to set the topping.
- To cut bars: let the pan sit at room temperature about 5 minutes to soften slightly. Use the parchment overhang to lift the slab from the pan. Wipe a sharp knife dry between slices — warm the knife under hot water, dry it, then cut. Return any leftovers covered to the freezer immediately.
Why I Love This Recipe
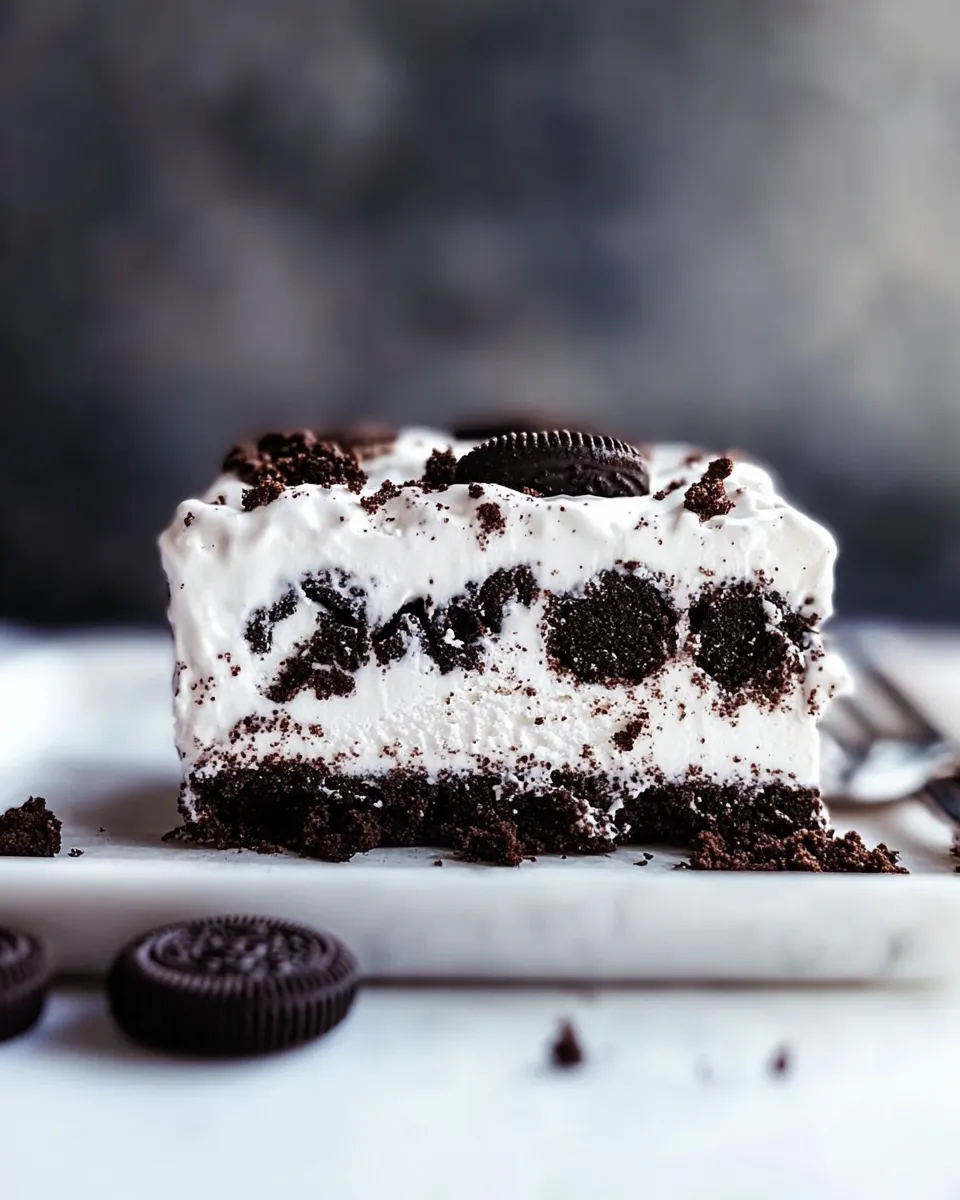
There are three reasons this one gets pulled out again and again: it’s visually striking, it’s straightforward, and it scales. The contrast between the fudgy brownie and the bright, creamy cookies-and-cream layer reads like a bakery treat, but the method relies on short cuts that save time without compromising texture.
It’s also very forgiving. Slightly underbaking the brownies gives you a chewy, dense base that snaps cleanly when frozen. Softening the ice cream only a touch ensures you can spread it without melting it into the brownie. And because you’re assembling and freezing rather than trying to balance temperatures on a single tray, the end result is consistent.
Substitutions by Category
- Brownie mix — swap for your favorite boxed brownie mix of the same size if you prefer a particular brand, or prepare a homemade fudgy brownie batter measured to fill a 9×13 pan if you want to skip the box.
- Oreos — any sandwich cookie will work (same quantity). For a different texture, use chocolate wafer cookies or chopped chocolate chip cookies; keep the total cookie count the same.
- Hot fudge — use caramel sauce for a different flavor profile. Keep the 11.75-ounce container size in mind so the layer is thin and sets quickly.
- Ice cream — stick to a 48-ounce container; swap the flavor but expect different visual and flavor results (mint chip, plain vanilla with cookie mix-ins, or even a swirl).
- Whipped topping — any 8-ounce thawed whipped topping container or stabilized whipped cream works; if you prefer to pipe a decorative top, chilled stabilized whipped cream is a good option.
Cook’s Kit
- 9×13-inch baking pan — essential size for these ratios.
- Parchment paper — for an easy lift and clean cuts.
- Sharp knife — warm and dry between cuts for clean edges.
- Offset spatula or large rubber spatula — for smoothing ice cream and hot fudge.
- Mixing bowl and wooden spoon — to prepare the brownie batter.
- Microwave-safe bowl or the hot fudge container itself — to warm the fudge.
- Freezer space — you’ll need a flat area where your 9×13 pan can rest undisturbed for several hours.
Avoid These Traps
- Don’t overbake the brownies. Remove 3 minutes early as directed. Overbaked brownies become dry and can make the bars crumbly when slicing.
- Don’t let the ice cream get too soft. Leave it only about 5 minutes at room temperature. If it melts, it’ll soak into the brownie and make a soggy slab.
- Don’t skip the parchment overhang. Lifting the slab from the pan makes cutting and serving much easier and avoids scraping sticky edges.
- Don’t rush the freezes. The hot fudge, ice cream, and whipped layers all need time to set. Cutting too early causes uneven layers and messy slices.
- Slice with a warm, dry knife. It sounds minor, but a hot knife and a quick wipe between cuts are the difference between neat bars and torn edges.
Dietary Swaps & Alternatives
- Dairy-free — use a dairy-free brownie mix (if available), dairy-free sandwich cookies, a dairy-free hot fudge alternative, plant-based ice cream in a 48-ounce container, and a dairy-free whipped topping. Expect small texture differences but similar assembly.
- Lower-sugar options — reducing sugar is tricky here because the recipe relies on packaged items. Look for reduced-sugar ice cream and hot fudge, but keep in mind store-bought Oreos and brownie mixes vary in sweetness.
- Gluten-free — use a gluten-free brownie mix and gluten-free sandwich cookies. Make sure the ice cream and whipped topping are labeled gluten-free.
Pro Perspective
Think in layers and temperature control. Each layer needs to be cold enough to hold its shape before the next is added. A quick chill between the hot fudge and ice cream is crucial. I use a timer to avoid the common mistake of guessing when a layer is set.
When smoothing the ice cream, use broad, gentle strokes. Pressing too hard will force melted bits into the brownie. Work quickly but deliberately. For very clean presentation, trim the outer edges of the slab with a warm knife before slicing the middle into bars.
Make-Ahead & Storage
Freezing and Holding
Make these bars up to a week ahead and keep them well covered in the freezer. After the final set (the 30-minute return to the freezer), wrap the slab tightly in plastic wrap and then foil, or transfer individual bars to an airtight container between layers of parchment. Store at 0°F for best texture.
Thawing & Serving
To slice, let the pan sit at room temperature about 5 minutes, then lift out the slab using the parchment overhang. If you need softer bars for faster slicing, let them sit a few minutes longer, but don’t leave them out long enough to soften through. Return leftovers to the freezer immediately.
Handy Q&A
- Can I make these in a smaller pan? You could, but the quantities are calibrated for a 9×13 pan. If you use a smaller pan, the layers will be thicker and the bake/freeze times may change.
- What if my hot fudge doesn’t spread? Warm it a little longer, stir well, and work quickly. It should be pourable but not hot enough to melt the Oreos or brownie.
- How should I transport them? Keep them frozen in a cooler with ice packs. Pack them flat and avoid stacking until they are fully set and firm.
- Can I swap the Oreo flavor? Yes. Chocolate sandwich cookies or flavored Oreos change the taste; just use the same count (27) and divide as directed.
- What’s the best way to get clean slices for serving? Use a long, sharp knife. Run it under hot water, dry it completely, and slice in one smooth motion. Wipe and re-warm between cuts.
Ready to Cook?
If you have the components on hand, this is one of those recipes you can assemble in an afternoon and enjoy over the next week. Follow the steps, respect the chilling windows, and you’ll end up with neat, crowd-pleasing bars that store well. Make a batch, freeze a few, and you’ll always have an impressive dessert ready.
Brownie Oreo Ice Cream Bars
Ingredients
Equipment
Method
- Line a 9×13-inch pan with parchment paper, leaving an overhang for easy removal. Preheat the oven according to the fudge brownie mix package directions.
- Prepare the 18.4-ounce fudge brownie mix according to the package directions. Pour the batter into the prepared 9×13-inch pan.
- Bake the brownies according to the package directions but remove them from the oven 3 minutes before the package’s recommended time (slightly underbaked). The brownies should be set but still soft. Let the brownies cool in the pan about 20 minutes.
- While the brownies cool, set aside 3 Oreos. Coarsely chop the remaining 24 Oreos (for example, cut each into 4 pieces).
- Gently press the chopped 24 Oreos in an even layer over the cooled brownie surface.
- Warm the entire 11.75-ounce container of hot fudge topping in the microwave about 30 seconds (microwave times vary). Stir and drizzle dollops of the warm hot fudge over the Oreo layer, then use the back of a spoon to spread the fudge into an even layer.
- Place the pan in the freezer for 10 minutes to set the hot fudge.
- Remove the 48-ounce container of cookies and cream ice cream from the freezer and let it sit at room temperature about 5 minutes to soften slightly.
- Remove the pan from the freezer. Scoop large portions of softened ice cream onto the frozen hot fudge layer and use a spatula to gently press and smooth the ice cream into an even layer.
- Freeze the pan for at least 2 hours (preferably overnight) until the ice cream is firm.
- Spread the completely thawed 8-ounce container of frozen whipped topping evenly over the firm ice cream. If desired, garnish with the 3 reserved Oreos (whole or chopped). Cover the pan and return it to the freezer for 30 minutes to set the topping.
- To cut bars: let the pan sit at room temperature about 5 minutes to soften slightly. Use the parchment overhang to lift the slab from the pan. Wipe a sharp knife dry between slices — warm the knife under hot water, dry it, then cut. Return any leftovers covered to the freezer immediately.
Notes
Note 1
: Use a brownie mix made for a 9×13 pan (like Betty Crocker Fudge Brownies).
Storage
: You can store leftovers in the freezer in an airtight container for up to 2 months.