Chicken Satay
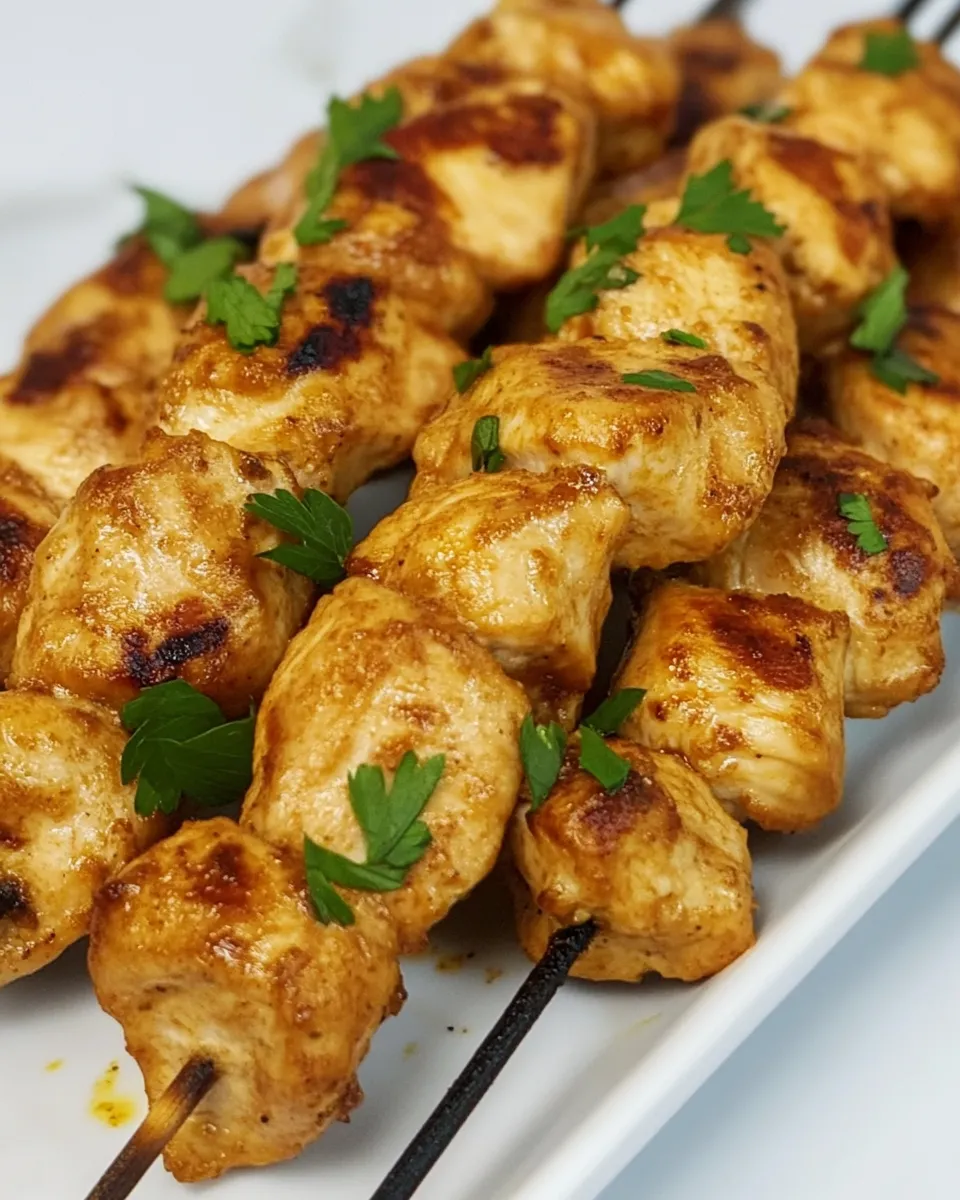
If you’re looking to spice up your dinner table with an exotic feast, look no further than Chicken Satay! This delightful dish, marinated to perfection and served with a rich, creamy peanut sauce, is a surefire way to impress family and friends. It brings together succulent pieces of chicken grilled to perfection, offering both flavor and tenderness in every bite. Prepare to embark on a culinary adventure that will transport you straight to the streets of Southeast Asia!
Why This Recipe Is a Must-Try

Chicken Satay is not just delicious; it’s a favorite for many reasons. Firstly, the combination of flavors from the marinade and the satay sauce is truly divine. The savory notes from soy sauce, the sweetness from chili sauce and brown sugar, and the creamy texture of peanut butter come together beautifully. Moreover, grilling the chicken adds a smoky depth that elevates this dish to restaurant-quality right in your home!
Additionally, this recipe is straightforward and adaptable. Whether you’re hosting a lively party or looking for a family-friendly meal, Chicken Satay can satisfy everyone’s taste buds. Plus, it’s a fantastic dish to prepare ahead of time, making it perfect for busy weeknights or gatherings.
Ingredients
To create this mouthwatering Chicken Satay, you’ll need the following ingredients:
- 1 pound boneless, skinless chicken breasts, cut into strips
- 1 cup creamy peanut butter
- ¼ cup soy sauce
- 2 tablespoons sweet chili sauce
- 1 tablespoon brown sugar
- ½ cup hot water
- Skewers (preferably wooden, soaked in water for 30 minutes)
Make sure to gather all the ingredients before you start, ensuring a smooth cooking experience!
How To Make Chicken Satay

Step 1: Marinate the Chicken
In a large bowl, combine the soy sauce, sweet chili sauce, and brown sugar. Mix until the sugar is dissolved. Add the chicken strips to the marinade, ensuring they are well-coated. Cover the bowl with plastic wrap and let the chicken marinate in the refrigerator for at least 30 minutes, or up to 2 hours for deeper flavor.
Step 2: Prepare the Peanut Sauce
In another bowl, prepare the creamy peanut sauce. Whisk together the creamy peanut butter and hot water until smooth. If you want a slightly thinner consistency, feel free to add more hot water, 1 tablespoon at a time until you reach your desired texture.
Step 3: Preheat the Grill
Preheat your grill or grill pan over medium heat. If you’re using a wooden skewers, ensure they are soaked in water to prevent burning. This will help the chicken stick to the skewers without risk during grilling.
Step 4: Assemble the Skewers
Once the chicken has marinated, thread the chicken strips onto the soaked skewers. You can fit about 4-5 pieces on each skewer, depending on their size.
Step 5: Grill the Chicken
Place the skewers on the preheated grill. Grill for about 5-7 minutes per side, or until the chicken is cooked through and has nice grill marks. Keep an eye on them to prevent burning. The internal temperature should reach 165°F for safe consumption.
Step 6: Serve and Enjoy!
Remove the skewers from the grill and place them on a serving platter. Drizzle the creamy peanut sauce over the chicken or serve it on the side for dipping. Garnish with chopped peanuts and fresh cilantro for an extra pop of flavor!
Expert Tips
- For extra flavor, consider adding minced garlic or ginger to the marinade.
- If you prefer a spicy kick, mix in some red pepper flakes or sriracha into the peanut sauce.
- Let the chicken marinate longer if your schedule allows; this will intensify the flavors.
- To ensure even cooking, cut the chicken into uniform strips.
Variations and Customizations

- For a vegetarian option, substitute the chicken with firm tofu, ensuring it’s pressed and cut into strips.
- You can mix and match vegetables such as bell peppers, zucchini, or mushrooms on the skewers for added nutrition and color.
- Experiment with different nut butters like almond or cashew for a unique twist on the sauce.
- For added crunch, top with chopped scallions and crushed peanuts before serving.
How to Store Leftovers
If you have any leftovers, store them in an airtight container in the refrigerator. Chicken Satay is best enjoyed within 2-3 days. When reheating, do so gently to prevent the chicken from drying out. You can warm it in a microwave or on a skillet until heated through. The peanut sauce can also be stored separately and will keep well for about a week.
FAQ
Can I use chicken thighs instead of breasts for satay?
Absolutely! Chicken thighs are typically juicier and more flavorful than breasts, making them an excellent choice for this dish. Just adjust the cooking time slightly, as thighs may take a bit longer to cook through.
What can I serve with Chicken Satay?
Chicken Satay pairs beautifully with jasmine rice, a fresh cucumber salad, or coconut rice. You can also serve it as an appetizer at parties alongside other finger foods.
Can I make the peanut sauce ahead of time?
Yes! The peanut sauce can be made in advance and stored in the refrigerator for up to a week. Just give it a good stir before serving, as it may thicken upon sitting.
Is there a gluten-free option for soy sauce?
Yes! You can easily substitute regular soy sauce with gluten-free tamari sauce, which offers a similar flavor without gluten. Just ensure all other ingredients are also gluten-free if necessary.
Conclusion
In conclusion, Chicken Satay is not only a delightful dish bursting with flavor, but it also offers versatility that fits any occasion, be it a family dinner or a special gathering. With the simple yet robust ingredients included in this recipe, you can create a stunning meal that will tantalize taste buds and create lasting memories. Embrace this culinary journey, and enjoy every grilled bite of your delicious Chicken Satay! Happy cooking!

Chicken Satay
Equipment
- Grill
- Mixing Bowl
- Skewers
Ingredients
Chicken
- 1 pound boneless, skinless chicken breasts, cut into strips
Sauce
- 1 cup creamy peanut butter
- ¼ cup soy sauce
- 2 tablespoons sweet chili sauce
- 1 tablespoon brown sugar
- ½ cup hot water
- as needed skewers (preferably wooden, soaked in water for 30 minutes)
Instructions
- Step 1: In a large bowl, combine the soy sauce, sweet chili sauce, and brown sugar. Mix until the sugar is dissolved. Add the chicken strips to the marinade, ensuring they are well-coated. Cover the bowl with plastic wrap and let the chicken marinate in the refrigerator for at least 30 minutes, or up to 2 hours for deeper flavor.
- Step 2: In another bowl, prepare the creamy peanut sauce. Whisk together the creamy peanut butter and hot water until smooth. If you want a slightly thinner consistency, feel free to add more hot water, 1 tablespoon at a time until you reach your desired texture.
- Step 3: Preheat your grill or grill pan over medium heat. If you’re using wooden skewers, ensure they are soaked in water to prevent burning.
- Step 4: Once the chicken has marinated, thread the chicken strips onto the soaked skewers. You can fit about 4-5 pieces on each skewer, depending on their size.
- Step 5: Place the skewers on the preheated grill. Grill for about 5-7 minutes per side, or until the chicken is cooked through and has nice grill marks. The internal temperature should reach 165°F for safe consumption.
- Step 6: Remove the skewers from the grill and place them on a serving platter. Drizzle the creamy peanut sauce over the chicken or serve it on the side for dipping. Garnish with chopped peanuts and fresh cilantro for an extra pop of flavor!

