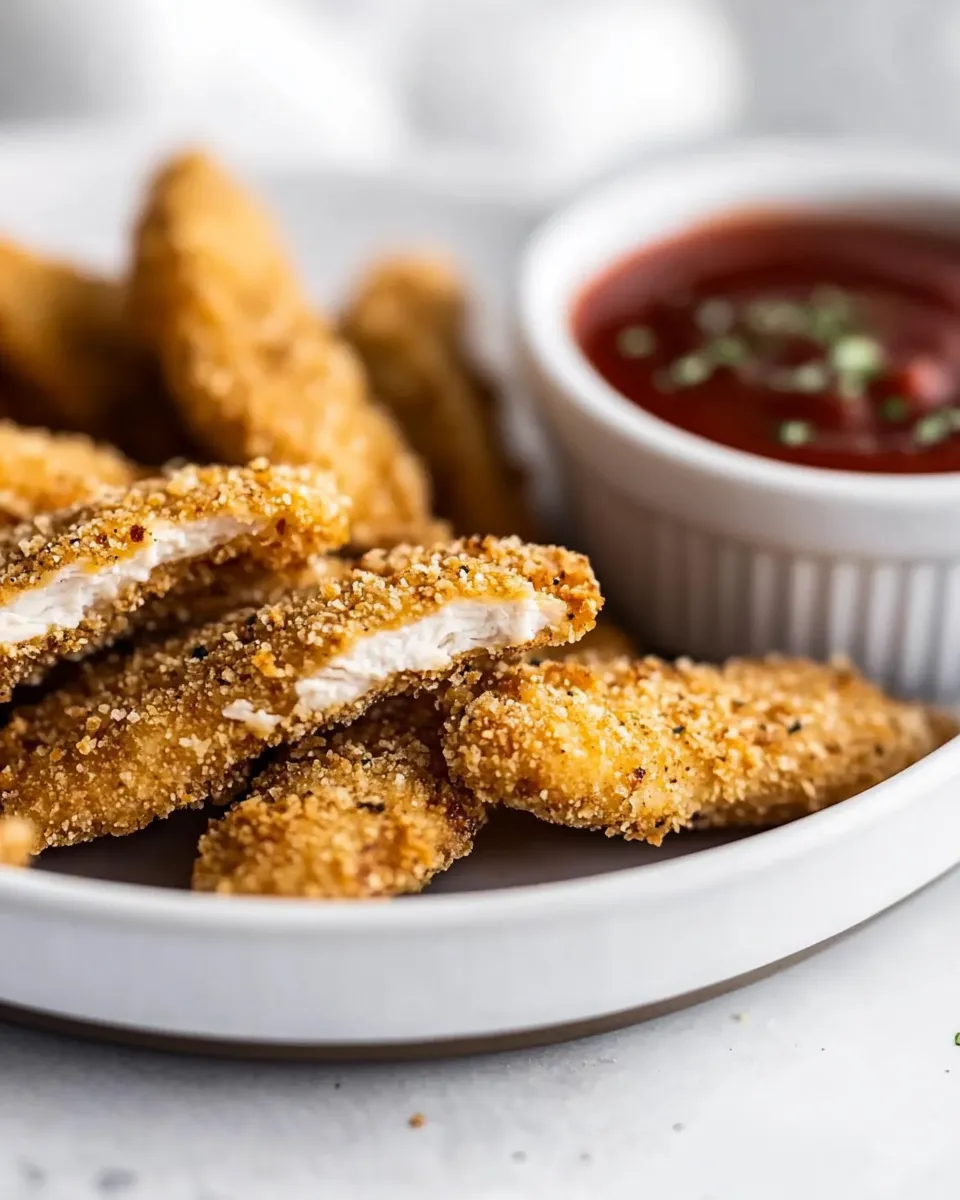
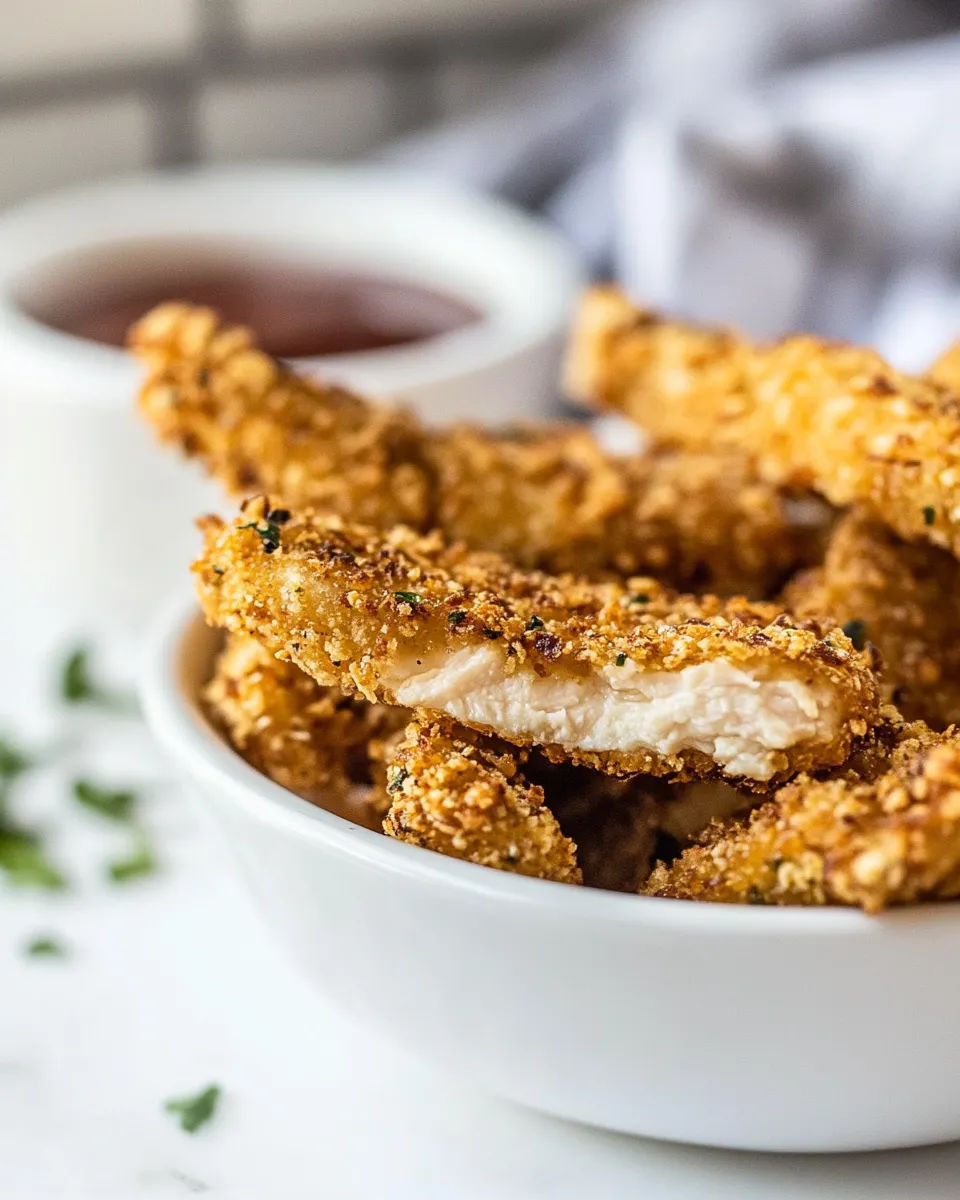
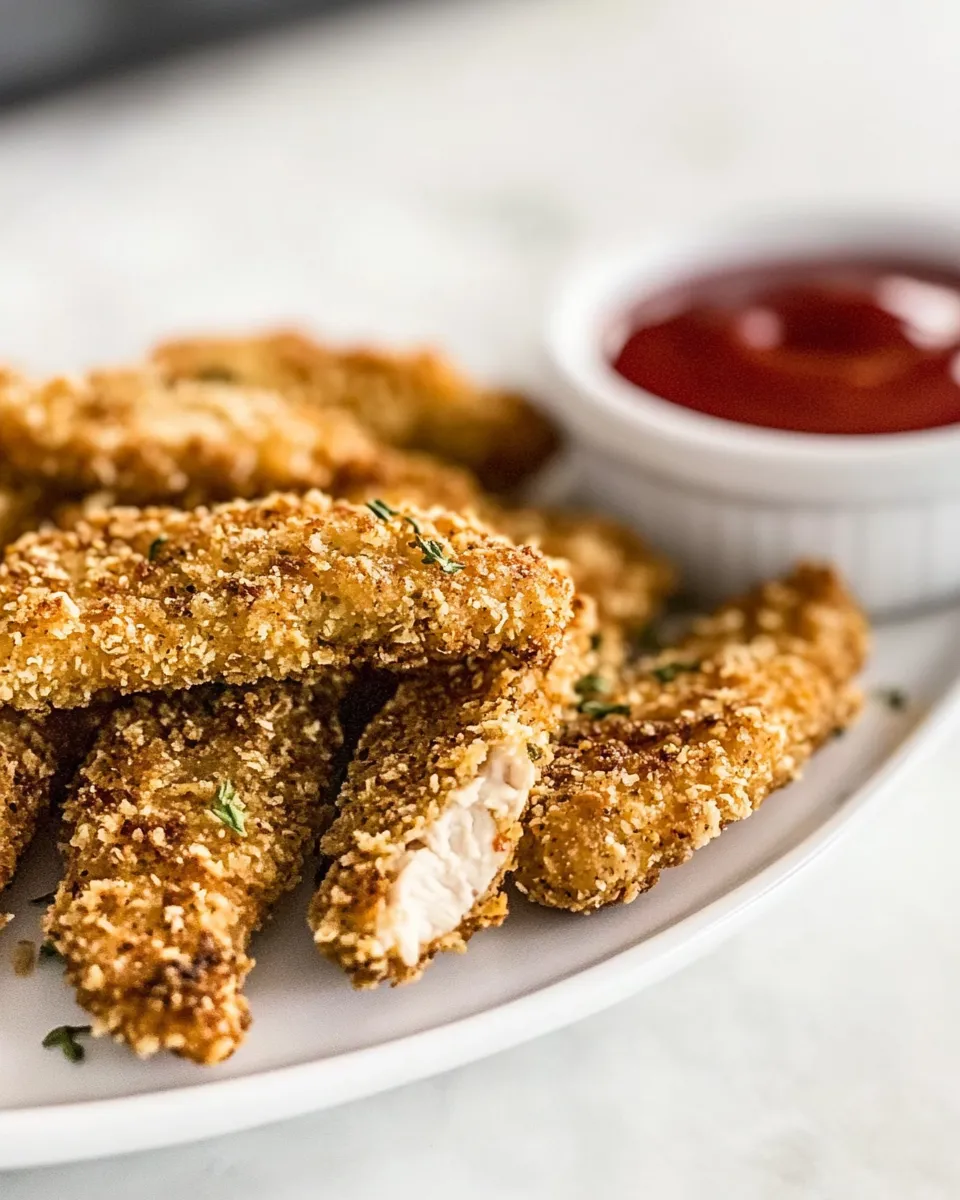
Chicken Tenders
These chicken tenders are the kind of weeknight win I fall back on again and again. Crisp breadcrumb exterior, juicy interior, and a straightforward bake that doesn’t demand frying or technical skill. I keep the seasoning simple on purpose — it makes the tenders universally appealing and quick to riff on when I want to change the mood.
There are a few small habits that make the difference: drying the chicken, an even dredge in egg and crumbs, and a light spray of oil so the coating browns in the oven. Those three things take a standard breadcrumb-coated tender from mediocre to reliably golden, without extra fuss.
Below you’ll find the exact ingredient list and the step-by-step method I use every time, followed by swaps, tools, troubleshooting and serving ideas. No fluff — just clear, practical guidance so you get crisp, juicy Chicken Tenders the first time.
What Goes Into Chicken Tenders
This recipe relies on a short list of pantry-friendly items and one simple technique: wet (egg) then dry (breadcrumbs + panko). The panko brings the crunch, the seasoned breadcrumbs give flavor, and the olive oil spray helps the crust crisp and brown in the oven. Salt the meat right after patting it dry so it seasons through.
Ingredients
- 12 chicken tenderloins, 1 ¼ lbs total — the base of the recipe; choose similar-sized tenders for even cooking.
- 1 large egg, beaten — binds the crumbs to the chicken and helps the coating set.
- 1 teaspoon kosher salt — seasons the meat; sprinkle evenly after drying the tenders.
- ½ cup seasoned breadcrumbs, I like 4C, or use gluten-free breadcrumbs — gives flavor and body to the crust; use the gluten-free option if needed.
- ½ cup seasoned panko crumbs, or gluten-free crumbs — provides flaky, airy crunch that panko is known for.
- olive oil spray — a light coating of oil on the outside encourages browning without deep frying.
- ketchup or BBQ sauce, optional for dipping — classic dip options; serve on the side so people can choose.
Chicken Tenders in Steps
- Preheat oven to 425°F (218°C). Line a sheet pan with parchment or foil if desired, then lightly spray the lined pan with olive oil spray.
- Pat the 12 chicken tenderloins dry with paper towels. Evenly sprinkle the 1 teaspoon kosher salt over the chicken.
- Place the beaten large egg in a shallow bowl. In a second shallow bowl, combine the ½ cup seasoned breadcrumbs and ½ cup seasoned panko crumbs.
- Working one tender at a time, dip a chicken tender into the beaten egg, then press it into the breadcrumb mixture so crumbs adhere; shake off any excess.
- Arrange the breaded tenders in a single layer on the prepared sheet pan, leaving a little space between each.
- Spray the top of each tender with olive oil spray, then carefully turn each tender over and spray the other side.
- Bake on the middle oven rack for 18 minutes, flipping the tenders once halfway through baking (about at 9 minutes), until cooked through and internal temperature reaches 165°F (or juices run clear).
- Let the tenders rest for 2–3 minutes, then serve with ketchup or BBQ sauce if desired.
What Makes This Recipe Special
It’s the balance between simplicity and outcome. The technique is intentionally low-tech — no breading station with flour and multiple bowls is required — but each step targets texture and moisture. Patting the tenders dry removes surface water that would otherwise steam the crust; the beaten egg is just enough to glue the crumbs; the panko keeps the exterior flaky and light.
Another strength is versatility. Because the seasoning comes from packaged seasoned crumbs, the tenders are a great blank canvas: switch dips, pair with sides in different cuisines, or change the breadcrumb blend. Yet the core method delivers consistent results, every time.
Dairy-Free/Gluten-Free Swaps

Dairy-free: This recipe as written is dairy-free. The coating and method don’t require milk or butter, and olive oil spray replaces any butter you might be tempted to use for browning.
Gluten-free: The ingredient list already notes alternatives. Use ½ cup gluten-free seasoned breadcrumbs and ½ cup gluten-free panko crumbs in place of the regular breadcrumbs and panko. Check labels for cross-contamination if you’re cooking for someone with celiac disease.
Essential Tools for Success
- Baking sheet or sheet pan — choose one with some rim so crumbs don’t fall onto the oven floor.
- Parchment paper or foil — makes cleanup quick and prevents sticking.
- Olive oil spray — a light, even spray is easier to control than pouring oil; it promotes crisping.
- Shallow bowls (2) — one for the beaten egg and one for the breadcrumb mixture; they keep the work compact and tidy.
- Instant-read thermometer — confirm the internal temperature hits 165°F so you avoid under- or over-cooking.
- Paper towels — for patting the chicken dry and catching excess moisture.
Mistakes That Ruin Chicken Tenders
- Not drying the chicken — surface moisture prevents crumbs from adhering properly and can cause soggy spots.
- Skipping the salt step — if you don’t season the meat, the tenders taste flat even if the crust is crisp.
- Overcrowding the pan — when tenders touch, steam builds and the crust won’t crisp evenly. Give them a little breathing room.
- Spraying oil only on one side — the side without oil won’t brown as well; spray both sides lightly.
- Skipping the flip — without turning once, one side can brown much faster and the interior might cook unevenly.
- Rushing the internal temp check — pulling tenders too early leaves pink center and undercooked meat; wait until 165°F.
In-Season Flavor Ideas
Because the base recipe is straightforward, seasonal pairings are an easy way to change the plate without altering technique. In spring and summer, serve with a bright herb slaw or a lemony yogurt-based dip. In fall and winter, pair with roasted root vegetables and a smoky BBQ sauce. A simple green salad with vinaigrette refreshes the palate in any season.
If you want to change flavor profiles, adjust your dipping sauces and side dishes before changing the coating. For example, a sweet chili or Thai-style dipping sauce leans Asian; honey mustard or a tangy BBQ plays Southern. The tenders themselves remain the same — the accompaniments do the heavy lifting.
Testing Timeline
Here’s a compact timeline you can follow so the whole process feels organized and efficient:
- 0–5 minutes: Preheat oven to 425°F (218°C). Line sheet pan and have olive oil spray ready.
- 5–10 minutes: Pat 12 chicken tenderloins dry and evenly sprinkle 1 teaspoon kosher salt. Set up two shallow bowls: 1 beaten large egg, 1 bowl with combined ½ cup seasoned breadcrumbs + ½ cup seasoned panko crumbs.
- 10–20 minutes: Bread all tenders, arranging them on the sheet pan. Spray tops and bottoms lightly with olive oil spray.
- 20–38 minutes: Bake on the middle rack for 18 minutes total, flipping once at about 9 minutes. Target internal temp is 165°F.
- 38–41 minutes: Rest for 2–3 minutes before serving; this short rest lets juices redistribute and keeps tenders moist.
Prep Ahead & Store
Short-term prep: You can bread the tenders and keep them on a tray, covered, in the refrigerator for up to a few hours before baking. If you refrigerate the breaded pieces, give the coating a minute to come back to near room temperature before baking; baking straight from very cold can slightly change the cooking time.
Leftovers: Store cooked tenders in an airtight container in the fridge for up to 3 days. Reheat in a 350°F oven on a sheet pan for 8–10 minutes to regain crispness; a quick 1–2 minute blast under the broiler can help finish the job, but watch closely.
Freezing: You can freeze cooked tenders on a baking sheet until solid and then bag them for longer storage. Reheat from frozen at 375°F until warmed through, checking that the internal temperature reaches 165°F. If you’re freezing uncooked breaded tenders, flash-freeze them on a tray first so they don’t stick together, then store in a sealed bag; bake from frozen, adding a few minutes to the cook time.
Handy Q&A
How do I know when they’re done?
Use an instant-read thermometer in the thickest part of a tender; it should register 165°F. If you don’t have a thermometer, cut into the thickest piece — juices should run clear, and there should be no visible pink in the center.
Can I use more than one egg or a flour step?
The recipe calls for 1 large beaten egg and that’s sufficient for 12 tenderloins when you work efficiently. Adding a flour step or increasing egg quantity isn’t necessary here and only adds cleanup. If you prefer a thicker crust, you can experiment, but follow the same baking time as a starting point and check internal temperature.
Why spray both sides with oil?
Light oil on both sides ensures even browning. The spray helps the crumbs develop color and gives a fried-like texture without submerging the tenders in oil.
What if my breadcrumb mixture looks too dry or too wet?
The specified ratio of ½ cup seasoned breadcrumbs to ½ cup seasoned panko should be balanced. If crumbs clump into a paste against the meat, they’re too wet — shake off excess egg before pressing crumbs on. If crumbs don’t stick, the egg may be too thin; make sure it’s beaten well and coat each tender thoroughly.
Bring It Home
These Chicken Tenders are designed to be dependable, quick, and adaptable. Follow the simple steps: dry the meat, salt, egg, crumbs, light oil spray, then bake. The payoff is a crunchy, juicy result that pleases kids and adults alike and works with a range of sauces and sides.
Make them for a no-fuss weeknight dinner, stash extras for lunchboxes, or use the method as a base to experiment with different crumb blends and dipping sauces. Once you’ve mastered these basics, you’ll have a fast ticket to a familiar, comforting plate that cooks up in under an hour from start to finish.
Chicken Tenders
Ingredients
Equipment
Method
- Preheat oven to 425°F (218°C). Line a sheet pan with parchment or foil if desired, then lightly spray the lined pan with olive oil spray.
- Pat the 12 chicken tenderloins dry with paper towels. Evenly sprinkle the 1 teaspoon kosher salt over the chicken.
- Place the beaten large egg in a shallow bowl. In a second shallow bowl, combine the ½ cup seasoned breadcrumbs and ½ cup seasoned panko crumbs.
- Working one tender at a time, dip a chicken tender into the beaten egg, then press it into the breadcrumb mixture so crumbs adhere; shake off any excess.
- Arrange the breaded tenders in a single layer on the prepared sheet pan, leaving a little space between each.
- Spray the top of each tender with olive oil spray, then carefully turn each tender over and spray the other side.
- Bake on the middle oven rack for 18 minutes, flipping the tenders once halfway through baking (about at 9 minutes), until cooked through and internal temperature reaches 165°F (or juices run clear).
- Let the tenders rest for 2–3 minutes, then serve with ketchup or BBQ sauce if desired.
Notes
5 tbsp of the breadcrumb mixture gets tossed after coating and has been subtracted from the nutrition info.