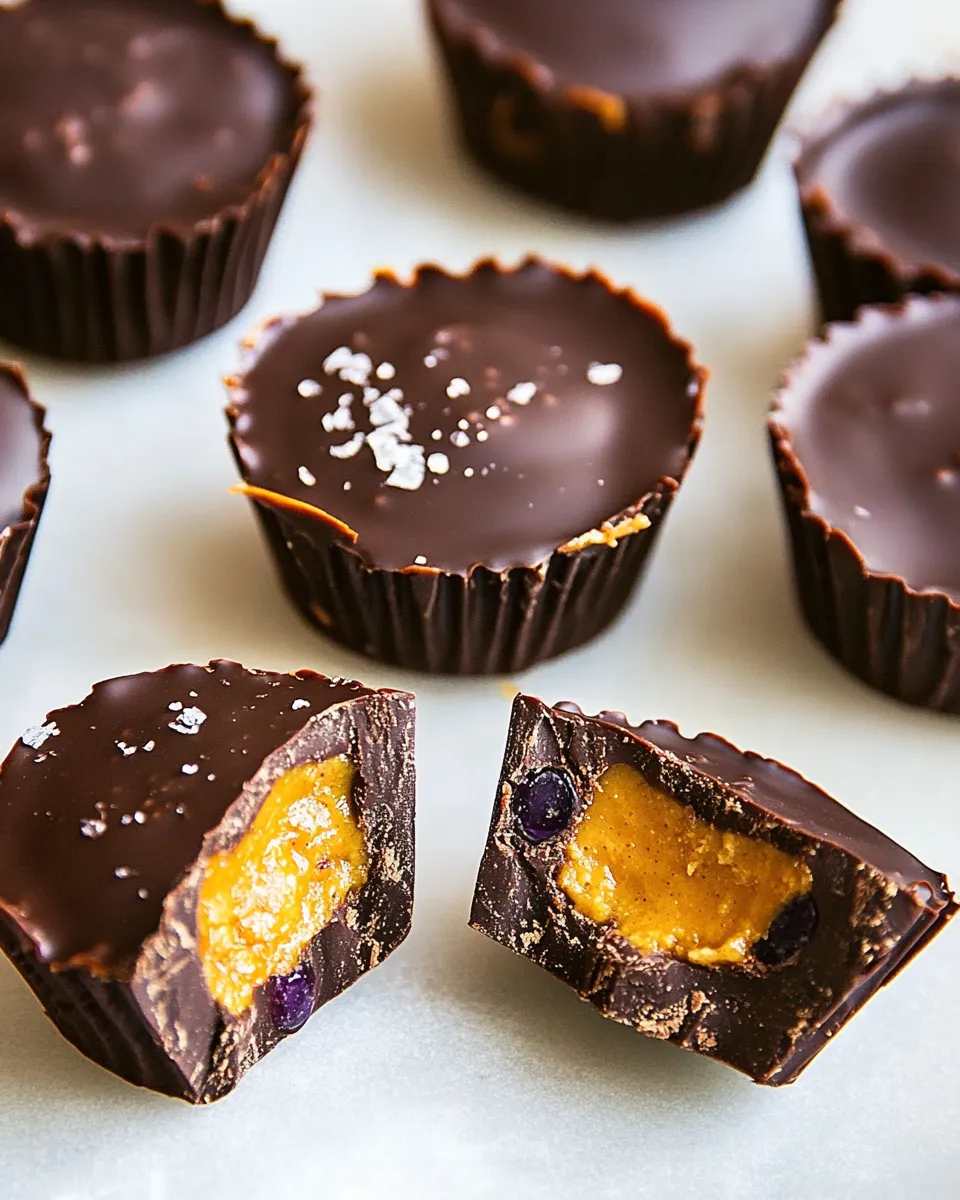
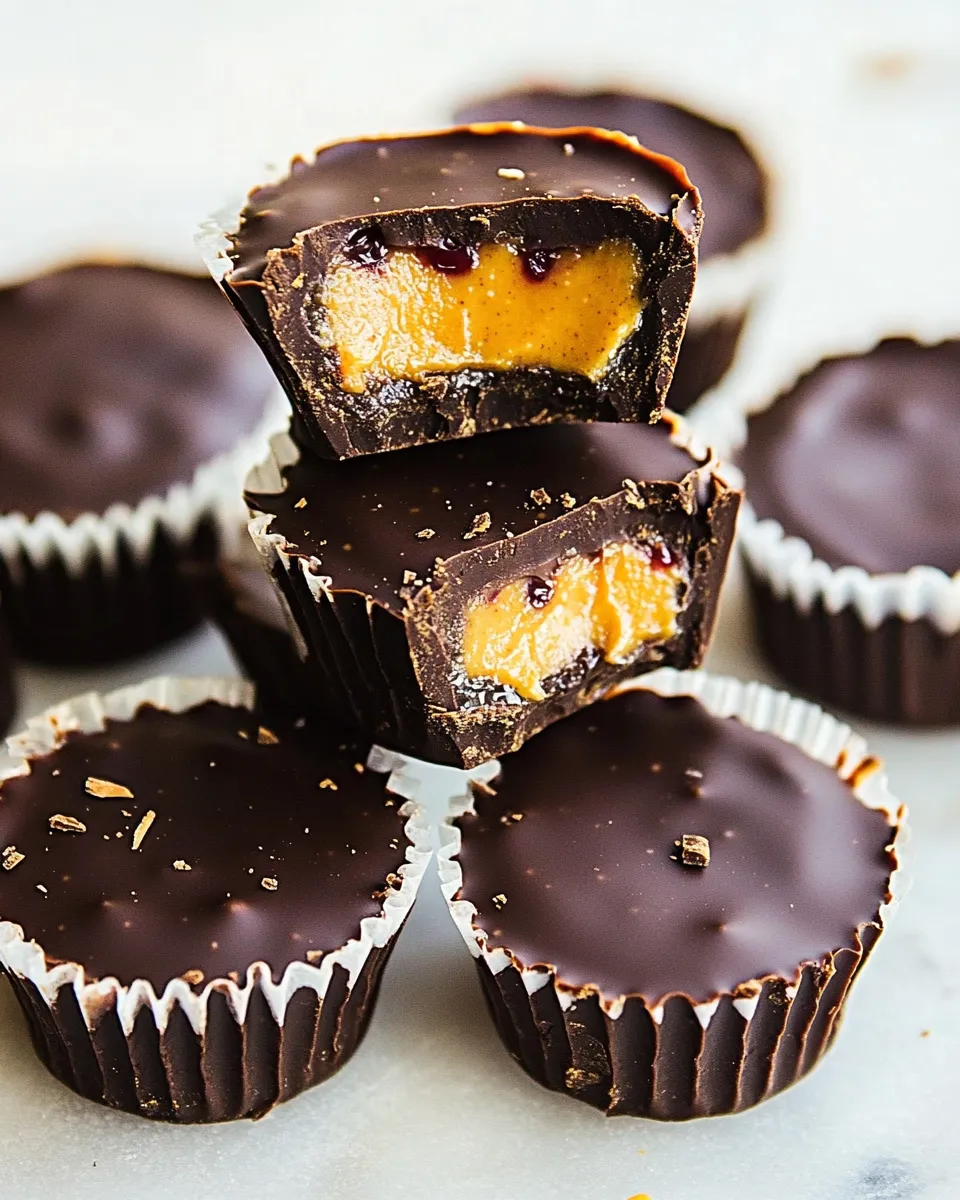
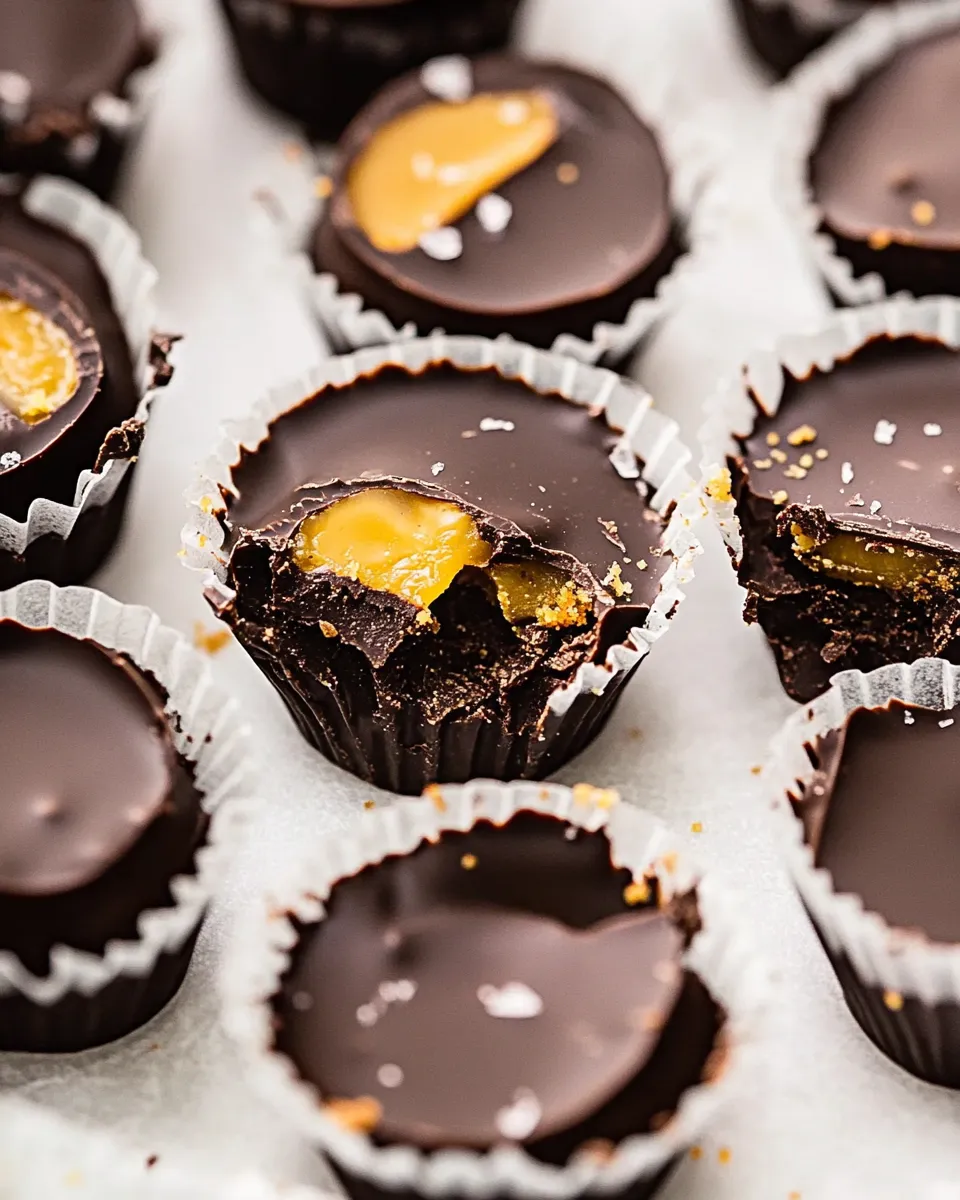
Chocolate Peanut Butter and Jelly Cups
Small, nostalgic, and strikingly simple to make — these chocolate peanut butter and jelly cups are the kind of sweet that feels like a tiny celebration. They’re the grown-up version of a PB&J: deep dark chocolate shells, a dollop of smooth peanut butter, and a bright hit of jam, all sealed and chilled so you can snack with no mess and every bite counts.
I love these when I need something quick to assemble that still feels thoughtful. You can make a whole tray in under 30 minutes if you plan ahead and use the freezer to speed things up. The steps are straightforward, and the results are forgiving.
Below I give the ingredient breakdown, the exact step-by-step directions, troubleshooting tips, and simple swaps to suit diets or preferences. Keep the recipe handy — these cups disappear fast, and you’ll find yourself making them again and again.
What Goes In
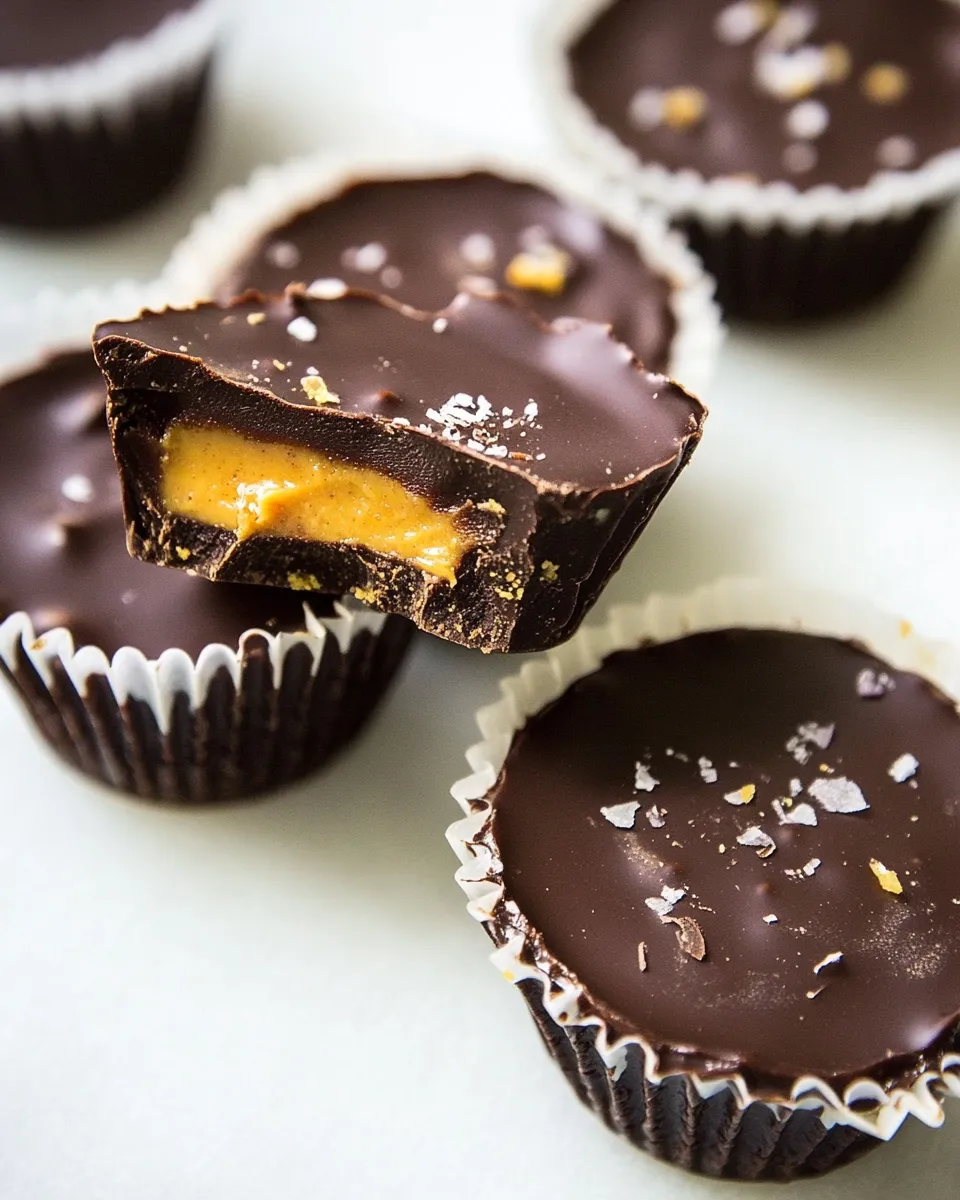
There are only a few components here, and each one pulls its weight. The chocolate forms the shell and the seal, the peanut butter gives body and creaminess, and the jam adds the bright, fruity contrast. A tiny pinch of flaky salt at the end is optional but excellent for balancing sweetness.
Ingredients
- 8oz dark chocolate — creates the shells and the top seal; use a chocolate bar or chips that melt smoothly.
- ¼ cup smooth peanut butter — provides the creamy center; smooth keeps the texture uniform so the cups set neatly.
- ¼ cup jelly or jam of choice — adds a bright, fruity counterpoint; choose a flavor you love since it shines in a small amount.
- Flaked or coarse salt, optional — a light sprinkle enhances depth and cuts sweetness; add only a tiny pinch per cup.
Chocolate Peanut Butter and Jelly Cups in Steps
- Line a 24-cup mini muffin tin with 24 mini muffin liners and set the tray aside with room in the freezer for later.
- If using a chocolate bar, break or chop the 8 oz dark chocolate into small pieces so it melts evenly.
- Melt the chocolate either by microwave or double boiler:
- Microwave: heat in a microwave-safe bowl in 30-second intervals, stirring between each interval, until just melted and smooth.
- Double boiler: place the chocolate in a heatproof bowl set over (but not touching) simmering water in a saucepan. Stir occasionally until melted, then remove the bowl from the heat.
- Spoon or drizzle some melted chocolate into each liner and rotate the tin or use the back of the spoon to spread the chocolate up the sides of each liner, forming a chocolate shell. Reserve the remaining melted chocolate in the bowl.
- Transfer the tray to the freezer until the chocolate shells are set and no longer tacky, about 5 minutes.
- Divide the 1/4 cup smooth peanut butter evenly among the 24 set shells, placing the peanut butter in the center of each shell. Then divide the 1/4 cup jelly or jam evenly and add it on top of the peanut butter in each cup.
- Spoon the remaining melted chocolate over each filled cup to fully cover the peanut butter and jelly and seal each cup. If the chocolate has begun to harden, briefly rewarm it until pourable before topping.
- Sprinkle a small pinch of flaked or coarse salt on each cup if desired.
- Return the tray to the freezer until the tops are firm, about 5–10 minutes. Remove the cups from their liners and enjoy immediately, or store chilled.
Why You’ll Keep Making It
These cups hit several sweet spots at once: they’re fast, portable, and crowd-pleasing. The assembly is mostly spoon-and-seal work. No tempering, no precision piping, no baking. That makes them a reliable last-minute treat for after-school snacks, picnic add-ons, or party platters.
Flavor-wise, the contrast sells it. Dark chocolate brings bitterness and structure. Peanut butter brings fat and cream. Jam brings acidity and sweetness. Combined, they read familiar and special. The texture contrast — crisp chocolate giving way to soft peanut butter and jam — keeps every bite interesting.
Finally, you control the portions easily. Because these are mini cups, a little goes a long way. They’re indulgent without being overwhelming. Once you’ve made one batch, you’ll find yourself adapting the flavor combo and repeating it.
Easy Ingredient Swaps
Want to customize? Swap confidently but keep proportions similar so the cups still set properly.
- Use milk or semi-sweet chocolate instead of dark if you prefer a sweeter shell.
- Switch peanut butter for almond butter or sunflower seed butter if you need a nut-free option; choose smooth varieties so the filling spreads evenly.
- Try different jams or preserves — raspberry, strawberry, and apricot all play nicely with chocolate and nuts.
- If you prefer a softer top layer, mix a teaspoon of neutral oil into the melted chocolate to keep it slightly pliable at room temperature.
Tools of the Trade
You don’t need fancy gear. A few basic tools make the process clean and fast.
- 24-cup mini muffin tin — the standard form for perfectly sized cups.
- Mini muffin liners — paper or silicone; silicone can make removal easier.
- Heatproof bowl and saucepan — for a double boiler setup.
- Microwave-safe bowl — if you melt the chocolate in the microwave.
- Spoons or a small offset spatula — for spreading the chocolate and sealing the tops.
- Small cookie scoop or teaspoon — for portioning peanut butter and jam evenly.
Troubles You Can Avoid
Chocolate temper, texture, and sealing are where things can go sideways. Here’s what to watch for and how to fix it.
Chocolate seizing: if a splash of water gets into melted chocolate it can seize into a grainy paste. Avoid using wet spoons or bowls. If it happens, add a teaspoon of neutral oil or use the seized chocolate as a mix-in for cookies instead.
Thin shells: if your chocolate layer is too thin, the cups can break when you remove them. Rotate the tin while the chocolate is still warm to push it up the sides, and don’t be stingy with the first layer.
Runny filling: very warm peanut butter or overly soft jam can make the shell sag. Let fillings come to cool-room temperature and portion them into the center of each shell rather than pushing them to the edges.
Chocolate that won’t set: chocolate needs a cool, dry place. If your room is warm, use the freezer in short bursts to set shells quickly. Avoid refreezing repeatedly; one chill to set, then store chilled.
Make It Diet-Friendly
Small changes keep the spirit of this recipe while addressing dietary needs.
- Lower-sugar: pick a lower-sugar or sugar-free jam and pair it with a higher-cacao dark chocolate to reduce sweetness overall.
- Nut-free: swap peanut butter for sunflower seed butter; it behaves similarly and has a comparable fat content for structure.
- Vegan: choose dairy-free chocolate and a plant-based nut or seed butter; ensure your jam has no added gelatin or animal-derived clarifiers.
- Allergy-conscious: label any batch you bring to gatherings, and consider making two batches (one nut-free) to be safe.
Flavor Logic
This combination works because of contrast. Dark chocolate supplies bitterness and texture. Peanut butter brings creaminess and fat, which carries flavor and fills the mouth. Jam adds acid and brightness to cut through those heavier elements. Salt, even a whisper, amplifies the flavors and rounds the sweetness.
The structure matters as much as the flavors. The chocolate shell contains and separates the peanut butter and jam so each bite gives a balanced taste. Too much of one component will dominate; the small proportions here mean each element plays a supporting role.
Keep It Fresh: Storage Guide
Store these cups chilled. They’ll keep best in an airtight container in the refrigerator for up to 2 weeks. If you want longer storage, layer them between sheets of parchment and freeze for up to 3 months; thaw briefly on the counter before serving so the textures relax a bit.
In warm weather, serve them straight from the fridge to prevent the chocolate from becoming overly soft. If you refrigerate and notice condensation on the chocolate after moving between temperatures, let the cups sit sealed at room temperature for a few minutes before opening the container to reduce surface moisture.
Quick Q&A
Q: Can I use peanut butter powder reconstituted with water? A: I wouldn’t. Powdered versions can change texture and make the filling runny when chilled. Use full-fat, smooth peanut butter for best results.
Q: Why is my chocolate cloudy after refrigeration? A: That’s likely bloom — fat or sugar migrating when temperatures change. It’s purely cosmetic and won’t affect flavor. Avoid extreme temperature swings to reduce bloom.
Q: Can I double the recipe? A: Yes. Use an extra mini muffin tin and double the ingredients. Work in batches with the chocolate if your bowl or microwave capacity is limited.
Q: Can I pre-portion the peanut butter and jam? A: Yes. Scoop fillings into small bowls or a parchment-lined tray and chill slightly so you can speed the assembly during the final step.
Ready to Cook?
These Chocolate Peanut Butter and Jelly Cups are one of those recipes that reward minimal effort with a high return. Set up your station, chop that chocolate, and use the freezer as your friend. Follow the steps, keep your components chilled when necessary, and you’ll have a tray of tidy, irresistible bites in under half an hour.
Make a batch this afternoon. Try raspberry jam first; it’s a classic match. Once you’ve nailed that, experiment with different jams or nut-butters to find your favorite twist. Enjoy every little cup — they’re built to be shared, but I won’t judge if you keep most of them to yourself.
Chocolate Peanut Butter and Jelly Cups
Ingredients
Equipment
Method
- Line a 24-cup mini muffin tin with 24 mini muffin liners and set the tray aside with room in the freezer for later.
- If using a chocolate bar, break or chop the 8 oz dark chocolate into small pieces so it melts evenly.
- Melt the chocolate either by microwave or double boiler: - Microwave: heat in a microwave-safe bowl in 30-second intervals, stirring between each interval, until just melted and smooth. - Double boiler: place the chocolate in a heatproof bowl set over (but not touching) simmering water in a saucepan. Stir occasionally until melted, then remove the bowl from the heat.
- Spoon or drizzle some melted chocolate into each liner and rotate the tin or use the back of the spoon to spread the chocolate up the sides of each liner, forming a chocolate shell. Reserve the remaining melted chocolate in the bowl.
- Transfer the tray to the freezer until the chocolate shells are set and no longer tacky, about 5 minutes.
- Divide the 1/4 cup smooth peanut butter evenly among the 24 set shells, placing the peanut butter in the center of each shell. Then divide the 1/4 cup jelly or jam evenly and add it on top of the peanut butter in each cup.
- Spoon the remaining melted chocolate over each filled cup to fully cover the peanut butter and jelly and seal each cup. If the chocolate has begun to harden, briefly rewarm it until pourable before topping.
- Sprinkle a small pinch of flaked or coarse salt on each cup if desired.
- Return the tray to the freezer until the tops are firm, about 5–10 minutes. Remove the cups from their liners and enjoy immediately, or store chilled.
Notes
Chocolate
: You can use any type of melting chocolate you like. I prefer to keep these a little on the healthier side by using 60% or more dark chocolate but milk or even white chocolate will work.