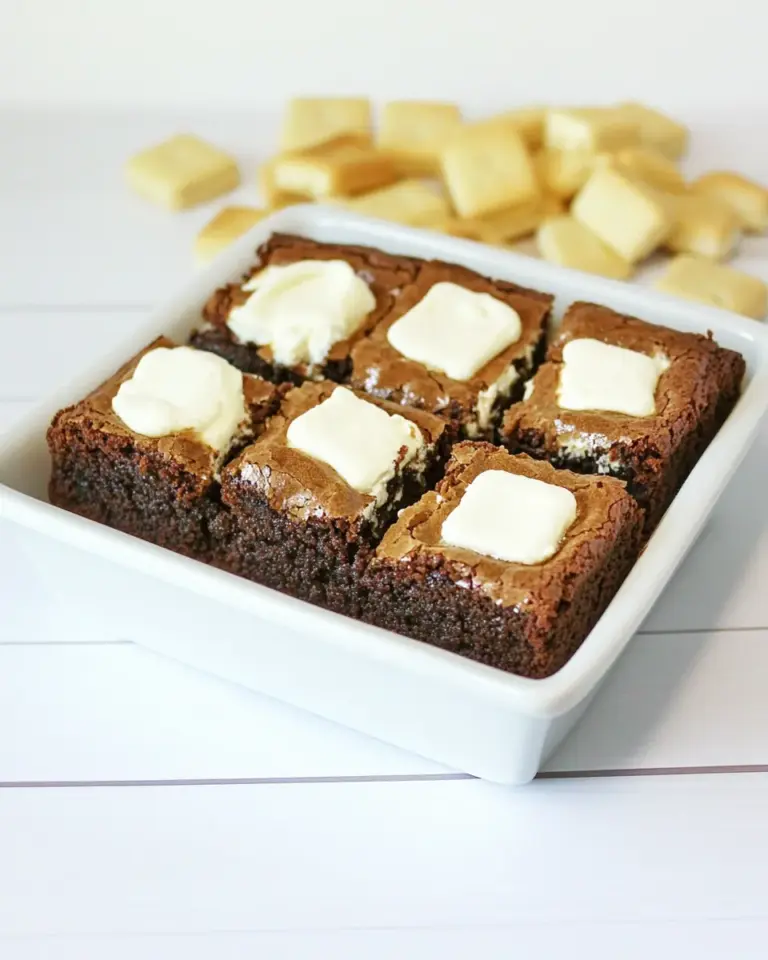
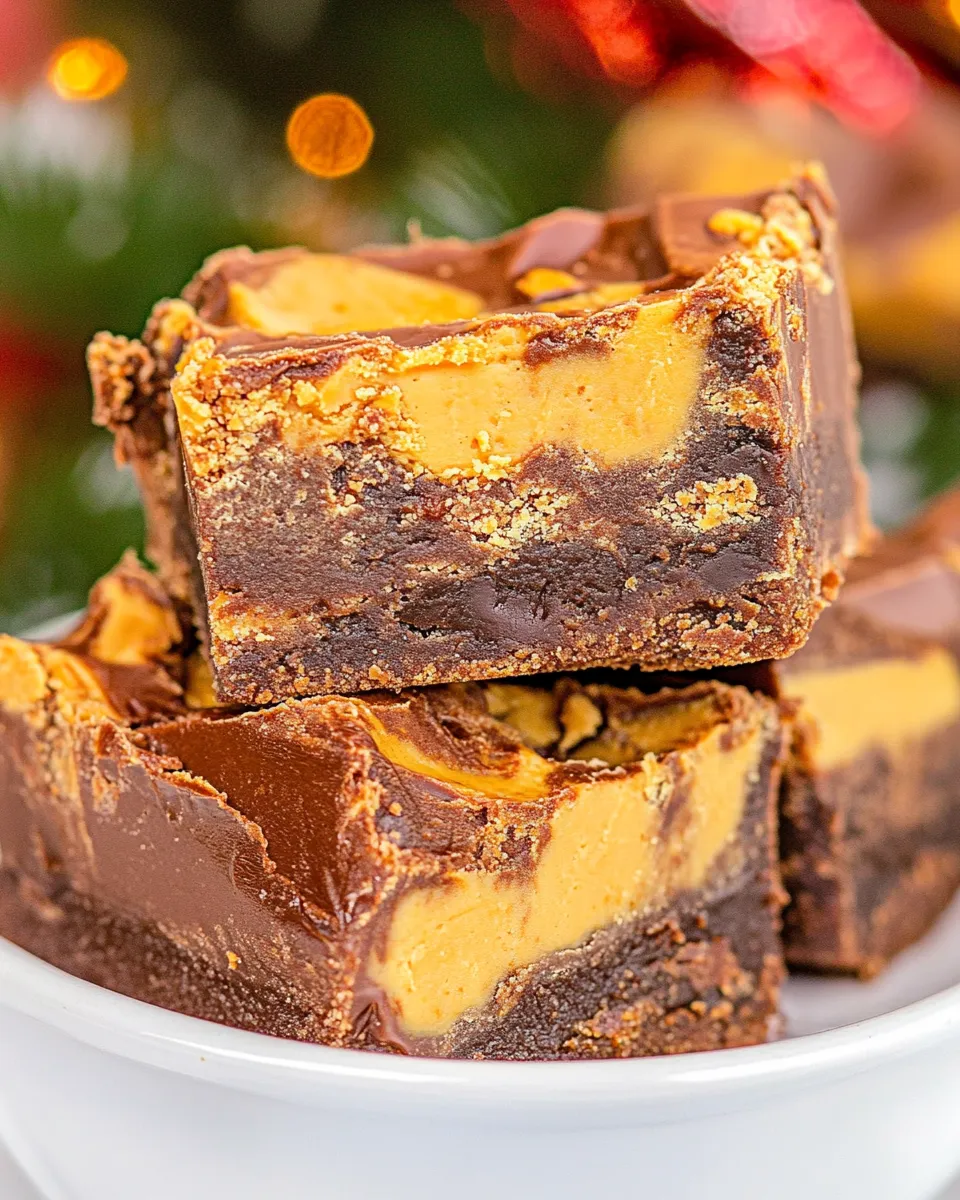
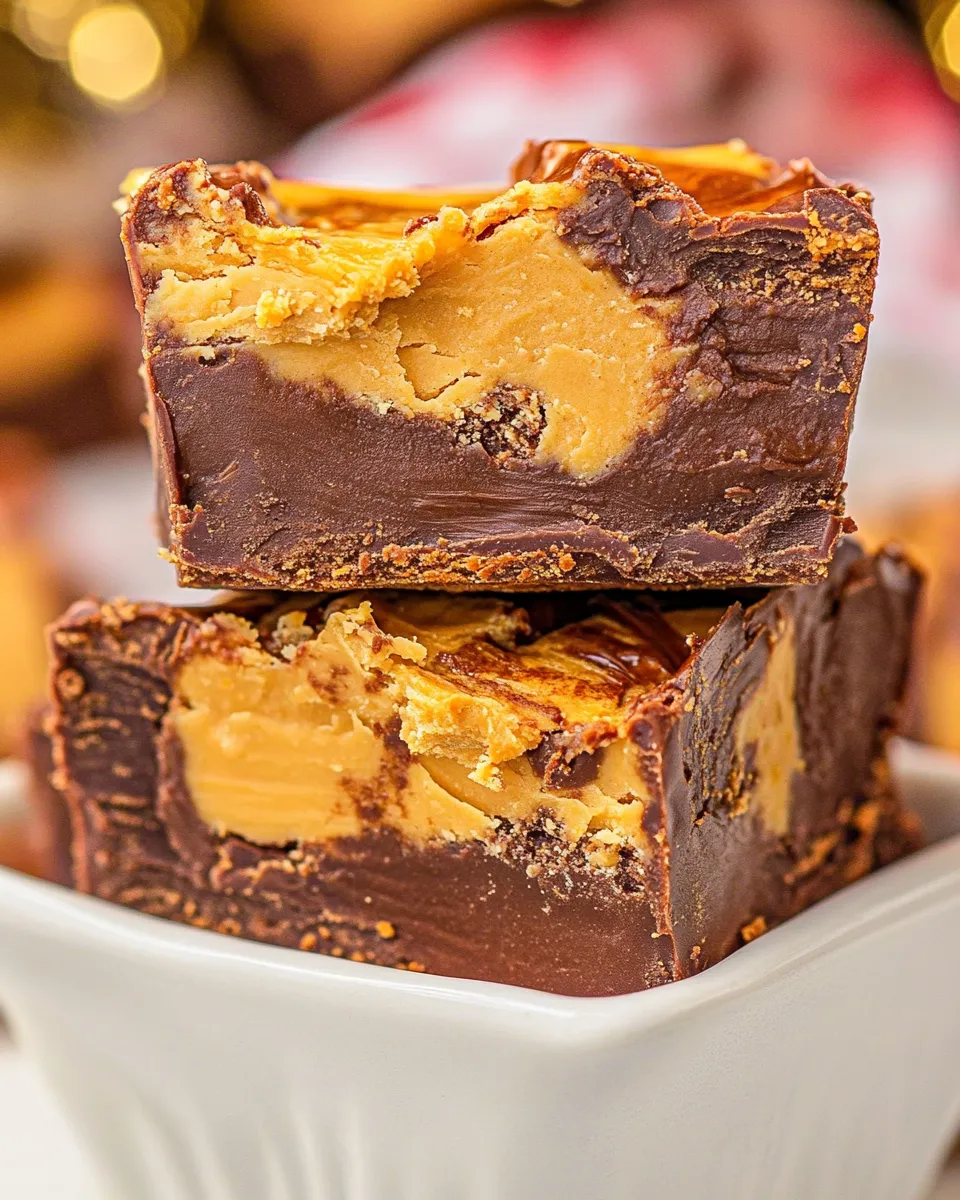
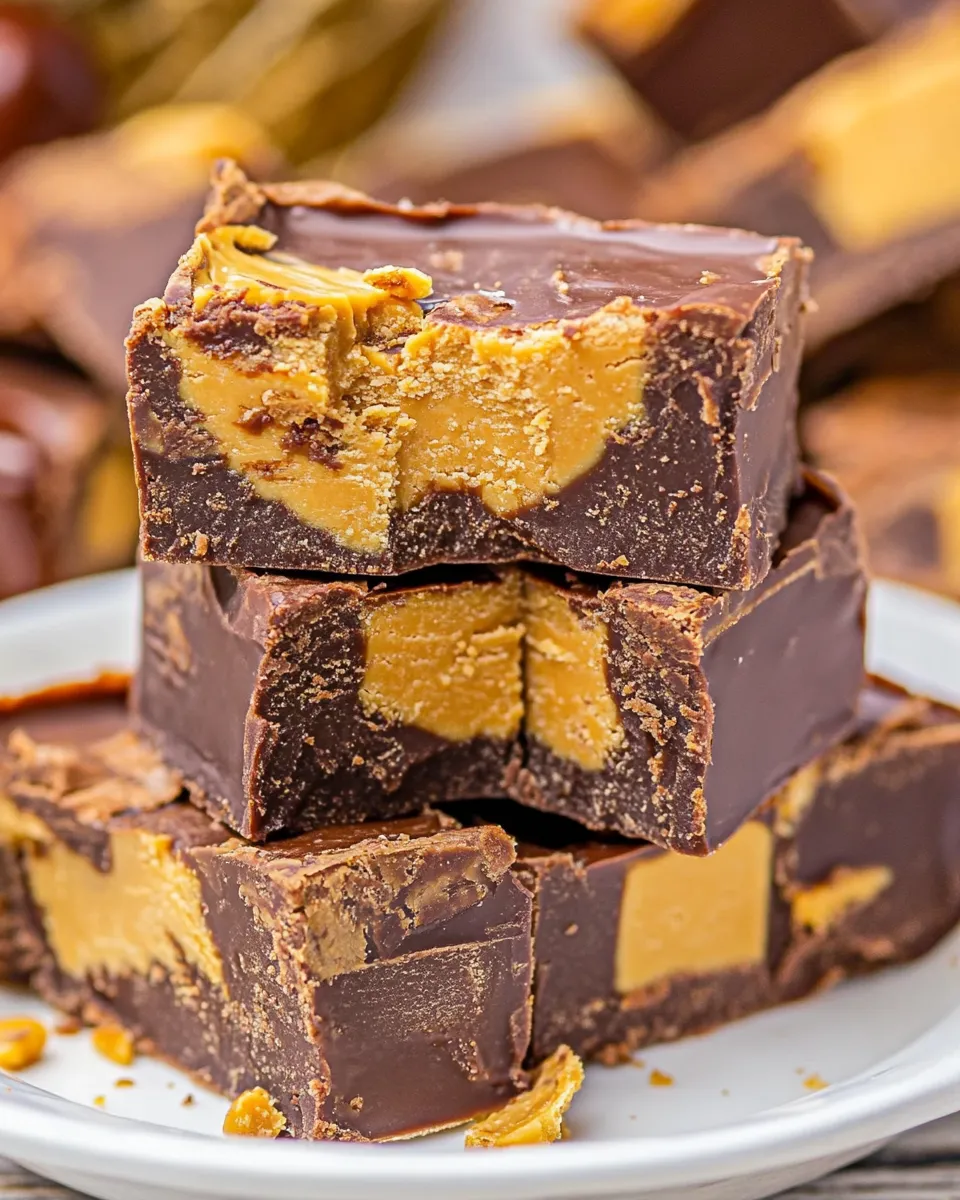
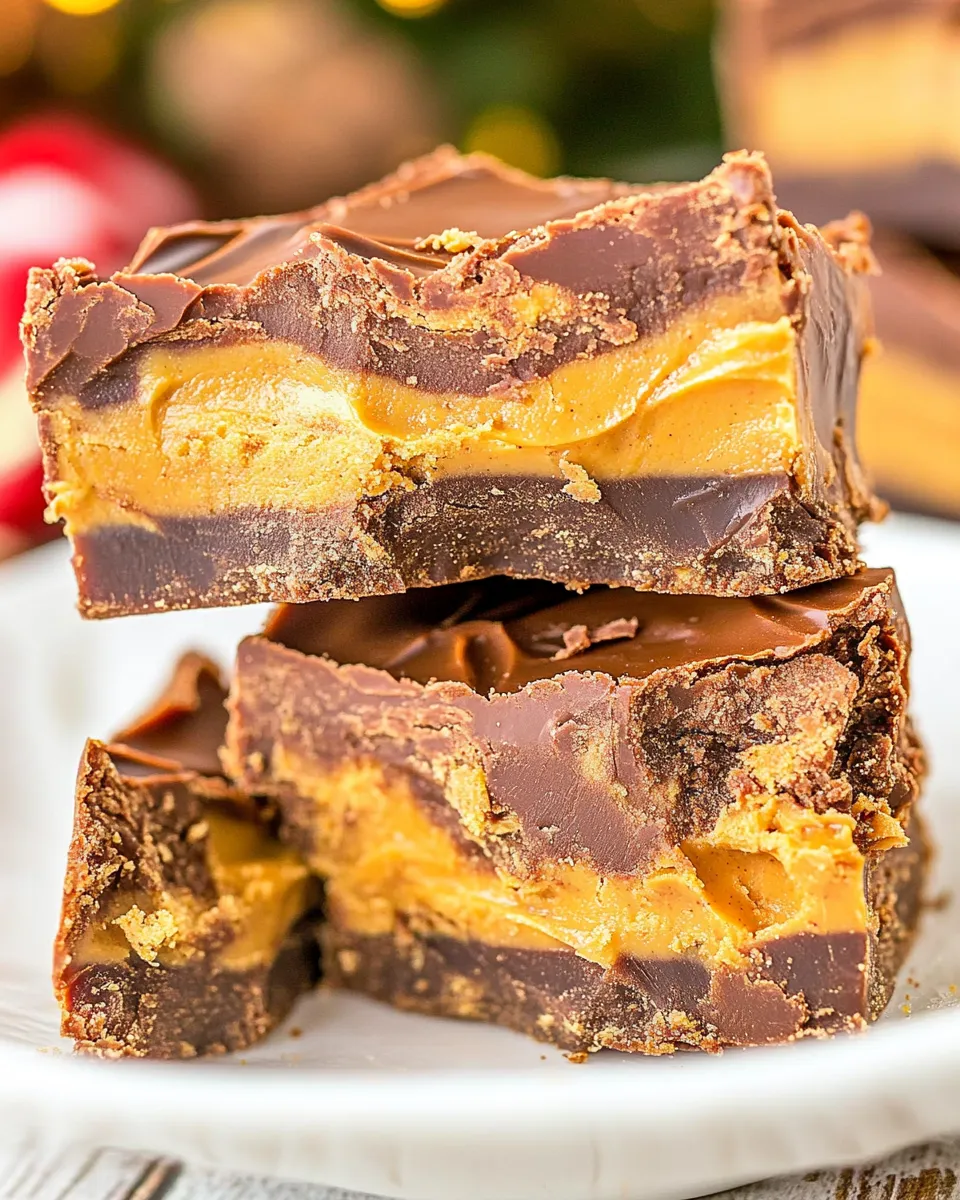
Chocolate Peanut Butter Fudge
I make this chocolate peanut butter fudge whenever I want something rich, fast, and utterly comforting. It’s one of those recipes that doesn’t demand fuss or a long ingredient list, but it delivers a dense, sliceable treat that disappears in a day. The texture is silky from the coconut oil and peanut butter, and the cocoa-chocolate backbone keeps things deeply chocolatey without being cloyingly sweet.
What I love most is how reliably it comes together: melt, whisk, set. The swirl on top is the fun part — pretty, functional, and a small moment of creativity that makes these squares feel special even when you’re short on time. It’s perfect for a last-minute dessert to bring to a gathering, an afternoon pick-me-up, or a weekend treat for the family.
Below you’ll find the exact ingredients and the step-by-step directions I follow every time. I’ve also collected practical tips for troubleshooting, storing, and a few swaps if you want to make it vegan or change the texture. No fluff — just clear, warm guidance so your batch turns out perfect.
Ingredient Checklist
- 1/2 cup chocolate chips — gives the fudge its chocolate base and helps set a firm, glossy texture.
- 1/2 cup coconut oil — melts smoothly to create a silky body; solidifies when chilled so the fudge firms up.
- 3/4 cup peanut butter — primary binder and flavor; use a creamy, well-stirred peanut butter for best spread and texture.
- 1/2 cup cocoa powder — deepens the chocolate flavor without adding extra sweetness.
- 1/2 cup pure maple syrup — sweetens and keeps the fudge pliable; liquid sweetener that sets well with the fats.
- 1 tablespoon coconut oil — paired with the drizzle to thin the peanut butter so it’s easy to swirl.
- 2 tablespoons peanut butter — for the top swirl; melts smoothly and creates that classic chocolate-peanut ribbon effect.
Directions: (Chocolate Peanut Butter Fudge)
- Line an 8×8 baking dish (for thinner fudge) or a 9×5 loaf pan (for thicker fudge) with parchment paper, leaving an overhang on two sides to lift the fudge out when set; press the parchment to fit the pan.
- In a medium saucepan, combine 1/2 cup chocolate chips and 1/2 cup coconut oil. Melt over medium-low heat, stirring frequently, until fully melted and smooth.
- Remove the saucepan from the heat and whisk in 3/4 cup peanut butter, 1/2 cup cocoa powder, and 1/2 cup pure maple syrup until the mixture is smooth and evenly combined.
- Pour the mixture into the prepared pan and spread it evenly with a spatula.
- In a small saucepan or microwave-safe bowl, melt 2 tablespoons peanut butter and 1 tablespoon coconut oil together until smooth. If using a microwave, heat in 15–20 second intervals, stirring between intervals.
- Drizzle the melted peanut butter mixture over the top of the fudge in a back-and-forth motion. Use the tip of a knife or a toothpick to drag through the drizzle in the opposite direction to create swirls.
- Refrigerate the pan for about 2 hours, or until the fudge is firm.
- Lift the set fudge from the pan using the parchment overhang and place it on a cutting board. Cut into 20 small squares.
- Store the squares in an airtight container in the refrigerator for up to one week.
Why You’ll Love This Recipe
This fudge hits a sweet spot between effortless and indulgent. You don’t need a candy thermometer or hours of simmering — the recipe relies on a small number of pantry staples and a short set time. The result is dense, not grainy, with a chocolate intensity balanced by the nuttiness of peanut butter.
The maple syrup gives it a smoother mouthfeel than granulated sugar would, and coconut oil helps the fudge set cleanly while keeping it spreadable enough to cut without crumbling. It’s crowd-pleasing in texture and familiar in flavor, which makes it a safe bet for family events or cookie swaps.
Finally, the recipe scales easily: use a bigger pan for thinner squares or a smaller pan for thicker bars. The method stays the same, and you’ll still have reliable results.
Vegan & Vegetarian Swaps
This recipe is already vegetarian. Making it vegan is just as straightforward because all core ingredients are plant-based, assuming your chocolate chips are dairy-free.
- Use dairy-free chocolate chips to ensure the chocolate base is vegan-friendly.
- Stick with pure maple syrup as the liquid sweetener — it’s vegan by nature and blends beautifully here.
- If you want to swap peanut butter for another nut or seed butter, choose a smooth variety with neutral oil separation for best texture (note: flavor will shift).
Prep & Cook Tools
- 8×8 baking dish or 9×5 loaf pan — choose based on how thick you want the bars.
- Parchment paper — for easy removal and clean cuts.
- Medium saucepan — for melting chocolate and coconut oil together.
- Small saucepan or microwave-safe bowl — for heating the drizzle.
- Rubber spatula — for spreading the fudge evenly.
- Whisk — to fully incorporate cocoa powder and peanut butter.
- Knife or toothpick — to create the swirl pattern and to cut the squares cleanly.
- Airtight container — for storing the finished squares.
Troubleshooting Tips
If the mixture looks grainy after whisking
Give it a little more gentle heat off the stove while stirring — cocoa powder sometimes needs a minute of residual warmth to fully hydrate and smooth out. Don’t overheat, though; if the peanut butter starts to separate, remove from heat immediately and whisk briskly to bring it back together.
If the fudge is too soft after refrigeration
Make sure your coconut oil was measured accurately — too much will keep the mixture soft. Also, check your refrigerator temperature; a very mild fridge setting can lengthen set time. If it’s still soft, pop it back in the fridge for another hour or two.
If the drizzle sinks into the top instead of sitting on it
Let the poured base cool at room temperature for a few minutes until it’s not steaming or visibly hot, then add the drizzle. If the base is too hot, the drizzle will melt into it instead of forming visible swirls.
Nutrition-Minded Tweaks
If you’re watching sugar, this recipe already leans on maple syrup rather than refined sugar, which provides a more complex sweetness and slightly lower glycemic impact for some people. For a lighter bite without changing texture drastically, you can reduce the drizzle amount or skip it entirely — the base is rich enough on its own.
To increase protein, use a natural peanut butter with no added oil or sugar, and be sure to stir it thoroughly before measuring. Swap to an unsweetened cocoa powder if you prefer more chocolate intensity without added sugars. Keep in mind that altering sweeteners or fat content will affect set and mouthfeel, so changes should be modest.
Behind the Recipe
This fudge is a simple adaptation of no-bake, oil-set confections that rely on solidifying fats to achieve a sliceable bar. Coconut oil is the unsung hero here: it’s liquid when warm and solid at refrigerator temperatures, which is exactly what we need to go from a pourable mix to a firm square. Cocoa powder and melted chocolate chips work together to deliver layered chocolate flavor — cocoa brings depth and a slightly bitter backbone, while the chips add sweetness and body.
The peanut butter serves multiple roles. It’s flavor, yes, but also acts as an emulsifier and binder, improving texture and preventing the final product from being crumbly. The top swirl is optional, but it creates a pleasing contrast both visually and in flavor balance, giving you pockets of pure peanut butter against a chocolate backdrop.
Cooling, Storing & Rewarming
After swirling, refrigerate for at least two hours until firm. Use the parchment overhang to lift the block cleanly from the pan for tidy cutting. Cut into 20 small squares for bite-sized portions that are easier to portion and share.
Store the squares in an airtight container in the refrigerator for up to one week. If you want to keep them longer, they freeze nicely — layer parchment between rows to prevent sticking and freeze for up to three months. Thaw in the refrigerator before serving to avoid condensation making the surface a little sticky.
Your Top Questions
Can I use other nut butters?
Yes. Almond or cashew butter will work, but they’ll change the flavor profile. If the swap is oilier, you might notice a slightly softer set.
What if my chocolate chips won’t melt smoothly?
Use medium-low heat and stir constantly. If they still resist, remove the pan from heat and keep stirring — residual heat often finishes the job. A splash more coconut oil can help the melt but avoid adding too much.
Can I cut the recipe in half or double it?
Yes. If you double it, use a correspondingly larger pan and keep an eye on set time. For half batches, a smaller loaf pan works well. The technique doesn’t change.
See You at the Table
This Chocolate Peanut Butter Fudge is one of my go-to recipes for when I want a special treat without a big time investment. It’s forgiving, fast, and reliably delicious. Make a batch, slice into small squares, and keep them in the fridge for snacking — they’re perfect with coffee, as a lunchbox surprise, or gifted in a little box to a neighbor. If you try this, tell me how you swirled yours and what pan you used — I love hearing how simple recipes fit into real life.
Chocolate Peanut Butter Fudge
Ingredients
Equipment
Method
- Line an 8×8 baking dish (for thinner fudge) or a 9×5 loaf pan (for thicker fudge) with parchment paper, leaving an overhang on two sides to lift the fudge out when set; press the parchment to fit the pan.
- In a medium saucepan, combine 1/2 cup chocolate chips and 1/2 cup coconut oil. Melt over medium-low heat, stirring frequently, until fully melted and smooth.
- Remove the saucepan from the heat and whisk in 3/4 cup peanut butter, 1/2 cup cocoa powder, and 1/2 cup pure maple syrup until the mixture is smooth and evenly combined.
- Pour the mixture into the prepared pan and spread it evenly with a spatula.
- In a small saucepan or microwave-safe bowl, melt 2 tablespoons peanut butter and 1 tablespoon coconut oil together until smooth. If using a microwave, heat in 15–20 second intervals, stirring between intervals.
- Drizzle the melted peanut butter mixture over the top of the fudge in a back-and-forth motion. Use the tip of a knife or a toothpick to drag through the drizzle in the opposite direction to create swirls.
- Refrigerate the pan for about 2 hours, or until the fudge is firm.
- Lift the set fudge from the pan using the parchment overhang and place it on a cutting board. Cut into 20 small squares.
- Store the squares in an airtight container in the refrigerator for up to one week.
Notes
1 medium banana
2 ounces sprinkles
Place the shredded coconut in a high speed blender and blitz until it reaches a butter consistency. If you are having difficulty getting it to blend try adding a small dash of coconut milk or melted coconut oil to get it moving.
Add the banana and blitz again until combined.
Spoon the mixture into a small dish lined with parchment paper. Top with sprinkles if desired and refrigerate for 1 to 2 hours or until the fudge has hardened.
Serve immediately or store in the fridge for up to 5 days in an airtight container.