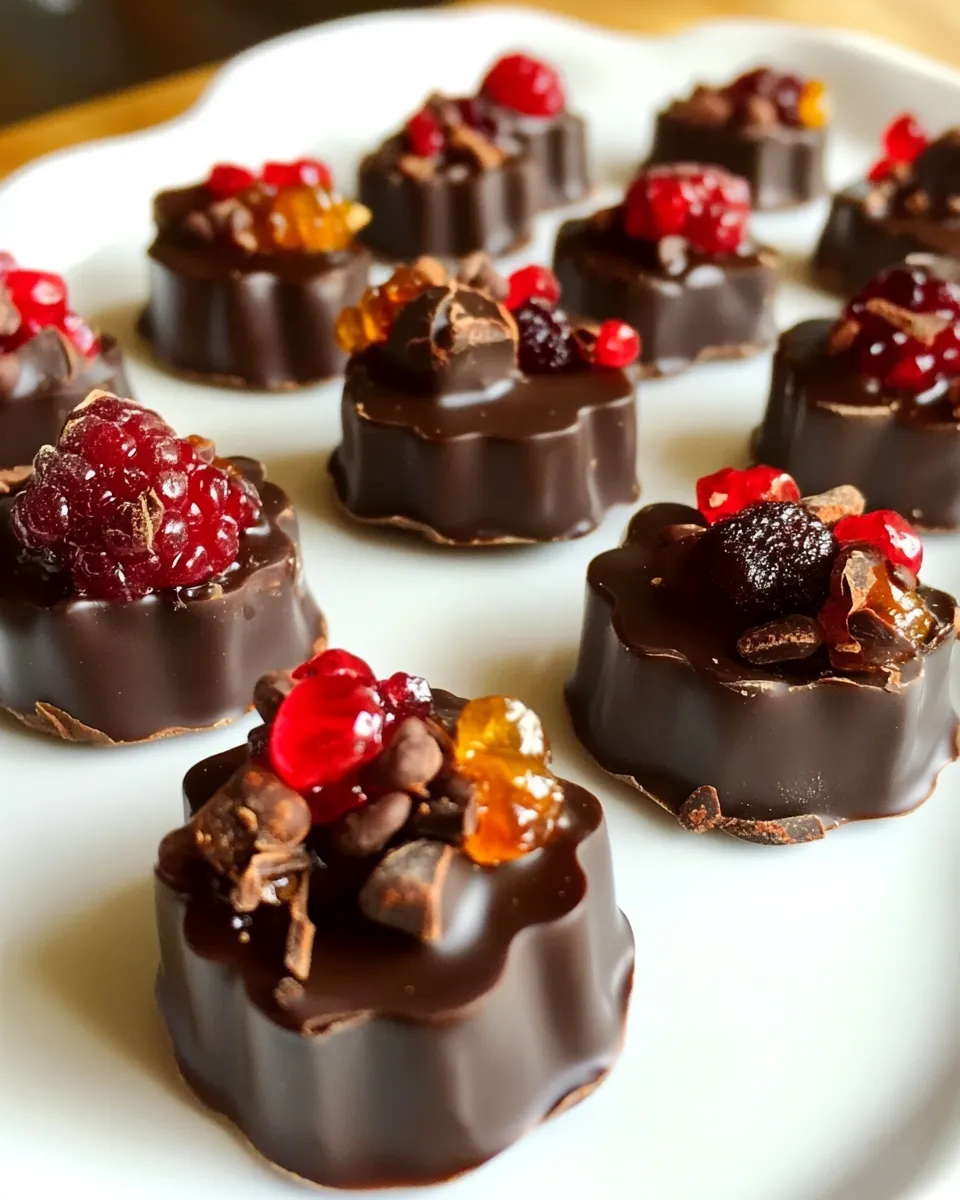
Dark Chocolate Fruit Candies
These little bites are the kind of thing I reach for when I want something that feels indulgent but is simple to make. Dark chocolate, paired with bright pomegranate seeds and soft, sweet dried fruit, gives you contrast in texture and flavor in every mouthful. They’re portable, giftable, and they keep well if you follow a few basic rules.
I like to make a batch in a mini muffin pan on a quiet afternoon. The prep is relaxed: melt chocolate, spoon, top with fruit, and set. No candy thermometer required unless you want a glossy temper. The finished candies are elegant enough for guests and easy enough to assemble with kids.
Below I walk you through what to buy, the exact steps to follow, troubleshooting, and storage so you get consistent results. There are a few small habits that make a big difference — you’ll find them sprinkled throughout the post.
Ingredients
- 4 bars dark chocolate (or 3 cups dark chocolate chips) — the base and shell for the candies; choose a quality dark chocolate you enjoy eating.
- 2/3 cup pomegranate seeds — adds bright acidity and a juicy pop against the chocolate.
- 2/3 cup dates, chopped into small pieces — provides chew and concentrated sweetness; chop small so they fit nicely in the cups.
- 2/3 cup dried figs, chopped into small pieces — adds soft texture and a honeyed flavor to balance the cocoa.
Your Shopping Guide
Buy the best dark chocolate you can comfortably afford. Taste matters here because the chocolate is the majority of each bite. Look for bars with at least 60% cocoa for a good balance of bitterness and sweetness; if you prefer sweeter, go lower. If you’re using chips, check the label for high cocoa content and quality ingredients.
For pomegranate seeds, fresh is best — they provide a crunchy, juicy contrast. If pomegranates aren’t in season, frozen arils will thaw well; drain any excess liquid before assembly. For dates and figs, Medjool dates are plump and sweet, but any soft, moist date will work. Dried figs can range from chewy to very soft; aim for ones that are pliable and chop them into small, even pieces.
Also grab a mini muffin pan and paper mini-muffin cups if you don’t have them. The paper cups make removal and presentation easier and they’re inexpensive. If you plan to temper chocolate, a chocolate thermometer is a useful one-time purchase.
Method: Dark Chocolate Fruit Candies
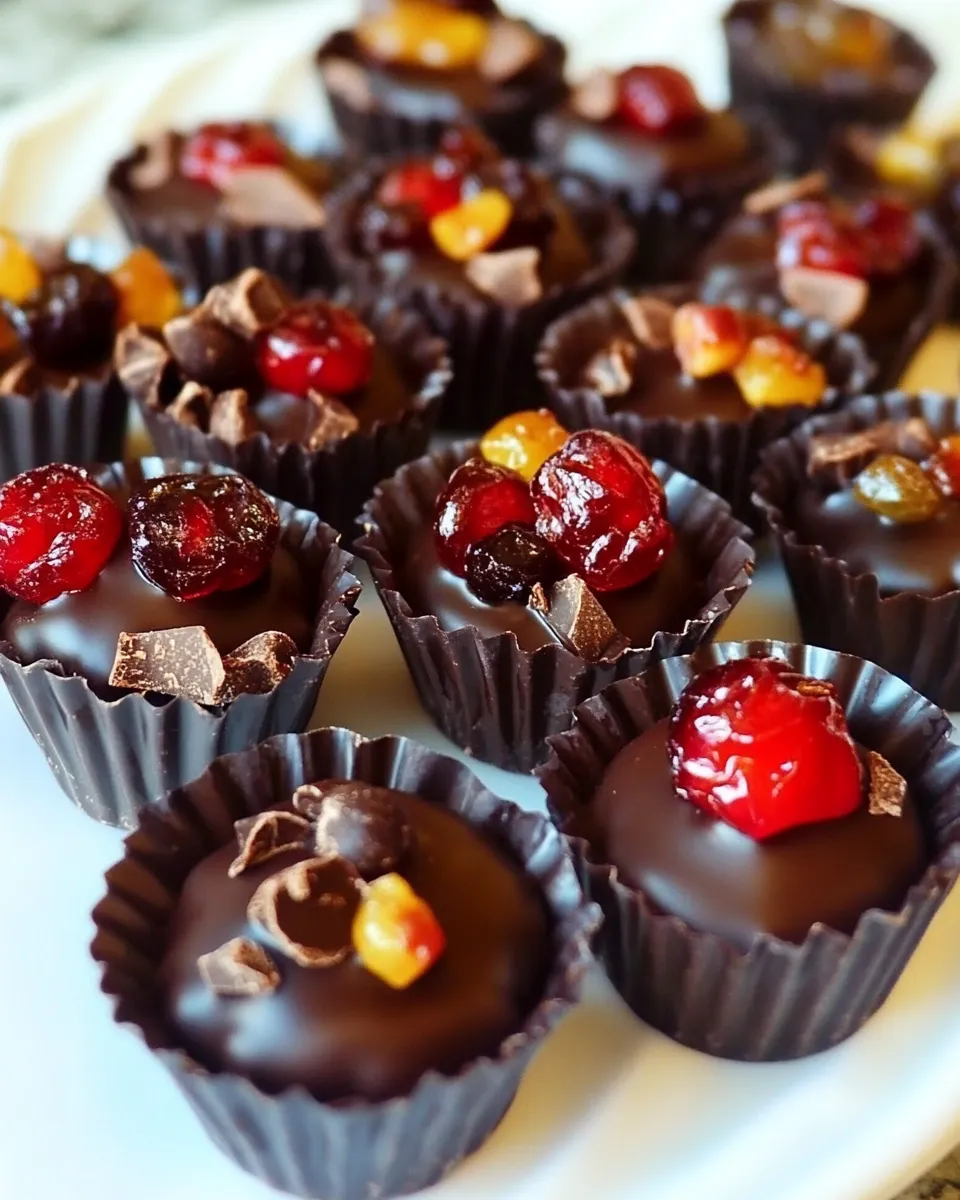
- Line a mini muffin pan with paper mini-muffin cups.
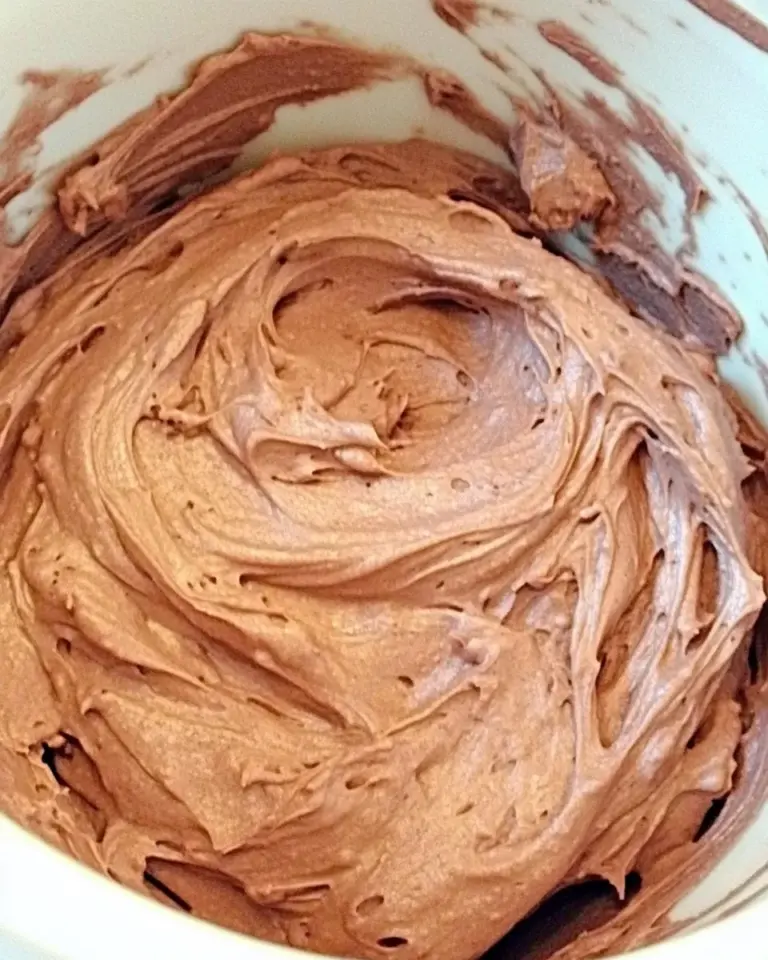
- Break the dark chocolate bars into small pieces (or measure out the chocolate chips) and place in a heatproof bowl set over a pan of simmering water (double boiler). Stir gently and continuously until the chocolate is fully melted and smooth. (If you wish to temper the chocolate to reduce blooming, use a chocolate thermometer and follow a tempering method.)
- Spoon some melted chocolate into each lined cup, just enough to completely cover the bottom of each cup.
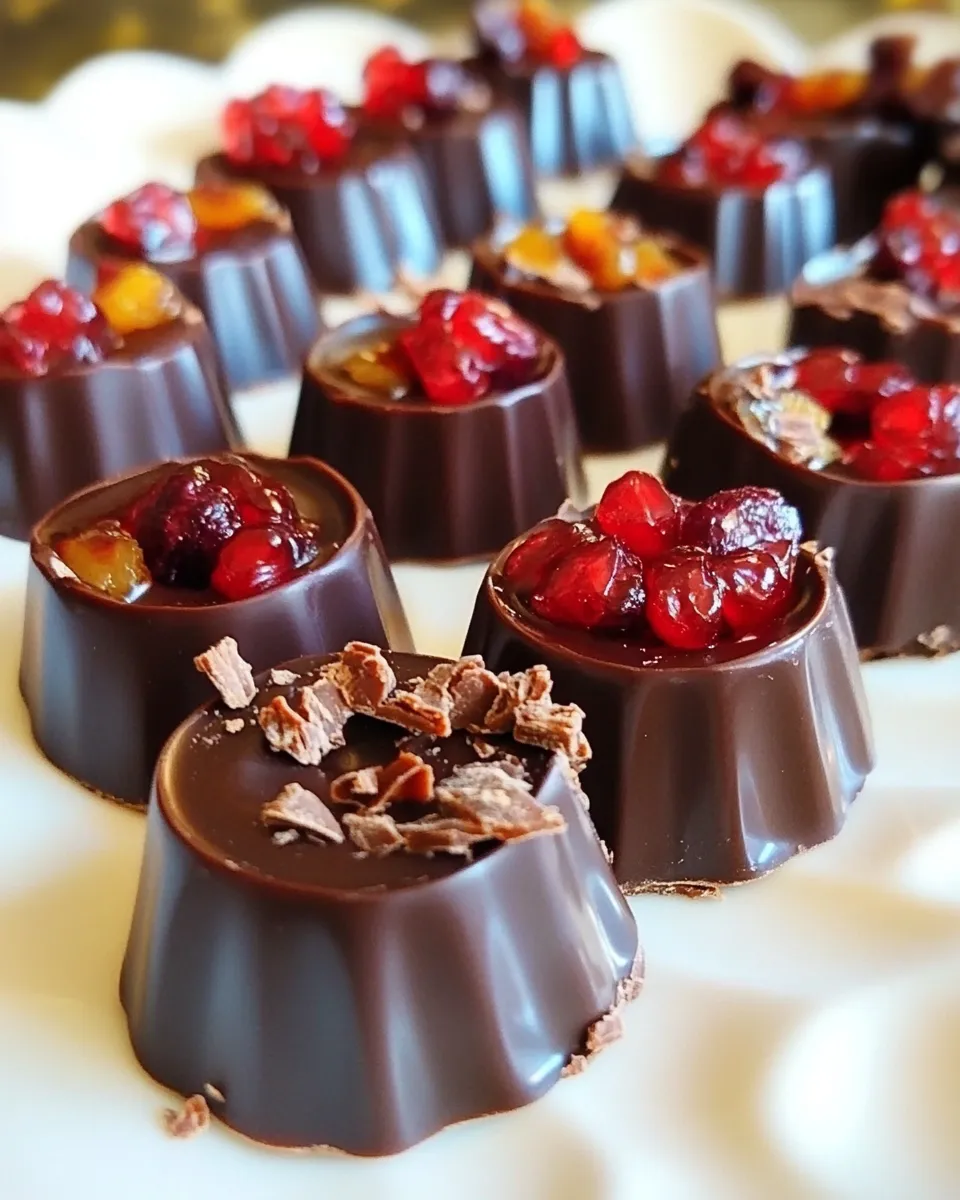
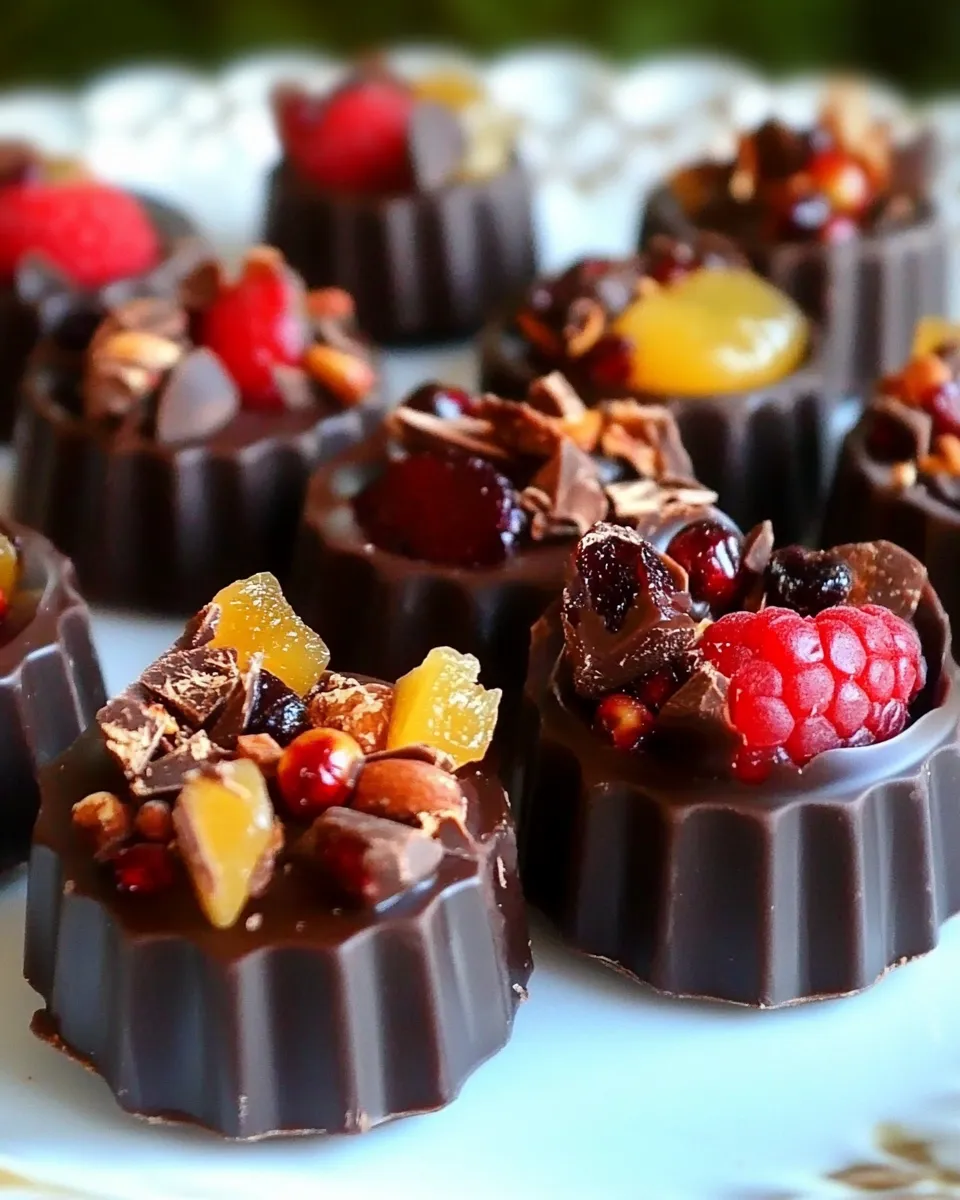
- Divide the lined cups into three roughly equal groups. Evenly distribute the pomegranate seeds among the cups in the first group, the chopped dates among the cups in the second group, and the chopped dried figs among the cups in the third group.
- Spoon the remaining melted chocolate over the fruit in each cup to fully cover the fruit and fill each cup. Tap the pan gently on the counter to level the chocolate and remove air bubbles, and wipe any drips from the edges.
- Let the chocolates set until firm. Leave them in a cool, dry place for about 4 hours, or speed up setting by placing the pan in the refrigerator for about 30 minutes.
- Store finished candies as follows: keep the pomegranate-topped chocolates refrigerated for up to 1 week. Store the date- and fig-topped chocolates in a cool, dry place at room temperature for 2–3 weeks. Note: chocolate may develop a cloudy “bloom” over time; this affects appearance only, not flavor.
Why This Recipe Is Reliable
The method is intentionally simple and forgiving. The double boiler ensures gentle heat so the chocolate melts smoothly without burning. Spoon-fill techniques and a mini muffin pan give you consistent portion sizes, and separating the cups into groups makes even distribution of the three fruits straightforward.
Timing is generous. You can let the chocolates set slowly at room temperature for a few hours, which reduces the risk of condensation or sudden changes in texture that can happen if you move warm chocolate into cold storage too quickly. The recipe also uses common pantry fruits that are shelf-stable (dates and figs), while the refrigerated pomegranate option is noted for best freshness.
Dairy-Free/Gluten-Free Swaps
These candies are naturally gluten-free so long as your chocolate and any added ingredients are labeled GF. For dairy-free versions, choose dark chocolate that’s explicitly vegan or dairy-free. Many dark chocolate bars are already dairy-free, but brands vary, so check the label for milk solids or cross-contamination warnings.
If you need to avoid added sugars, use a higher-cocoa dark chocolate with less sugar. The fruit toppings provide natural sweetness and texture, so you can comfortably go darker on the chocolate without losing enjoyment.
Equipment & Tools
- Mini muffin pan — creates the candy shape and consistent sizes.
- Paper mini-muffin cups — make removal and presentation clean and easy.
- Heatproof bowl and a saucepan for a double boiler — melt chocolate gently.
- Spoon (tablespoon and small teaspoon) or small scoop — for portioning chocolate and fruit.
- Spatula — to help transfer melted chocolate and wipe the bowl clean.
- Chocolate thermometer (optional) — only if you plan to temper for extra shine and snap.
- Refrigerator (optional) — to speed up setting.
Learn from These Mistakes
Overheating the chocolate is the single most common error. Chocolate will seize or become grainy if it gets too hot or if steam/water gets into it. Keep the water at a gentle simmer and stir constantly. If any water splashes into the chocolate, discard and start fresh — a small amount ruins the texture.
Using large chunks of fruit will make the candies lumpy and uneven. Chop dates and figs into small pieces so they sit neatly inside each cup beneath the top layer of chocolate. Pomegranate seeds are naturally small, so they need no prep beyond a quick check for stray white membrane.
Filling the cups too full before the fruit is set can cause fruit to float and create uneven tops. Add a base layer of chocolate, add fruit, then top with more chocolate to seal. Tap the pan gently after filling to settle the chocolate and remove trapped air.
Nutrition-Minded Tweaks
To keep these a lighter treat, reduce the amount of chocolate in each cup by making a thinner base and thinner top — the fruit provides bulk and satisfaction. Choosing high-cocoa dark chocolate increases antioxidants and decreases sugar per serving.
If you’re tracking portions, use a small scoop to ensure each candy is the same size; that makes calorie and portion control easier. For someone watching sugar intake, prioritizing the fig- and date-topped candies in moderation is wise, and savoring pomegranate-topped candies for a brighter, slightly tangier bite can feel more refreshing.
Chef’s Notes
Work in a cool, dry kitchen. Warm or humid environments can cause the chocolate to sweat or bloom more readily. If your chocolate does bloom (a white, powdery film), it’s still perfectly safe — it just looks less glossy.
If you want a glossy, professional finish, temper the chocolate: melt, cool, and reheat to the correct temperatures for your specific chocolate. Tempering takes practice but gives a crisp snap and shine. For home use, a simple melt-and-set method is adequate and much faster.
Label your boxes if gifting. The flavors are distinct, so a simple note like “pomegranate,” “dates,” and “figs” helps receivers know what they’re tasting. They make beautiful, easy gifts when arranged in small tins or clear boxes.
Keep-It-Fresh Plan
Storage matters and it’s already built into the recipe’s steps. Keep the pomegranate-topped chocolates refrigerated and eat them within one week; the seeds release a bit of moisture over time which is why refrigeration preserves their texture. Keep the date- and fig-topped chocolates at room temperature in a cool, dry cupboard for 2–3 weeks. Always store in a single layer or separated with parchment to avoid sticking.
If your kitchen is warm, store all chocolates in the refrigerator and allow them to come to room temperature for 10–15 minutes before serving to reduce condensation. Remember: bloom affects appearance, not flavor. If the chocolates develop a white film, they’re still fine to eat.
Troubleshooting Q&A
Q: My chocolate seized and turned grainy. What happened?
A: Seizing occurs when a small amount of water contacts melted chocolate or the chocolate was overheated. Start over with dry equipment, and keep steam away from the bowl. Use a gentle simmer and continuous stirring.
Q: The candies look dull or have a white film after a few days.
A: That’s chocolate bloom — either fat bloom from temperature changes or sugar bloom from moisture. The candies are safe to eat; bloom only alters appearance. To reduce bloom, store in a stable, cool place and avoid temperature swings.
Q: The fruit sank or floated oddly in the chocolate.
A: Ensure you create a bottom layer of chocolate and chill briefly if needed before adding fruit. Chop fruits small and distribute them evenly. Tap the pan after filling to level everything and release bubbles.
Q: They stick to the paper cups.
A: Use good-quality paper cups and ensure the candies are fully set before attempting removal. Running a small offset spatula around the edge can help lift them free. For easier presentation, you can leave them in the paper cups when serving.
Hungry for More?
If you enjoyed these, try swapping the fruit toppings with other small, chopped dried fruit or toasted nuts — keeping in mind the storage differences for moist toppings. These candies are a template: once you’re comfortable with the method, you can scale up, gift-pack, or adapt toppings to the season.
I love seeing your results. If you make a batch, note what chocolate percentage you used and which topping was your favorite. Small changes to the base chocolate or fruit can shift the whole experience, and that’s the fun of this easy, flexible recipe.
Dark Chocolate Fruit Candies
Ingredients
Equipment
Method
- Line a mini muffin pan with paper mini-muffin cups.
- Break the dark chocolate bars into small pieces (or measure out the chocolate chips) and place in a heatproof bowl set over a pan of simmering water (double boiler). Stir gently and continuously until the chocolate is fully melted and smooth. (If you wish to temper the chocolate to reduce blooming, use a chocolate thermometer and follow a tempering method.)
- Spoon some melted chocolate into each lined cup, just enough to completely cover the bottom of each cup.
- Divide the lined cups into three roughly equal groups. Evenly distribute the pomegranate seeds among the cups in the first group, the chopped dates among the cups in the second group, and the chopped dried figs among the cups in the third group.
- Spoon the remaining melted chocolate over the fruit in each cup to fully cover the fruit and fill each cup. Tap the pan gently on the counter to level the chocolate and remove air bubbles, and wipe any drips from the edges.
- Let the chocolates set until firm. Leave them in a cool, dry place for about 4 hours, or speed up setting by placing the pan in the refrigerator for about 30 minutes.
- Store finished candies as follows: keep the pomegranate-topped chocolates refrigerated for up to 1 week. Store the date- and fig-topped chocolates in a cool, dry place at room temperature for 2–3 weeks. Note: chocolate may develop a cloudy “bloom” over time; this affects appearance only, not flavor.
Notes
You will also need: Double boiler, 2 mini muffin tins, 36 mini muffin cups