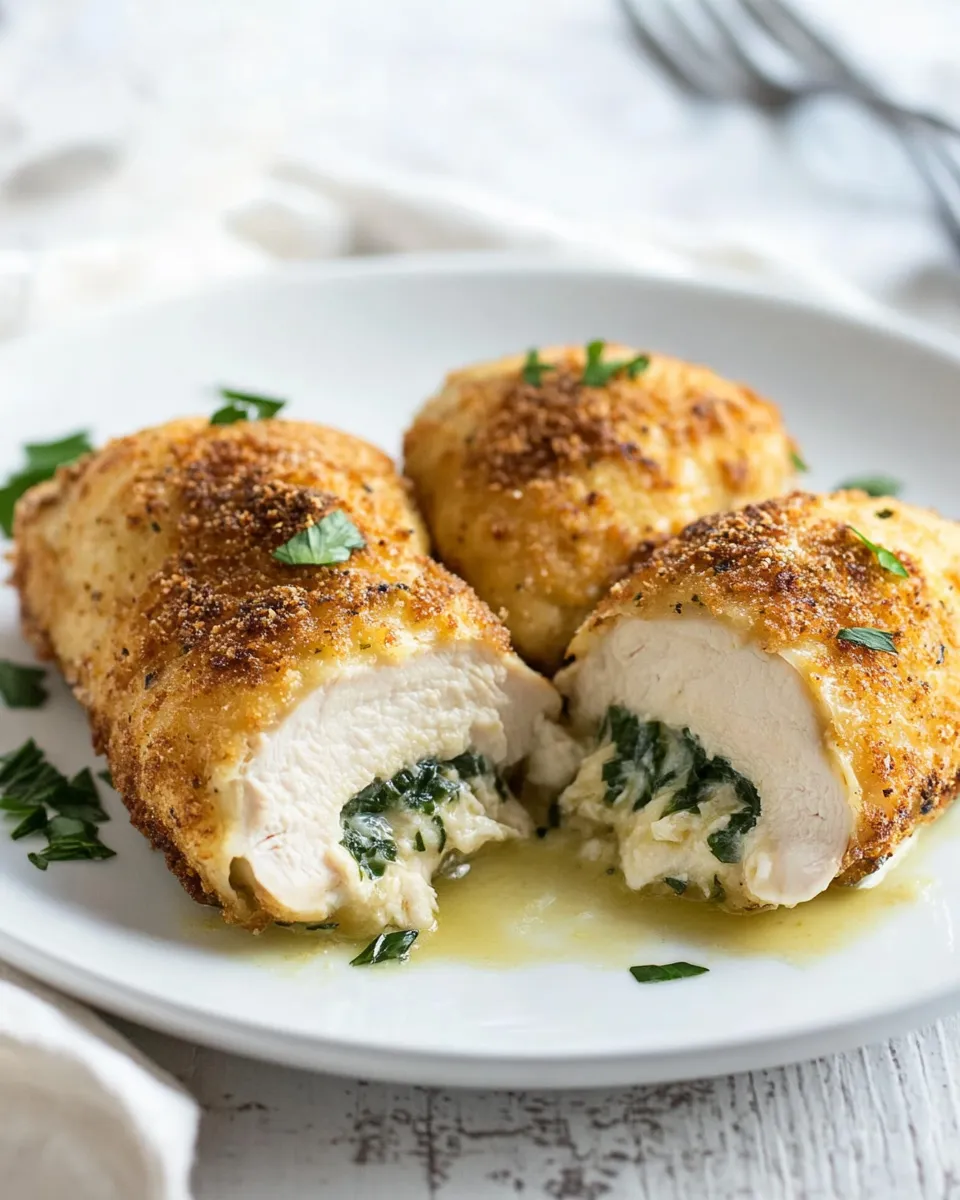
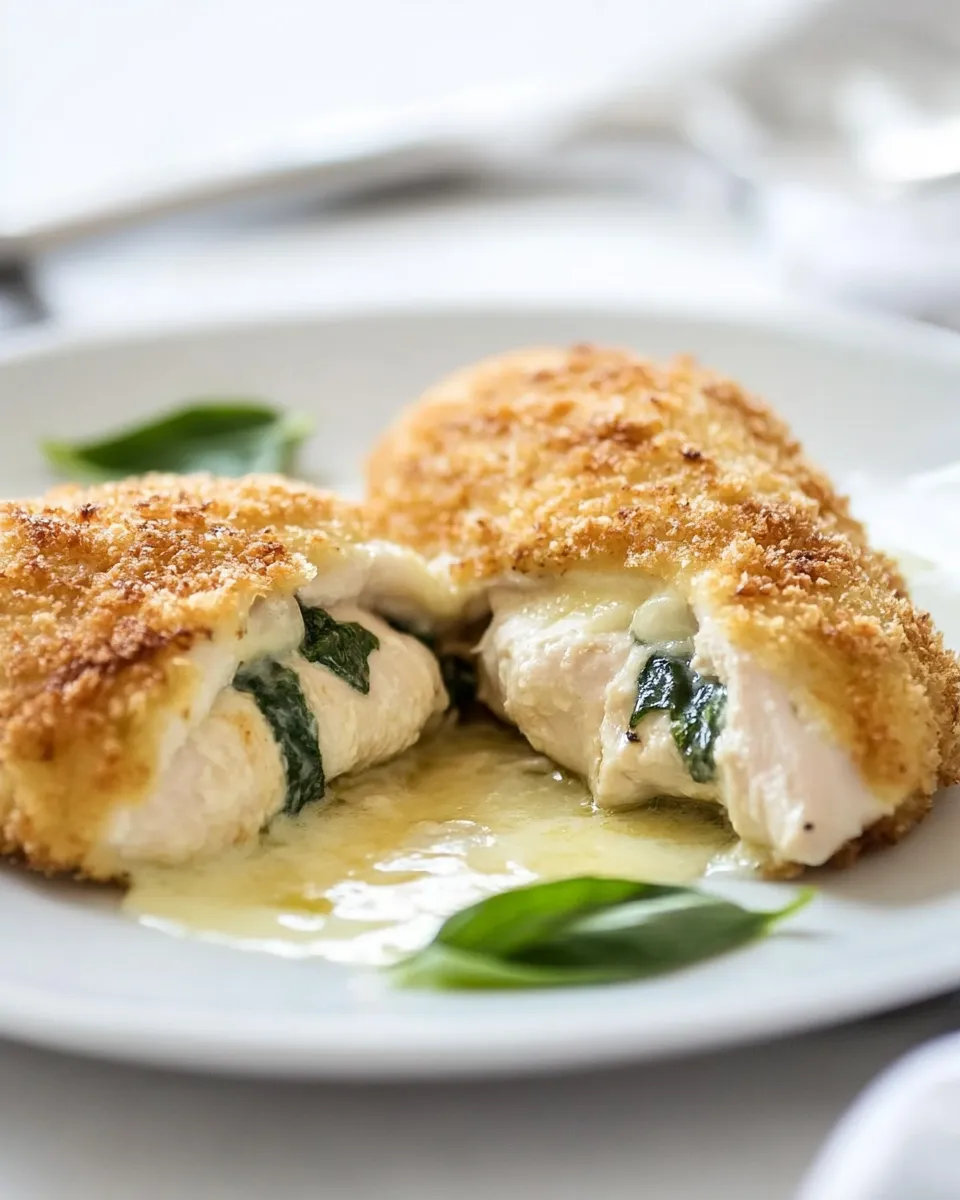
Easy Chicken Kiev
Welcome to a homey, flavorful take on a classic comfort dish: Easy Chicken Kiev. If you love crisp, golden breading giving way to a burst of buttery, garlicky herb filling, this recipe delivers—without fuss and with simple, pantry-friendly ingredients. It’s perfect for weeknight dinners, a cozy weekend meal, or something a little special to impress guests. The recipe uses four small boneless chicken breasts and a handful of straightforward staples to create a restaurant-worthy result right in your kitchen.
Why you’ll love this Easy Chicken Kiev
- Quick to assemble with just a few components.
- Buttery herb center that stays velvety if prepared and sealed well.
- Crisp panko coating for a light, irresistible crunch.
- Built for busy cooks who want big flavor with minimal stress.
Ingredients
Makes 4 servings.
- 4 small boneless chicken breasts
- 6 tablespoons butter
- 4 teaspoons parsley, chopped
- 1 clove garlic, minced
- 1 teaspoon lemon pepper seasoning
- 2 large eggs
- 1 ½ cups panko breadcrumbs
- ½ cup all-purpose flour
- 2 teaspoons salt
- oil for frying
Equipment
- Mixing bowls
- Plastic wrap or parchment
- Measuring spoons and cups
- Meat mallet or rolling pin
- Skillet or frying pan with lid
- Thermometer (optional, but helpful)
- Tongs and a plate lined with paper towels
Prep ahead
You can make the herb butter up to a day in advance and keep it chilled. Breadcrumbs can be prepared and kept in a shallow dish. If you want an easier sear-to-bake finish, preheat the oven to 350°F (175°C) and transfer fried pieces to a baking sheet to finish cooking through for 8–10 minutes.
Step-by-step instructions
Follow these clear steps to create a perfectly rolled, crispy, and buttery Easy Chicken Kiev. The directions follow the ingredient list and keep the order logical for assembly, coating, and cooking.
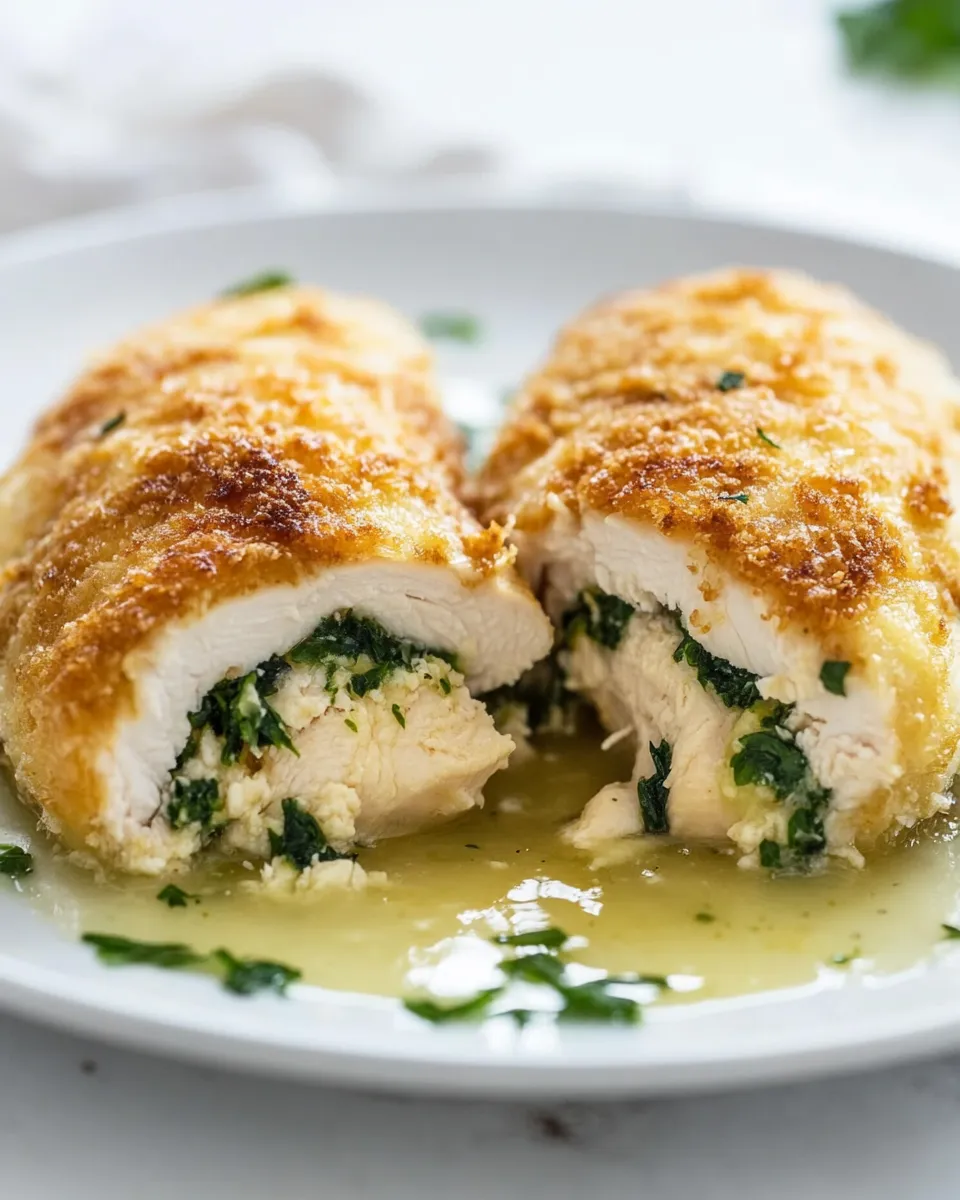
- Make the herb butter: Soften 6 tablespoons butter in a small bowl until spreadable but not melted. Add 4 teaspoons chopped parsley and 1 clove minced garlic. Mix thoroughly so the parsley and garlic are evenly distributed. Season the mixture with 1 teaspoon lemon pepper seasoning, stirring to combine. Shape the butter into a log or a flat rectangle using plastic wrap or parchment. Chill the butter until firm—at least 20 minutes in the refrigerator.
- Prepare the chicken: Pat the 4 small boneless chicken breasts dry with paper towels. Lay a piece of plastic wrap or parchment over each breast and gently pound them with a meat mallet or rolling pin until they are about ¼ inch thick and an even thickness across. Season both sides lightly with 2 teaspoons salt, distributing it evenly across all pieces.
- Fill the breasts: Remove the chilled herb butter from the refrigerator. Cut the butter into four equal pieces. Place one piece of herb butter in the center of each flattened chicken breast. Fold the sides of the chicken over the butter and roll tightly to fully encase the butter. Seal edges by pressing or tucking so the butter is enclosed. If needed, use a toothpick to secure the rolls.
- Set up the breading station: In one shallow bowl, place ½ cup all-purpose flour. In a second bowl, beat 2 large eggs until smooth. In a third shallow dish, place 1 ½ cups panko breadcrumbs. These three bowls will be used in order for coating.
- Bread the chicken: One at a time, dredge each rolled breast in the flour, shaking off any excess. Dip it into the beaten eggs, allowing excess egg to drip away. Finally, press it firmly into the panko breadcrumbs, ensuring an even, full coating. Repeat with all four rolls. For extra assurance, you can repeat the egg and panko step for a thicker crust.
- Rest before frying: Set the breaded chicken rolls on a plate and chill them in the refrigerator for 10–15 minutes. This helps the coating adhere and reduces the chance of the butter leaking out during frying.
- Heat the oil: Pour oil for frying into a large skillet to a depth that will come about 1/4 to 1/2 inch up the side. Heat the oil over medium heat until it reaches a gentle shimmer but is not smoking. If you have a thermometer, aim for an oil temperature around 325–350°F (160–175°C).
- Fry the chicken: Working in batches if necessary so the pan is not crowded, carefully place each breaded chicken roll into the hot oil. Fry for about 3–4 minutes per side, turning gently with tongs to brown evenly on all sides. The goal is a deep golden color and a firm crust; do not rush the browning at too high a temperature.
- Finish cooking through: After achieving a golden crust on all sides, lower the heat slightly and cover the skillet with a lid for 2–3 minutes to help cook the center without over-browning the exterior. Alternatively, transfer the browned rolls to a preheated 350°F (175°C) oven and bake for 8–10 minutes until the chicken reaches 165°F (74°C) internally. Using a thermometer helps ensure doneness while protecting the buttery center.
- Rest and serve: Remove the cooked chicken rolls from the pan and place them on a plate lined with paper towels to drain any excess oil. Let them rest for 3–5 minutes; this also helps the butter settle so it doesn’t explode out the moment you slice. Serve each roll whole or slice on an angle to reveal the buttered center. Garnish with a little extra chopped parsley if desired, and offer lemon wedges for brightening the flavors.
Troubleshooting and tips
- If the butter leaks during frying, the oil may be too hot or the chicken was not sealed tightly. Chill thoroughly before frying and keep oil at a moderate temperature.
- Use panko for a lighter, crunchier crust than regular breadcrumbs.
- If you prefer less frying, brown the rolls in the skillet and finish in a 350°F oven for a crisp outside with fully cooked insides.
- For a garlic-forward profile, increase minced garlic in the butter to 2 cloves, but be mindful of stronger flavors.
- Always check internal temperature to ensure food safety: chicken should read 165°F (74°C).
Serving suggestions
This Easy Chicken Kiev pairs beautifully with mashed potatoes, buttered peas, roasted asparagus, or a simple mixed green salad. A spoonful of pan juices or a light lemony sauce complements the rich butter center without overpowering it.
Storage
Leftover cooked chicken keeps in an airtight container in the refrigerator for up to 3 days. Reheat gently in a 350°F (175°C) oven for 8–10 minutes to restore crispness. For freezing, wrap individual portions tightly and freeze up to 2 months; thaw overnight before reheating.
Final notes
This version of Easy Chicken Kiev keeps things straightforward and reliable. With a butter-herb core and a crunchy panko shell, it’s an accessible recipe that rewards careful preparation: chill the butter, seal the rolls well, and control your frying temperature. The result is a luscious, crowd-pleasing dish that feels elegant and tastes like a treat.
Enjoy your cooking, and savor every buttery bite of this classic made simple.
Easy Chicken Kiev
Ingredients
Equipment
Method
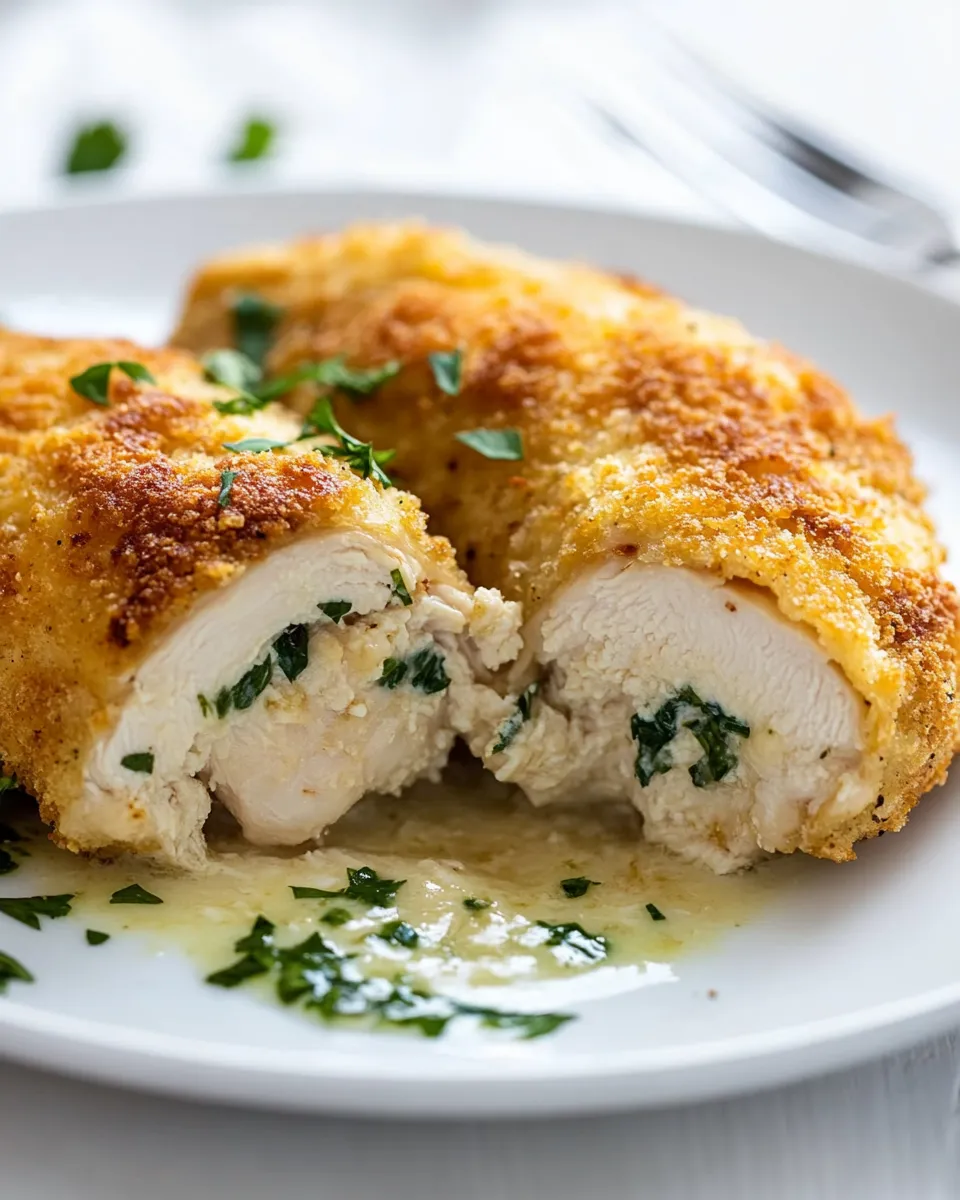
- Place chicken breasts on a cutting board. Using a sharp knife held parallel to the board, butterfly each breast by cutting through the middle lengthwise, leaving one edge intact so the breast opens like a book.
- Divide the butter into four portions (about 1½ tablespoons each). In the center of each opened breast place a portion of butter, 1 teaspoon chopped parsley, a small pinch of minced garlic, and a sprinkle of lemon pepper seasoning.
- Fold the breasts closed over the filling and press the edges firmly to seal.
- Set up three shallow pans: whisk the eggs in one, place the panko in a second, and combine the flour and salt in the third.
- Heat about 3/4 inch of oil in a large skillet over medium heat until shimmering but not smoking.
- Working one at a time, dredge each sealed breast in the flour mixture, then dip thoroughly in the beaten eggs to coat completely, and finally press into the panko to form an even crust.
- Carefully place the breaded breasts in the hot oil and cook for 4–5 minutes per side, flipping gently once, until golden brown and cooked through.
- Transfer the cooked breasts to a paper towel–lined plate to drain briefly, then serve warm.
Notes
- Use small breasts (about 4–5 oz each) for stovetop cooking.
- If breasts are larger, finish in the oven or cut into cutlets before proceeding.
- Beat eggs well so they fully coat and seal the breasts.
- Press breadcrumbs firmly to ensure an even crust.
- Maintain medium heat so crust browns without undercooking the interior.