Easy Flaky All Butter Pie Crust
This is a straightforward, all-butter pie crust that delivers consistent flake and flavor without drama. I use it for fruit pies, tarts, and anytime the filling needs a tender, buttery edge. It’s forgiving, predictable, and worth learning — the techniques matter more than perfect measurements.
There are a few small timing tricks that change everything: very cold butter, short pulses, brief resting in the fridge. Follow them and you’ll get that layered texture everyone loves. If you bake often, this will become your default crust.
I wrote the steps so you can move through them with confidence: measure, pulse, chill, roll, and bake when needed. Read the ingredients list and tools at a glance, then follow the method. No fluff. Just a reliable crust.
What to Buy
Keep your shopping list tight. Buy a high-quality unsalted butter — it’s the main flavor. If you bake regularly, buy a block, not spreadable butter, and keep it well chilled. A sturdy all-purpose flour is fine here; no specialty flours needed.
Other pantry items are basic: salt, a bit of sugar (optional), and eggs for brushing if you blind-bake. You’ll also want pie weights or dried beans saved just for blind-baking. Those small investments make a huge difference in the final texture.
Ingredients
- 2 ½ cups (12 ½ ounces) all-purpose flour, divided — provides structure; reserving some flour helps control texture.
- 1 teaspoon salt — balances and enhances butter flavor.
- 1 tablespoon sugar, optional (omit for savory pies) — adds a touch of sweetness and browning for sweet pies.
- 1 cup very cold unsalted butter, cut into tablespoon slices — the fat that creates flake; keep it cold for layers.
- 5–7 tablespoons very cold ice water — binds the dough; add only enough so it just holds together.
- 2 tablespoons egg whites, lightly beaten for brushing on the crust — sets and glosses the surface after blind baking.
Flaky All Butter Pie Crust, Made Easy
- Add 1 1/2 cups (of the 2 1/2 cups) all-purpose flour, the 1 teaspoon salt, and the 1 tablespoon sugar (if using) to the bowl of a large food processor. Pulse 1–2 times to combine.
- Add the 1 cup very cold unsalted butter, cut into tablespoon slices, to the processor. Pulse until the mixture resembles coarse crumbs with pea-sized pieces of butter; do not puree into a paste.
- Add the remaining 1 cup all-purpose flour and pulse 3–4 times more just until the flour is distributed and butter pieces are still visible.
- With the processor running in short pulses, add 5 tablespoons very cold ice water, a little at a time, pulsing after each addition. Stop adding water when the dough just begins to clump and holds together when squeezed. If the dough is still dry, add up to 2 more tablespoons ice water (for a total of 7 tablespoons max), pulsing as needed. Do not overwork the dough.
- Turn the dough out onto a work surface and gather it into a shaggy mass. Do not knead.
- Divide the dough into two equal portions.
- Shape each portion into a ball, then press each ball into a thick disk. Wrap each disk tightly in plastic wrap.
- Refrigerate the wrapped disks for 1 hour.
- When ready to roll, remove one disk from the refrigerator and let it sit at room temperature for 10 minutes to soften slightly.
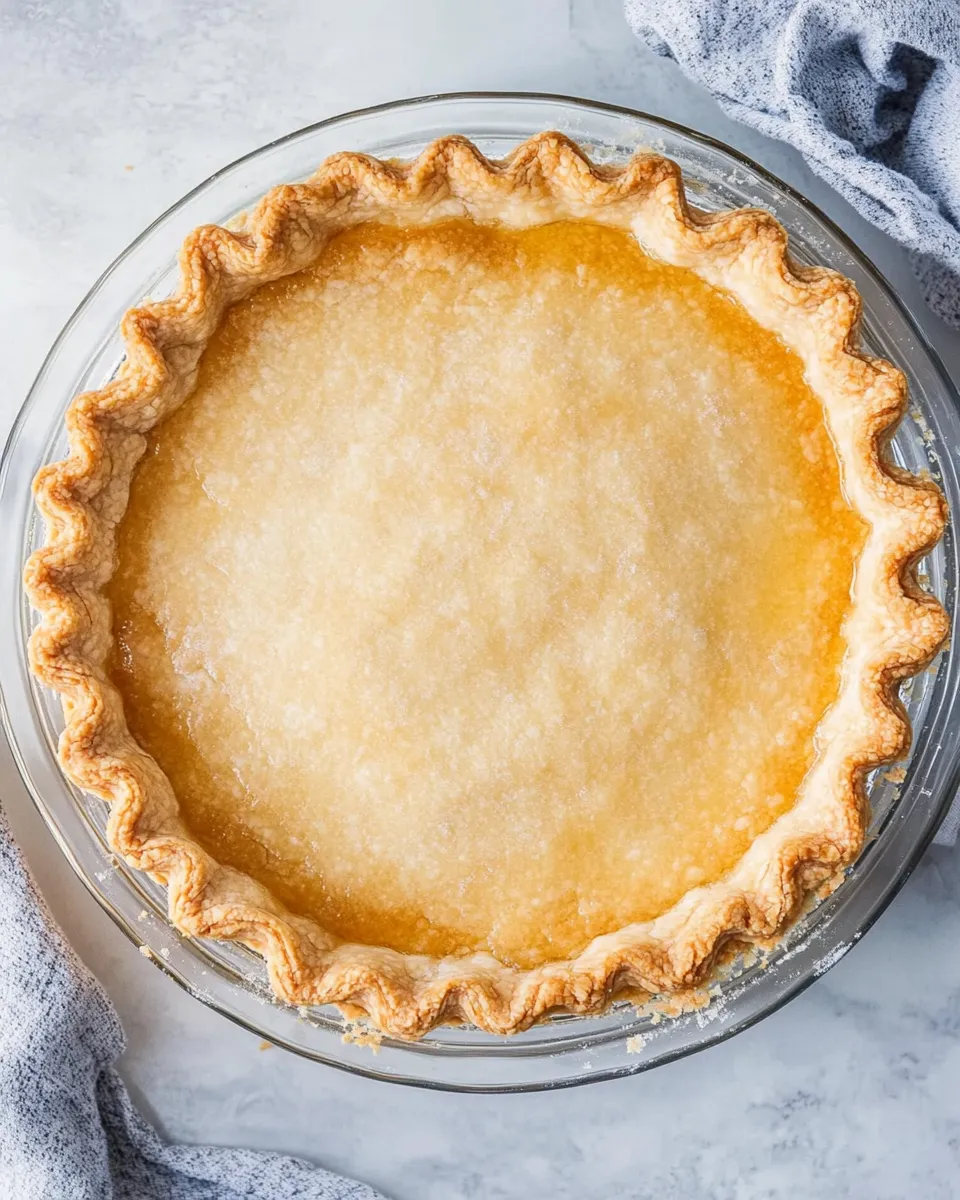
- On a lightly floured surface (use a little of the measured flour), roll the disk to approximately a 12-inch diameter. Roll the dough up over the rolling pin and gently unroll it over a 9-inch (or your pan size) pie pan. Press the dough into the base and sides of the pan.
- Trim the dough so there is about a 1-inch overhang all around. Fold the overhang under itself to create a thicker edge.
- To crimp the edge: use the thumb and index finger of one hand to push the dough inward while using the index finger of the other hand to press from the outside, forming a fluted ridge. (Any crimp style you prefer is fine.)
- Optional: return the lined pie pan to the refrigerator for about 30 minutes to chill; this helps produce a flakier crust.
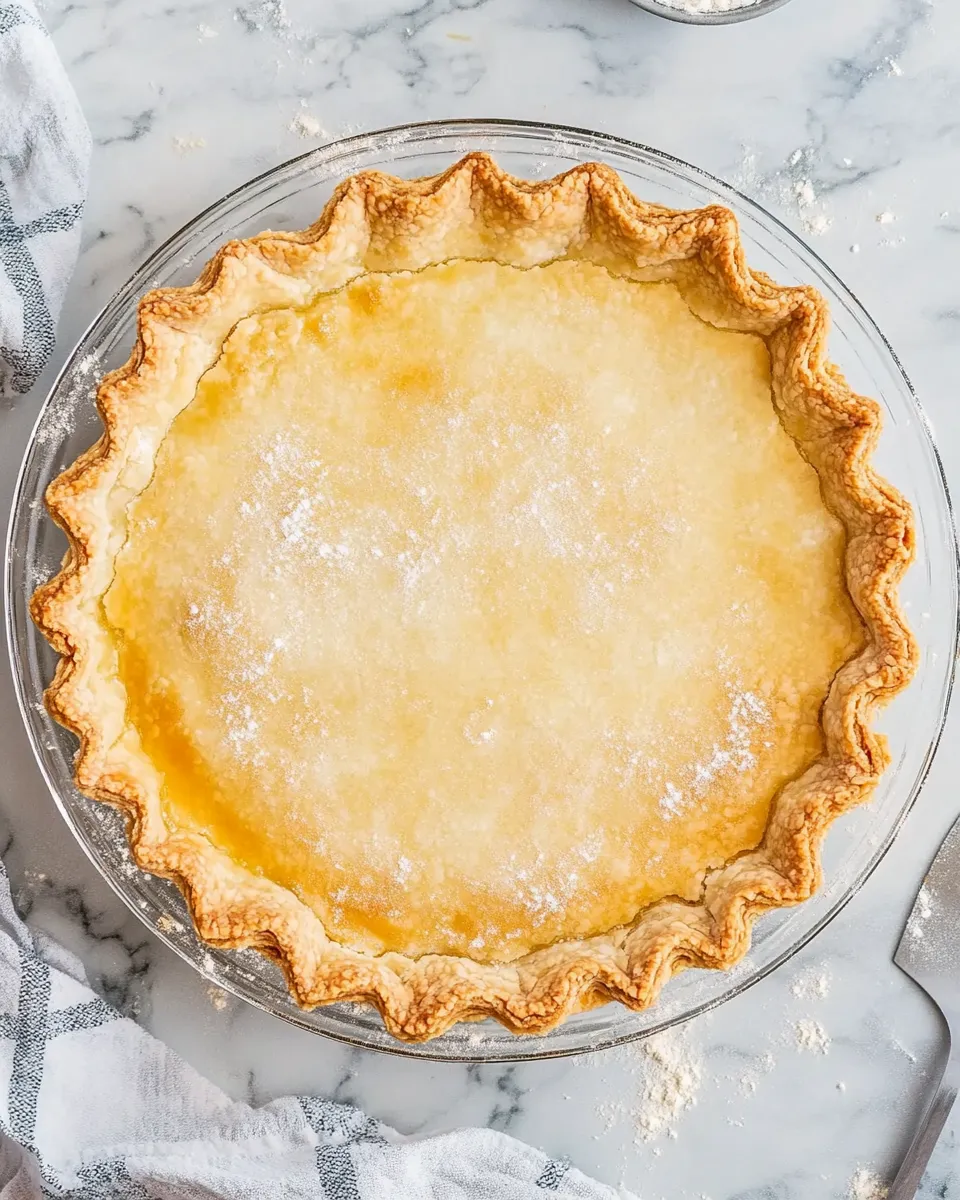
- For blind baking (if your filling requires a prebaked crust): preheat the oven to 450°F. Prick the bottom of the crust a few times with a fork if desired, then cover the crust with aluminum foil and fill the foil with dry beans or pie weights to weigh the crust down.
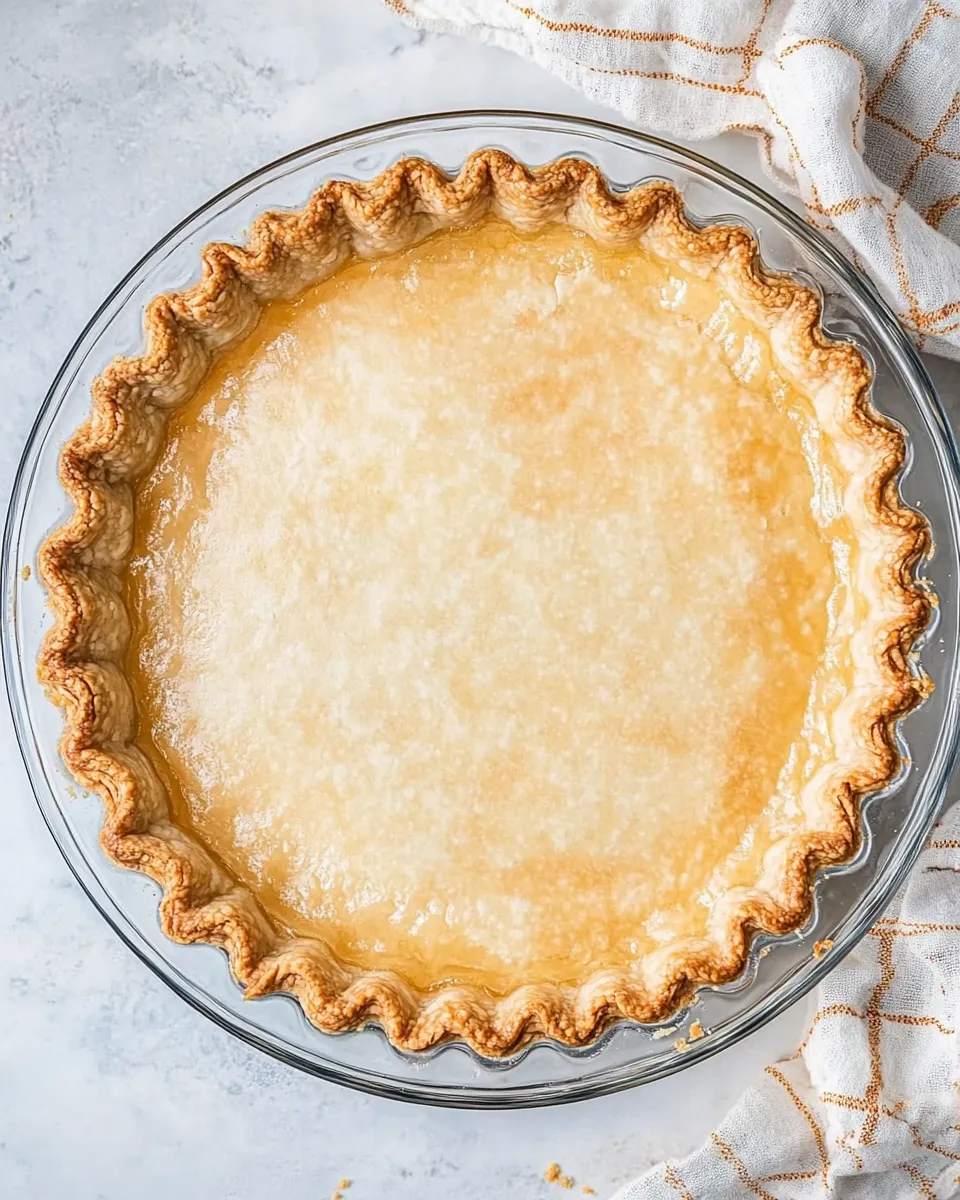
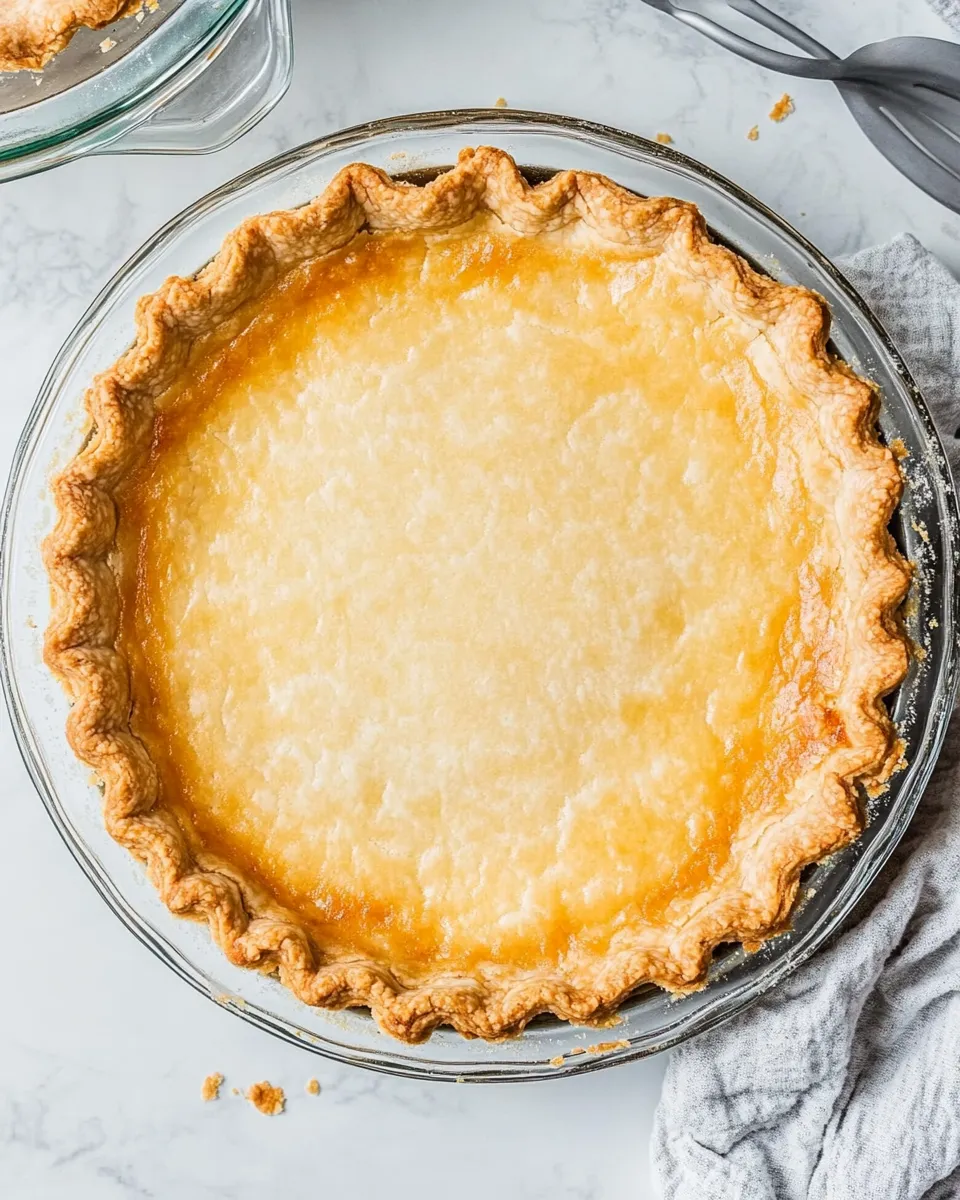
- Bake the crust with weights for 15 minutes. Remove the foil and weights, then brush the crust with the 2 tablespoons of lightly beaten egg whites.
- Return the crust to the oven and bake an additional 3–4 minutes to set the surface. Remove from oven and proceed with your filling.
- For a double-crust pie: roll the second chilled disk to approximately 12 inches, place it over the filled bottom crust, trim to a 1-inch overhang, fold under and crimp the edges as in step 12, and vent the top with a few slits in the center to allow steam to escape. Then bake according to your pie filling recipe.
Why You’ll Love This Recipe
It’s reliable. The method focuses on temperature control and minimal mixing, which produces visible layers instead of a dense slab. Because it’s all butter, the flavor is straightforward and rich — nothing masks the buttery notes but also nothing overwhelms.
It’s versatile. Use it for single-crust fruit pies, custard tarts, or as the base for savory quiches. The optional sugar keeps it neutral for either sweet or savory applications. And because you roll two discs, you can make two pies or freeze one for later.
Smart Substitutions
Be wary of substituting the butter. If you must, shortening will give a slightly different texture — more tender but less buttery flavor. I don’t recommend swapping the butter measurement or switching to margarine; stick to the 1 cup of very cold unsalted butter for the intended result.
If you want a whole-grain note, replace up to ¼ cup of the all-purpose flour with finely ground whole wheat, but expect a slightly firmer crust and darker color. For gluten-free, this recipe would need a tested blend; don’t substitute single flours without a proven recipe.
Tools & Equipment Needed
Essentials:
- Food processor — for quick, even cutting of butter into flour. Short pulses are key.
- Rolling pin — a basic straight pin works well.
- Pie pan (9-inch) — metal or glass, whichever you prefer for baking.
- Plastic wrap — for chill and storage of disks.
- Pie weights or dry beans — for blind baking to keep the crust flat.
Optional but helpful: a bench scraper to lift dough, a pastry brush for egg whites, and a small ruler if you like precise edges. None of these are required, though; you can manage with just the basics.
Troubles You Can Avoid
Dough that’s too warm is the most common problem. If the butter melts into the flour, you’ll lose flake. Use very cold butter and pulse briefly. Chill the disks a full hour — don’t skip it. If the dough won’t hold together, add ice water by the tablespoon as directed, up to the 7-tablespoon max.
Overworking is another frequent issue. Stop pulsing when you see pea-sized butter bits. Gather gently. Don’t knead; that develops gluten and makes the crust tough. Finally, if the crust collapses during blind baking, check that it was chilled long enough and that you used enough weights.
In-Season Flavor Ideas
Spring: lemon curd or strawberry-rhubarb. The buttery crust offsets the bright fruit acids.
Summer: mixed berry or peach. Brush a thin apricot glaze on lattice tops if you like a glossy finish.
Fall: apple with a cinnamon-spiced filling or pear and almond frangipane. The crust pairs beautifully with warm spices.
Winter: use this crust for lemon meringue or a holiday mincemeat pie. It stands up to bold fillings without losing its texture.
Testing Timeline
Make-ahead: Dough disks can be refrigerated for up to 48 hours wrapped tightly. This gives you flexibility for busy schedules.
Freezing: Freeze wrapped disks for up to 3 months. Thaw overnight in the refrigerator before rolling, or let sit at room temperature for 10–15 minutes before rolling if still slightly firm.
Baking timeline: If blind baking, follow the 15-minute bake with weights, then 3–4 minutes after brushing egg whites. For filled pies, bake according to the filling’s recipe; the crust holds up well to standard pie bake times.
Cooling, Storing & Rewarming
Cool pies on a wire rack until they reach warm temperature; this helps the filling set and keeps the crust from steaming and getting soggy. For fruit pies, let them rest at least 2 hours before slicing for cleaner slices.
Store baked pies: at room temperature for up to 2 days (covered loosely). For longer storage, refrigerate up to 4 days for fruit or custard pies. Freeze whole or in slices for up to 2 months; wrap tightly to protect against freezer burn. Reheat slices in a 325°F oven for 10–12 minutes to refresh the crispness.
Flaky All Butter Pie Crust Q&A
Q: My dough is crumbly and won’t come together. A: Add more ice water, one tablespoon at a time, up to the 7-tablespoon total. Pulse only enough to bring it together.
Q: The butter melted while I worked. A: Chill the dough disks for an hour. If the butter has melted before chilling, return the dough to the refrigerator until firm, then proceed; the crust will still work but may be less flaky.
Q: How do I avoid a soggy bottom? A: Blind bake with weights if the filling is very wet. Also prebake for a short time and brush with egg white as instructed to seal the surface before adding a wet filling.
Q: Can I brush the crust with whole egg instead of egg white? A: Yes, but egg yolk will brown more deeply and add fat; egg white gives a subtle sheen and sets without extra color. Follow the recipe’s egg-white step for the intended result.
Bring It to the Table
This crust is a template: bake a simple apple pie, a lemon tart, or a savory quiche and watch how the crisp, layered edge elevates the whole dish. Serve slices at room temperature for the best texture. If you want a showstopper, pair with a scoop of vanilla ice cream or a dollop of lightly sweetened whipped cream.
Trust the process: cold butter, short pulses, a brief chill, and measured water. That’s the rhythm that makes a consistently flaky, all-butter crust. Once you run through the steps a couple of times, you’ll be able to assemble a pie in a relaxed, confident way — and the results will speak for themselves.
Easy Flaky All Butter Pie Crust
Ingredients
Equipment
Method
- Add 1 1/2 cups (of the 2 1/2 cups) all-purpose flour, the 1 teaspoon salt, and the 1 tablespoon sugar (if using) to the bowl of a large food processor. Pulse 1–2 times to combine.
- Add the 1 cup very cold unsalted butter, cut into tablespoon slices, to the processor. Pulse until the mixture resembles coarse crumbs with pea-sized pieces of butter; do not puree into a paste.
- Add the remaining 1 cup all-purpose flour and pulse 3–4 times more just until the flour is distributed and butter pieces are still visible.
- With the processor running in short pulses, add 5 tablespoons very cold ice water, a little at a time, pulsing after each addition. Stop adding water when the dough just begins to clump and holds together when squeezed. If the dough is still dry, add up to 2 more tablespoons ice water (for a total of 7 tablespoons max), pulsing as needed. Do not overwork the dough.
- Turn the dough out onto a work surface and gather it into a shaggy mass. Do not knead.
- Divide the dough into two equal portions.
- Shape each portion into a ball, then press each ball into a thick disk. Wrap each disk tightly in plastic wrap.
- Refrigerate the wrapped disks for 1 hour.
- When ready to roll, remove one disk from the refrigerator and let it sit at room temperature for 10 minutes to soften slightly.
- On a lightly floured surface (use a little of the measured flour), roll the disk to approximately a 12-inch diameter. Roll the dough up over the rolling pin and gently unroll it over a 9-inch (or your pan size) pie pan. Press the dough into the base and sides of the pan.
- Trim the dough so there is about a 1-inch overhang all around. Fold the overhang under itself to create a thicker edge.
- To crimp the edge: use the thumb and index finger of one hand to push the dough inward while using the index finger of the other hand to press from the outside, forming a fluted ridge. (Any crimp style you prefer is fine.)
- Optional: return the lined pie pan to the refrigerator for about 30 minutes to chill; this helps produce a flakier crust.
- For blind baking (if your filling requires a prebaked crust): preheat the oven to 450°F. Prick the bottom of the crust a few times with a fork if desired, then cover the crust with aluminum foil and fill the foil with dry beans or pie weights to weigh the crust down.
- Bake the crust with weights for 15 minutes. Remove the foil and weights, then brush the crust with the 2 tablespoons of lightly beaten egg whites.
- Return the crust to the oven and bake an additional 3–4 minutes to set the surface. Remove from oven and proceed with your filling.
- For a double-crust pie: roll the second chilled disk to approximately 12 inches, place it over the filled bottom crust, trim to a 1-inch overhang, fold under and crimp the edges as in step 12, and vent the top with a few slits in the center to allow steam to escape. Then bake according to your pie filling recipe.
Notes
Alternatively, you can make the crust in advance and it will keep airtight in the freezer for up to 3months. Thaw before rolling.