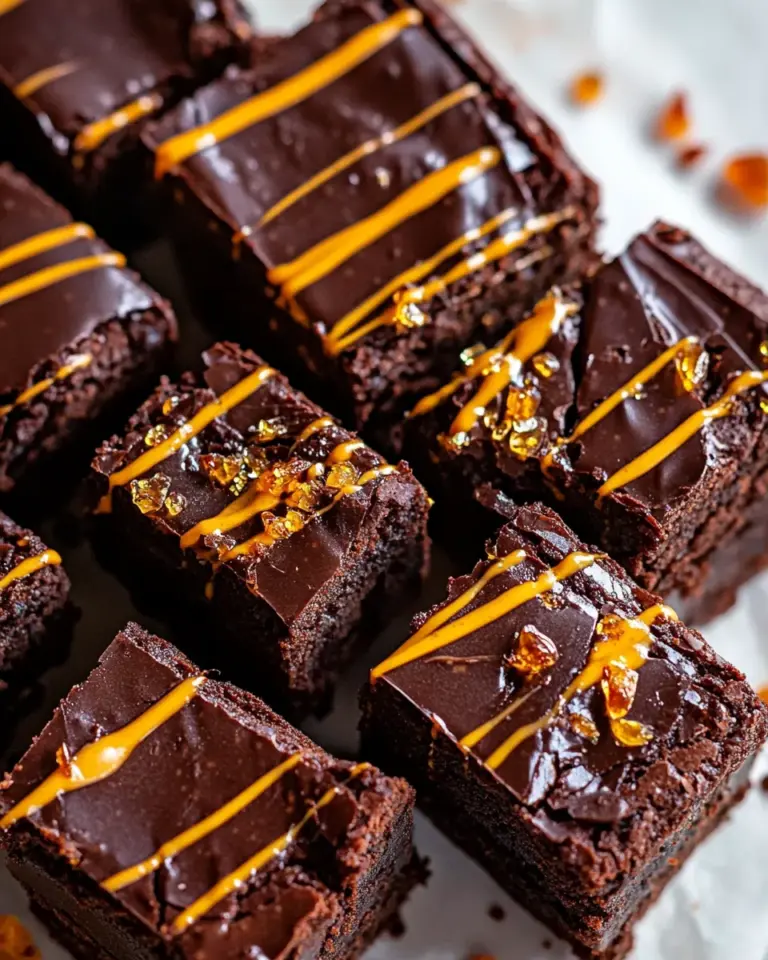
Fudge Cookies
These fudge cookies are the kind I reach for when I want chocolate without turning on the oven. They’re dense, intensely chocolatey, and come together in minutes with just four pantry ingredients. I love that they slice through cravings and hold up well for snacks, dessert trays, or an easy gift.
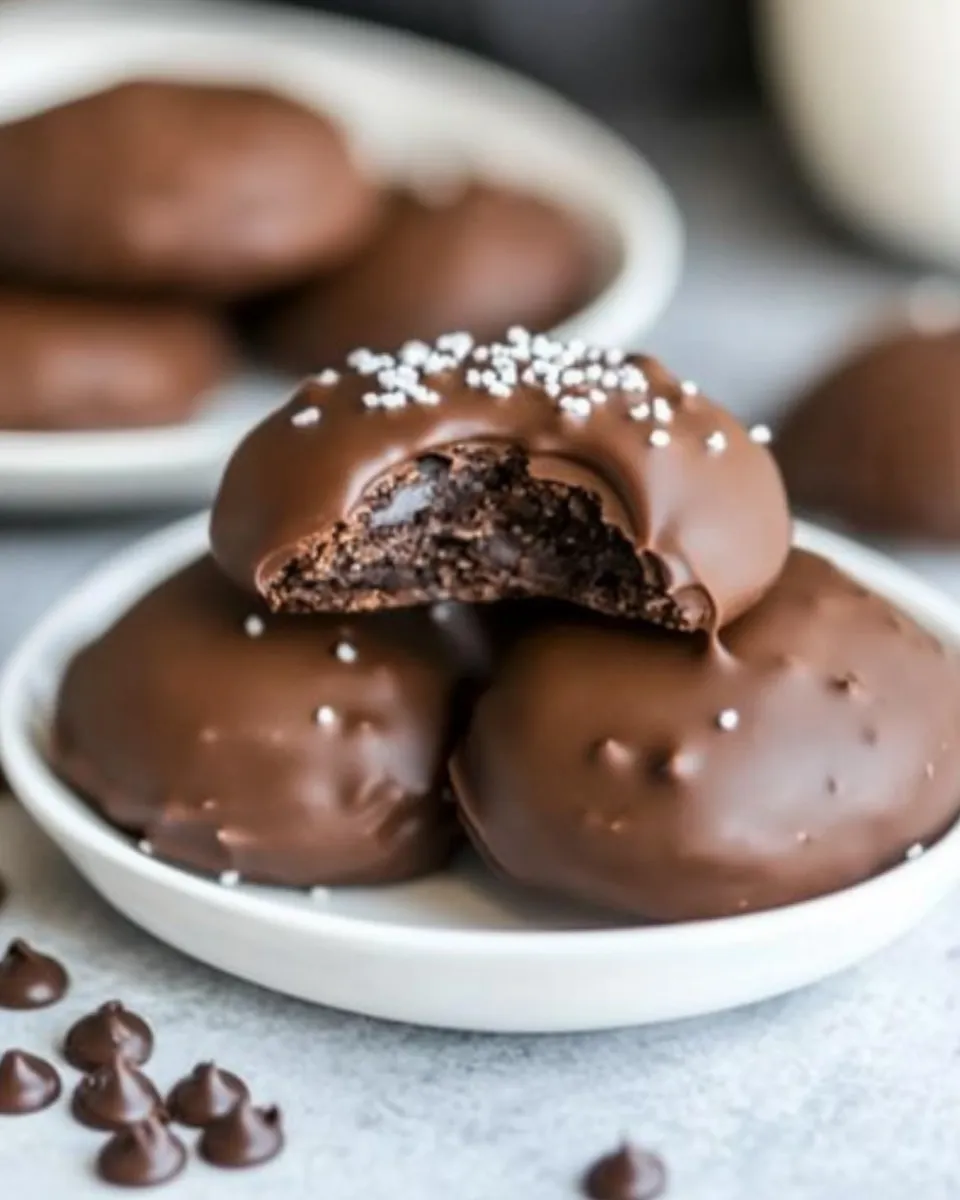
The method is straightforward: mix, shape, chill, and coat. The coconut flour gives structure, maple syrup binds, the healthy Nutella brings the fudgy base, and chocolate chips finish with a glossy shell. No baking, no fuss—just a few minutes of hands-on time and a short chill.
I’ll walk you through the exact ingredient list and step-by-step directions, then share practical swaps, common mistakes, and storage tips from testing. Keep your measuring cups handy and a tray lined with parchment; these cookies are simple but they respond to small technique tweaks.
Ingredient List
- 2 cups healthy Nutella — the primary flavor and fat source; provides the fudgy, chocolate-hazelnut base.
- 1/2 cup maple syrup — sweetens and helps bind the dough; adjust slightly if you prefer softer or firmer texture.
- 3/4 cup coconut flour — absorbs moisture and gives structure; coconut flour is very absorbent, so measure carefully.
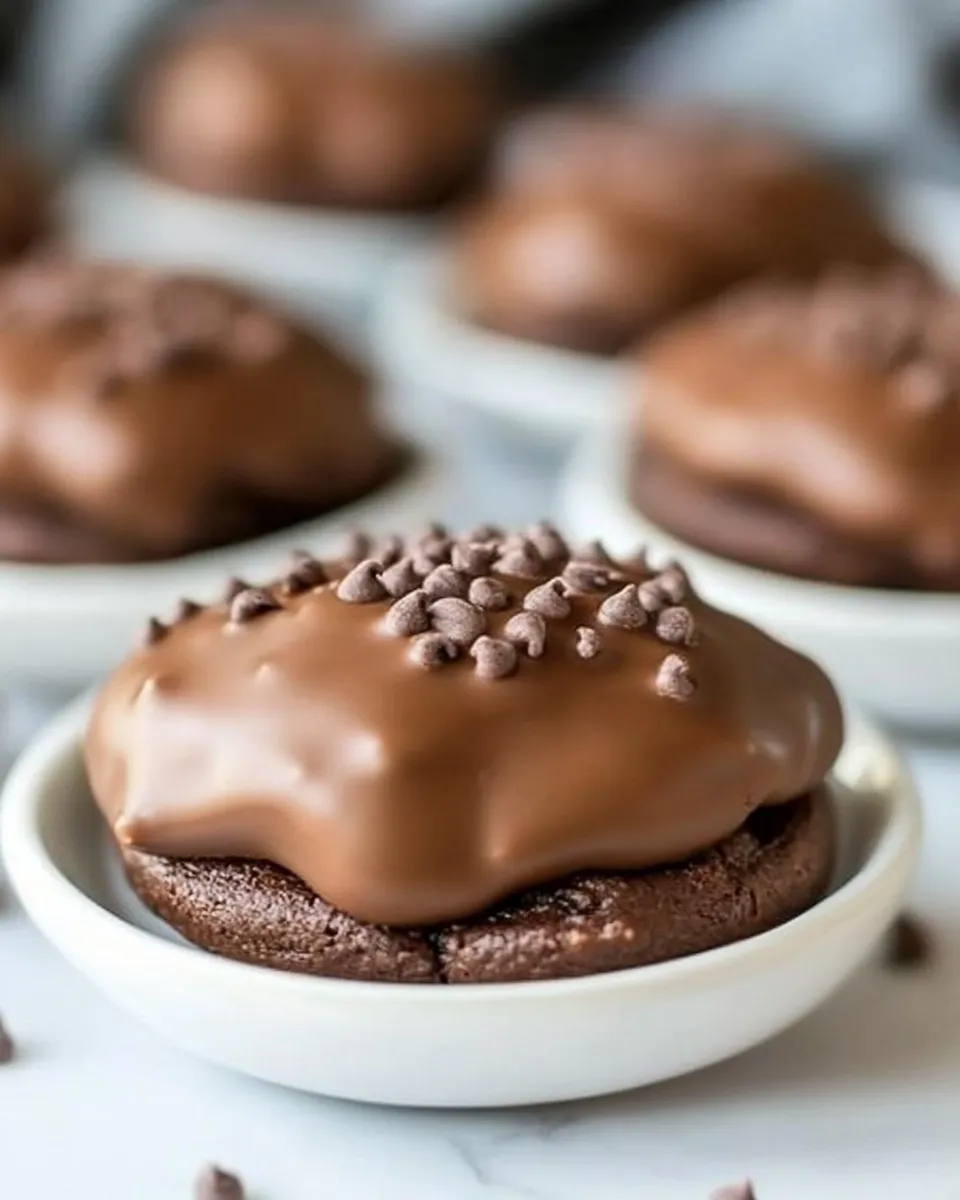
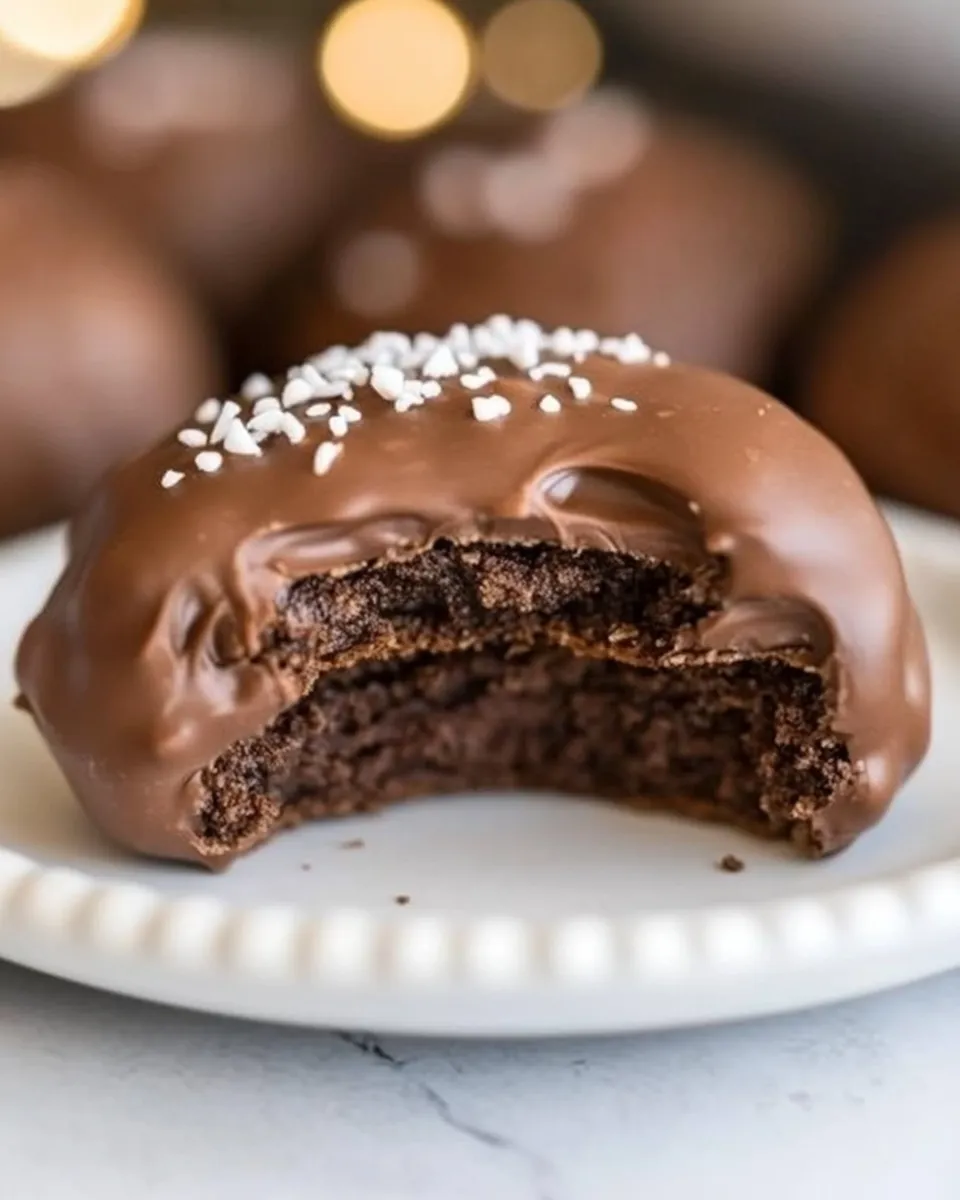
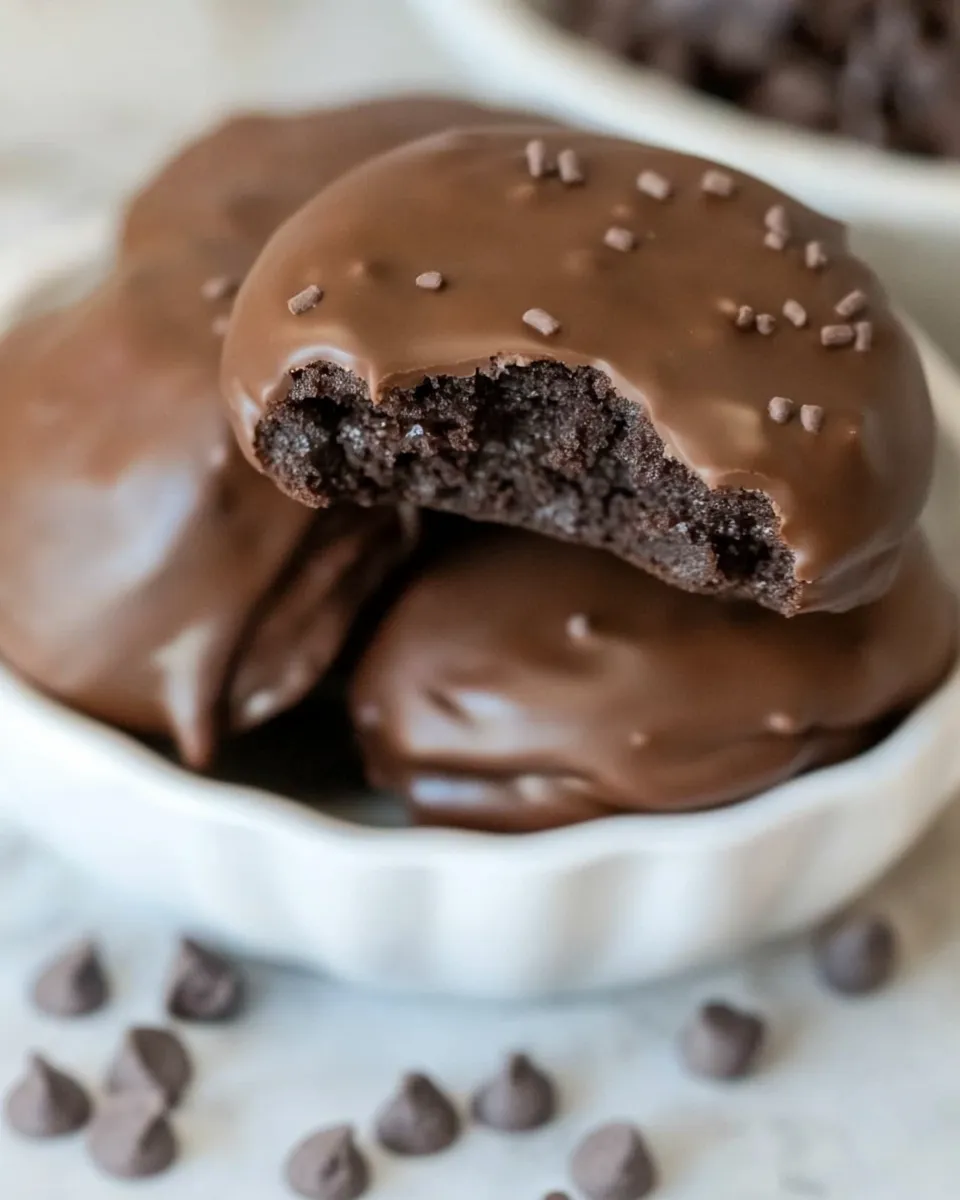
- 2 cups chocolate chips — for coating the cookies; melts to form a glossy, settable shell.
Fudge Cookies, Made Easy
- Line a large plate or tray with parchment paper and set aside.
- In a large mixing bowl, combine 2 cups healthy Nutella, 1/2 cup maple syrup, and 3/4 cup coconut flour. Stir until the mixture is smooth and holds together as a thick, moldable batter. If the batter is too dry or crumbly, add a little more maple syrup, a small amount at a time, until the dough is moist and sticks together (do not add any ingredients not listed).
- Using clean hands, scoop and roll the dough into small balls (about 1 inch / bite-sized or your preferred size). Place the balls on the lined tray, leaving a little space between each.
- Press each ball gently with your palm or the bottom of a glass to flatten into a small cookie shape.
- Transfer the tray to the freezer and chill until the cookies are firm, about 15–30 minutes.
- While the cookies chill, melt 2 cups chocolate chips in a heatproof bowl. Microwave method: heat in 20–30 second bursts, stirring between each burst, until smooth. Double-boiler method: set a heatproof bowl over simmering water and stir the chips until melted and smooth. Use whichever method you prefer.
- Remove the cookies from the freezer. Working one at a time, use two forks to lower a cookie into the melted chocolate, fully coat it, lift it out, and let excess chocolate drip back into the bowl. Place the coated cookie back on the parchment.
- When all cookies are coated, refrigerate the tray until the chocolate coating is set, about 20–30 minutes.
- Once set, the cookies are ready to serve. Store any leftovers refrigerated.
Why This Fudge Cookies Stands Out
Recipe simplicity is the star here. With just four ingredients you get a remarkably rich, fudgy bite that feels indulgent but requires very little time. The combination of a spread-like base and coconut flour creates a dense texture that mimics a baked brownie without an oven.
The contrast between the soft, fudgy interior and the set chocolate coating gives these cookies a professional touch. They look polished on a platter but don’t need tempering or complicated techniques—microwave melting or a double boiler both work fine.
Finally, the recipe is forgiving. The directions include a small texture adjustment you can make (add a bit more maple syrup if too dry), which means you can adapt to small variations in ingredient moisture or humidity without wrecking the cookies.
Swap Guide
- Adjusting sweetness/texture — increasing or decreasing the 1/2 cup maple syrup will directly change chewiness and sweetness; add in tiny increments if altering.
- Chocolate chip choices — use whatever 2 cups chocolate chips you already have for the coating; darker chips yield a less sweet shell, milkier chips create a sweeter finish.
- Coconut flour handling — coconut flour is highly absorbent; if your batter seems too dry, the directions permit adding small amounts of the listed maple syrup until it holds.
- Size variations — rolling into larger or smaller balls only changes chilling time and yield; shape them consistently for even coating.
Cook’s Kit
- Large mixing bowl — for combining the dough ingredients.
- Measuring cups — accurate measuring of 2 cups, 3/4 cup, and 1/2 cup matters for texture.
- Plate or tray and parchment paper — for chilling and setting the coated cookies.
- Freezer and refrigerator — freezer quick-chills the shapes; fridge sets the chocolate coating.
- Heatproof bowl and microwave or small saucepan for double boiler — to melt 2 cups chocolate chips safely.
- Two forks — to lower and lift cookies during coating without making a mess.
- Clean hands — the simplest tools for shaping the dough into consistent balls.
Learn from These Mistakes
- Skipping the chill stage — if you try to coat unchilled dough, the cookies will deform and the coating won’t set cleanly. Chill 15–30 minutes as directed.
- Using too much coconut flour — because coconut flour soaks up moisture, adding more than listed will make a dry, crumbly dough. Stick to 3/4 cup and adjust only with the listed maple syrup.
- Melting chocolate too hot — overheating chocolate can seize or burn. Use short microwave bursts and stir, or low, gentle heat over simmering water until smooth.
- Coating multiple cookies at once — work one at a time for a tidy coating and to avoid the chocolate cooling and thickening mid-process.
- Not letting the coating set fully — placing the tray straight into the fridge after coating gives the shell a clean snap; rushing this step can leave fingerprints or smudges.
Season-by-Season Upgrades
These cookies are a blank canvas because the base is already rich chocolate. Small, simple tweaks that use what’s in the recipe produce seasonal feels without extra shopping.
- Winter — increase the chocolate coating ratio slightly for a deeper, richer shell that feels more decadent on cold evenings.
- Spring — keep the coating lighter and press a few extra chocolate chips onto the top before chilling for a textured finish that looks fresh and casual.
- Summer — serve straight from the fridge for a cool, refreshing bite; the chilled center is especially pleasant in warm weather.
- Fall — if you like a softer cookie, add a touch more maple syrup during mixing to give a chewier mouthfeel that pairs well with fall drinks.
What I Learned Testing
Testing revealed that timing and temperature matter more than complicated technique. I found that chilling the shaped cookies in the freezer for the full 30 minutes made coating easiest—shorter times made the dough soft and slippery. Once coated, a solid 20–30 minutes in the refrigerator ensures the shell sets completely and prevents smudging.
Measuring coconut flour accurately changed outcomes the most. Because it’s so thirsty, even a slightly heaping scoop can turn a smooth batter into a crumbly one. Spoon the flour into the cup and level it for best results.
Finally, working with melted chocolate in small batches keeps it glossy. If the chocolate begins to thicken while you’re coating, briefly reheat in short bursts and stir until smooth again.
Freezer-Friendly Notes
These cookies freeze well if you follow a couple of quick steps. After coating and allowing the chocolate to set, flash-freeze the cookies on a single layer until solid, then transfer them to an airtight container or freezer bag. Separate layers with parchment to prevent sticking.
To serve, thaw in the refrigerator for 30–60 minutes or at room temperature for 10–15 minutes, depending on the room’s warmth. For best texture, eat refrigerated or slightly chilled; repeated freeze-thaw cycles can affect the chocolate shell’s shine.
Helpful Q&A
- Are these baked? No. The recipe is no-bake: the structure comes from coconut flour and chilling rather than oven time.
- How long will they keep? Stored in the refrigerator, they keep well for about 7–10 days. Keep them in an airtight container to prevent absorbing other flavors.
- Can I shorten chilling time? You can chill on the shorter end (15 minutes) if your freezer is very cold, but full chilling makes coating cleaner and easier.
- Will the coating crack? If you handle them too roughly after the shell sets or expose them to temperature swings, the shell may develop hairline cracks. Keep them consistently chilled if you need a pristine appearance.
- What if the dough is too sticky to roll? Wash and dry your hands between batches, or chill the bowl for a few minutes to firm up the dough slightly before rolling.
Serve & Enjoy
Arrange these fudge cookies on a platter straight from the fridge for a neat presentation, or let them sit at room temperature a few minutes for a softer bite. They pair well with coffee or tea and travel nicely in a sealed container for potlucks or picnics.
For gifting, stack them between layers of parchment in a box or tin. They look special without extra decoration, but saving a few chocolate chips to press on top before the shell sets gives a handcrafted touch. Enjoy—they’re quick to make and reliably satisfying.
Fudge Cookies
Ingredients
Equipment
Method
- Line a large plate or tray with parchment paper and set aside.
- In a large mixing bowl, combine 2 cups healthy Nutella, 1/2 cup maple syrup, and 3/4 cup coconut flour. Stir until the mixture is smooth and holds together as a thick, moldable batter. If the batter is too dry or crumbly, add a little more maple syrup, a small amount at a time, until the dough is moist and sticks together (do not add any ingredients not listed).
- Using clean hands, scoop and roll the dough into small balls (about 1 inch / bite-sized or your preferred size). Place the balls on the lined tray, leaving a little space between each.
- Press each ball gently with your palm or the bottom of a glass to flatten into a small cookie shape.
- Transfer the tray to the freezer and chill until the cookies are firm, about 15–30 minutes.
- While the cookies chill, melt 2 cups chocolate chips in a heatproof bowl. Microwave method: heat in 20–30 second bursts, stirring between each burst, until smooth. Double-boiler method: set a heatproof bowl over simmering water and stir the chips until melted and smooth. Use whichever method you prefer.
- Remove the cookies from the freezer. Working one at a time, use two forks to lower a cookie into the melted chocolate, fully coat it, lift it out, and let excess chocolate drip back into the bowl. Place the coated cookie back on the parchment.
- When all cookies are coated, refrigerate the tray until the chocolate coating is set, about 20–30 minutes.
- Once set, the cookies are ready to serve. Store any leftovers refrigerated.
Notes
TO STORE:
Cookies can be stored at room temperature, provided the chocolate coating is firm. They will stay fresh in an airtight container for up to 2 weeks. If the chocolate coating is thin, it’s best to store them in the fridge.
TO FREEZE:
Leftover no-bake chocolate cookies can be stored in a freezer bag and kept frozen for up to 6 months.