Honey Bread
This honey bread is the kind of loaf I reach for when I want something gentle, reliably moist, and low-effort. It’s a slow-bake, single-bowl batter that leans on honey and brown sugar for flavor and a soft crumb. The long, low oven time develops a deep, almost caramelized sweetness without drying the interior.
There’s nothing finicky about this recipe: a 5×9-inch loaf pan, a mixer for the wet ingredients, and a patient watch at the 2½-hour mark. You’ll come away with a loaf that slices cleanly and holds up well for breakfasts, snack plates, or an easy dessert. I’ll walk you through the shopping, the step-by-step method, sensible swaps, and practical storage tips so you can make this again and again.
Your Shopping Guide
Aim for pantry-stable, everyday ingredients. The quantities are moderate, so you don’t need special packaging or odd measures. If you already buy a quart of milk and keep all-purpose flour on hand, this loaf will come together with what’s likely in your kitchen.
Buy a good jar of honey you enjoy eating by the spoon — it’s the star flavor. A firmly packed brown sugar gives the loaf its distinct molasses note, so don’t skimp on that if you want the intended flavor profile.
Stepwise Method: Honey Bread
Ingredients
- 1 cup honey — primary sweetener and flavor; contributes moisture and a mild floral note.
- 1 cup milk — hydrates the flour and softens the crumb; whole milk gives richer texture.
- 1 cup firmly packed brown sugar — adds depth and a touch of molasses flavor while helping with caramelization.
- 3½ cups all-purpose flour — structure for the loaf; measure by spooning into the cup and leveling for accuracy.
- 2 teaspoons ground cinnamon — warm spice that complements honey; even distribution avoids pockets of spice.
- 1 teaspoon baking soda — the leavening agent; helps the loaf rise during the long, low bake.
- ½ teaspoon salt — balances sweetness and enhances overall flavor.
Step-by-step
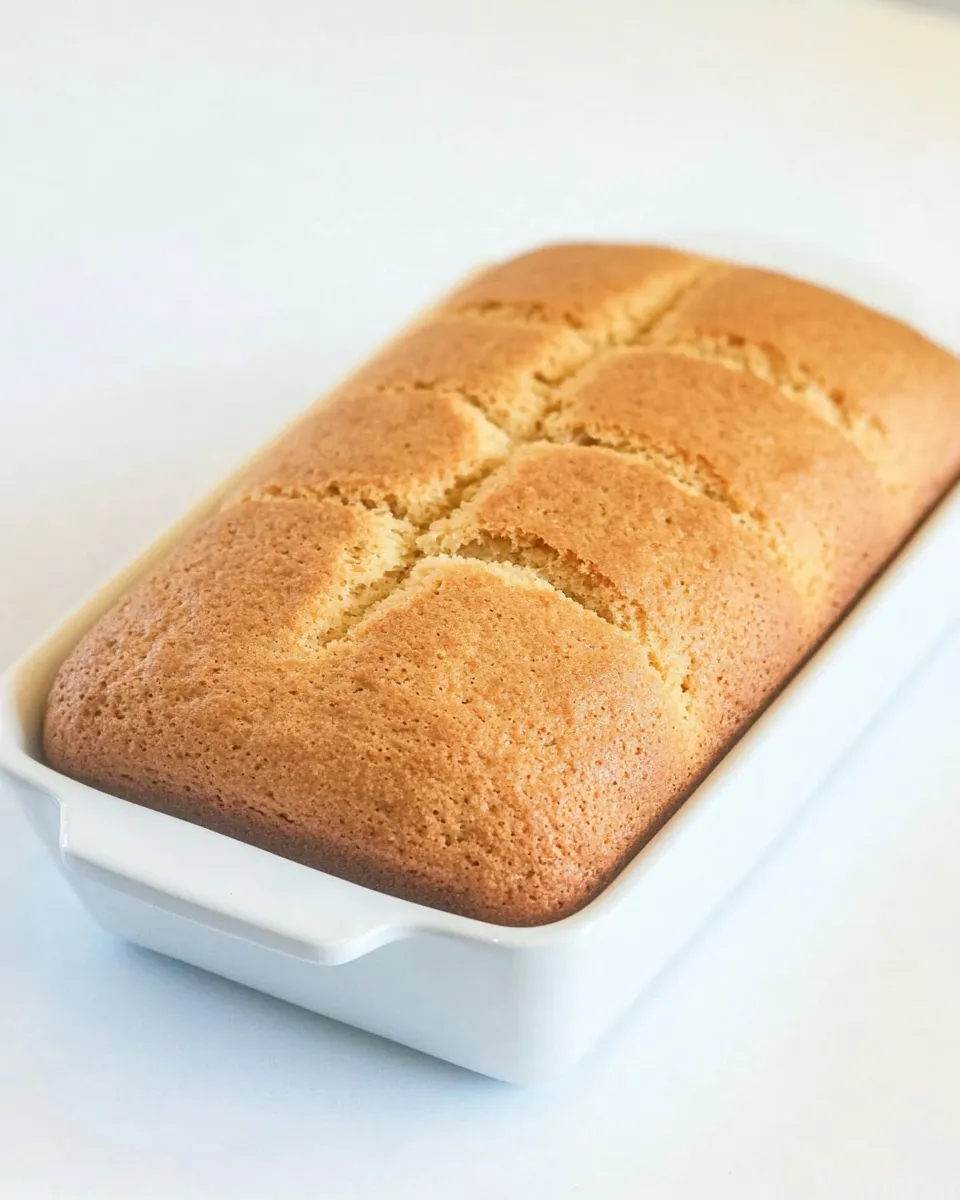
- Preheat the oven to 250°F. Spray a 5×9-inch loaf pan with nonstick spray and set aside.
- In a large bowl, combine 1 cup honey, 1 cup milk, and 1 cup firmly packed brown sugar. Beat with an electric mixer on medium speed until smooth and well blended.
- In a separate bowl, whisk together 3½ cups all-purpose flour, 2 teaspoons ground cinnamon, 1 teaspoon baking soda, and ½ teaspoon salt until evenly combined.
- Add the dry ingredients to the honey mixture and stir with a spatula or wooden spoon just until combined and no large streaks of flour remain; do not overmix.
- Pour the batter into the prepared 5×9-inch loaf pan and smooth the top.
- Bake in the preheated 250°F oven for about 3 hours, checking at 2½ hours. The bread is done when a toothpick inserted into the center comes out clean or with a few dry crumbs.
- Remove the pan from the oven and place it on a wire rack. Let the bread cool in the pan 10–15 minutes, then turn it out onto the rack and cool completely before slicing.
Why You’ll Keep Making It
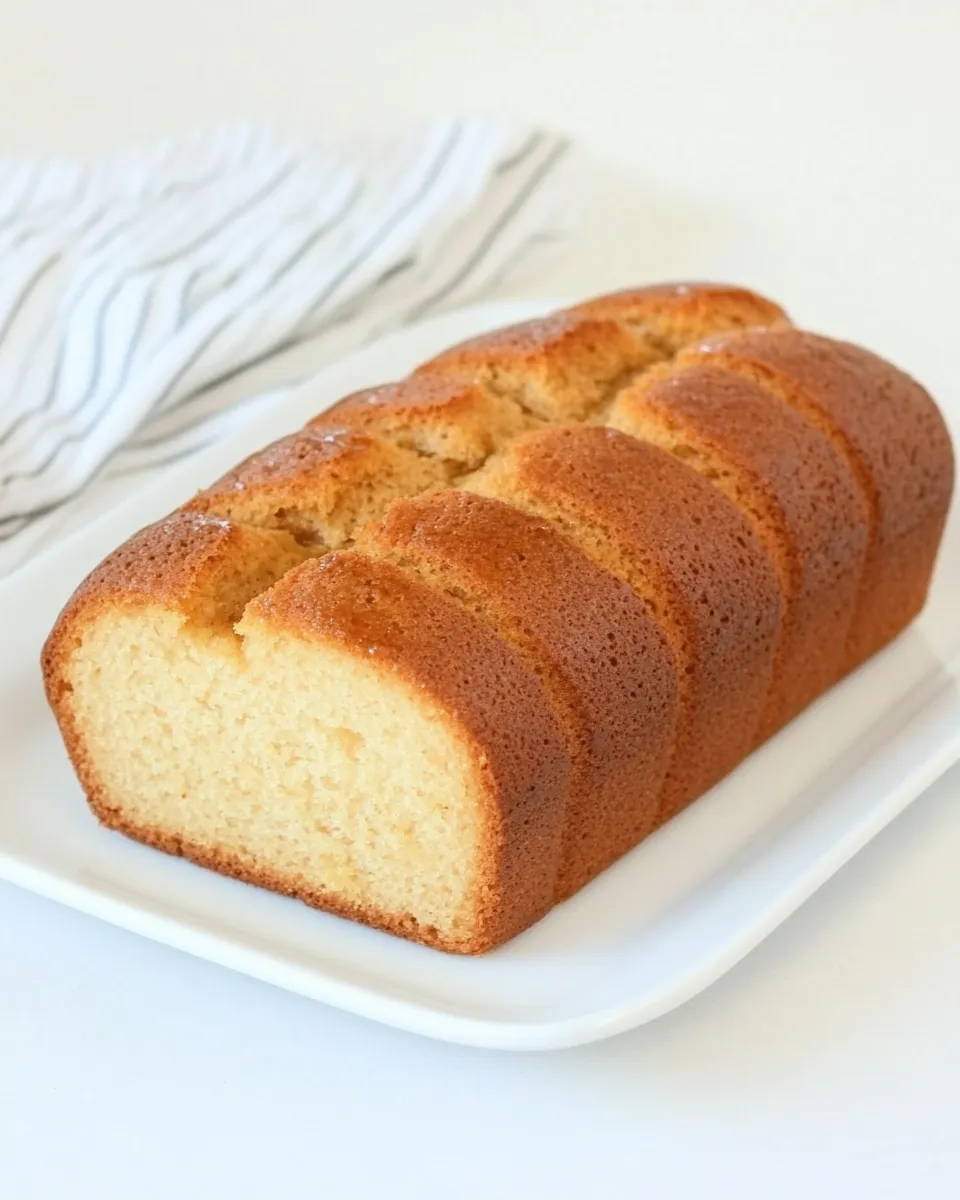
This loaf is unfussy and dependable. The long, slow bake gives the crumb time to set evenly while allowing honey and brown sugar to concentrate without burning. The result is a tender, moist slice that’s sweet but not cloying.
It’s also forgiving: you don’t need perfect technique or special equipment to get a great result. The method involves straightforward mixing and a watchful eye at the end of the bake. That makes this a go-to when you want something homemade without anxiety.
Budget & Availability Swaps
There’s no need to buy specialty items for this recipe. Choose budget-friendly versions of the staple ingredients when you need to save. Store-brand all-purpose flour and milk perform fine here.
If you prefer or need a dairy-free option, plant-based milks like soy or oat can be used 1:1. Using a milder-flavored honey will soften the honey note but keep the loaf’s texture intact. If you buy honey in larger jars, the cost per loaf drops quickly.
Recommended Tools
- 5×9-inch loaf pan — required size for the recipe to bake through as written.
- Nonstick spray — for easy release; or grease and flour the pan if you prefer.
- Electric mixer — speeds up combining the wet ingredients and ensures smoothness.
- Mixing bowls — one large for wet, one for dry; stainless or glass work well.
- Spatula or wooden spoon — fold the batter gently; avoid overworking it.
- Wire rack — cool the loaf evenly after the brief in-pan rest.
- Toothpick or cake tester — check doneness at the center.
- Oven thermometer (optional) — useful if your oven runs hot or cold; this recipe relies on maintaining a steady 250°F.
Troubles You Can Avoid
Low-and-slow baking lowers the risk of a dry exterior with an undercooked center, but a few pitfalls can still occur. Here’s what to watch for and how to fix or prevent each issue:
- Dense crumb: Measure flour correctly. Spoon the flour into the cup and level it off rather than scooping directly from the bag, which compacts the flour and adds too much.
- Undercooked center: Ovens vary. Check at 2½ hours, then every 10–15 minutes until a toothpick comes out clean. If the top browns too quickly, tent with foil while the center finishes.
- Overmixing: Stir only until flour streaks disappear. Overworking develops gluten and leads to toughness.
- Sticking to pan: Ensure the pan is well-sprayed. If using a darker pan, allow a slightly longer bake time and check earlier for doneness because heat conductance varies.
- Cracked top: A small crack is normal with this style of loaf. Avoid aggressive oven temperature spikes by preheating fully and opening the oven door minimally during baking.
Make It Year-Round
This loaf adapts to any season because its flavor profile is neutral and comforting. Serve it warm in colder months with a cup of tea or coffee. In warmer months, let it cool completely and slice thin; it pairs well with fresh fruit or a light spread.
For gatherings, slice the loaf the morning of and arrange on a platter for easy access. The loaf holds up well to transport and can be made a day ahead without significant loss of quality if stored correctly.
Chef’s Rationale
There’s intent behind every choice in this recipe. Honey and brown sugar together create an internal moisture and a layered sweetness that keeps the crumb soft as it cools. The baking soda provides lift while reacting with the brown sugar’s acidity and honey’s acidity, so the bread achieves a good rise even at a low temperature.
Using a 250°F oven and extending the bake time minimizes aggressive oven spring and prevents the exterior from setting too quickly. This gentle method lets the loaf bake evenly and develop a uniform texture from edge to center.
Storage Pro Tips
Store the cooled loaf at room temperature, wrapped tightly in plastic wrap or in an airtight container, for up to 3 days. For longer storage, wrap slices individually and freeze for up to 3 months. Thaw at room temperature or toast directly from frozen.
If refrigeration is necessary in warm, humid climates, wrap the loaf well to prevent it from absorbing odors and store it in the fridge for up to a week. Bring slices to room temperature or warm briefly before serving to regain a soft texture.
Frequently Asked Questions
Can I halve the recipe? Yes, you can halve everything, but use a smaller loaf pan and check the bake time earlier. The oven temperature remains the same; start checking for doneness after about 90 minutes for a half loaf.
Can I use different milk? Yes. Whole milk gives the richest crumb, but lower-fat and plant-based milks work. Use the same volume called for in the recipe.
Why such a low oven temperature? The 250°F bake allows the loaf to develop a tender crumb and avoid a dry exterior. It also encourages gentle caramelization of the honey and brown sugar without burning.
How do I know when it’s done? A toothpick inserted in the center should come out clean or with a few dry crumbs. Because of the loaf’s density from honey and brown sugar, a slightly moist toothpick can indicate it needs more time.
Wrap-Up
This Honey Bread is honest and satisfying: simple ingredients, an easy method, and a reliably pleasing result. Make it when you want a no-fuss loaf that performs well across breakfasts and snacks. Follow the steps closely, watch the bake toward the end, and you’ll have a tender, sweet loaf that becomes a quiet staple in your rotation.
When you bake it, let me know how you served it and whether you warmed a slice or kept it plain. Small notes like those help refine the loaf for your kitchen — and that’s what keeps a recipe useful for years.

Honey Bread
Ingredients
Equipment
Method
- Preheat the oven to 250°F. Spray a 5x9-inch loaf pan with nonstick spray and set aside.
- In a large bowl, combine 1 cup honey, 1 cup milk, and 1 cup firmly packed brown sugar. Beat with an electric mixer on medium speed until smooth and well blended.
- In a separate bowl, whisk together 3½ cups all-purpose flour, 2 teaspoons ground cinnamon, 1 teaspoon baking soda, and ½ teaspoon salt until evenly combined.
- Add the dry ingredients to the honey mixture and stir with a spatula or wooden spoon just until combined and no large streaks of flour remain; do not overmix.
- Pour the batter into the prepared 5x9-inch loaf pan and smooth the top.
- Bake in the preheated 250°F oven for about 3 hours, checking at 2½ hours. The bread is done when a toothpick inserted into the center comes out clean or with a few dry crumbs.
- Remove the pan from the oven and place it on a wire rack. Let the bread cool in the pan 10–15 minutes, then turn it out onto the rack and cool completely before slicing.