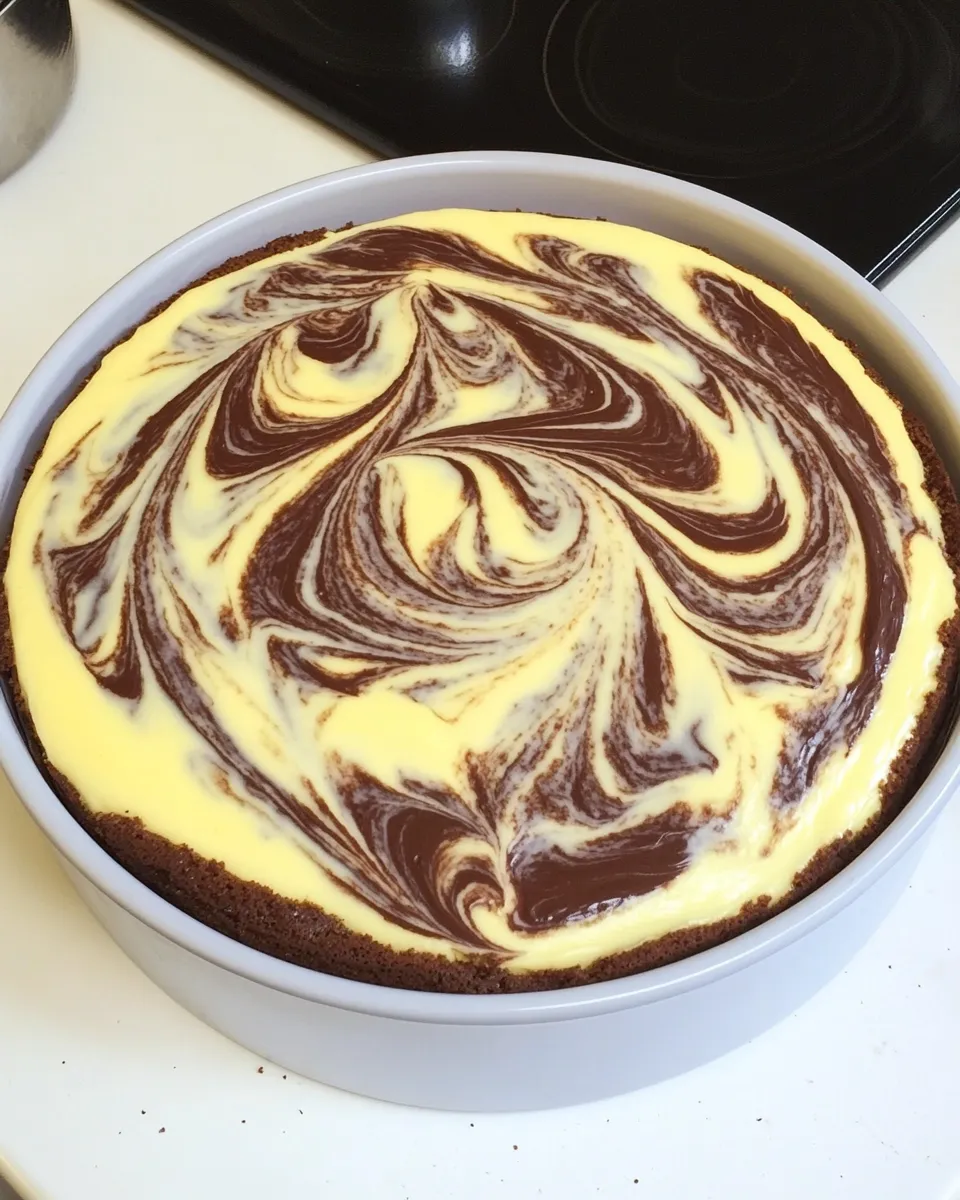
How to Marble a Cake
Marbling a cake is one of those small, rewarding techniques that turns a simple batter into something visually special. It’s less about perfect symmetry and more about clear contrast and confident movement—two things you can learn in less than an hour at your counter. I teach this to readers the way I’d show a friend: steady hands, simple rules, and one good knife.
If you’re baking in a loaf, bundt, or tube pan, the same core approach applies. You’ll layer batters so they form a checkerboard, then make a few deliberate swirls. The trick is in the layers and in resisting the urge to over-swirl. Too many passes, and the pattern blurs into a muddled blend. A few intentional motions, though, and the interior slices look like a pottery studio’s happiest accident.
I’ll walk you through ingredient notes, the exact step-by-step build, what makes a marbled cake stand out, equipment, common mistakes, variations, storage tips, and what I learned during recipe testing. This isn’t theory—these are practical, hands-on tips that get reliable results every time.
Ingredient Notes

Ingredients
- 1light colored cake batter — this is your base; choose a batter with good lift so the contrast stays defined.
- 1dark colored cake batter — provides the visual contrast; keep it similar in density to the light batter for even layering.
Build Marble a Cake Step by Step
- Place your 1 light colored cake batter and 1 dark colored cake batter next to your prepared baking pan on a stable surface.
- Using a large spoon, scoop 1/3 of the light colored cake batter into the pan in a down–up–down pattern. If you are using a small loaf pan, place three large dollops; if you are using a round tube or bundt pan, drop dollops in the same down–up–down pattern all the way around the pan.
- Scoop 1/3 of the dark colored cake batter into the empty spaces to form a rough checkerboard pattern on the base of the pan.
- For the second (middle) layer, use the next 1/3 of the batters but reverse the order so the colors alternate vertically: first scoop the next 1/3 of the dark colored batter into the down–up–down positions above the light squares below, then fill the remaining spaces with the next 1/3 of the light colored batter to complete the middle checkerboard layer.
- Repeat the pattern for the third (top) layer with the remaining batter: scoop the final 1/3 of the light colored batter into the same positions you used for the bottom layer, then fill the remaining spaces with the final 1/3 of the dark colored batter. You should now have three checkerboard layers.
- Take a butter knife and gently swirl: make rounded vertical zig-zags from one side of the pan to the other. Wipe excess batter from the knife, then repeat the same zig-zags in the opposite direction. If using a loaf pan, make long horizontal swirls instead; if using a round tube or bundt pan, make opposing zig-zags all the way around to create a chain-shaped swirl. Do not over-swirl—fewer swirls yield a clearer marbled pattern.
- Bake the cake according to your cake recipe’s baking instructions. Allow the cake to cool completely before slicing to reveal the marbled interior.
Why This Marble a Cake Stands Out

This method gives a clear, defined marble because it relies on layering and contrast, not frantic stirring. The three-layer checkerboard builds vertical and horizontal contrast so the pattern is evident in every slice. When the top and bottom layers mirror each other, the eye reads the interior much more cleanly.
Another reason this stands out: control. You place dollops with intention, then make a small number of measured swirls. That single disciplined step—placing dollops in a pattern—does most of the visual work. The slight knife motion afterward is just a flourish that ties it together.
Finally, it’s forgiving. Even if your dollops aren’t perfectly identical, the alternation produces natural movement. Slight imperfections become charm. The key is consistency of batter weight and viscosity; matching those means the batters settle evenly and rise together.
Flavor-Forward Alternatives
Marbling is primarily a visual technique, but it’s also a great opportunity to introduce complementary flavors. Keep the batter base similar in texture so layering and baking behavior remain consistent.
Classic chocolate and vanilla is the obvious choice—one color, two flavors. You can also fold in espresso or coffee powder into the dark batter for a bitter lift that pairs beautifully with vanilla. For a brighter contrast, use citrus zest or extract in the light batter and cocoa in the dark.
For more modern twists: a matcha-dark chocolate pair creates a green-and-brown contrast that’s both striking and sophisticated. Or make one batter with almond or hazelnut paste for a nutty roundness against a plain vanilla base. If you want to try flavor swaps, add gently and taste as you go so you don’t upset the batter’s balance.
Equipment Breakdown
Good equipment makes this technique easier and more consistent. You don’t need anything exotic—just reliable, sturdy tools that let you handle batter without stress.
Essential items:
- A prepared baking pan: loaf, bundt, or tube pans work well depending on the shape you want to reveal.
- A large spoon or small scoop: helps you make uniform dollops for the checkerboard pattern.
- A butter knife: a narrow, straight knife works best for controlled swirls.
- Two bowls or containers: keep each colored batter in its own vessel for clean scooping and consistent texture.
- A stable surface: working on a flat counter gives you control while you layer and swirl.
Mistakes Even Pros Make
Over-swirl. Pros know that more movement doesn’t equal better pattern. The more times you pass the knife through, the muddier the interior becomes. Stop after two opposing passes and assess.
Mismatch of batter consistency. If one batter is much thinner, it will sink or spread and destroy the checkerboard layering. Measure oil, butter, and liquids carefully, and keep both batters similar in viscosity.
Uneven dollops. If you place tiny dollops in some spots and giant ones in others, the cake will bake unevenly and the slices won’t be symmetric. Use the same spoon or scoop for every placement.
Baking too hot or too long. Because you’re layering, the middle can be denser. Follow your cake recipe’s temperature and timing, and check doneness with a skewer rather than relying on color alone.
How to Make It Lighter
If you want a lighter crumb, focus on aeration and gentle handling. Whip your batter long enough to incorporate air, but fold dry ingredients in gently so you don’t deflate what you just aerated. Use room-temperature eggs for better emulsification and lift.
Smaller portion sizes and tube pans often yield a lighter feel because heat reaches the center more readily. Also consider reducing heavy inclusions (like nuts or dense chocolate chunks) if they’ll weigh the batter down—leave them out or use fewer for a lighter slice.
Notes from the Test Kitchen
In testing, consistency was the primary variable. When both batters were similar in density, the checkerboard held its shape and the swirls read well. When one batter was runnier, it chased into the other and blurred the pattern. Match textures before you assemble.
For loaf pans, long horizontal swirls worked best. In bundt pans, I found that completing the down–up–down dollops around the circumference first gave the nicest ring when sliced. A light hand on the knife produced the best chain-shaped swirl; too much pressure flattens the pattern.
During blind tests with friends, the version with fewer swirls was preferred almost every time. Even when the flavor was identical, people perceived the less-swirl cake as more refined.
Prep Ahead & Store
You can prepare both batters the night before and keep them covered in the fridge. Bring them to room temperature before layering so they’re easily scooped and similar in viscosity. If you chill them overnight, give each bowl a gentle stir to reincorporate any settled ingredients.
Store the baked cake wrapped tightly at room temperature for up to 3 days. For longer storage, freeze slices individually wrapped for up to 3 months. Thaw at room temperature and serve slightly warm or at room temp—either works well for marbled cakes.
Ask & Learn
Got a specific pan shape you want to use? Ask. Wondering how to adapt marbling for cupcakes or for layers? I’ve tried both and can walk you through scaling and technique changes. Tell me which pan you have, what flavors you like, and I’ll suggest a simple plan that keeps your batters consistent and your slices dramatic.
If a swirl came out too faint or too messy, describe the batter (was one thinner?), the pan, and your swirl motion, and I’ll help you troubleshoot. Small adjustments—matching batter thickness, changing the dollop size, or stopping after fewer knife passes—fix most issues quickly.
Final Thoughts
Marbling a cake is a small investment that yields big returns. The method I’ve shared is very forgiving, visual, and repeatable: three checkerboard layers, controlled swirls, and a cool-down before slicing. Keep your batters similar in texture, resist overworking the knife, and choose flavors that play well together.
Try it with a simple batter first—vanilla and cocoa are a gentle place to start. Once you feel the rhythm of the dollops and the knife, branch out: coffee, citrus, or matcha can add personality without complicating the technique. Make one cake, slice it, and enjoy the little moment of surprise when you reveal that marbled interior. It’s exactly the kind of kitchen win I bake for.
How to Marble a Cake
Ingredients
Equipment
Method
- Place your 1 light colored cake batter and 1 dark colored cake batter next to your prepared baking pan on a stable surface.
- Using a large spoon, scoop 1/3 of the light colored cake batter into the pan in a down–up–down pattern. If you are using a small loaf pan, place three large dollops; if you are using a round tube or bundt pan, drop dollops in the same down–up–down pattern all the way around the pan.
- Scoop 1/3 of the dark colored cake batter into the empty spaces to form a rough checkerboard pattern on the base of the pan.
- For the second (middle) layer, use the next 1/3 of the batters but reverse the order so the colors alternate vertically: first scoop the next 1/3 of the dark colored batter into the down–up–down positions above the light squares below, then fill the remaining spaces with the next 1/3 of the light colored batter to complete the middle checkerboard layer.
- Repeat the pattern for the third (top) layer with the remaining batter: scoop the final 1/3 of the light colored batter into the same positions you used for the bottom layer, then fill the remaining spaces with the final 1/3 of the dark colored batter. You should now have three checkerboard layers.
- Take a butter knife and gently swirl: make rounded vertical zig-zags from one side of the pan to the other. Wipe excess batter from the knife, then repeat the same zig-zags in the opposite direction. If using a loaf pan, make long horizontal swirls instead; if using a round tube or bundt pan, make opposing zig-zags all the way around to create a chain-shaped swirl. Do not over-swirl—fewer swirls yield a clearer marbled pattern.
- Bake the cake according to your cake recipe's baking instructions. Allow the cake to cool completely before slicing to reveal the marbled interior.
Notes
You will also need: baking pan for cake batter, large spoon, butter knife.