Instant Pot Taco Meat
I make this Instant Pot taco meat on busy weeknights, when my family wants something flavorful with minimal babysitting. It browns quickly, packs well for lunches, and handles toppings like a champ. No standing over the stove and no complicated spice mixes — just a few pantry staples and the Instant Pot doing what it does best.
The sauce and dry spices lock into the meat under pressure, which means deeper flavor than a quick skillet toss. It’s forgiving, too: a short sauté finish evaporates any excess liquid and brings the texture exactly where you want it. I’ll walk you through the exact steps, the little pitfalls I’ve learned, and sensible swaps if you need them.
Make this once and you’ll see how easy weeknight tacos can be. Ready? Let’s get into the recipe and everything that makes it work well in a pressure cooker.
What We’re Using
Short and practical: we’re using lean ground beef, olive oil, a splash of Cholula for heat and tang, a trio of dry spices, and a little water to help the pressure build without scorching. The Instant Pot does the heavy lifting — browning, pressurizing, and finishing — so you spend less time watching and more time setting toppings and tortillas.
Keep your tools simple: a good spatula or meat chopper for breaking up the beef while browning, measuring spoons for the spices, and the Instant Pot on hand. These basics are all you need to make consistent taco meat fast.
Ingredients
- 2 lbs. lean ground beef — the main protein; lean helps reduce excess grease while still delivering flavor.
- 2 T olive oil — for initial browning and to prevent sticking in the pot.
- 6 T Cholula Hot Sauce (see notes) — provides heat and acidity; you can adjust the type of hot sauce but keep the volume for flavor balance.
- 1 1/4 T ground cumin — earthy backbone spice for classic taco flavor.
- 1 1/4 T garlic powder — adds savory depth without requiring fresh cloves.
- 1 1/4 T onion powder — rounds out the aromatics in an easy, shelf-stable form.
- 2/3 tsp. fine grind black pepper (more or less to taste) — brightens the mix; adjust to your spice tolerance.
- salt to taste — brings the flavors forward; add gradually and taste before serving.
- 1/2 cup water — creates the steam the Instant Pot needs and prevents scorch warnings while concentrating spices.
Instant Pot Taco Meat, Made Easy
- Turn the Instant Pot to SAUTÉ (HIGH). Add 2 T olive oil and let it heat until shimmering.
- Add 2 lbs. lean ground beef to the hot oil. Cook, breaking the meat into small pieces with a spatula, wooden spoon, or meat chopper, until well browned and no pink remains, about 8–10 minutes.
- Add 6 T Cholula Hot Sauce (see notes), 1 1/4 T ground cumin, 1 1/4 T garlic powder, 1 1/4 T onion powder, 2/3 tsp. fine grind black pepper, salt to taste, and 1/2 cup water.
- Stir thoroughly to distribute the seasonings and scrape any browned bits from the bottom of the pot so nothing is sticking (this helps prevent a burn notice).
- Secure the lid and set the Instant Pot to MANUAL (HIGH) for 3 minutes. Make sure the pressure valve is set to SEALING.
- When the cook time finishes, perform a quick release (move the valve to VENTING) and wait until the float valve drops before opening the lid. Open the lid away from your face.
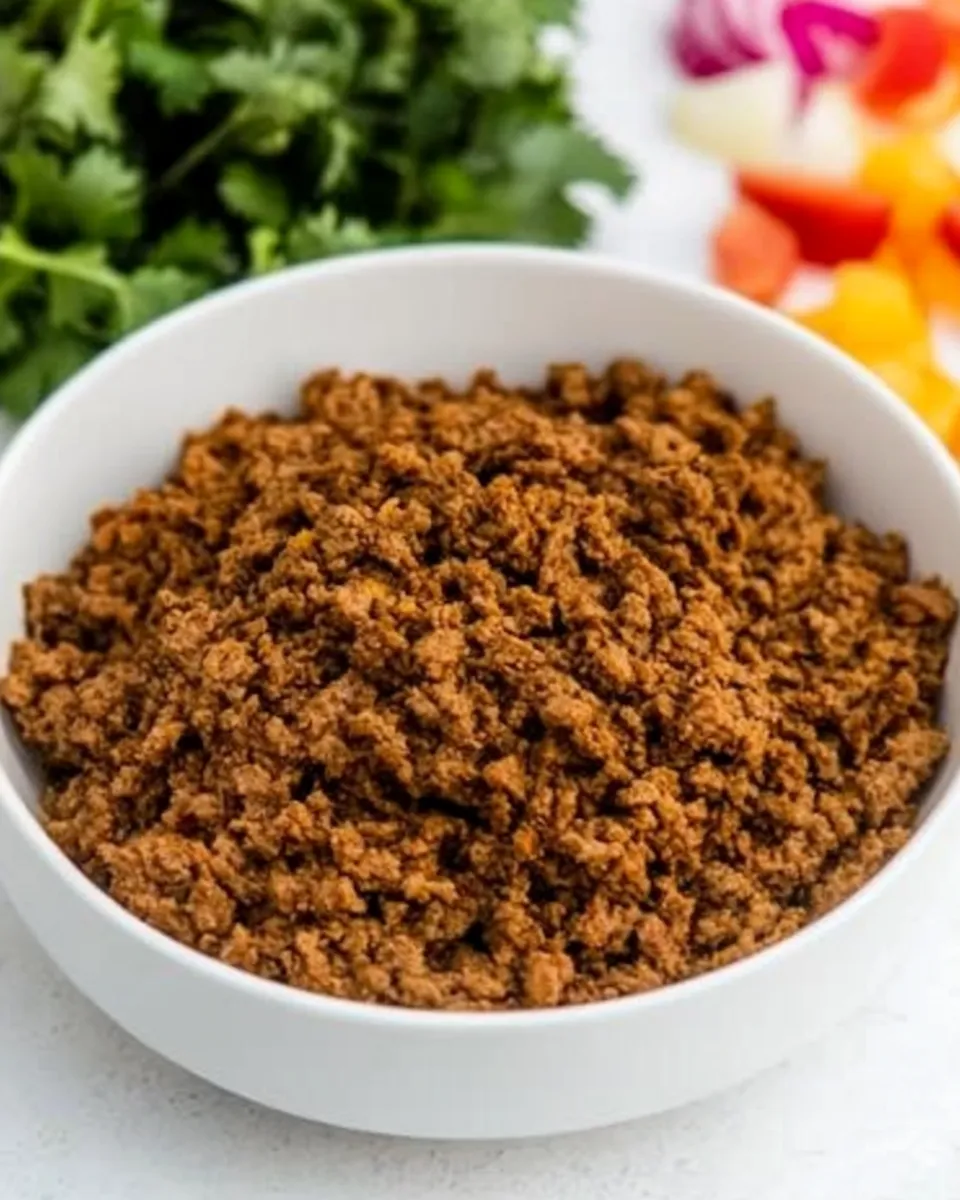
- If there is more liquid than you want, turn the Instant Pot to SAUTÉ (HIGH) and simmer, stirring occasionally, until the excess liquid evaporates and the meat reaches your desired consistency (a few minutes).
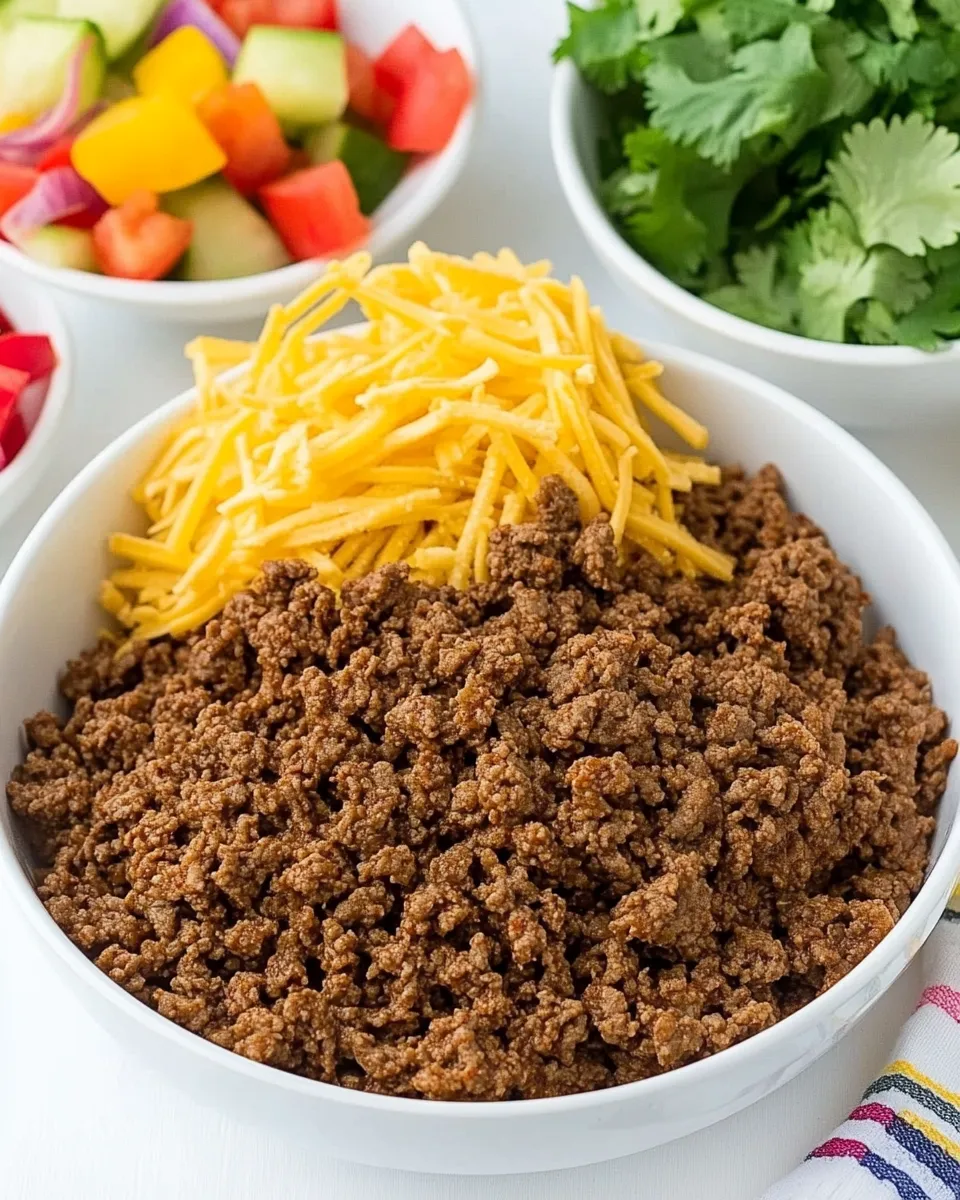
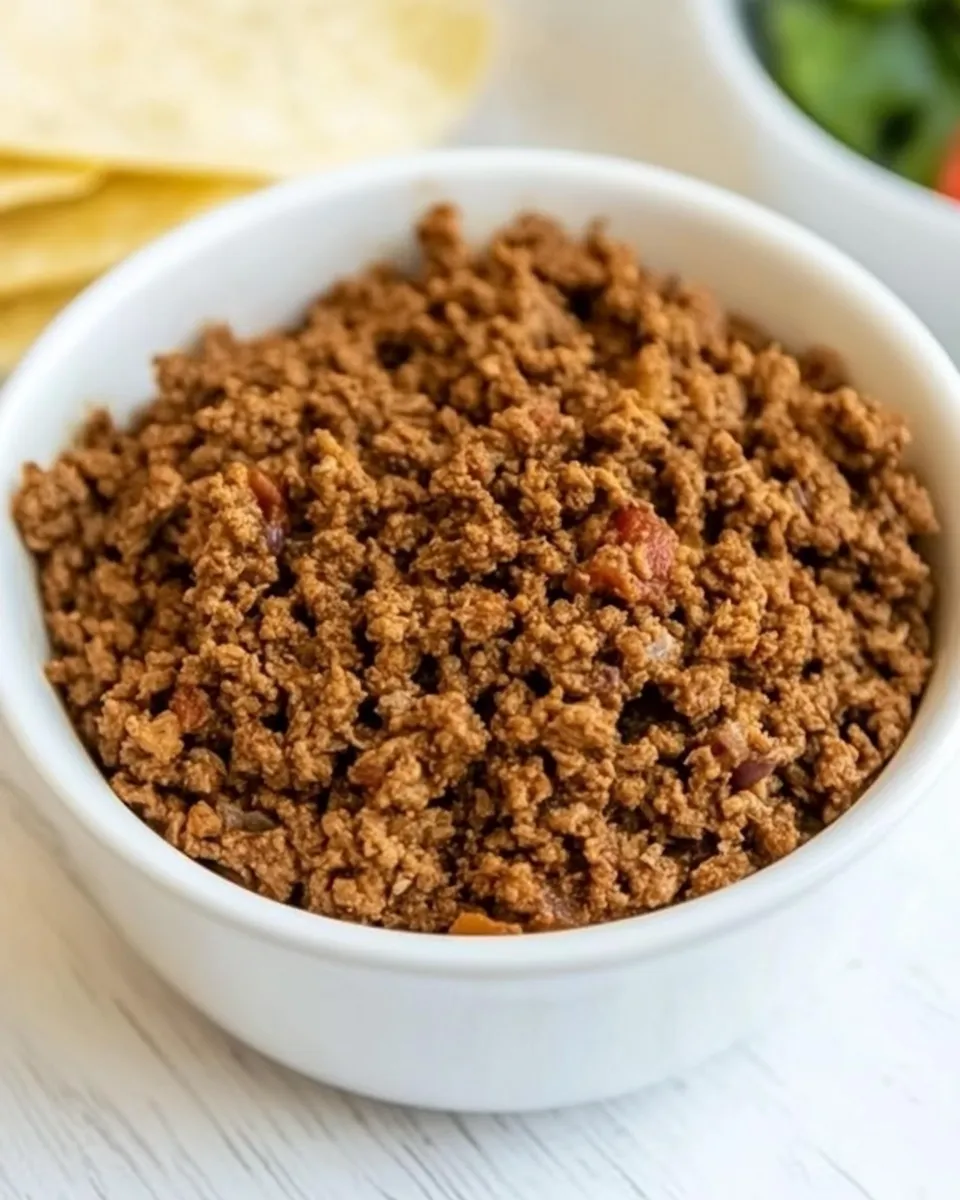
- Turn the Instant Pot off. Serve the taco meat in tortillas with desired toppings.
- To freeze, cool the taco meat, then transfer to airtight containers and freeze for future use.
Why This Recipe Works
There’s a simple logic behind each step. Sautéing the beef first develops Maillard browning — those browned bits are flavor gold. Adding the hot sauce and dry spices with a little water lets the flavors meld under pressure and prevents the pot from throwing a burn notice. Three minutes at high pressure is enough time for the spices to infuse without turning the meat mushy.
The quick release preserves chew and texture; a long natural release can leave the meat wetter and softer. Finally, finishing with a brief sauté if needed concentrates the flavors and evaporates excess liquid, giving you control over texture at the end.
Texture-Safe Substitutions

If you want to change the texture or swap ingredients, here are safe choices that won’t break the method:
- Ground turkey or chicken — will yield a leaner, milder meat. Brown thoroughly; the seasoning will carry the flavor.
- Less-lean ground beef (higher fat content) — gives a richer result and more pan liquid; spoon off excess fat after pressure cooking or before adding the water if you prefer.
- Plant-based crumbles — use the same method; keep an eye on browning times since textures vary between brands.
- Lower heat condiments — if you don’t have Cholula or prefer a milder sauce, use any neutral hot sauce or even a mild tomato-based sauce, but expect flavor shifts; maintain the 6 T volume for liquid balance.
Essential Tools for Success
- Instant Pot or electric pressure cooker — same basic settings and results across models; the key is a reliable sealing valve.
- Sturdy spatula, wooden spoon, or meat chopper — for breaking up meat during browning and scraping browned bits later.
- Measuring spoons — several of the spices use tablespoons; consistent measuring keeps the flavor balanced.
- Heatproof ladle or spoon — for stirring and serving.
- Airtight containers or freezer bags — for cooling and freezing portions.
Easy-to-Miss Gotchas
These are the small mistakes that cause a hiccup or a burned batch:
- Not scraping the bottom before sealing — browned bits stuck to the bottom can trigger a burn notice once liquid is added and pressure builds.
- Skipping browning — it’s tempting to skip sauté and go straight to pressure, but you’ll lose depth of flavor and texture.
- Overfilling the pot — keep the Instant Pot under the max fill line. Two pounds of beef plus liquid fits comfortably, but don’t add extra ingredients beyond the recipe without adjusting capacity.
- Forgetting to set valve to SEALING — the manual (high) setting won’t build pressure if the valve is left on venting.
- Opening the lid too early — always wait until the float drops after quick release to avoid steam burns.
Variations for Dietary Needs
This base is flexible. A few swaps make it fit different diets without extra complexity:
- Keto / low-carb — serve in lettuce wraps or low-carb tortillas. The recipe is already low in carbs.
- Lower-sodium — reduce the hot sauce or switch to a low-sodium hot sauce and hold back on added salt; taste before serving.
- Vegetarian / vegan — use a plant-based ground meat substitute and follow the same steps; monitor browning and final texture.
- Gluten-free — all listed ingredients are gluten-free, but always check labels on hot sauce and spices if you need strict GF compliance.
Insider Tips
Little habits that make the process smoother and the results more consistent:
- Use room-temperature beef when possible. It browns more evenly than meat taken straight from the fridge.
- When sautéing, let the meat sit a moment between stirs so it can develop color. Constant stirring prevents browning.
- Deglaze thoroughly after browning. A quick scrape with water dissolves flavorful bits and prevents a false burn notice.
- Adjust black pepper and salt at the end. The heat from Cholula can change perceived saltiness; taste after pressure cooking and finish seasoning if needed.
- If you like crisper texture, finish with a 1–2 minute sauté after pressure cooking to evaporate liquid and concentrate flavor.
Meal Prep & Storage Notes
Cook once, use all week. This taco meat is ideal for meal prep because it freezes and reheats well. Cool completely before transferring to airtight containers; this prevents condensation and freezer burn. I portion into meal-sized packs so I can grab exactly what I need.
Refrigerate for 3–4 days, or freeze for 2–3 months for best quality. Thaw overnight in the refrigerator before reheating. Reheat on the stovetop in a skillet over medium heat or in the microwave covered, stirring halfway through to heat evenly.
Quick Q&A
- Can I halve the recipe? Yes. The Instant Pot handles smaller batches fine; keep the same ratios and adjust timing only if your model suggests it for very small volumes.
- Can I use fresh garlic and onion instead of powders? Yes, but you’ll need to sauté them with the oil before adding the meat and adjust amounts to taste. (This changes the procedure slightly from the Source of Truth.)
- Why quick release instead of natural? Quick release preserves firmer texture. Natural release will continue to steam the meat and can make it softer and wetter.
- What if I get a burn notice? Turn off the pot, carefully release pressure if safe, open the lid, scrape any stuck bits, add a splash more water, then reseal and cook briefly if needed.
Time to Try It
This Instant Pot Taco Meat is a reliable, family-friendly base for countless weeknight meals. Follow the steps, brown well, and don’t skip the scrape — those two habits change everything. Once you’ve got it down, you’ll be able to adapt toppings and serving styles without relearning the core technique.
Make a batch, freeze half, and you’ll thank yourself on the next hectic evening. Then come back and tell me what toppings you loved — I’m always swapping ideas for quick taco nights.
Instant Pot Taco Meat
Ingredients
Equipment
Method
- Turn the Instant Pot to SAUTÉ (HIGH). Add 2 T olive oil and let it heat until shimmering.
- Add 2 lbs. lean ground beef to the hot oil. Cook, breaking the meat into small pieces with a spatula, wooden spoon, or meat chopper, until well browned and no pink remains, about 8–10 minutes.
- Add 6 T Cholula Hot Sauce (see notes), 1 1/4 T ground cumin, 1 1/4 T garlic powder, 1 1/4 T onion powder, 2/3 tsp. fine grind black pepper, salt to taste, and 1/2 cup water.
- Stir thoroughly to distribute the seasonings and scrape any browned bits from the bottom of the pot so nothing is sticking (this helps prevent a burn notice).
- Secure the lid and set the Instant Pot to MANUAL (HIGH) for 3 minutes. Make sure the pressure valve is set to SEALING.
- When the cook time finishes, perform a quick release (move the valve to VENTING) and wait until the float valve drops before opening the lid. Open the lid away from your face.
- If there is more liquid than you want, turn the Instant Pot to SAUTÉ (HIGH) and simmer, stirring occasionally, until the excess liquid evaporates and the meat reaches your desired consistency (a few minutes).
- Turn the Instant Pot off. Serve the taco meat in tortillas with desired toppings.
- To freeze, cool the taco meat, then transfer to airtight containers and freeze for future use.