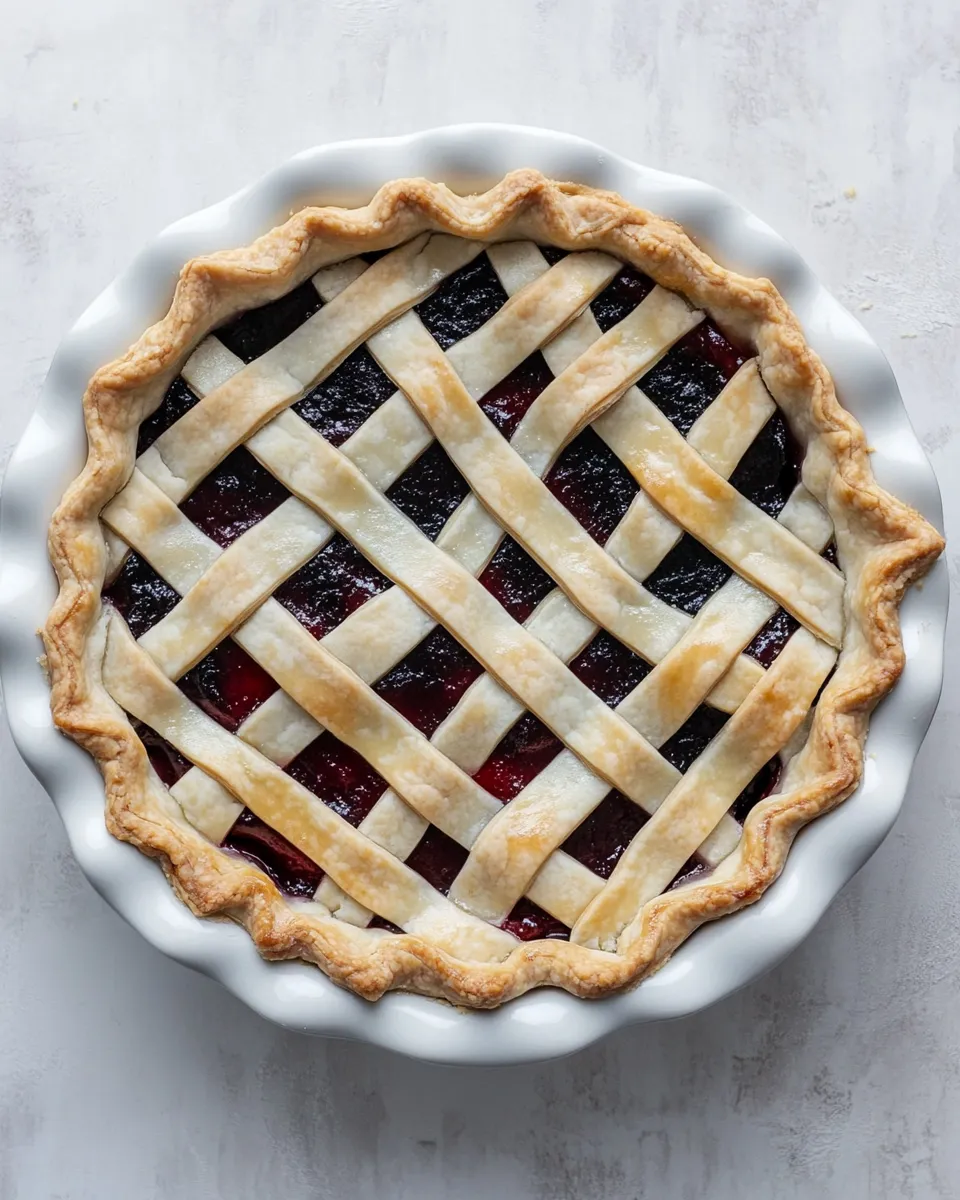
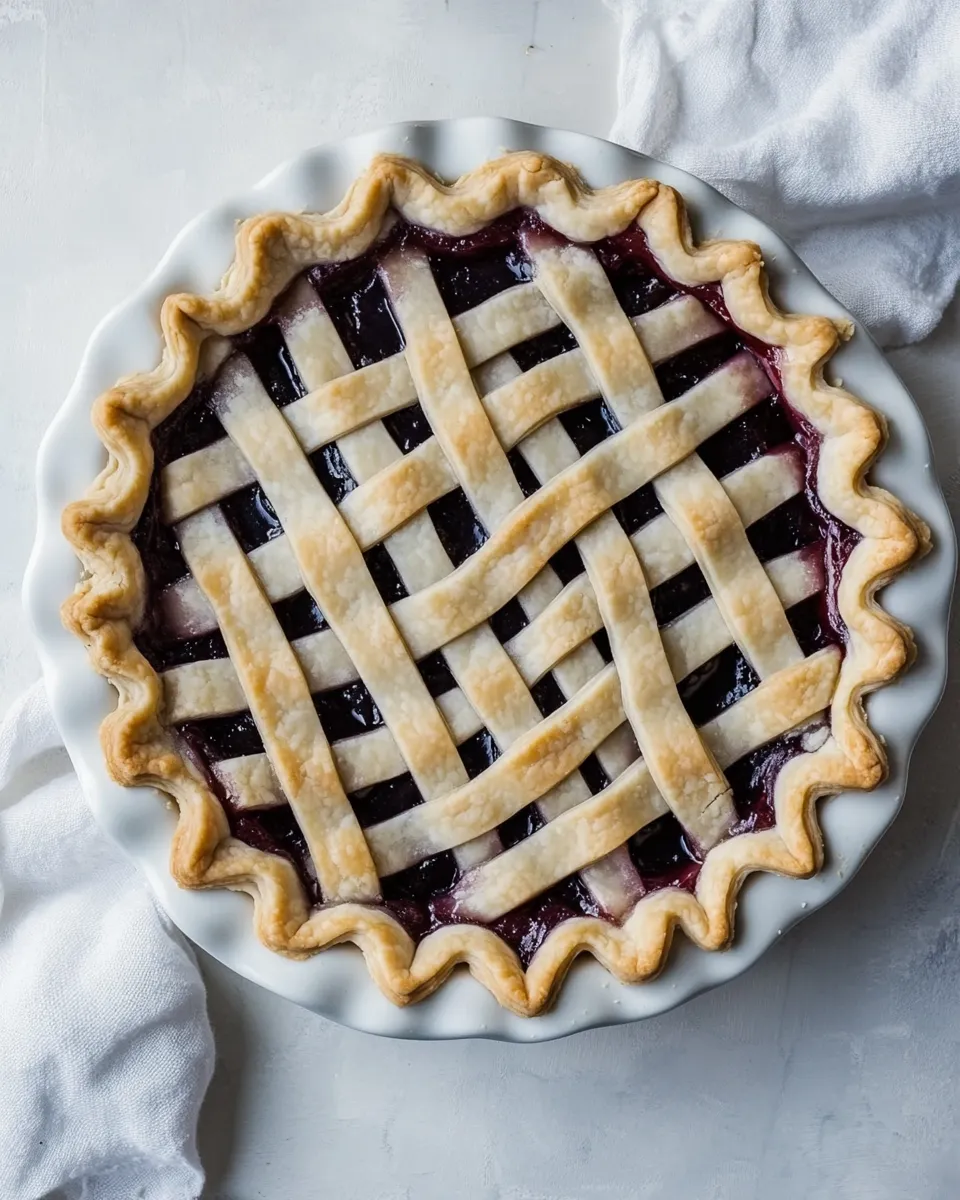
Lattice Pie Crust
There’s something about a lattice crust that makes a pie feel intentional. It’s a simple pattern but one that demands attention to rhythm and spacing — not fuss, just consistent hands and a clear plan. The result is a pie that breathes as it bakes, with golden strips framing bubbling filling. I keep a lattice in my repertoire because it turns a humble pie into a centerpiece without needing decorative cutters or complex braids.
In the kitchen, lattice work is more about timing and technique than complicated ingredients. Use a well-chilled double pie crust and a filling that’s not so runny it will flood the pattern. A pizza cutter and a few minutes of patience are enough to make an attractive top that bakes evenly. You’ll get better tension and a neater edge each time you practice the fold-lay-unfold sequence.
This post walks you through what to buy, how to assemble the lattice step by step, and practical tips that save time and frustration. No fluff — just the sensible, hands-on guidance I wish someone had given me the first dozen times I tried to weave dough. Read through the steps once, and keep the page open while you work. You’ll be done before you know it.
What to Buy
For a tidy, successful lattice you don’t need many specialty items. Start with good, cold pastry dough and a filling that sets reasonably well when baked. If you bake often, a metal pie pan and a reliable cutter will repay themselves quickly. Below are the core items to have on hand.
Ingredients
- 1double pie crust — the top and bottom together; keep it well chilled so strips hold shape.
- filling of your choice — pick a filling that’s not overly runny; thickened fruit or cream-based fillings work best for lattice.
Lattice Pie Crust: From Prep to Plate
- On a lightly floured surface, roll out the bottom portion of the double pie crust to a circle large enough to line your pie pan. Transfer it to the pan, gently pressing it into the bottom and up the sides; leave a small overhang of dough around the rim for sealing later.
- Add your filling of your choice into the prepared bottom crust. Set the filled pie aside while you work on the top crust.
- Roll out the top portion of the dough to a circle slightly larger than the pie pan so you can cut strips from it.
- Using a pizza cutter or sharp knife, cut the top crust into even parallel strips. Make them the thickness you prefer; keep the strips roughly the same width for an even lattice.
- Lay half of the strips across the filled pie in one direction, spaced evenly and all oriented the same way. Leave gaps between strips so you can weave the lattice.
- Starting at one edge, fold back every other strip (every second strip) about halfway or to the rim so alternate strips are lifted and alternate strips remain flat.
- Place one cut strip crosswise across the pie where you folded the strips back, laying it flat across the exposed gaps.
- Unfold the folded strips back over the crosswise strip so the crosswise strip is now woven under half the strips and over the others.
- Move one strip-width along, fold back the same set of alternating strips again (the ones you folded previously), lay the next crosswise strip into place, then unfold the folded strips over it. Repeat this fold-lay-unfold sequence until the entire top of the pie is woven into a lattice.
- Trim any excess strip length flush with the edge of the pan. Fold the bottom crust over any remaining strip ends if needed, then press the top and bottom crusts together around the rim to seal and form a neat edge.
Why It Deserves a Spot
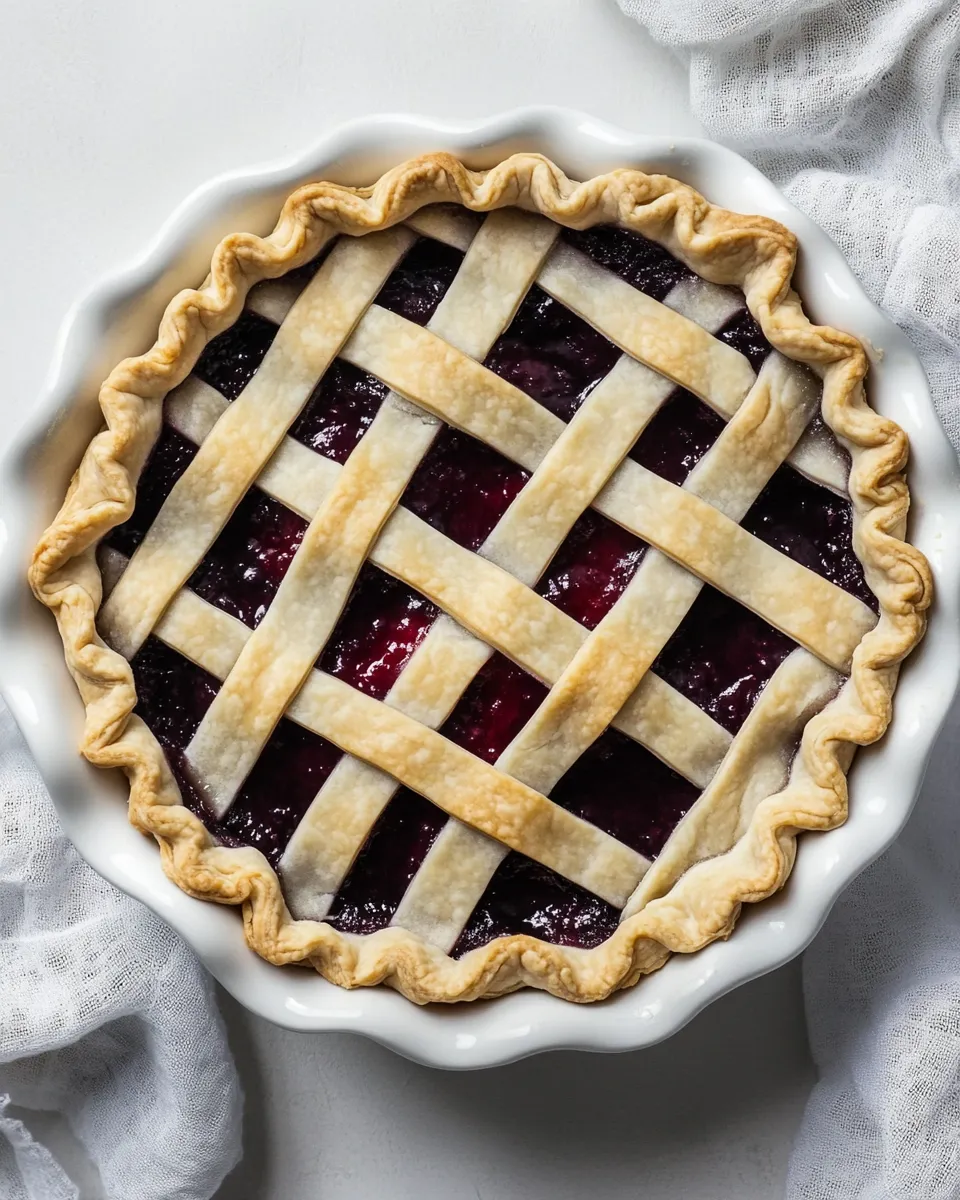
A lattice top does more than look pretty. It regulates steam release and helps the filling reduce and thicken as the pie bakes. That open pattern encourages evaporation so fruit fillings concentrate flavor instead of turning soggy under a sealed top. Visually, lattice offers a rustic, handmade quality you can’t get from a solid lid or foil-cut vent. It elevates a summer berry pie the same way a perfectly tied ribbon lifts a present.
It’s also remarkably flexible. You can choose thin strips for a delicate, lacy look or wider bands for a bold, classic appearance. The same technique works with premade or homemade crusts, sweet or savory fillings, and with a little practice you’ll be able to speed through the weave while keeping the result tidy and even.
International Equivalents
Pie lattice work is a global idea under different names. In North America, it’s most associated with fruit pies. In parts of Europe, similar openwork crusts show up on tarts and galettes. In Latin cuisines, woven pastry tops appear on sweet empanada-style pies and seasonal fruit tarts. The technique translates across dough types — puff, shortcrust, and even some enriched yeast doughs can be woven if handled gently.
If you want to lean into a regional interpretation, try a lattice with a buttery shortcrust (Western pies), or use a sturdier, slightly sweeter pastry for holiday-style fruit fillings. In any locale, the principle is the same: the woven top provides structure, ventilation, and an attractive grid for slicing and serving.
Appliances & Accessories
Minimal tools are necessary, but a few make the job easier:
- Pizza cutter or sharp chef’s knife — for clean, even strips.
- Floured work surface or pastry mat — keeps dough from sticking without overworking it.
- Chilled pie pan (metal or ceramic) — metal gives a crisper edge; ceramic holds heat longer after baking.
- Offset spatula or bench scraper — helpful for transferring strips and lifting softened dough.
- Pastry brush — for egg wash if you want a glossy finish.
Slip-Ups to Skip
Here are the common mistakes I see and how to avoid them:
- Warm dough — Don’t let your top crust warm up too much. If strips become floppy, chill them for 10 minutes before weaving.
- Uneven strips — Measure visually and aim for consistent widths; inconsistent strips make the lattice look sloppy and change baking times across the pie.
- Overfilling — If your filling is too runny, the juice will pool and push strips apart. Thicken fruit fillings slightly or use a fruit with higher pectin.
- Rushing the weave — Fold carefully. The fold-lay-unfold rhythm keeps the lattice tidy; forcing strips can tear them.
- Skipping the seal — If you don’t press the rim properly, juices can leak down the sides and burn on the pan during baking.
Tailor It to Your Diet
Dietary tweaks are generally about the filling or crust base, not the lattice technique itself. For gluten-free diets, use a tested gluten-free double crust and work slightly colder — gluten-free doughs can be more fragile. For lower-fat versions, try a crust made with part butter, part shortening or a reduced-fat recipe, but expect a different texture and more delicate handling.
For vegan pies, use a vegan pastry and non-dairy milk or aquafaba for brushing instead of egg wash. For lower-sugar fillings, choose naturally sweet fruits and allow them to concentrate during baking; a lattice top will still let excess moisture escape so the filling thickens properly.
Cook’s Notes
Chill between steps. After cutting strips, rest them in the fridge for 10–15 minutes if they feel warm. That brief chill firms the fat so strips hold a clean edge when woven. If dough tears while you’re weaving, patch with a small piece of extra dough pressed gently into place — it’ll bake right in and be hardly noticeable.
When trimming and sealing, tuck the overhang under and crimp or flute the edge to lock in juices. If you want an extra-crisp crust, brush the lattice lightly with an egg wash (one beaten egg with a teaspoon of water) and sprinkle a little coarse sugar on top for sparkle and crunch.
Freezer-Friendly Notes
You can assemble the pie up to the point before baking and freeze it. Freeze the whole assembled pie on a baking sheet until solid, then wrap tightly in plastic and foil. When you’re ready to bake, place it from frozen into a preheated oven, add about 20–30 minutes to the baking time, and cover the edge with foil if it browns too quickly. Alternatively, cut and freeze extra pie dough strips flat between parchment paper for future lattices.
Frequently Asked Questions
Can I make the lattice ahead of time? Yes. You can cut strips and keep them chilled for an hour or two, or fully assemble an unbaked lattice and freeze the pie as noted above. Avoid leaving assembled, unbaked pies at room temperature for long periods.
What width should the strips be? That’s a matter of style. For a classic look, 1/2 to 3/4 inch is common. Thinner strips give a delicate pattern and show more filling; wider strips create a bold, rustic grid. Try a couple sizes and see what you prefer visually and in baking performance.
My strips tear when I fold them — why? Most often because the dough is too warm or overworked. Chill the strips briefly, handle them gently, and roll them just enough to meet the pan size. If you repeatedly have trouble, try a slightly more robust recipe or add a short rest in the refrigerator before cutting.
Do I need to brush the lattice? No, but an egg wash will give a glossy, deeply browned finish. If you prefer no egg, a thin skim of milk or nondairy milk will lightly color the crust, or leave it unbrushed for a more matte look.
Wrap-Up
Lattice pie crust is a small skill with a big payoff. It adds ventilation, texture, and eye appeal without requiring fancy tools. Use a chilled double crust, steady hands, and that fold-lay-unfold cadence, and you’ll have a pie that looks and bakes like a pro’s. Practice once or twice, and it becomes a quick way to make weekday desserts feel special and weekend dinners look celebratory.
Now get your dough chilled, pick a filling, and weave with confidence. A well-made lattice turns a simple pie into something you’ll be proud to slice and share.

Lattice Pie Crust
Ingredients
Method
- On a lightly floured surface, roll out the bottom portion of the double pie crust to a circle large enough to line your pie pan. Transfer it to the pan, gently pressing it into the bottom and up the sides; leave a small overhang of dough around the rim for sealing later.
- Add your filling of your choice into the prepared bottom crust. Set the filled pie aside while you work on the top crust.
- Roll out the top portion of the dough to a circle slightly larger than the pie pan so you can cut strips from it.
- Using a pizza cutter or sharp knife, cut the top crust into even parallel strips. Make them the thickness you prefer; keep the strips roughly the same width for an even lattice.
- Lay half of the strips across the filled pie in one direction, spaced evenly and all oriented the same way. Leave gaps between strips so you can weave the lattice.
- Starting at one edge, fold back every other strip (every second strip) about halfway or to the rim so alternate strips are lifted and alternate strips remain flat.
- Place one cut strip crosswise across the pie where you folded the strips back, laying it flat across the exposed gaps.
- Unfold the folded strips back over the crosswise strip so the crosswise strip is now woven under half the strips and over the others.
- Move one strip-width along, fold back the same set of alternating strips again (the ones you folded previously), lay the next crosswise strip into place, then unfold the folded strips over it. Repeat this fold-lay-unfold sequence until the entire top of the pie is woven into a lattice.
- Trim any excess strip length flush with the edge of the pan. Fold the bottom crust over any remaining strip ends if needed, then press the top and bottom crusts together around the rim to seal and form a neat edge.