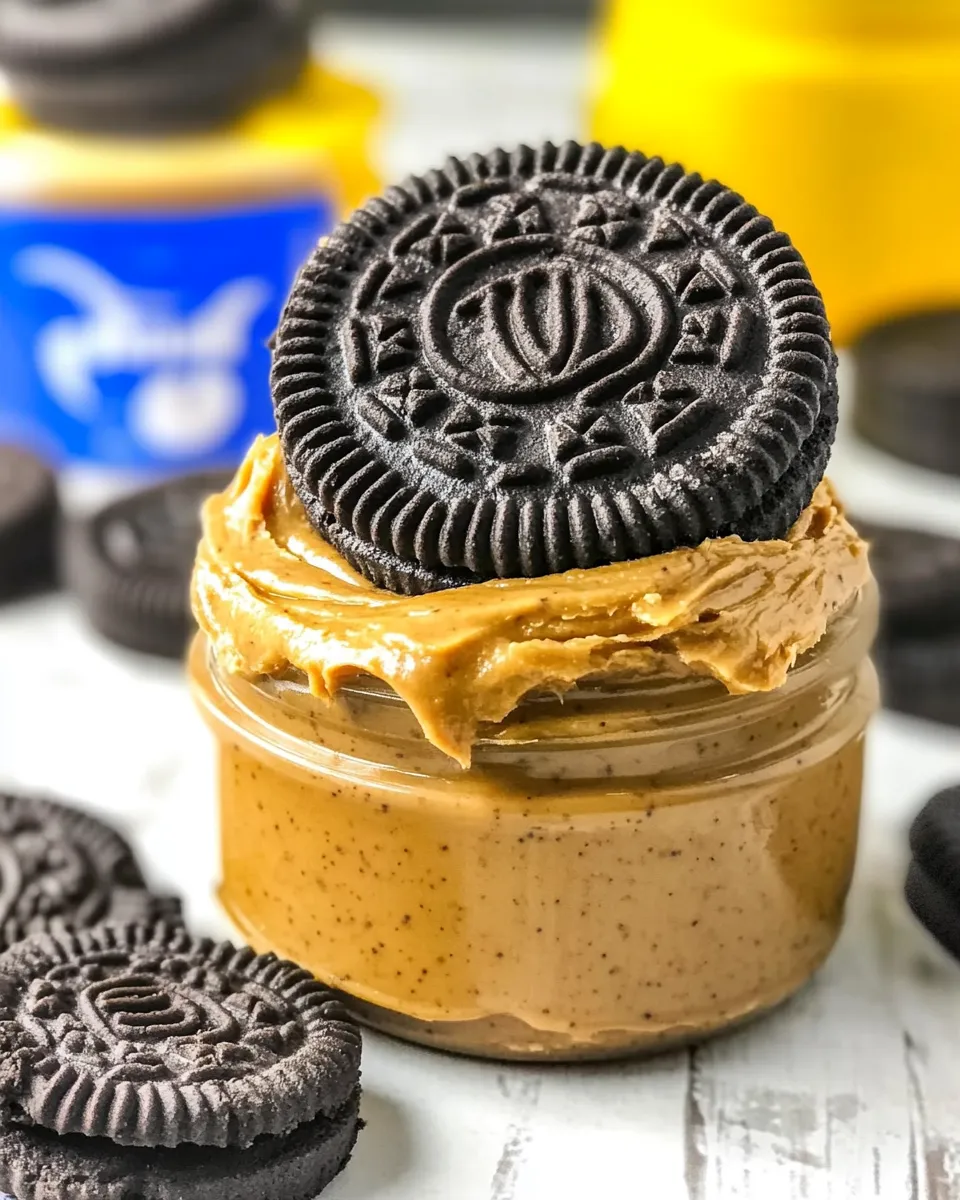
Oreo Peanut Butter
This is one of those small, silly recipes that feels like a treat and also somehow solves dinner-related boredom. It’s quick, forgiving, and needs only two pantry ingredients you probably already have or can grab on a grocery run: honey roasted peanuts and Oreos. The result is a spread with peanut butter richness and a chocolate-cookie twang — great on toast, perfect for dipping fruit, and unapologetically fun straight from the jar.
I test and retest small ideas like this in my kitchen because they’re delightful shortcuts to endless snack moments. No tempering chocolate, no melting, no long bake time. If you have a food processor, you’re fifteen minutes away from a spread that tastes like childhood with a grown-up twist.
Below you’ll find the ingredient list, step-by-step instructions from start to finish, and practical notes — storage tips, appliance notes, and a few common pitfalls I’d hate for you to hit. Let’s make something simple and stirringly good.
Ingredient List

- 1 ½ cups (202 g) honey roasted peanuts — provide the base, natural oil, and honeyed sweetness that make this spread creamy and flavorful.
- 10 (116 g) Oreos — add chocolate, crunch-turned-creamy, and cookie flavor; they balance the peanuts with a sweet, slightly bitter edge.
Cook (Oreo Peanut Butter) Like This
- Place 1 ½ cups (202 g) honey roasted peanuts and 10 Oreos (116 g) in the bowl of a food processor and secure the lid.
- Process on high. If your processor is older, use 15–30 second pulses at first; otherwise you can run it continuously. Stop and scrape down the sides of the bowl with a spatula every 30–60 seconds to ensure even blending.
- Continue processing until the mixture becomes smooth and reaches a creamy, buttery consistency. This will vary by machine but should take about 4 minutes total.
- If the food processor starts to feel hot, stop processing and let the machine rest for a few minutes before resuming.
- When finished, scrape the Oreo peanut butter into a jar or container.
- Serve on toast, use as a dip, or enjoy with a spoon.
Why It’s My Go-To
I reach for this Oreo Peanut Butter when I want something quick that feels special. It’s unexpectedly versatile: it dresses up a weekday breakfast, makes an afternoon snack feel like dessert, and can rescue a pity party with a spoon. The balance here is what hooks me — salty-sweet peanuts giving texture and body, and Oreos lending a chocolatey, almost fudge-like note.
It’s also low drama. No awkward tempering, no stovetop babysitting. If you’ve got a food processor, the machine does the heavy lifting. The recipe scales easily and rewards a little patience at the processor: scrape the sides regularly, and you’ll be rewarded with silk rather than grit.
Finally, it’s playful. Food should make you smile, and this one does — especially when you smear it on warm toast and watch the crumbs and peanut oil bloom together. It’s not a formal spread; it’s meant to be loved with abandon.
Budget & Availability Swaps

Honey roasted peanuts and Oreos are widely available at most supermarkets. If honey roasted peanuts are pricier or hard to find, plain roasted peanuts will work — just add a little honey to taste after processing if you want that same sweetness. If Oreos aren’t stocked, similar chocolate sandwich cookies with a cream center can stand in, but expect small flavor and texture shifts.
Buying peanuts in bulk saves money if you make nut butters often. The cookies are inexpensive per batch; a single pack often contains more than the 10 cookies called for, so you can use the leftovers for snacking or another batch.
For tight budgets: plain roasted peanuts + a small spoonful of cocoa powder and sugar can mimic the chocolate nuttiness if you don’t have sandwich cookies, but that nudges this away from the original two-ingredient charm.
Appliances & Accessories
Primary tool: a food processor. A high-powered blender might work, but processors are better for scraping and working through the gritty phase. If your machine is older or less powerful, use pulses in the beginning to avoid overheating and to help everything break down evenly.
Helpful extras: a rubber spatula for scraping the bowl and transferring the finished spread, and a clean airtight jar for storage. If you plan to use this on toast often, a small offset spatula or butter knife makes life easier.
Don’t have a processor? A strong manual option is a mortar and pestle, but be prepared for a workout and a coarser result. I recommend the processor if you want that creamy, buttery finish.
Pitfalls & How to Prevent Them
Trap: over-processing the machine until it overheats. Prevention: watch the processor closely. The directions note about four minutes total; if the motor feels hot, stop and let it rest. Short pauses prevent strain on your machine and protect the flavor of the nuts.
Trap: uneven blending with stubborn chunks. Prevention: scrape down the sides every 30–60 seconds as directed. This helps the blades reach everything and creates a consistent texture.
Trap: a final result that’s too runny or too dry. Prevention: use exactly the ingredients listed. Honey roasted peanuts bring oil that loosens during processing; different nuts (or flavors) change that. If you do end up with a slightly drier texture, let it sit at room temperature for a few minutes — the oils redistribute and soften the spread.
Better-for-You Options
If you want to nudge this toward a healthier profile, you can swap honey roasted peanuts for dry-roasted or unsweetened roasted peanuts. That reduces added sugar while keeping the nut fat that gives the spread body. If you use unsweetened peanuts, you might add a teaspoon of honey or maple syrup to taste after processing to keep the flavor balance.
For fewer processed ingredients, choose cookies with simpler ingredient lists, or make a small batch of homemade chocolate sandwich cookies (if you already bake). That’s more labor, yes, but it lets you control sugar and fat. Remember, swapping ingredients will change texture and final sweetness — taste as you go.
Chef’s Notes
1) Timing: The total processing time is a guideline. My processor hit the right creamy stage at about four minutes, but yours may vary. Expect anywhere from three to six minutes depending on power and starting temperature of the peanuts.
2) Texture control: If you like it chunkier, reserve one or two Oreos, pulse the rest until smooth, then drop them in and pulse briefly to create cookie bits. Conversely, if you want ultra-smooth, pulse longer and be patient with scraping.
3) Flavor experiments: A pinch of flaky sea salt on top of the jar brightens the taste. A drizzle of extra honey will make it more dessert-like. These are optional and personal, but worth trying for variety.
Leftovers & Meal Prep
Storage: Transfer the finished Oreo Peanut Butter into an airtight jar and store it in the refrigerator. It keeps well for up to two weeks. The cold will make the spread firmer; let it sit at room temperature for 10–20 minutes before using if you prefer it softer.
Portions and prep: This recipe yields a small jar — great for sampling or giving as a gift. To meal-prep, double or triple the amounts and process in batches. Make sure your processor bowl has room — overfilling makes blending uneven.
Uses: Beyond toast and spoons, use it as a sandwich spread, dollop it into oatmeal, swirl into plain yogurt, or serve as a dip for apple slices and pretzels. Get creative: it’s a mood-booster more than a strict pantry staple.
Common Questions
Will regular peanuts work? Yes. Regular roasted peanuts work fine; honey-roasted add sweetness and a caramelized note. If you switch to plain peanuts, taste and add a small amount of sweetener if you want that extra sweetness.
Can I make this in a blender? Possibly. High-powered blenders can work, but you may need to stop and scrape more often. Food processors are preferable for the even blending they provide with small batches like this.
Is this safe to leave out? I recommend refrigeration. While the oils in peanuts are stable, refrigeration keeps freshness and prevents any flavor degradation. If left at room temperature for short periods while serving, it’s fine, but store it back in the fridge afterward.
Can I use reduced-sugar Oreos or another cookie? Yes. Different cookies change sweetness and texture, so taste as you go and adjust expectations accordingly. Lower-sugar cookies will make the spread less sweet and slightly less cohesive.
That’s a Wrap
Oreo Peanut Butter is proof that two ingredients can make a snack feel like an occasion. It’s fast, forgiving, and deliciously nostalgic without being fussy. Make it when you want comfort and curiosity in equal measure — when you want a spreadable cheat that lifts toast, fruit, or a spoonful of late-night craving.
If you try it, tell me how you served yours: on warm toast, with banana slices, or straight from the jar at midnight. Small notes from the kitchen are my favorite things.

Oreo Peanut Butter
Ingredients
Equipment
Method
- Place 1 ½ cups (202 g) honey roasted peanuts and 10 Oreos (116 g) in the bowl of a food processor and secure the lid.
- Process on high. If your processor is older, use 15–30 second pulses at first; otherwise you can run it continuously. Stop and scrape down the sides of the bowl with a spatula every 30–60 seconds to ensure even blending.
- Continue processing until the mixture becomes smooth and reaches a creamy, buttery consistency. This will vary by machine but should take about 4 minutes total.
- If the food processor starts to feel hot, stop processing and let the machine rest for a few minutes before resuming.
- When finished, scrape the Oreo peanut butter into a jar or container.
- Serve on toast, use as a dip, or enjoy with a spoon.
Notes
If your mixture is too thick, you can add vegetable oil (about 1 tablespoon) to thin it.