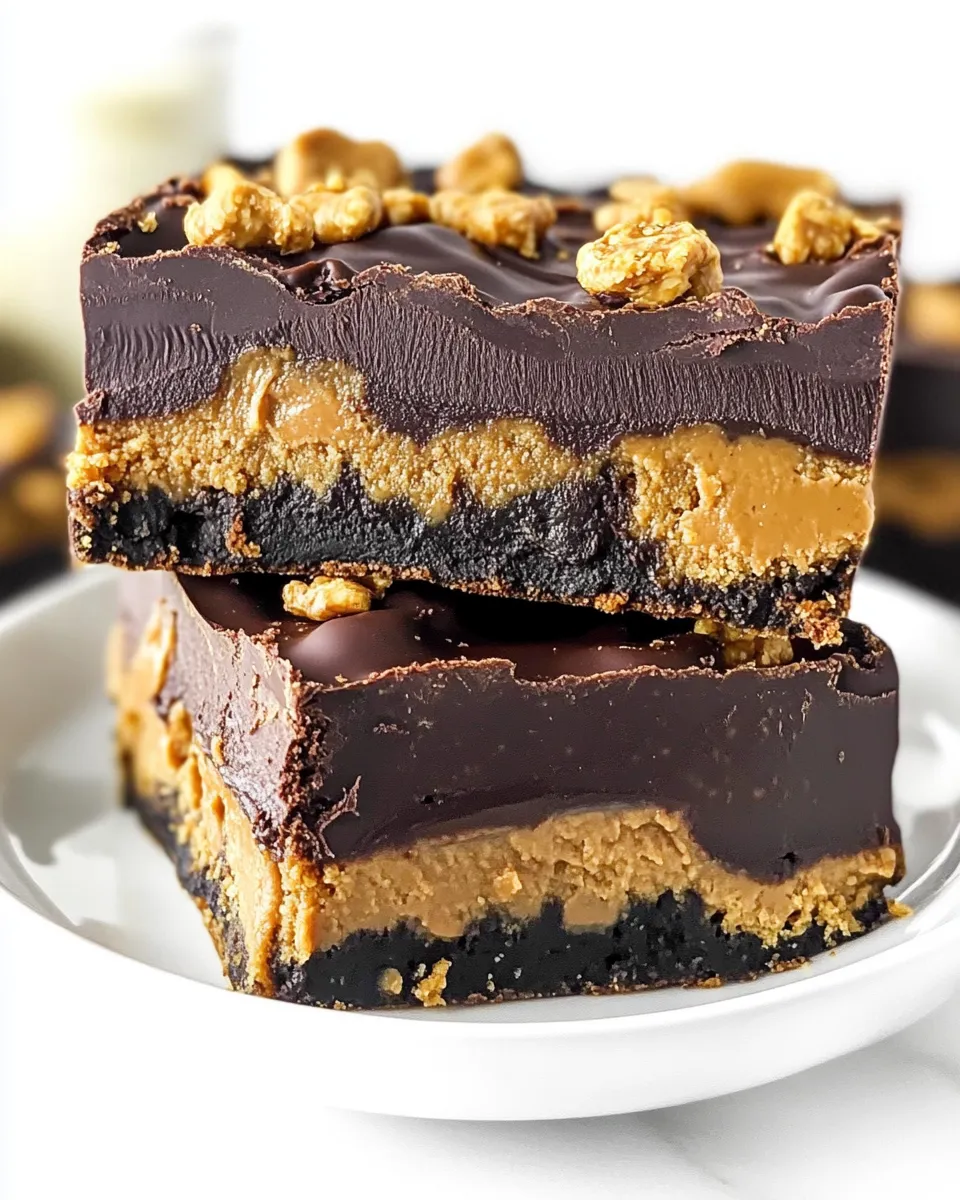
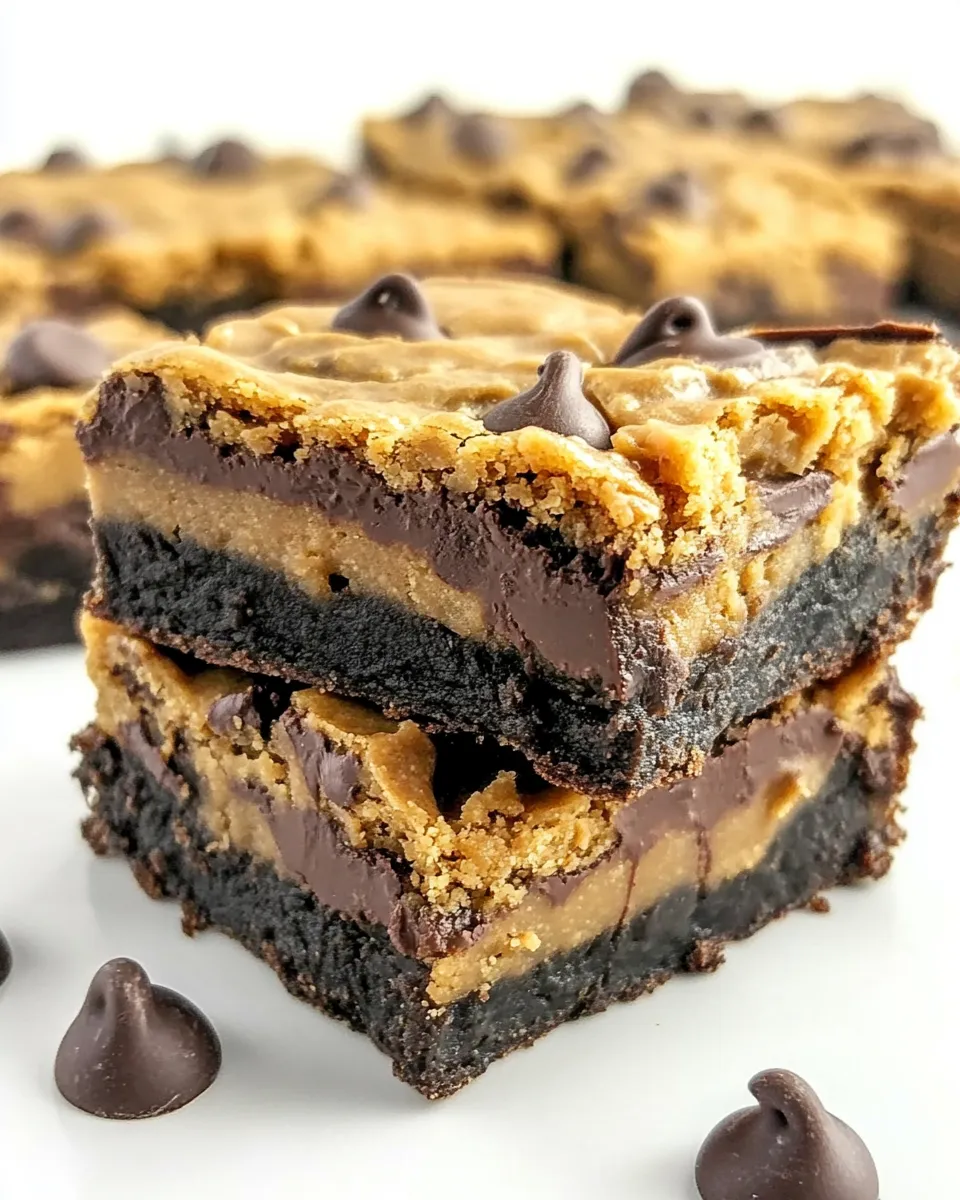
Peanut Butter Stuffed Chocolate Cookie Bars
I test new recipes constantly, and these bars quickly became a go-to when friends asked for something chocolaty but not fussy. They’re dense, chocolatey cookie layers with a creamy peanut butter center — familiar flavors that play well together. The assembly is straightforward, and the finished texture is sturdy enough to hold up while still feeling indulgent.
What I like most is how forgiving the dough is. You press half into the pan, make a simple peanut butter filling, and top with broken bits of the remaining dough. No rolling, no piping, and no complicated timing. You’ll get crisp edges, a tender cookie body, and that sweet-salty peanut butter ribbon in the middle.
Below I’ll give clear steps, the exact ingredient list, and practical tips so your first pan comes out perfect. I also include troubleshooting, variations, and storage advice — everything I wish I’d known the first time I made these.
The Essentials

Yield: One 8×8-inch pan. Oven temperature is standard: 350°F (177°C). Total bake time is about 28–33 minutes, but cooling time is important — let the bars cool completely before slicing so the peanut butter layer sets.
These bars are built from pantry staples. Measure carefully for the cookie-like structure: the balance of butter, sugars, flour, and cocoa gives you a sliceable bar rather than a soft brownie. The peanut butter filling is thickened with powdered sugar; it’s sweet and holds its shape.
Ingredients
- ½ cup (113 g) unsalted butter, melted — provides fat and richness; melt and cool slightly so it doesn’t cook the egg.
- ⅓ cup (67 g) granulated sugar — adds structure and a bit of snap to the cookie layer.
- ½ cup (100 g) packed light brown sugar — brings moisture and a subtle caramel note.
- 1 large egg — binds the dough and adds tenderness.
- 1 teaspoon vanilla extract — lifts the chocolate and harmonizes flavors.
- ¼ cup (17 g) unsweetened cocoa powder (use special dark to get the dark look of these bars) — gives the chocolate base its deep color and chocolate intensity.
- ½ teaspoon baking soda — a small lift so the cookie layer isn’t flat and dense.
- ½ teaspoon salt — balances sweetness and enhances chocolate flavor.
- 1 ⅓ (155 g) cups all-purpose flour — the main structure; measure by spooning into the cup and leveling or weigh for accuracy.
- 1 cup (170 g) chocolate chips (semi-sweet or milk) — stud the dough for pockets of melty chocolate.
- ¾ cup (200 g) peanut butter — creamy peanut butter works best for a smooth filling.
- 1 cup (113 g) powdered sugar — thickens and sweetens the peanut butter filling so it holds shape.
- 1 teaspoon vanilla — echoes the vanilla in the dough and brightens the filling.
- 2 tablespoons milk — loosens the peanut butter filling to a spreadable but thick consistency.
Step-by-Step: Peanut Butter Stuffed Chocolate Cookie Bars
- Preheat the oven to 350°F (177°C). Line an 8×8-inch baking pan with foil, leaving some overhang for easy lifting, and spray the foil with nonstick cooking spray.
- In a large bowl, combine the melted ½ cup (113 g) unsalted butter, ⅓ cup (67 g) granulated sugar, and ½ cup (100 g) packed light brown sugar. Stir with a wooden spoon until smooth.
- Add 1 large egg and 1 teaspoon vanilla extract to the butter-sugar mixture and stir until fully incorporated.
- Add ¼ cup (17 g) unsweetened cocoa powder, ½ teaspoon baking soda, and ½ teaspoon salt. Stir until evenly combined.
- Gradually add 1 ⅓ (155 g) cups all-purpose flour to the bowl and mix just until the dough comes together and is smooth. Scrape down the sides of the bowl as needed. Do not overmix.
- Stir in 1 cup (170 g) chocolate chips until distributed through the dough.
- Remove about half of the dough and set it aside. Press the remaining half evenly into the bottom of the prepared pan to form a thin cookie layer. If the dough sticks to your hands, spray hands lightly with nonstick cooking spray or use a spatula to press it down.
- In a medium microwave-safe bowl, heat ¾ cup (200 g) peanut butter for about 45 seconds, or until it becomes smooth and slightly runny. Immediately whisk in 1 cup (113 g) powdered sugar, 1 teaspoon vanilla, and 2 tablespoons milk until the mixture is thick and fully combined.
- Spread the peanut butter mixture evenly over the pressed cookie layer, leaving a small (about 1/4-inch) border around the edges.
- With clean hands or a spatula, break the reserved dough into pieces and press it gently over the peanut butter layer to cover it. Seal the edges where the top dough meets the pan so the filling is enclosed. The top layer will be thin.
- Bake in the preheated oven for 28–33 minutes, or until the top no longer looks glossy and a toothpick inserted into the cookie portion (not necessarily the center of the filling) comes out with a few moist crumbs but not raw batter.
- Cool the bars completely in the pan on a wire rack (use the foil overhang to lift them out if desired) before slicing into squares. Store in an airtight container for up to 3 days or freeze for up to 2 months.
Why This Peanut Butter Stuffed Chocolate Cookie Bars Stands Out
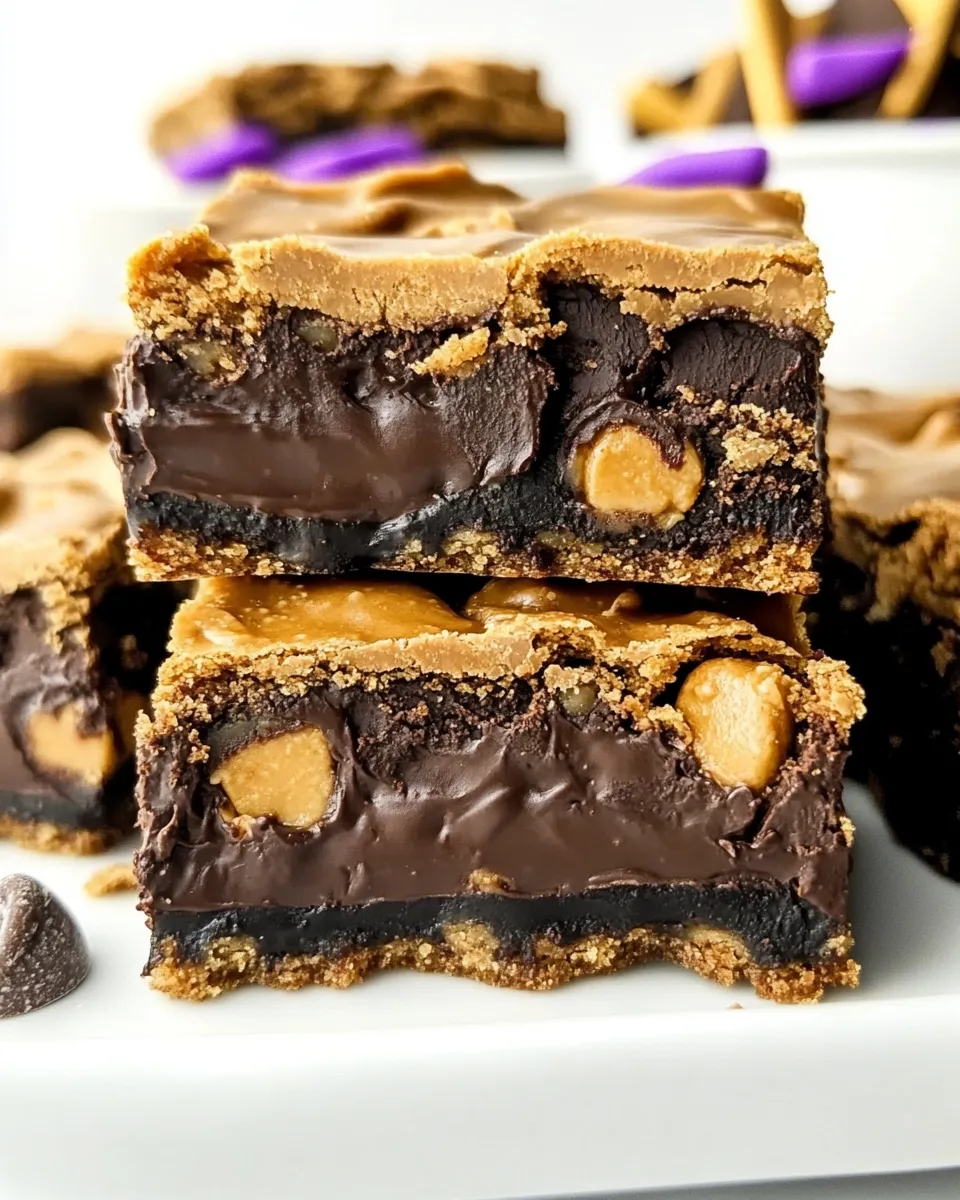
Two-layer treats aren’t new, but these bars balance texture, flavor, and simplicity in a way that makes them reliable. The bottom cookie layer is thin and slightly chewy around the edges, while the top cookie layer forms a crust that protects the peanut butter center. The filling is sweet but not cloying because the cocoa and salt in the dough keep everything grounded.
Another advantage: the filling is cooked only by residual heat, so you get a smooth, creamy ribbon rather than a runny sauce. The method of pressing half the dough into the pan and breaking the rest on top creates an intentionally rustic look that’s forgiving in a kitchen where perfection isn’t the goal — great for weekend baking or last-minute guests.
Flavor-Forward Alternatives
Want to tweak flavors without breaking the formula? Try one of these subtle swaps.
Chocolate variations
Use dark chocolate chips for a deeper bittersweet contrast. If you prefer milk chocolate, expect a sweeter bar that pairs nicely with the peanut butter filling.
Peanut butter swaps
Natural peanut butter will work but may separate and be grainier; stir thoroughly before heating. For a nuttier twist, replace half the peanut butter with almond butter — the filling will be less sweet and more fragrant.
Texture add-ins
Fold 1/2 cup finely chopped toasted peanuts into the peanut butter filling for crunch. Alternatively, sprinkle a few extra chocolate chips on top before baking for a studded finish.
Essential Tools for Success
These are the small items that make the recipe easier and more consistent.
- 8×8-inch baking pan — ensures the bars are the right thickness for the stated bake time.
- Foil overhang — makes lifting the whole slab out for clean slicing simple.
- Wooden spoon or sturdy spatula — the dough is manageable by hand; use a wooden spoon for the wet mix and a spatula to press dough into the pan.
- Microwave-safe bowl — heats the peanut butter quickly and evenly; a short burst stops it from overheating.
- Wire rack — cooling fully before slicing prevents squashed centers.
Avoid These Traps
Common problems are easy to prevent with a little attention.
Overbaking
If the bars bake too long they’ll dry out. Start checking at 28 minutes. The toothpick should show a few moist crumbs from the cookie portion — avoid waiting for a clean toothpick through the filling.
Under-setting filling
Slicing while warm will cause the peanut butter to smudge. Cool completely in the pan, ideally an hour or more, before lifting and cutting.
Top layer gaps
If you don’t seal the top dough to the edges, the filling can leak out. Press the top pieces gently and patch any gaps to create a rim where the filling is enclosed.
Make It Diet-Friendly
These bars are indulgent by design, but here are modest adjustments for specific diets.
For lower sugar: reduce powdered sugar in the filling by 20–25% and add 1–2 tablespoons more peanut butter to maintain spreadability. Texture and shelf life change slightly.
For a dairy-free version: use dairy-free margarine or melted coconut oil in place of the butter. The flavor shifts but the structure holds. Choose dairy-free chocolate chips.
For gluten-free: replace the all-purpose flour with a 1:1 gluten-free blend that contains xanthan gum; the dough should behave similarly but note the crumb will be slightly different.
Behind-the-Scenes Notes
I tested timing on both metal and glass pans. The metal pan gives slightly crisper edges and may finish a minute or two faster. If using glass, watch closely and expect the lower end of the bake window to be safer.
Also: measuring flour by weight is more reliable. I list the gram amounts in the ingredient list because small differences in flour can change how the dough presses and how the top layer bakes.
Refrigerate, Freeze, Reheat
Store cooled bars in an airtight container at room temperature for up to 3 days. After that, you’ll want to refrigerate if your kitchen is warm. Refrigerated bars keep well for up to a week but will be firmer; bring to room temperature for 20–30 minutes before serving.
Freeze individual squares between layers of parchment in an airtight container for up to 2 months. Thaw overnight in the refrigerator or on the counter for a couple of hours. Reheat briefly (10–15 seconds) in the microwave if you like the chocolate softened, but avoid heating until the filling becomes liquid.
Reader Q&A
Q: Can I use natural peanut butter?
A: Yes, but natural peanut butter separates. Stir well and skim off excess oil if needed before measuring. You may need to microwave it a touch longer to make it spreadable.
Q: My top layer sank into the filling — what happened?
A: Most likely the top was pressed too thin in places or gaps weren’t sealed, so the filling settled into them while baking. When assembling, keep the top pieces slightly thicker and press edges to seal.
Q: Can I cut the recipe in half?
A: The recipe is already sized for an 8×8 pan. Doubling for a 9×13 works, but adjust bake time and use a full-size pan. For half the recipe, reduce ingredients proportionally and use a smaller pan; baking time will be shorter — watch closely.
The Takeaway
These Peanut Butter Stuffed Chocolate Cookie Bars are straightforward, forgiving, and reliably crowd-pleasing. The method is flexible — press, fill, top — and the flavors are classic. Follow the recipe and the bake cues, let the bars cool fully, and you’ll have neat, rich squares that travel well and disappear fast.
Make a tray for a gathering, or keep a pan in the freezer for last-minute guests. Either way, these bars are a dependable recipe to add to your rotation.
Peanut Butter Stuffed Chocolate Cookie Bars
Ingredients
Equipment
Method
- Preheat the oven to 350°F (177°C). Line an 8×8-inch baking pan with foil, leaving some overhang for easy lifting, and spray the foil with nonstick cooking spray.
- In a large bowl, combine the melted ½ cup (113 g) unsalted butter, ⅓ cup (67 g) granulated sugar, and ½ cup (100 g) packed light brown sugar. Stir with a wooden spoon until smooth.
- Add 1 large egg and 1 teaspoon vanilla extract to the butter-sugar mixture and stir until fully incorporated.
- Add ¼ cup (17 g) unsweetened cocoa powder, ½ teaspoon baking soda, and ½ teaspoon salt. Stir until evenly combined.
- Gradually add 1 ⅓ (155 g) cups all-purpose flour to the bowl and mix just until the dough comes together and is smooth. Scrape down the sides of the bowl as needed. Do not overmix.
- Stir in 1 cup (170 g) chocolate chips until distributed through the dough.
- Remove about half of the dough and set it aside. Press the remaining half evenly into the bottom of the prepared pan to form a thin cookie layer. If the dough sticks to your hands, spray hands lightly with nonstick cooking spray or use a spatula to press it down.
- In a medium microwave-safe bowl, heat ¾ cup (200 g) peanut butter for about 45 seconds, or until it becomes smooth and slightly runny. Immediately whisk in 1 cup (113 g) powdered sugar, 1 teaspoon vanilla, and 2 tablespoons milk until the mixture is thick and fully combined.
- Spread the peanut butter mixture evenly over the pressed cookie layer, leaving a small (about 1/4-inch) border around the edges.
- With clean hands or a spatula, break the reserved dough into pieces and press it gently over the peanut butter layer to cover it. Seal the edges where the top dough meets the pan so the filling is enclosed. The top layer will be thin.
- Bake in the preheated oven for 28–33 minutes, or until the top no longer looks glossy and a toothpick inserted into the cookie portion (not necessarily the center of the filling) comes out with a few moist crumbs but not raw batter.
- Cool the bars completely in the pan on a wire rack (use the foil overhang to lift them out if desired) before slicing into squares. Store in an airtight container for up to 3 days or freeze for up to 2 months.
Notes
You cannot use anything larger than an 8×8-inch pan or the cookies won’t fit. If you prefer a larger pan, you can double the entire recipe and use a 9×13-inch pan.