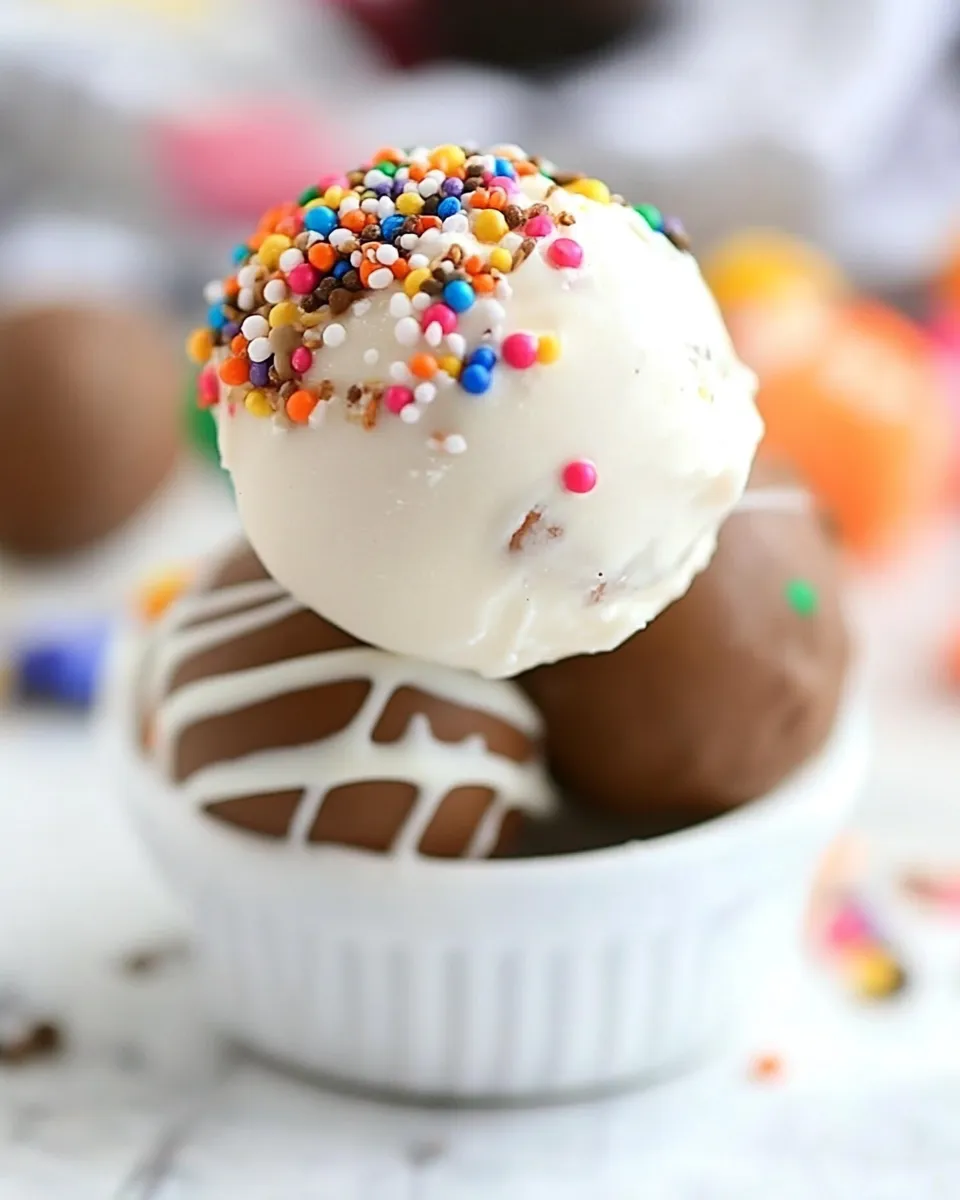
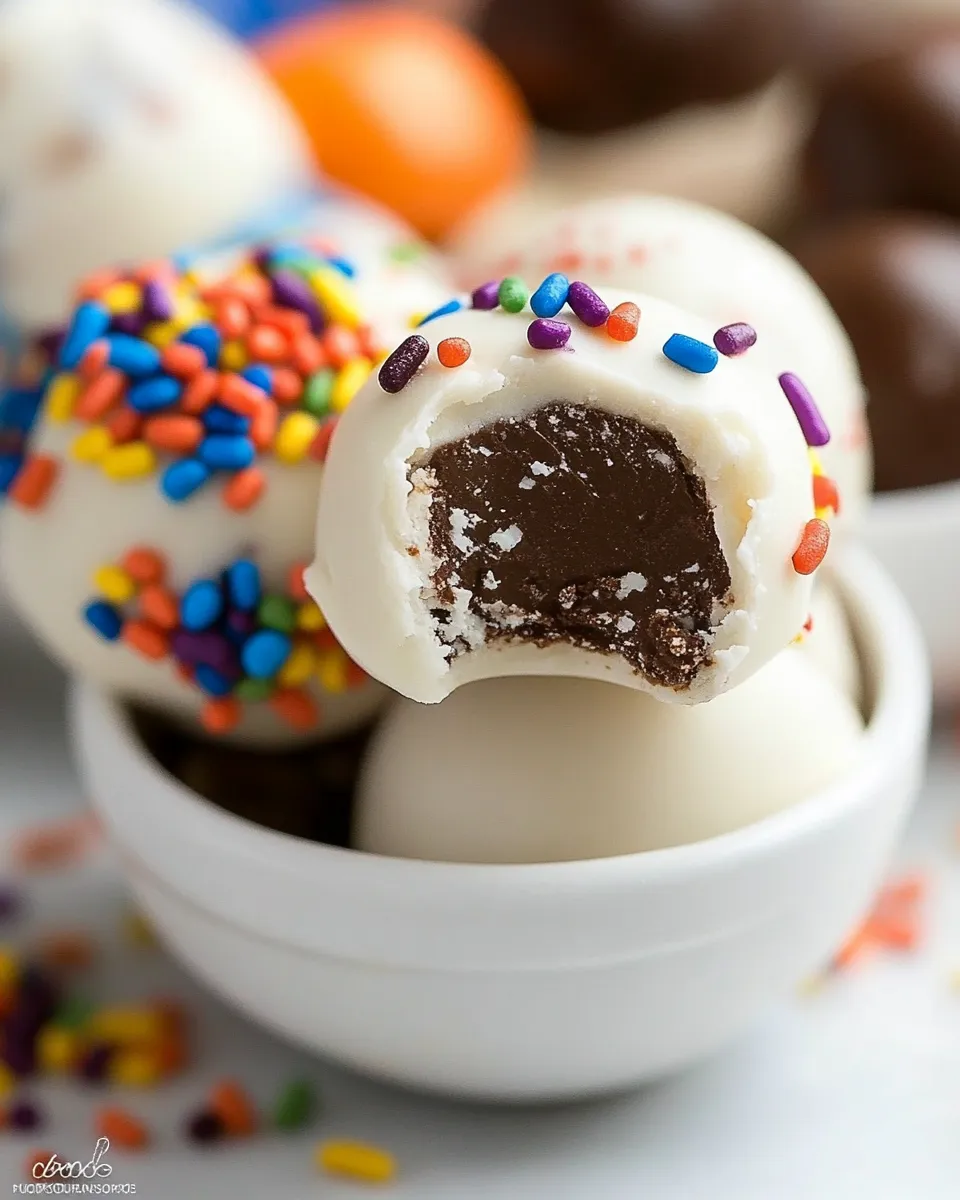
Taffy Truffles
These Taffy Truffles are a quick, no-bake treat that turns a familiar cookie into something a little decadent. They take minutes to make and disappear fast. The base is simple — crushed Taffy Cookies and cream cheese — then a smooth candy coating and a sprinkle of finishing texture. Practical, tidy, and great for holiday plates or an after-dinner nibble.
I like this recipe because it’s forgiving. The food processor does most of the work; if you don’t have one, a bowl and elbow grease work fine. The chilled centers hold up for dipping, and the coating sets quickly so you can get a plate of truffles on the table within an hour.
Below you’ll find the exact ingredient list, step-by-step directions, troubleshooting pointers, storage notes, and a handful of serving ideas. I keep the method straightforward so you can focus on the fun parts: rolling, dipping, and topping.
Ingredients at a Glance
- 8 Taffy Cookies (Mother’s brand) — the crumbly, sweet cookie forms the truffle base and gives the taffy flavor.
- 2 ounces cream cheese (regular or low-fat) — binds the crumbs into a soft, scoopable center and adds richness.
- 6-8 ounces CandiQuik (vanilla or chocolate) or baking chocolate — the coating; CandiQuik melts easily in the microwave, baking chocolate is melted over a double boiler. Do not add liquids.
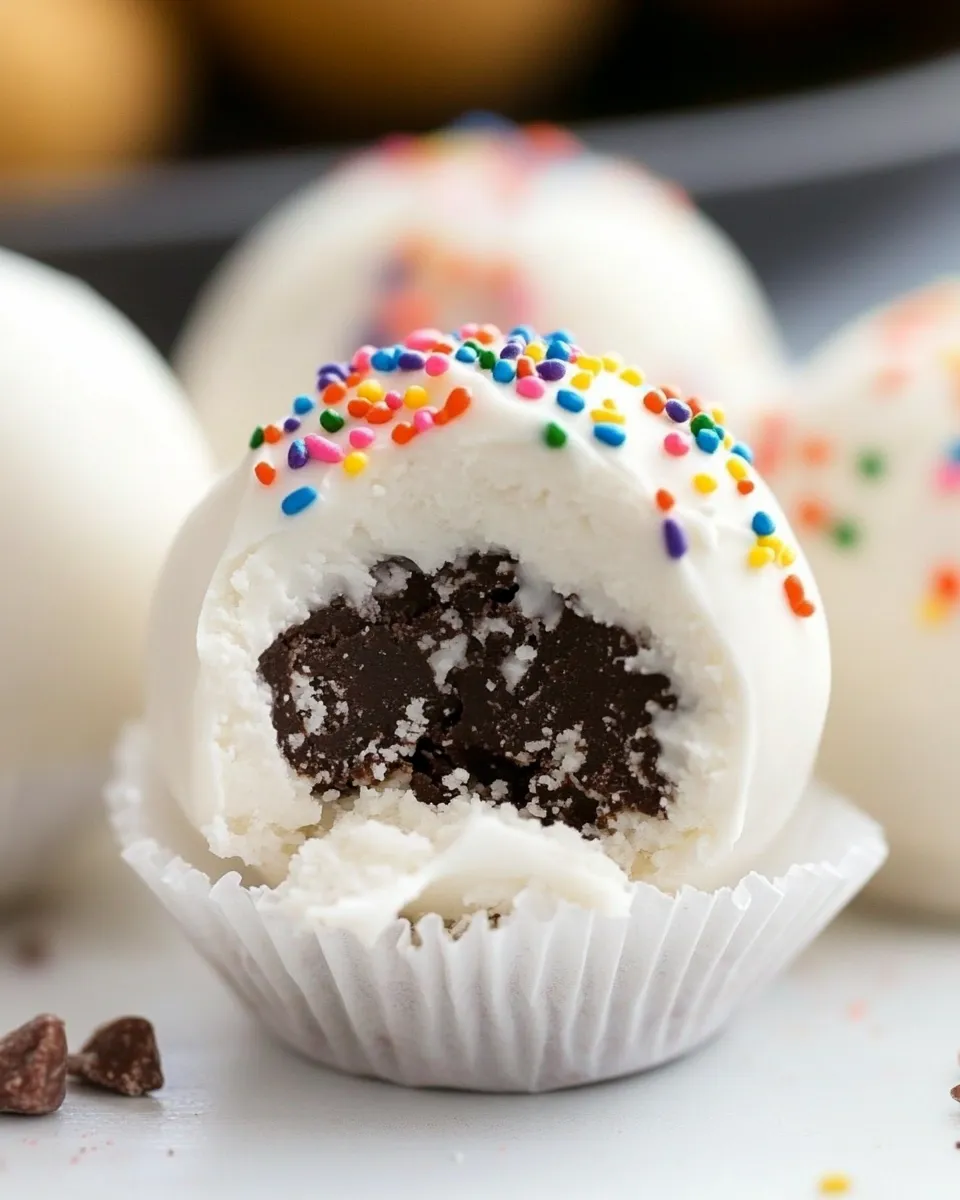
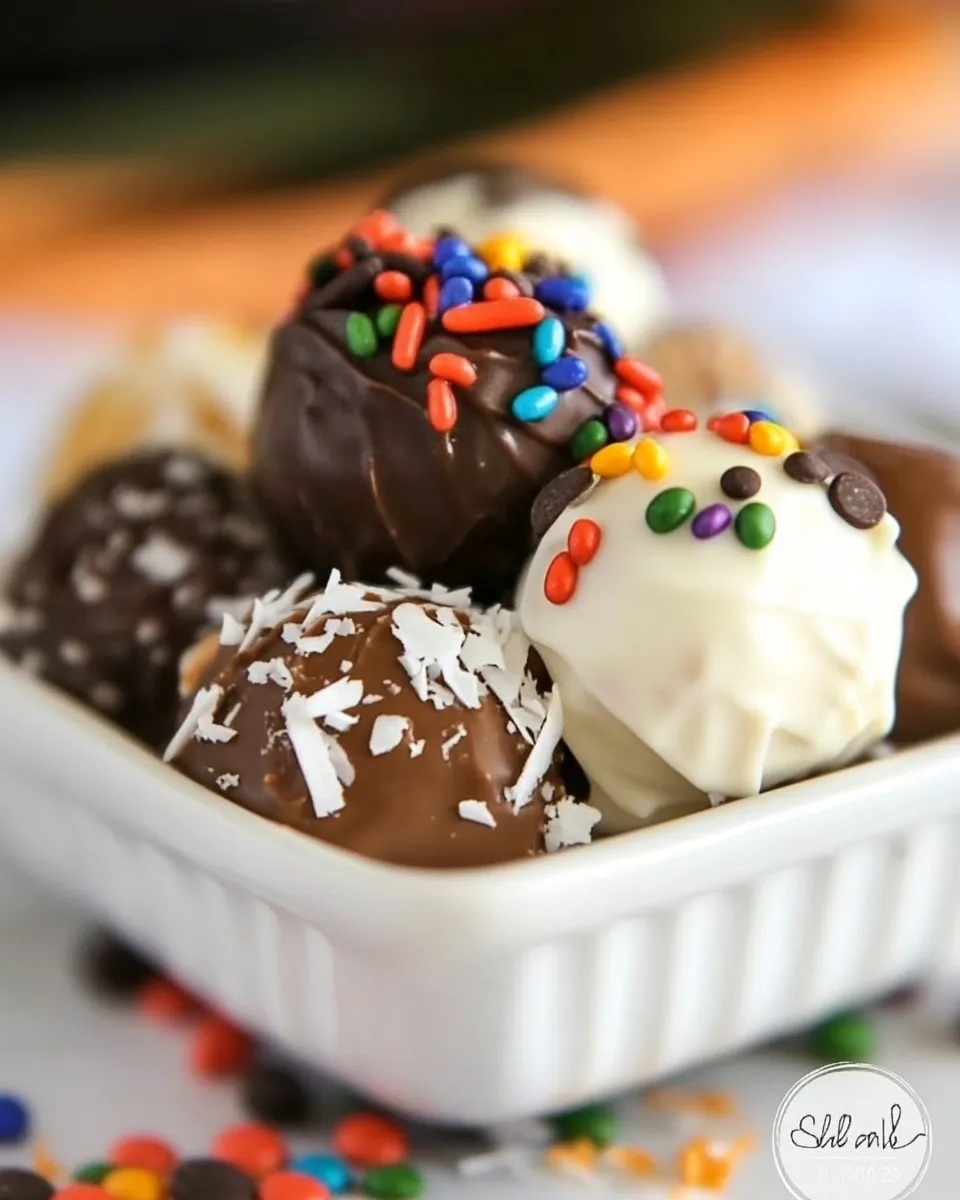
- Sprinkles or toasted coconut for topping — immediate garnish to add color and texture; work best when applied while coating is still wet.
Cook Taffy Truffles Like This
- Place 8 Taffy Cookies (Mother’s brand) and 2 ounces cream cheese in a food processor; process until the mixture comes together into a soft ball. (If you don’t have a food processor, crush the cookies in a bowl and mix thoroughly with the cream cheese until uniform.)
- Using a 1‑tablespoon scoop or spoon, portion the mixture and roll each portion into a smooth ball between your palms. Place the balls on a wax-paper-lined baking sheet.
- Chill the baking sheet in the refrigerator for 30 minutes, until the balls are firm.
- Prepare 6-8 ounces CandiQuik (vanilla or chocolate) or baking chocolate for dipping. For CandiQuik/candy melts: put in a microwave-safe bowl and heat in 30-second intervals, stirring between each, until fully melted and smooth. For baking chocolate: melt in a heatproof bowl set over simmering water, stirring until smooth. Do not add liquids.
- Remove the chilled truffle centers from the refrigerator. Dip each ball into the melted coating using a fork or dipping tool, tapping the fork on the bowl edge to remove excess coating.
- Return each coated truffle to the wax-paper-lined baking sheet and immediately top with sprinkles or toasted coconut.
- Repeat dipping and topping until all truffles are coated.
- Chill the coated truffles in the refrigerator until the coating is set, about 10–30 minutes, then serve.
Reasons to Love Taffy Truffles
They’re fast. From pantry to plate in under an hour. The hands-on part — scooping, rolling, and dipping — is fun and keeps the process social if you make these with family or friends.
They’re also forgiving. The recipe tolerates small changes in coating amount (6–8 ounces gives you room depending on how thin or thick you dip) and texture: if your centers are a touch soft, extra chill time fixes that.
Finally, they’re portable and giftable. Tucked into a small box or cellophane bag, these truffles make a tidy homemade gift without complicated packaging.
If You’re Out Of…
If you’re missing something on the ingredient list, here are safe, minimal-change options that keep the recipe intact:
- If you’re out of CandiQuik, use baking chocolate melted over simmering water — the directions include both methods.
- If you don’t have sprinkles, use toasted coconut (already listed) or leave them plain; the coating will set and still look tidy.
- If you don’t have regular cream cheese but have low-fat, that’s listed as an option and will work fine.
- If you don’t have exactly Mother’s brand Taffy Cookies, a similar taffy-style cookie will work, but note the flavor and texture may shift slightly.
Prep & Cook Tools
- Food processor (or a bowl and a sturdy rolling pin for crushing cookies)
- 1‑tablespoon scoop or spoon
- Wax paper–lined baking sheet
- Microwave-safe bowl or heatproof bowl for a double boiler
- Fork or dipping tool
- Refrigerator space for chilling
Watch Outs & How to Fix
Coating too thick or clumpy: If you accidentally overheat candy melts, they can seize or become grainy. Remove from heat and stir; a little more gentle stirring often smooths them. If they look separated or dry, let them cool slightly and stir until smooth. Do not add water or milk — that will cause the coating to seize further.
Centers too soft to roll: Chill the mixture longer. If after chilling they’re still very soft, return them to the fridge for 15–30 minutes and test again. A firmer center helps the truffle hold its shape during dipping.
Coating cracking after setting: This usually happens if the truffle centers are too cold and the coating contracts. Let the centers sit at cool room temperature for a few minutes before dipping, or chill the coated truffles less aggressively (10–15 minutes) until set.
Excess coating pooling: Tap the fork well on the bowl edge to remove excess. If you’re getting large pools under each truffle, place them on a wire rack over the baking sheet (if available) so excess coating can drip off and be collected for reheating or reuse.
Spring–Summer–Fall–Winter Ideas
Spring: Use vanilla CandiQuik and pastel sprinkles for a light, seasonal look. Serve chilled on a small platter with other pastel candies.
Summer: Choose vanilla or chocolate CandiQuik and toast coconut well for a tropical twist — the coconut’s toasty flavor pairs nicely with the taffy base. Keep the truffles chilled until serving to stay firm in warm weather.
Fall: Use chocolate CandiQuik and keep the toppings simple. Darker coatings give these truffles a slightly richer, fall-appropriate profile.
Winter: Make them for cookie trays. Use both vanilla and chocolate coatings to create contrast. Arrange on a serving plate and garnish with a light dusting of finely crushed cookie crumbs if desired.
If You’re Curious
Why cream cheese? It binds the cookie crumbs into a cohesive, scoopable center and adds a bit of tang to balance the cookie sweetness. The amount is small — 2 ounces — which keeps the centers light rather than overly creamy.
Why chill before dipping? Chilling firms the centers so they don’t break apart when you dip them into warm coating. It also reduces the risk that heat will melt the cream cheese and cause the center to soften too quickly.
Why not add liquid to the coating? Adding liquid will seize chocolate-based coatings and make them grainy. Use the specified melting methods — microwave in short intervals or a double boiler — and stir patiently until smooth.
Prep Ahead & Store
Prep ahead: You can form the centers and keep them chilled for up to 24 hours before dipping. Place them on a lined baking sheet, cover loosely with plastic wrap, and refrigerate. If you want to prepare them further ahead, freeze the uncoated centers (on a tray, then transferred to a freezer container) for up to 1 month; let them thaw in the refrigerator before dipping.
After coating: Chill until coating sets. Store the truffles in an airtight container in the refrigerator for up to 1 week. If left at room temperature, consume within 1–2 days depending on ambient heat; refrigeration preserves firmness.
Freezing finished truffles: Coated truffles can be frozen; place them in a single layer on a tray to freeze solid, then transfer to an airtight container with parchment between layers. Thaw in the refrigerator to avoid condensation on the coating.
Common Questions
Can I use a different cookie? The recipe relies on taffy-style cookies for flavor. A similar texture cookie will work, but the finishing flavor will change. The key is to end up with 8 cookies’ worth of crumbs mixed with 2 ounces cream cheese.
How many truffles does this make? Using a 1‑tablespoon scoop, you’ll get roughly 12–16 truffles, depending on how tightly you pack the scoop and how large the cookies are once processed.
Can I make them dairy-free? The recipe uses cream cheese as a binder. If you have a dairy-free cream cheese substitute with similar texture, you could try that, but I haven’t tested specific brands — consistency is essential for binding.
What’s the best way to dip evenly? Use a fork or dipping tool and tap to remove excess. Work quickly but carefully; too-long handling warms the center and can make dipping messy. Chill the centers well before you begin.
Let’s Eat
These Taffy Truffles are best served slightly chilled. Arrange them on a simple plate or a small tray lined with parchment. Let guests pick one or two at a time — they’re rich in a good way. If you made both vanilla- and chocolate-coated versions, alternate them on the plate for a nice look.
For gifting, stack in a small box with paper dividers or place a few in a clear bag tied with ribbon. They hold up well and give a homemade touch without much fuss.
Try this when you want a quick, no-bake, nostalgic treat that’s easy to customize by switching coating flavors or using either sprinkles or toasted coconut. The method is simple, the results are reliable, and the truffles travel well — perfect for last-minute entertaining or a small, sweet gift.
Taffy Truffles
Ingredients
Equipment
Method
- Place 8 Taffy Cookies (Mother’s brand) and 2 ounces cream cheese in a food processor; process until the mixture comes together into a soft ball. (If you don’t have a food processor, crush the cookies in a bowl and mix thoroughly with the cream cheese until uniform.)
- Using a 1‑tablespoon scoop or spoon, portion the mixture and roll each portion into a smooth ball between your palms. Place the balls on a wax-paper-lined baking sheet.
- Chill the baking sheet in the refrigerator for 30 minutes, until the balls are firm.
- Prepare 6-8 ounces CandiQuik (vanilla or chocolate) or baking chocolate for dipping. For CandiQuik/candy melts: put in a microwave-safe bowl and heat in 30-second intervals, stirring between each, until fully melted and smooth. For baking chocolate: melt in a heatproof bowl set over simmering water, stirring until smooth. Do not add liquids.
- Remove the chilled truffle centers from the refrigerator. Dip each ball into the melted coating using a fork or dipping tool, tapping the fork on the bowl edge to remove excess coating.
- Return each coated truffle to the wax-paper-lined baking sheet and immediately top with sprinkles or toasted coconut.
- Repeat dipping and topping until all truffles are coated.
- Chill the coated truffles in the refrigerator until the coating is set, about 10–30 minutes, then serve.