Macaroni and Cheese Baked Cheese Balls
There’s comfort food, and then there’s comfort food turned into irresistible bite-sized snacks. These Macaroni and Cheese Baked Cheese Balls are crispy on the outside, creamy and cheesy on the inside, and perfect for parties, weeknight dinners, or an indulgent snack. They’re made from a well-chilled batch of mac and cheese, coated in flour, egg, and breadcrumbs, and finished in a hot skillet with olive oil so they get golden and crunchy without deep frying. The flavor is classic — gooey cheddar-forward macaroni meeting a satisfyingly crisp crust — and the method is simple enough that anyone can make them at home.
Why you’ll love these

- They transform leftover or freshly made mac and cheese into a new dish that’s playful and portable.
- Quick to assemble once the mac and cheese is chilled.
- Oven-free crisp: a skillet gives you a beautiful crust with less oil than deep frying.
- Customizable — add chopped herbs, a pinch of cayenne, or swap breadcrumbs for panko for extra crunch.
Ingredients
- ▢1 batch macaroni and cheese, prepared as directed and well chilled (1 box store-bought or your favorite homemade recipe, I used one 5.5-ounce box Kraft)
- ▢½ cup all-purpose flour
- ▢2 large eggs, beaten
- ▢about 1 cup breadcrumbs, seasoned if preferred; I used Trader Joe’s which are unseasoned
- ▢4 tablespoons olive oil, divided
Make ahead and storage
These Macaroni and Cheese Baked Cheese Balls are perfect for make-ahead cooking. Chill the macaroni and cheese thoroughly — ideally overnight — so it firms up and is easier to shape. After cooking, store leftovers in an airtight container in the refrigerator for up to 3 days. Reheat in a skillet over medium-low heat or in a 350°F (175°C) oven for 8–10 minutes to restore the crust.
Tried-and-true tips
- Chill the mac and cheese well. Warm macaroni and cheese is too soft to form into balls.
- Use slightly damp hands when forming balls to keep sticking to a minimum.
- If the breadcrumbs don’t adhere well, press the breadcrumbs gently onto the formed balls before frying.
- Cook in batches so the skillet doesn’t become overcrowded; crowded pans steam instead of crisp.
Step-by-step instructions

Below is a clearer, step-by-step rendition of the original directions, rewritten for better flow while keeping the ingredient amounts and overall order intact. Follow each step in sequence for best results.
- Prepare your mac and cheese according to the package or your favorite method. Transfer it to a bowl or shallow pan and cover. Chill thoroughly until it is well set and firm; this is easiest if refrigerated overnight. The recipe uses one batch of mac and cheese — I used a 5.5-ounce box of Kraft for the sample photos.
- Set up a breading station: place the ½ cup all-purpose flour in one shallow bowl, beat the 2 large eggs in a second shallow bowl, and pour about 1 cup of breadcrumbs into a third shallow bowl. Use seasoned breadcrumbs if you prefer more flavor, or plain breadcrumbs and add salt and pepper to taste.
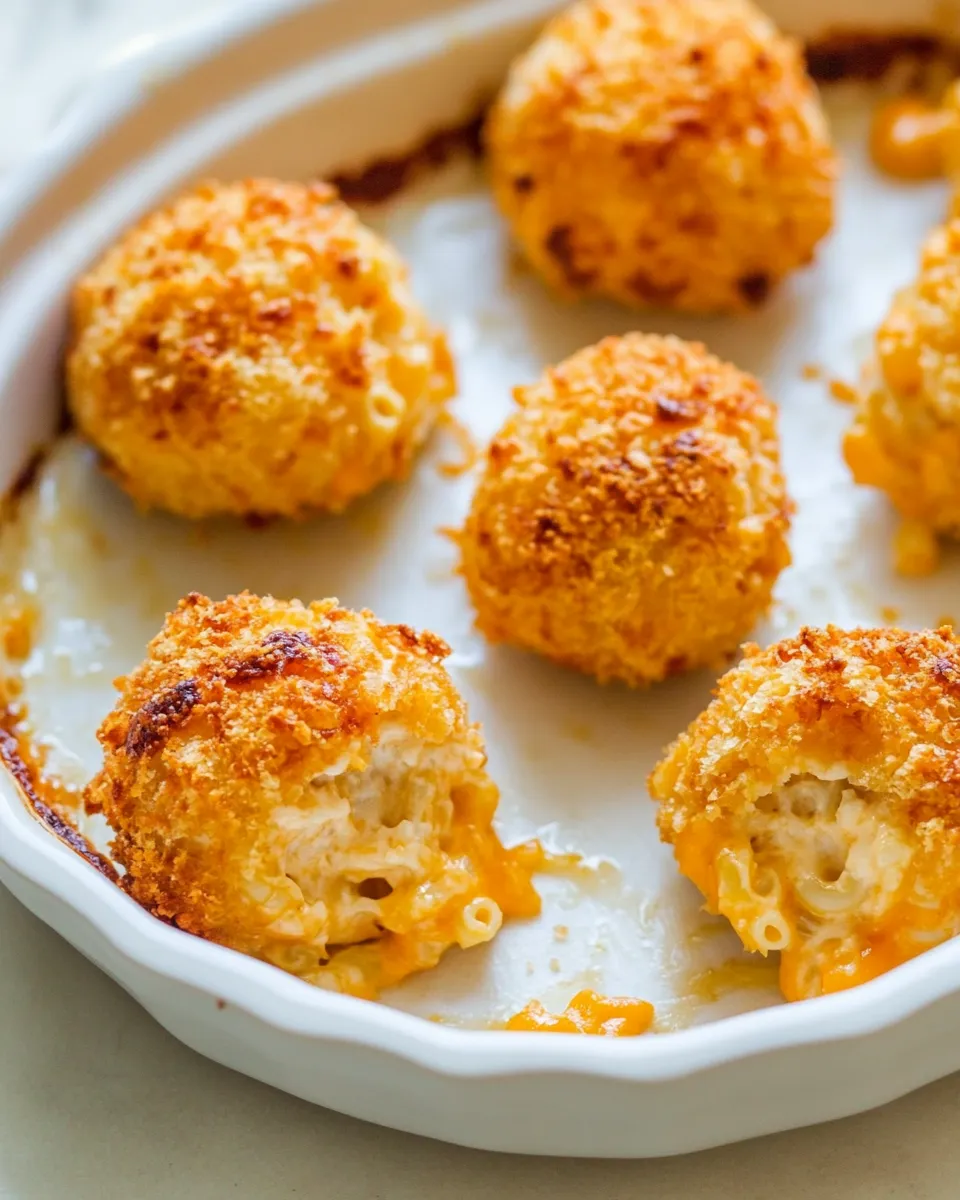
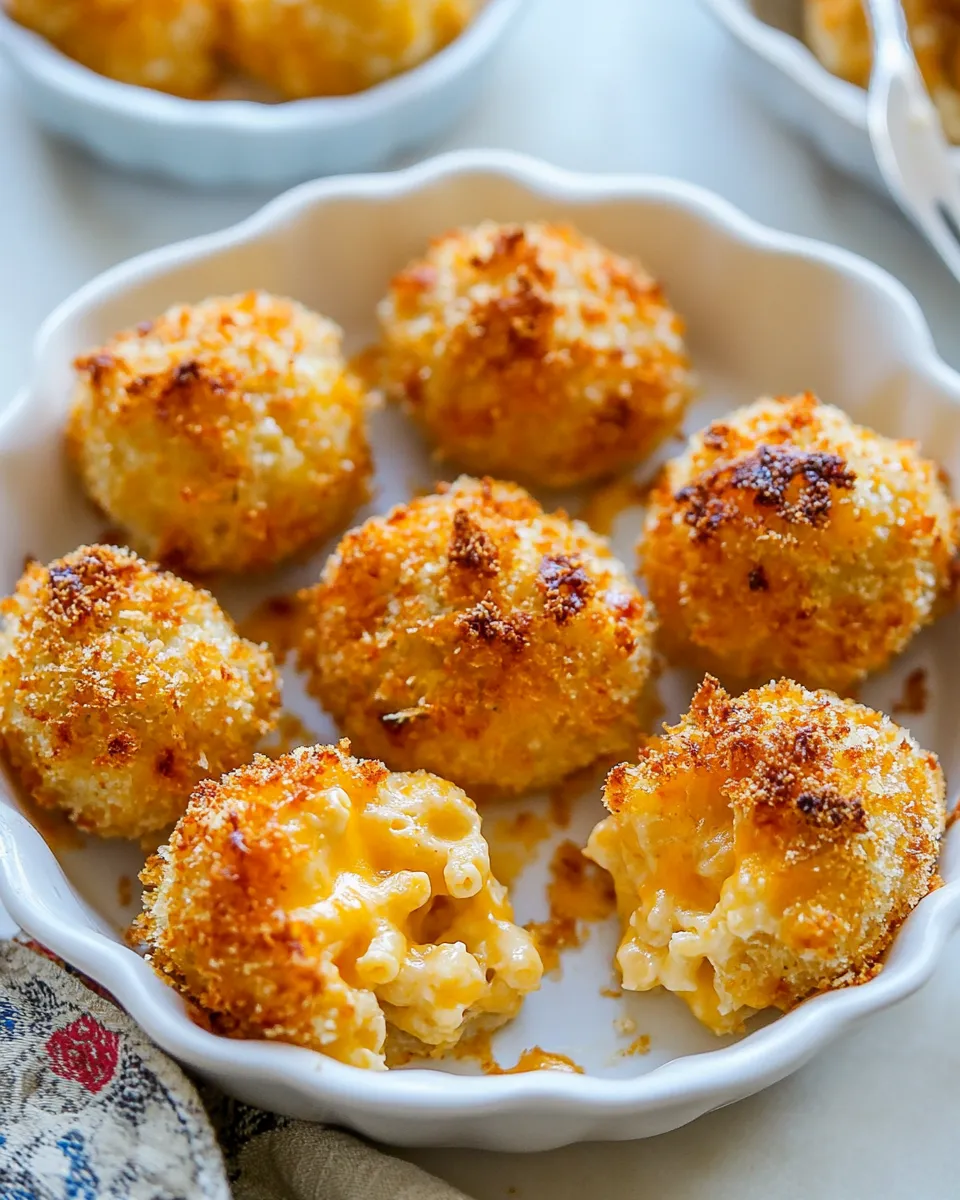
- With slightly damp hands, scoop a portion of the chilled mac and cheese and roll it into a compact ball. Size is up to you; golf-ball size is a good reference. Repeat until you’ve formed all the mac and cheese into balls. If the mac and cheese is too crumbly, press it firmly into shape; if it’s too soft, return it to the refrigerator for 15–30 minutes to firm up more.
- Working one at a time, roll each ball first in the flour so it’s lightly coated on all sides. Tap off any excess flour.
- Next, dip the floured ball into the beaten eggs, making sure it’s fully coated. Allow excess egg to drip off for a second or two.
- Finally, roll the egg-coated ball in the breadcrumbs. Press the breadcrumbs gently into the surface so they adhere evenly. Place the breaded balls onto a tray or plate while you bread the rest.
- In a large skillet, heat 2 tablespoons of the olive oil over medium heat until shimmering. Carefully add a few mac and cheese balls to the skillet, leaving space between them so air can circulate and they can crisp properly. Do not overcrowd the pan.
- Cook the balls, turning occasionally with tongs or a spatula, until they are golden brown and crisp on most sides, about 3–4 minutes per side. Add the remaining 2 tablespoons of olive oil as needed when you start the second batch so each set gets enough oil for a nice crust.
- Once cooked, transfer the cheese balls to a wire rack or paper towel-lined plate to drain briefly. Repeat with remaining balls until they are all cooked.
- Serve the Macaroni and Cheese Baked Cheese Balls hot, with dipping sauces such as marinara, ranch, or a spicy aioli if you like. They’re best eaten fresh while the centers are still melty.
Serving suggestions
These bites are endlessly adaptable. Serve them as an appetizer on a party platter with toothpicks and a trio of sauces: classic marinara, a tangy mustard dip, and a creamy herb dip. Turn them into a main by pairing with a crisp green salad, roasted vegetables, or steamed broccoli. For a kid-friendly option, present them with ketchup or a mild barbecue sauce for dipping.
Flavor variations
- Add a pinch of smoked paprika or cayenne to the breadcrumbs for a smoky kick.
- Mix in chopped cooked bacon or diced ham to the mac and cheese before chilling for a savory boost.
- Stir in chopped chives, green onions, or parsley to the chilled mac and cheese for a fresh herbal note.
- Swap plain breadcrumbs for panko for an extra-crispy exterior.
Troubleshooting
- If the balls fall apart while frying: your mac and cheese likely wasn’t chilled enough. Return the loose ones to the refrigerator for 20–30 minutes and try again.
- If the coating burns before the center is heated: lower the heat slightly and allow the balls to cook a bit longer so the center warms without over-browning the crust.
- If breadcrumbs aren’t sticking: make sure you dust in flour first, then egg, then breadcrumbs in that order; pressing the breadcrumbs gently onto the ball helps adhesion.
Why chilling matters
The chill step is the most important part of making successful Macaroni and Cheese Baked Cheese Balls. When the mac and cheese is cold and firm, it’s much easier to form into tight, compact balls that won’t fall apart during the coating and cooking steps. If you try to form balls from warm mac and cheese, they’ll be soft and will not hold their shape when rolled in flour, egg, and breadcrumbs.
Nutrition and portioning
These bites are indulgent, so portion them as an appetizer or decadent side. The exact nutrition will vary depending on the mac and cheese recipe or box mix used and the size of the balls you form. To lighten them up, use a lower-fat cheese sauce or a reduced-oil pan-fry method and serve smaller portions per person.
Final notes
These Macaroni and Cheese Baked Cheese Balls hit every texture note: the crunchy outer shell gives way to a creamy, cheesy core that tastes like a nostalgic hug from your favorite bowl of mac and cheese. They’re adaptable, straightforward, and a fun way to elevate leftovers into something party-ready. Follow the step-by-step directions above for consistent results: chill, form, flour, egg, breadcrumb, then fry in olive oil until golden. Invite friends and family, set out a few dipping sauces, and enjoy the smiles these little golden bites bring.
Happy cooking — and next time you have mac and cheese in the fridge, give these a try. They might just be the best reason to make an extra batch.
Macaroni and Cheese Baked Cheese Balls
Ingredients
Equipment
Method
- Prepare macaroni and cheese according to your recipe or package directions, then transfer to an airtight container and refrigerate at least 12 hours (up to 3 days) so it firms up.
- About 15 minutes before forming balls, place the chilled mac 'n' cheese in the freezer briefly to chill further.
- Place the flour, beaten eggs, and breadcrumbs into three separate shallow bowls.
- Preheat the oven to 425°F (220°C). Line two baking sheets with silicone mats, parchment, or foil. Drizzle 1 tablespoon of olive oil onto each sheet and spread it around.
- Using a 1-inch cookie scoop or a tablespoon, portion the chilled mac 'n' cheese into roughly 1-inch balls; if needed, shape gently with your hands so they hold together.
- Working one ball at a time, roll it in flour to coat, dip briefly in the beaten egg, then roll in breadcrumbs to fully coat. Place each coated ball on the prepared baking sheets, about 10 per sheet.
- Bake for 10 minutes, then remove the sheets. Add 1 tablespoon of olive oil to each sheet and spread it, flip the balls, and return to the oven.
- Bake an additional 7–10 minutes, until the balls are golden brown and crisp. Remove from the oven and serve immediately with your preferred condiment.
Notes
- Chilling the mac 'n' cheese is essential so the balls hold their shape.
- You can refrigerate the prepared mac 'n' cheese up to 3 days before shaping.
- If the mac 'n' cheese is too soft, freeze briefly before scooping.
- Use a small scoop to ensure balls are about 1-inch before breading.
- Drizzling oil on the baking sheet helps the balls brown evenly.